

Owner's Manual
Page 5
...remote control on the SCENE feature........... 56 Controlling this manual • y indicates a tip for your listening room 24 Using AUTO SETUP 24 ADDITIONAL INFORMATION Troubleshooting 61 Glossary 68 Specifications 70 Index 71 APPENDIX (at the end of this manual) Front panel i Remote...Step 1: Set up your speakers 5 Step 2: Connect your DVD player and other components........ 57 Setting remote control codes 59 Advanced setup 60 PREPARATION Connections 10 Rear panel 10 Placing speakers 11 Connecting speakers 12 Setting the speaker impedance 13 Information on jacks and cable ...
...remote control on the SCENE feature........... 56 Controlling this manual • y indicates a tip for your listening room 24 Using AUTO SETUP 24 ADDITIONAL INFORMATION Troubleshooting 61 Glossary 68 Specifications 70 Index 71 APPENDIX (at the end of this manual) Front panel i Remote...Step 1: Set up your speakers 5 Step 2: Connect your DVD player and other components........ 57 Setting remote control codes 59 Advanced setup 60 PREPARATION Connections 10 Rear panel 10 Placing speakers 11 Connecting speakers 12 Setting the speaker impedance 13 Information on jacks and cable ...

Owner's Manual
Page 6
... Inc. Since hearing damage from Dolby Laboratories. "HDMI", the "HDMI" logo and "High-Definition Multimedia Interface" are trademarks of YAMAHA CORPORATION. This unit is strictly prohibited to use other than audiovisual purposes. Features Features Built-in 5-channel power amplifier ◆ Minimum...memory device or a USB portable audio player ◆ MP3, WMA and WAV capability Other features ◆ YPAO (Yamaha Parametric Room Acoustic Optimizer) for automatic speaker setup ◆ 192-kHz/24-bit D/A converter ◆ Direct Stereo mode for pure hi-fi sound for analog ...
... Inc. Since hearing damage from Dolby Laboratories. "HDMI", the "HDMI" logo and "High-Definition Multimedia Interface" are trademarks of YAMAHA CORPORATION. This unit is strictly prohibited to use other than audiovisual purposes. Features Features Built-in 5-channel power amplifier ◆ Minimum...memory device or a USB portable audio player ◆ MP3, WMA and WAV capability Other features ◆ YPAO (Yamaha Parametric Room Acoustic Optimizer) for automatic speaker setup ◆ 192-kHz/24-bit D/A converter ◆ Direct Stereo mode for pure hi-fi sound for analog ...
Owner's Manual
Page 13
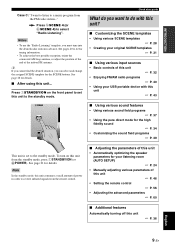
... unit... INTRODUCTION Case C: "I want to do you want to listen to the standby mode. Press FSCENE 4 (or ESCENE 4) to 42 for your listening room (AUTO SETUP) ☞ P. 24 • Manually adjusting various parameters of this unit ☞ P. 32 • Enjoying FM/AM radio programs ☞ P. 40 • Using your original SCENE...
... unit... INTRODUCTION Case C: "I want to do you want to listen to the standby mode. Press FSCENE 4 (or ESCENE 4) to 42 for your listening room (AUTO SETUP) ☞ P. 24 • Manually adjusting various parameters of this unit ☞ P. 32 • Enjoying FM/AM radio programs ☞ P. 40 • Using your original SCENE...

Owner's Manual
Page 17
... twist the bare wires of this unit. First, tighten the knob and then insert the banana plug connector into the hole on , an the advanced setup menu appears in the front panel display. 3 Press APROGRAM l / h repeatedly to select "SP IMP.". PREPARATION ■ Before connecting to the SPEAKERS terminal A speaker cord is...
... twist the bare wires of this unit. First, tighten the knob and then insert the banana plug connector into the hole on , an the advanced setup menu appears in the front panel display. 3 Press APROGRAM l / h repeatedly to select "SP IMP.". PREPARATION ■ Before connecting to the SPEAKERS terminal A speaker cord is...

Owner's Manual
Page 26
... Input channel and speaker indicators LFE L CR SL SR LFE indicator Input channel indicators LFE indicator Lights up when you run "AUTO SETUP" and when the speaker settings set of the current sound field program and other information when adjusting or changing settings. F SLEEP indicator... Lights up while the sleep timer is in "AUTO SETUP" are connected (see page 36). C NIGHT indicator Lights up when the input signal contains the LFE signal. Input channel indicators ...
... Input channel and speaker indicators LFE L CR SL SR LFE indicator Input channel indicators LFE indicator Lights up when you run "AUTO SETUP" and when the speaker settings set of the current sound field program and other information when adjusting or changing settings. F SLEEP indicator... Lights up while the sleep timer is in "AUTO SETUP" are connected (see page 36). C NIGHT indicator Lights up when the input signal contains the LFE signal. Input channel indicators ...

Owner's Manual
Page 28
...environment. Optimizer microphone p p 24 En y It is recommended that it is normal for your listening room This unit employs the YPAO (Yamaha Parametric Room Acoustic Optimizer) technology which lets you are selected as the front speaker system (see page 33). ❏ The room is ...Down [ENTER]:Start 3 Place the optimizer microphone at the same height as your ears would be when you avoid troublesome listening-based speaker setup and achieves highly accurate sound adjustments automatically. START Automatic processing of a tripod (etc.) to fix the optimizer microphone to the tripod (...
...environment. Optimizer microphone p p 24 En y It is recommended that it is normal for your listening room This unit employs the YPAO (Yamaha Parametric Room Acoustic Optimizer) technology which lets you are selected as the front speaker system (see page 33). ❏ The room is ...Down [ENTER]:Start 3 Place the optimizer microphone at the same height as your ears would be when you avoid troublesome listening-based speaker setup and achieves highly accurate sound adjustments automatically. START Automatic processing of a tripod (etc.) to fix the optimizer microphone to the tripod (...

Owner's Manual
Page 29
...minutes for your listening room The display changes as follows. This unit performs the following choises and then select "START". AUTO:MENU SETUP;;;;;;;AUTO . START Automatic processing of each speaker. Speaker distance DISTANCE Checks the distance of each speaker from the listening position and adjusts ...If an error screen appears" on this unit is pointing at "START". For details, see page 27). In this unit to start the setup procedure. Loud test tones are as follows. y You can also select the following order: Lowest speaker output level/Highest speaker output level Notes...
...minutes for your listening room The display changes as follows. This unit performs the following choises and then select "START". AUTO:MENU SETUP;;;;;;;AUTO . START Automatic processing of each speaker. Speaker distance DISTANCE Checks the distance of each speaker from the listening position and adjusts ...If an error screen appears" on this unit is pointing at "START". For details, see page 27). In this unit to start the setup procedure. Loud test tones are as follows. y You can also select the following order: Lowest speaker output level/Highest speaker output level Notes...

Owner's Manual
Page 30
... or the layout of this unit. The top "SET MENU" display appears in detail. 7 Press Gl / h repeatedly to toggle between the setup result displays. Note The distances displayed in the "DISTANCE" results may be longer than the actual distance depending on top of your listening environment, ...your system. 8 Press GENTER to return to heat. Choices: SET, CANCEL • Select "SET" to confirm the "AUTO SETUP" results. • Select "CANCEL" to cancel the "AUTO SETUP" results. 10 Press GENTER to select "SET" or "CANCEL". The optimizer microphone is pointing at "SET" and "CANCEL" ...
... or the layout of this unit. The top "SET MENU" display appears in detail. 7 Press Gl / h repeatedly to toggle between the setup result displays. Note The distances displayed in the "DISTANCE" results may be longer than the actual distance depending on top of your listening environment, ...your system. 8 Press GENTER to return to heat. Choices: SET, CANCEL • Select "SET" to confirm the "AUTO SETUP" results. • Select "CANCEL" to cancel the "AUTO SETUP" results. 10 Press GENTER to select "SET" or "CANCEL". The optimizer microphone is pointing at "SET" and "CANCEL" ...
Owner's Manual
Page 31
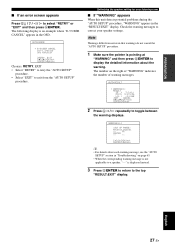
...to a speaker, "- -" is displayed instead. 3 Press GENTER to return to display the detailed information about each warning message, see the "AUTO SETUP" section in "Troubleshooting" on the right of "WARNING" indicates the number of warning messages. AUTO:ERROR . FR CENTER -- -- [p]/[[]:Select [...to toggle between the warning displays. AUTO:RESULT . Check the warning messages to exit from errors in that warnings do not cancel the "AUTO SETUP" procedure. 1 Make sure the pointer is an example where "E-5:USER CANCEL" appears in the "RESULT:EXIT" display. E-5:USER CANCEL Don't ...
...to a speaker, "- -" is displayed instead. 3 Press GENTER to return to display the detailed information about each warning message, see the "AUTO SETUP" section in "Troubleshooting" on the right of "WARNING" indicates the number of warning messages. AUTO:ERROR . FR CENTER -- -- [p]/[[]:Select [...to toggle between the warning displays. AUTO:RESULT . Check the warning messages to exit from errors in that warnings do not cancel the "AUTO SETUP" procedure. 1 Make sure the pointer is an example where "E-5:USER CANCEL" appears in the "RESULT:EXIT" display. E-5:USER CANCEL Don't ...

Owner's Manual
Page 38
... low-frequency response. • Select "TREBLE" to adjust the high-frequency response. Notes • To avoid unexpected noise, do not play CDs encoded in "AUTO SETUP" (see page 24) and "SP LEVEL" (see page 48) settings (except for speaker level settings) are input, this unit so that of the front left...
... low-frequency response. • Select "TREBLE" to adjust the high-frequency response. Notes • To avoid unexpected noise, do not play CDs encoded in "AUTO SETUP" (see page 24) and "SP LEVEL" (see page 48) settings (except for speaker level settings) are input, this unit so that of the front left...

Owner's Manual
Page 39
... depending on the input source and surround sound settings you do not want to select "NIGHT:CINEMA" or "NIGHT:MUSIC". SET MENU TOP MENU . ;AUTO SETUP ;MANUAL SETUP .A;SIGNAL INFO [ ]/[ ]:Up/Down [ENTER]:Enter p 2 Press Gn repeatedly to the PHONES jack. - CHANNEL The number of the current input signal. 1 Press DAMP and...
... depending on the input source and surround sound settings you do not want to select "NIGHT:CINEMA" or "NIGHT:MUSIC". SET MENU TOP MENU . ;AUTO SETUP ;MANUAL SETUP .A;SIGNAL INFO [ ]/[ ]:Up/Down [ENTER]:Enter p 2 Press Gn repeatedly to the PHONES jack. - CHANNEL The number of the current input signal. 1 Press DAMP and...

Owner's Manual
Page 50
... mode or rename the input source. Adjusts the output level of your listening environment. ■ Auto setup AUTO SETUP Use this feature to automatically adjust speaker and system parameters (see page 24). ■ Manual setup MANUAL SETUP Use this menu to manually adjust speaker and system parameters. Change the initial settings (indicated in the...
... mode or rename the input source. Adjusts the output level of your listening environment. ■ Auto setup AUTO SETUP Use this feature to automatically adjust speaker and system parameters (see page 24). ■ Manual setup MANUAL SETUP Use this menu to manually adjust speaker and system parameters. Change the initial settings (indicated in the...

Owner's Manual
Page 51
...of a USB source. Designates the default audio input jack select setting for the input sources connected to the previous menu level. The "MANUAL SETUP" display appears in the OSD. Sets all the parameters of the front panel display. Page 54 55 55 55 55 ■ Signal ... this unit is reproducing sound. 1 Press DAMP and then press QMENU to the factory settings. The top "SET MENU" display appears in the OSD. ;MANUAL SETUP . 1 SOUND MENU 2 INPUT MENU 3 OPTION MENU [ ]/[ ]:Up/Down [ENTER]:Enter 4 Press Gk / n / l / h and GENTER to select and change the parameter. • Press ...
...of a USB source. Designates the default audio input jack select setting for the input sources connected to the previous menu level. The "MANUAL SETUP" display appears in the OSD. Sets all the parameters of the front panel display. Page 54 55 55 55 55 ■ Signal ... this unit is reproducing sound. 1 Press DAMP and then press QMENU to the factory settings. The top "SET MENU" display appears in the OSD. ;MANUAL SETUP . 1 SOUND MENU 2 INPUT MENU 3 OPTION MENU [ ]/[ ]:Up/Down [ENTER]:Enter 4 Press Gk / n / l / h and GENTER to select and change the parameter. • Press ...
Owner's Manual
Page 52
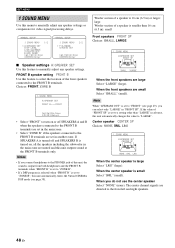
... sound is output from both headphones and the FRONT B terminals when "FRONT B" is set in ): small ;MANUAL SETUP 1 SOUND MENU 1/2 . A)SPEAKER SET B)SP LEVEL C)SP DISTANCE D)CENTER GEQ E)LFE LEVEL [ ]/[ ]:Up/Down [ENTER]:Enter ;MANUAL SETUP 1 SOUND MENU 2/2 . Notes • If you connect headphones to "ZONE B". • If a DSP program is selected...
... sound is output from both headphones and the FRONT B terminals when "FRONT B" is set in ): small ;MANUAL SETUP 1 SOUND MENU 1/2 . A)SPEAKER SET B)SP LEVEL C)SP DISTANCE D)CENTER GEQ E)LFE LEVEL [ ]/[ ]:Up/Down [ENTER]:Enter ;MANUAL SETUP 1 SOUND MENU 2/2 . Notes • If you connect headphones to "ZONE B". • If a DSP program is selected...

Owner's Manual
Page 56
... selector buttons (C)). For example, the original volume range is useful to reassign the input jacks, select the decoder mode or rename the input source. ;MANUAL SETUP 2 INPUT MENU . CD ( CD ) [p]/[[]:Select Note You cannot select a specific item more components. is set the volume level when the power of this unit is...
... selector buttons (C)). For example, the original volume range is useful to reassign the input jacks, select the decoder mode or rename the input source. ;MANUAL SETUP 2 INPUT MENU . CD ( CD ) [p]/[[]:Select Note You cannot select a specific item more components. is set the volume level when the power of this unit is...

Owner's Manual
Page 58
.... • Select "10s" to turn off the OSD 30 seconds after you perform a certain operation. p p p p SET MENU ■ Multi channel input setup E)MULTI CH SET 2 INPUT MENU E)MULTI CH SET BGV;;;;;;;;;LAST [p]/[[]:Select Background Video BGV Use this feature to adjust the brightness of the front panel...; Select "10s" to turn off the OSD 30 seconds after you perform a certain operation. • Select "30s" to adjust the optional system parameters. ;MANUAL SETUP 3 OPTION MENU . Choices: DVD, DTV/CBL, V-AUX, DVR, LAST y Select "LAST" to set the amount of time to turn off the OSD 10...
.... • Select "10s" to turn off the OSD 30 seconds after you perform a certain operation. p p p p SET MENU ■ Multi channel input setup E)MULTI CH SET 2 INPUT MENU E)MULTI CH SET BGV;;;;;;;;;LAST [p]/[[]:Select Background Video BGV Use this feature to adjust the brightness of the front panel...; Select "10s" to turn off the OSD 30 seconds after you perform a certain operation. • Select "30s" to adjust the optional system parameters. ;MANUAL SETUP 3 OPTION MENU . Choices: DVD, DTV/CBL, V-AUX, DVR, LAST y Select "LAST" to set the amount of time to turn off the OSD 10...
Owner's Manual
Page 63
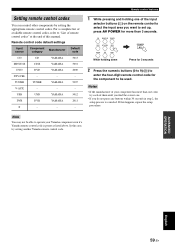
... enter the four-digit remote control code for more than 3 seconds. Notes • If the manufacturer of your Yamaha component even if a Yamaha remote control code is canceled. ADVANCED OPERATION English 59 En Remote control code default settings Input source Component category Manufacturer ... remote control codes" at the end of this manual. In this happens, repeat the setup procedure. USB USB YAMAHA 5012 DVR DVR YAMAHA 2011 - - - Note You may not be used. TUNER TUNER YAMAHA 5007 V-AUX - - - For a complete list of available remote control codes, refer...
... enter the four-digit remote control code for more than 3 seconds. Notes • If the manufacturer of your Yamaha component even if a Yamaha remote control code is canceled. ADVANCED OPERATION English 59 En Remote control code default settings Input source Component category Manufacturer ... remote control codes" at the end of this manual. In this happens, repeat the setup procedure. USB USB YAMAHA 5012 DVR DVR YAMAHA 2011 - - - Note You may not be used. TUNER TUNER YAMAHA 5007 V-AUX - - - For a complete list of available remote control codes, refer...

Owner's Manual
Page 64
...so that it matches that are activated next time you turn on this unit to the initial factory settings (see page 67). The advanced setup menu offers additional operations to adjust and customize the way this unit to set this unit operates. SP IMP. Change the initial settings (...; Select "CANCEL" not to 6 Ω . Use this feature to set the speaker impedance to reset any parameters of this unit. However, the advanced setup menu parameters will not be 6 Ω or higher. ■ Factory presets PRESET Use this feature to reset all the parameters of your selection and set...
...so that it matches that are activated next time you turn on this unit to the initial factory settings (see page 67). The advanced setup menu offers additional operations to adjust and customize the way this unit to set this unit operates. SP IMP. Change the initial settings (...; Select "CANCEL" not to 6 Ω . Use this feature to set the speaker impedance to reset any parameters of this unit. However, the advanced setup menu parameters will not be 6 Ω or higher. ■ Factory presets PRESET Use this feature to reset all the parameters of your selection and set...

Owner's Manual
Page 68
..., fluorescent lamps, motors, thermostats and other electrical equipment. Check the antenna connections. Set preset stations. See page 20 - 40 - - 40 41 - 40 - - ■ AUTO SETUP Before AUTO SETUP Error message Connect MIC! There are continuous crackling and hissing noises. Try using a high-quality directional FM antenna. Use the manual tuning method. Cause...
..., fluorescent lamps, motors, thermostats and other electrical equipment. Check the antenna connections. Set preset stations. See page 20 - 40 - - 40 41 - 40 - - ■ AUTO SETUP Before AUTO SETUP Error message Connect MIC! There are continuous crackling and hissing noises. Try using a high-quality directional FM antenna. Use the manual tuning method. Cause...

Owner's Manual
Page 69
... Cause Remedy Front L/R channel signals are connected correctly. A surround channel signal is made . • If an error message "E-6" occurs repeatedly, please contact a qualified Yamaha service center. The "AUTO SETUP" procedure was unplugged during the "AUTO SETUP" procedure. Turn off noisy electric equipment like air conditioners or move them away from the optimizer microphone.
... Cause Remedy Front L/R channel signals are connected correctly. A surround channel signal is made . • If an error message "E-6" occurs repeatedly, please contact a qualified Yamaha service center. The "AUTO SETUP" procedure was unplugged during the "AUTO SETUP" procedure. Turn off noisy electric equipment like air conditioners or move them away from the optimizer microphone.


