

Quick Reference Guide
Page 1
.... The priority of the other speakers is as follows: 1 Two surround speakers 2 One center speaker External components TV Playback device such as BD (Blu-ray Disc)/DVD players Cable • Cables for connecting external components (may ...
.... The priority of the other speakers is as follows: 1 Two surround speakers 2 One center speaker External components TV Playback device such as BD (Blu-ray Disc)/DVD players Cable • Cables for connecting external components (may ...
Quick Reference Guide
Page 2
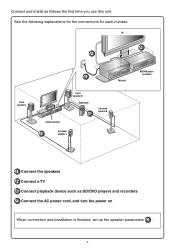
See the following explanations for the connections for each number. TV 3 2 Front speaker L 4 This unit Center speaker Front speaker R Subwoofer 1 Surround speaker R Surround 1 speaker L BD/DVD player (recorder) 1 Connect the speakers 2 Connect a TV 3 Connect playback device such as follows the first time you use this unit. Connect and install as BD/DVD players and recorders 4 Connect the AC power cord, and turn the power on When connection and installation is finished, set up the speaker parameters 5 . - 2 -
See the following explanations for the connections for each number. TV 3 2 Front speaker L 4 This unit Center speaker Front speaker R Subwoofer 1 Surround speaker R Surround 1 speaker L BD/DVD player (recorder) 1 Connect the speakers 2 Connect a TV 3 Connect playback device such as follows the first time you use this unit. Connect and install as BD/DVD players and recorders 4 Connect the AC power cord, and turn the power on When connection and installation is finished, set up the speaker parameters 5 . - 2 -
Quick Reference Guide
Page 3
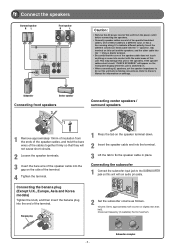
.... Refer to 6Ω on the side of the terminal. 4 Tighten the terminal. Banana plug KERS FRONT Connecting center speakers / surround speakers SURROUND 1 CENTERSPEAKE 3 2 1 Press the tab on settings. Crossover frequency (if available): Set to approximately half volume (or slightly less... than half). VOLUME CROSSOVER/ HIGH CUT - 3 - 1 Connect the speakers Surround speaker R L Front speaker R L ANTENNA FM GND AM SPEAKERS SURROUND CENTER FRONT SUBWOOFER Caution: • Remove the AC power cord of this unit from the ends of ...
.... Refer to 6Ω on the side of the terminal. 4 Tighten the terminal. Banana plug KERS FRONT Connecting center speakers / surround speakers SURROUND 1 CENTERSPEAKE 3 2 1 Press the tab on settings. Crossover frequency (if available): Set to approximately half volume (or slightly less... than half). VOLUME CROSSOVER/ HIGH CUT - 3 - 1 Connect the speakers Surround speaker R L Front speaker R L ANTENNA FM GND AM SPEAKERS SURROUND CENTER FRONT SUBWOOFER Caution: • Remove the AC power cord of this unit from the ends of ...
Quick Reference Guide
Page 6
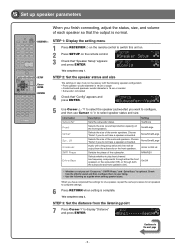
...to your liking. • Use the following speaker configuration: • Front speaker: woofer diameter is 16 cm or larger • Center/surround speakers: woofer diameter is optional. SP SET Config VOL. Choose "None" if you do not have a speaker connected. NRM/REV Selects ...Setup" appears and press ENTER. CONFIG VOL. Information Subwoofer Front Center Sur. SETUP VOL. This completes step 2. Small/Large Selects the size of the surround speakers. Subwoofer;;Yes SW L CR SL SR 5 Use Cursor B / C to select the speaker (subwoofer) you want to configure, and then ...
...to your liking. • Use the following speaker configuration: • Front speaker: woofer diameter is 16 cm or larger • Center/surround speakers: woofer diameter is optional. SP SET Config VOL. Choose "None" if you do not have a speaker connected. NRM/REV Selects ...Setup" appears and press ENTER. CONFIG VOL. Information Subwoofer Front Center Sur. SETUP VOL. This completes step 2. Small/Large Selects the size of the surround speakers. Subwoofer;;Yes SW L CR SL SR 5 Use Cursor B / C to select the speaker (subwoofer) you want to configure, and then ...

Quick Reference Guide
Page 7
... E to set the distance. This completes step 4. Information FL FR C SL SR SWFR Speakers Front speaker L Front speaker R Center speaker Surround speaker L Surround speaker R Subwoofer 15 If you find a speaker with a different volume level to close the Setup menu. - 7 - R SWFR Description ...tone. TEST >Off On VOL. LEVEL VOL. The front panel display shows the speaker that is complete. Front speaker L Front speaker R Center speaker Surround speaker L Surround speaker R Subwoofer Setting feet (ft) / meters (m) 1.0 ft to 80.0 ft (0.30 m to 24.0 m) 1.0 ft to 80.0 ft...
... E to set the distance. This completes step 4. Information FL FR C SL SR SWFR Speakers Front speaker L Front speaker R Center speaker Surround speaker L Surround speaker R Subwoofer 15 If you find a speaker with a different volume level to close the Setup menu. - 7 - R SWFR Description ...tone. TEST >Off On VOL. LEVEL VOL. The front panel display shows the speaker that is complete. Front speaker L Front speaker R Center speaker Surround speaker L Surround speaker R Subwoofer Setting feet (ft) / meters (m) 1.0 ft to 80.0 ft (0.30 m to 24.0 m) 1.0 ft to 80.0 ft...
Quick Reference Guide
Page 8
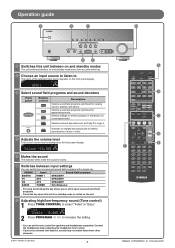
...This unit switches between input settings You can set an extreme tone balance, sounds may not match those from other channels. © 2011 Yamaha Corporation - 8 - VOL. Pressing and holding this key allows you set the tone control for compressed audio. G Adjusting high/low-frequency...L CR SL SR C Select sound field programs and sound decoders Front panel PROGRAM Remote control MOVIE MUSIC ENHANCER STEREO SUR. Selects surround decoders such as Dolby Pro Logic II. Selects settings for stereo playback or enhancers for speakers and headphones separately. D Adjusts the ...
...This unit switches between input settings You can set an extreme tone balance, sounds may not match those from other channels. © 2011 Yamaha Corporation - 8 - VOL. Pressing and holding this key allows you set the tone control for compressed audio. G Adjusting high/low-frequency...L CR SL SR C Select sound field programs and sound decoders Front panel PROGRAM Remote control MOVIE MUSIC ENHANCER STEREO SUR. Selects surround decoders such as Dolby Pro Logic II. Selects settings for stereo playback or enhancers for speakers and headphones separately. D Adjusts the ...

Owners Manual
Page 5
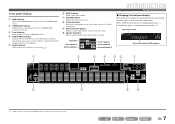
... level. J1 h Front panel display Displays information on the front panel display (☞p. 7). Attach the supplied VIDEO AUX input cover when not using and the surround sound decoder (☞p. 26). bc d ef g h l TONE CONTROL Adjusts high-frequency/low-frequency output of speakers/headphones (☞p. 25). b INFO Changes the information shown on...
... level. J1 h Front panel display Displays information on the front panel display (☞p. 7). Attach the supplied VIDEO AUX input cover when not using and the surround sound decoder (☞p. 26). bc d ef g h l TONE CONTROL Adjusts high-frequency/low-frequency output of speakers/headphones (☞p. 25). b INFO Changes the information shown on...
Owners Manual
Page 6
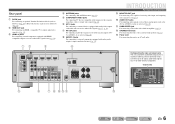
... Yamaha iPod universal dock (such as the AV5 or AUDIO1-2 jacks are selected (☞p. 20). b HDMI OUT jack For connecting an HDMI - k SUBWOOFER jack For connecting a subwoofer with a built-in white to output video signal (☞p. 14). l SPEAKER terminals For connecting the front, center, and surround...ARC HDMI OUT PR (BD/DVD) HDMI 1 HDMI 2 PB PB Y MONITOR OUT Y COMPONENT VIDEO VIDEO HDMI 3 HDMI 4 MONITOR OUT ANTENNA FM GND AM SURROUND CENTER SPEAKERS FRONT OPTICAL AV 1 COAXIAL AV 2 COAXIAL (CD) AV 3 OPTICAL ( TV ) AV 4 AV 5 AV OUT AUDIO 1 AUDIO 2 AUDIO OUT...
... Yamaha iPod universal dock (such as the AV5 or AUDIO1-2 jacks are selected (☞p. 20). b HDMI OUT jack For connecting an HDMI - k SUBWOOFER jack For connecting a subwoofer with a built-in white to output video signal (☞p. 14). l SPEAKER terminals For connecting the front, center, and surround...ARC HDMI OUT PR (BD/DVD) HDMI 1 HDMI 2 PB PB Y MONITOR OUT Y COMPONENT VIDEO VIDEO HDMI 3 HDMI 4 MONITOR OUT ANTENNA FM GND AM SURROUND CENTER SPEAKERS FRONT OPTICAL AV 1 COAXIAL AV 2 COAXIAL (CD) AV 3 OPTICAL ( TV ) AV 4 AV 5 AV OUT AUDIO 1 AUDIO 2 AUDIO OUT...
Owners Manual
Page 7
J1 Input source name HDMI1 STRAIGHT VOL. Press fINFO repeatedly to cycle through an optional Yamaha iPod universal dock (such as the active input source. En 7 e SLEEP indicator Lights up when a sound field effect that uses CINEMA DSP technology is... HDMI input source. Front panel display a HDMI indicator Lights up when an iPod/iPhone is connected through input source → sound field program → surround decoder in order. g VOLUME indicator Displays the current volume level. c Tuner indicator Lights up if corresponding cursors on menu items and settings. f MUTE...
J1 Input source name HDMI1 STRAIGHT VOL. Press fINFO repeatedly to cycle through an optional Yamaha iPod universal dock (such as the active input source. En 7 e SLEEP indicator Lights up when a sound field effect that uses CINEMA DSP technology is... HDMI input source. Front panel display a HDMI indicator Lights up when an iPod/iPhone is connected through input source → sound field program → surround decoder in order. g VOLUME indicator Displays the current volume level. c Tuner indicator Lights up if corresponding cursors on menu items and settings. f MUTE...
Owners Manual
Page 8
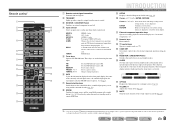
... the menu display. Sleep Off Sleep 30min. En 8 d Input selector Select an input source on the unit. J1 DOCK A Yamaha iPod universal dock or Bluetooth wireless audio receiver connected to FM. Returns to set the time for external component operations (☞p. 52...E, ENTER, RETURN Cursor B / C / D / E Select menu items and change settings when ENTER RETURN settings menus, etc are used when using and the surround decoder (☞p. 26). Press this unit (☞p. 41). Sleep 90min. q OPTION Displays the Option menu for this key repeatedly to the previous screen when setting...
... the menu display. Sleep Off Sleep 30min. En 8 d Input selector Select an input source on the unit. J1 DOCK A Yamaha iPod universal dock or Bluetooth wireless audio receiver connected to FM. Returns to set the time for external component operations (☞p. 52...E, ENTER, RETURN Cursor B / C / D / E Select menu items and change settings when ENTER RETURN settings menus, etc are used when using and the surround decoder (☞p. 26). Press this unit (☞p. 41). Sleep 90min. q OPTION Displays the Option menu for this key repeatedly to the previous screen when setting...

Owners Manual
Page 9
... it just under the center of the TV with the speaker tops at the rear of the room on the left and right speakers The surround speakers are about 1/4 of the screen from the wall. Ex. They should be brought to you the impact of a real movie theater or concert hall... speakers are used for the center channel sounds (dialog, vocals, etc.). Use a subwoofer that is used for effect and vocal sounds with an internal amplifier. Surround speaker layout: Place the speakers at a height of the speakers are for the front channel sounds (stereo sound) and effect sounds. ■...
... it just under the center of the TV with the speaker tops at the rear of the room on the left and right speakers The surround speakers are about 1/4 of the screen from the wall. Ex. They should be brought to you the impact of a real movie theater or concert hall... speakers are used for the center channel sounds (dialog, vocals, etc.). Use a subwoofer that is used for effect and vocal sounds with an internal amplifier. Surround speaker layout: Place the speakers at a height of the speakers are for the front channel sounds (stereo sound) and effect sounds. ■...

Owners Manual
Page 10
... can be placed between 60 degrees and 80 degrees from the listening position. J1 A STRAIGHT Center speaker 60q 60q 80q 80q Surround speaker R Surround speaker L • Connect at least two speakers (front left and right). • If you use magnetically shielded speakers to the... surround speakers. • The surround speakers should be configured as needed (Advanced Setup menu)" for details on the Advanced Setup menu (☞p. 55). En 10 When ...
... can be placed between 60 degrees and 80 degrees from the listening position. J1 A STRAIGHT Center speaker 60q 60q 80q 80q Surround speaker R Surround speaker L • Connect at least two speakers (front left and right). • If you use magnetically shielded speakers to the... surround speakers. • The surround speakers should be configured as needed (Advanced Setup menu)" for details on the Advanced Setup menu (☞p. 55). En 10 When ...

Owners Manual
Page 11
... or come into contact with the metal areas of two parallel insulated cables. One of these cables is switched on. Surround speaker RL Front speaker R L HDMI 4 OR OUT ANTENNA FM GND AM SURROUND CENTER SPEAKERS FRONT AUDIO 2 AUDIO OUT SUBWOOFER Subwoofer Center speaker CAUTION • Remove the AC power cord of this...
... or come into contact with the metal areas of two parallel insulated cables. One of these cables is switched on. Surround speaker RL Front speaker R L HDMI 4 OR OUT ANTENNA FM GND AM SURROUND CENTER SPEAKERS FRONT AUDIO 2 AUDIO OUT SUBWOOFER Subwoofer Center speaker CAUTION • Remove the AC power cord of this...

Owners Manual
Page 12
.... Crossover frequency (if available): Set to approximately half volume (or slightly less than half). ■ Connecting front speakers KERS 3 2 FRONT 1 4 ■ Connecting center speakers / surround speakers SURROUND 1 CENTERSPEAKE 3 2 1 Remove approximately 10mm of insulation from the ends of the speaker cables, and twist the bare wires of the cables together firmly so that...
.... Crossover frequency (if available): Set to approximately half volume (or slightly less than half). ■ Connecting front speakers KERS 3 2 FRONT 1 4 ■ Connecting center speakers / surround speakers SURROUND 1 CENTERSPEAKE 3 2 1 Remove approximately 10mm of insulation from the ends of the speaker cables, and twist the bare wires of the cables together firmly so that...

Owners Manual
Page 21
You can reduce noise. HDMI 3 HDMI 4 FM GND AM MONITOR OUT SURROUND CENTER SPEAKERS FRONT Connecting the AM loop antenna Press and hold Insert Release ■ Improving FM reception We recommend using an outdoor antenna. Make sure ...
You can reduce noise. HDMI 3 HDMI 4 FM GND AM MONITOR OUT SURROUND CENTER SPEAKERS FRONT Connecting the AM loop antenna Press and hold Insert Release ■ Improving FM reception We recommend using an outdoor antenna. Make sure ...
Owners Manual
Page 22
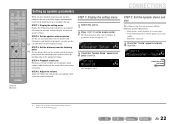
... PRESET TUNING INFO MEMORY MOVIE ENHANCER SUR. STEP 3: Set the distance from which you to the actual effect your speakers, configure this unit appears. Center/surround speakers: woofer diameter is 16 cm or larger - CONFIG VOL. Carry out the following speaker configuration: - SW Speaker Setup L CR SL SR 3 Check that allows...
... PRESET TUNING INFO MEMORY MOVIE ENHANCER SUR. STEP 3: Set the distance from which you to the actual effect your speakers, configure this unit appears. Center/surround speakers: woofer diameter is 16 cm or larger - CONFIG VOL. Carry out the following speaker configuration: - SW Speaker Setup L CR SL SR 3 Check that allows...
Owners Manual
Page 23
...80.0 ft (0.30 m to change the setting units under "Unit." Information Description Setting Subwoofer Sets the subwoofer status. Choose "None" if you have surround speakers connected. Woofer diameter • 6-1/4 in (16 cm) or larger → Large • 6-1/4 in (16 cm) or smaller →... through either of the front speakers. This completes step 2. DIST VOL. This completes step 3. LR Selects the size of the surround speakers. NRM/REV Extra Bass Selects whether to display "Distance" and press jENTER. Yes/None Front Selects the size (sound reproduction...
...80.0 ft (0.30 m to change the setting units under "Unit." Information Description Setting Subwoofer Sets the subwoofer status. Choose "None" if you have surround speakers connected. Woofer diameter • 6-1/4 in (16 cm) or larger → Large • 6-1/4 in (16 cm) or smaller →... through either of the front speakers. This completes step 2. DIST VOL. This completes step 3. LR Selects the size of the surround speakers. NRM/REV Extra Bass Selects whether to display "Distance" and press jENTER. Yes/None Front Selects the size (sound reproduction...

Owners Manual
Page 24
...POP-UP MENU MUTE j Front L Center Front R 1 2 3 4 5 6 7 8 9 INPUT MUTE 0 10 TV TV VOL TV CH ENT Subwoofer Surround L Surround R i SETUP j Cursor B / C / D / E j ENTER j RETURN 12 Check that is outputting the test tone. The front panel display shows the... speaker that the test tone is complete. Information FL FR C SL SR SWFR Speakers Front speaker L Front speaker R Center speaker Surround speaker L Surround speaker R Subwoofer 15 If you select "On." En 24 SOURCE 1 1 5 TRANSMIT CODE SET SLEEP RECEIVER HDMI 2 3 4 AV 2 3 4...
...POP-UP MENU MUTE j Front L Center Front R 1 2 3 4 5 6 7 8 9 INPUT MUTE 0 10 TV TV VOL TV CH ENT Subwoofer Surround L Surround R i SETUP j Cursor B / C / D / E j ENTER j RETURN 12 Check that is outputting the test tone. The front panel display shows the... speaker that the test tone is complete. Information FL FR C SL SR SWFR Speakers Front speaker L Front speaker R Center speaker Surround speaker L Surround speaker R Subwoofer 15 If you select "On." En 24 SOURCE 1 1 5 TRANSMIT CODE SET SLEEP RECEIVER HDMI 2 3 4 AV 2 3 4...
Owners Manual
Page 26
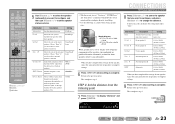
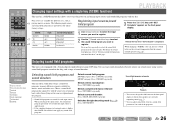
...REC POP-UP MENU MUTE Changing input settings with a single key (SCENE function) This unit has a SCENE function that sounds best with a Yamaha digital sound field processing (DSP) chip. Four scenes are currently outputting sound (☞p. 7). • You can use switch between the external... key repeatedly to turn the power on the name or explanation of the programs. En 26 Selects stereo reproduction: Press gSTEREO repeatedly. Selects surround decoder: Press gSUR. Switches Straight decoding mode (☞p. 27): Press gSTRAIGHT. SW L CR SL SR Program • You can adjust...
...REC POP-UP MENU MUTE Changing input settings with a single key (SCENE function) This unit has a SCENE function that sounds best with a Yamaha digital sound field processing (DSP) chip. Four scenes are currently outputting sound (☞p. 7). • You can use switch between the external... key repeatedly to turn the power on the name or explanation of the programs. En 26 Selects stereo reproduction: Press gSTEREO repeatedly. Selects surround decoder: Press gSUR. Switches Straight decoding mode (☞p. 27): Press gSTRAIGHT. SW L CR SL SR Program • You can adjust...

Owners Manual
Page 27
...gSTRAIGHT to exit straight decoding mode. STEREO VOL. 2ch Stereo SW L R 2 To deactivate stereo playback, press any surround speakers (Virtual CINEMA DSP mode). This unit will playback as follows for the playback of the gSound selection keys to...J 2 : However, SILENT CINEMA mode is selected. Hall in Vienna SW L CR SL SR PLAYBACK Enjoying sound field programs ■ Enjoying sound field programs without surround sound speakers This unit allows you want to select "2ch Stereo." SOURCE 1 1 5 TRANSMIT CODE SET SLEEP RECEIVER HDMI 2 3 4 AV 2 3 4 AUDIO...
...gSTRAIGHT to exit straight decoding mode. STEREO VOL. 2ch Stereo SW L R 2 To deactivate stereo playback, press any surround speakers (Virtual CINEMA DSP mode). This unit will playback as follows for the playback of the gSound selection keys to...J 2 : However, SILENT CINEMA mode is selected. Hall in Vienna SW L CR SL SR PLAYBACK Enjoying sound field programs ■ Enjoying sound field programs without surround sound speakers This unit allows you want to select "2ch Stereo." SOURCE 1 1 5 TRANSMIT CODE SET SLEEP RECEIVER HDMI 2 3 4 AV 2 3 4 AUDIO...


