
Quick Reference Guide
Page 4
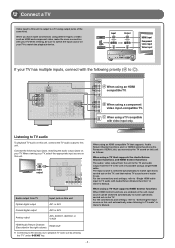
... unit Optical digital output AV1 or AV4 Coaxial digital output AV2 or AV3 Analog output AV5, AUDIO1, AUDIO2, or V-AUX HDMI Audio Return Channel (Described in the right column) HDMI OUT ✽ Connecting to AV4 allows you to TV audio with Audio Return Channel function" in Owner's Manual. - 4 - For the connections and settings, refer to "Single HDMI cable input to playback TV audio just by pressing the "TV" under "SCENE" key. The input source is output to a TV using output jacks of video...
... unit Optical digital output AV1 or AV4 Coaxial digital output AV2 or AV3 Analog output AV5, AUDIO1, AUDIO2, or V-AUX HDMI Audio Return Channel (Described in the right column) HDMI OUT ✽ Connecting to AV4 allows you to TV audio with Audio Return Channel function" in Owner's Manual. - 4 - For the connections and settings, refer to "Single HDMI cable input to playback TV audio just by pressing the "TV" under "SCENE" key. The input source is output to a TV using output jacks of video...
Quick Reference Guide
Page 8
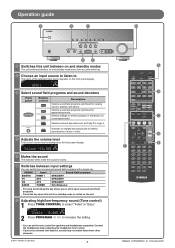
... sound The indicator blinks while the sound is displayed on the front panel display. G Adjusting high/low-frequency sound (Tone control) 1 Press TONE CONTROL to straight decoding mode for compressed audio. Connect the headphones when adjusting the headphone tone control. - DECODE MUSIC STEREO STRAIGHT BD DVD SETUP SCENE TV CD RADIO OPTION ENTER VOLUME RETURN DISPLAY TOP MENU REC POP-UP MENU MUTE 1 2 3 4 5 6 7 8 9 INPUT MUTE 0 10 TV TV VOL TV CH ENT YD283A0/QREN1 Operation guide PHONES SILENT CINEMA INFO MEMORY PRESET FM AM TUNING INPUT...
... sound The indicator blinks while the sound is displayed on the front panel display. G Adjusting high/low-frequency sound (Tone control) 1 Press TONE CONTROL to straight decoding mode for compressed audio. Connect the headphones when adjusting the headphone tone control. - DECODE MUSIC STEREO STRAIGHT BD DVD SETUP SCENE TV CD RADIO OPTION ENTER VOLUME RETURN DISPLAY TOP MENU REC POP-UP MENU MUTE 1 2 3 4 5 6 7 8 9 INPUT MUTE 0 10 TV TV VOL TV CH ENT YD283A0/QREN1 Operation guide PHONES SILENT CINEMA INFO MEMORY PRESET FM AM TUNING INPUT...
Owners Manual
Page 2
...connecting external components 52 Default remote control code settings 52 Registering remote control codes for external component operations 53 Resetting all remote control codes 54 Extended functionality that can be configured as needed (Advanced Setup menu 55 Displaying/Setting the Advanced Setup menu 55 Setting the impedance of speakers 55 Avoiding crossing remote control signals when using multiple Yamaha receivers 56 Initializing various settings for this unit 56 Using the HDMI Control function 57 APPENDIX Troubleshooting 60 General 60 HDMI 63 Tuner (FM/AM 63 Remote control...
...connecting external components 52 Default remote control code settings 52 Registering remote control codes for external component operations 53 Resetting all remote control codes 54 Extended functionality that can be configured as needed (Advanced Setup menu 55 Displaying/Setting the Advanced Setup menu 55 Setting the impedance of speakers 55 Avoiding crossing remote control signals when using multiple Yamaha receivers 56 Initializing various settings for this unit 56 Using the HDMI Control function 57 APPENDIX Troubleshooting 60 General 60 HDMI 63 Tuner (FM/AM 63 Remote control...
Owners Manual
Page 8
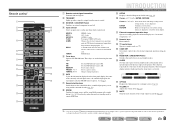
... p SLEEP Sets this unit is in standby mode automatically after a specified period of time has elapsed (sleep timer). s MUTE Turns the mute function of the currently selected input source, the sound field program, the surround decoder, the FM/AM tuner frequency, etc.)(☞p. 7). En 8 HDMI1-4 HDMI1-4 jacks AV1-5 AV1-5 jacks AUDIO1-2 AUDIO1-2 jacks V-AUX Front panel VIDEO AUX jacks [A]/[B] Changes the external component you operating with a single button (☞p. 26). Selects a preset station. h SCENE Switches the input source and the sound field program with...
... p SLEEP Sets this unit is in standby mode automatically after a specified period of time has elapsed (sleep timer). s MUTE Turns the mute function of the currently selected input source, the sound field program, the surround decoder, the FM/AM tuner frequency, etc.)(☞p. 7). En 8 HDMI1-4 HDMI1-4 jacks AV1-5 AV1-5 jacks AUDIO1-2 AUDIO1-2 jacks V-AUX Front panel VIDEO AUX jacks [A]/[B] Changes the external component you operating with a single button (☞p. 26). Selects a preset station. h SCENE Switches the input source and the sound field program with...
Owners Manual
Page 15
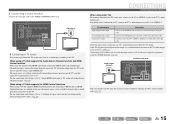
... input source connected via TV's audio output jack to the VIDEO (MONITOR OUT) jack. En 15 The input source is switched automatically to match operations carried out on this unit automatically when listening to the COAXIAL jack of the AV2 or AV3 with Audio Return Channel function" (☞p. 59). Panasonic VIERA Link), if HDMI Control functions are possible using a single HDMI cable. Connect to TV audio" (☞p. 58). If the TV supports optical digital audio output, we recommend that makes TV sound control...
... input source connected via TV's audio output jack to the VIDEO (MONITOR OUT) jack. En 15 The input source is switched automatically to match operations carried out on this unit automatically when listening to the COAXIAL jack of the AV2 or AV3 with Audio Return Channel function" (☞p. 59). Panasonic VIERA Link), if HDMI Control functions are possible using a single HDMI cable. Connect to TV audio" (☞p. 58). If the TV supports optical digital audio output, we recommend that makes TV sound control...
Owners Manual
Page 22
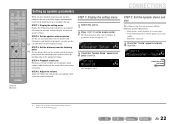
... parameters on the remote control. J1 SETUP VOL. Front speaker: woofer diameter is 16 cm or larger - Carry out the following speaker configuration: - STEP 1: Display the setting menu Display the Setup menu from each speaker and configure them so that the sound from which you to configure sound volumes while listening to configure all settings for this unit appears. SOURCE 1 1 5 TRANSMIT CODE SET SLEEP RECEIVER HDMI 2 3 4 AV 2 3 4 AUDIO 1 2 V-AUX [ A ] [ B ] DOCK TUNER FM AM PRESET TUNING INFO MEMORY...
... parameters on the remote control. J1 SETUP VOL. Front speaker: woofer diameter is 16 cm or larger - Carry out the following speaker configuration: - STEP 1: Display the setting menu Display the Setup menu from each speaker and configure them so that the sound from which you to configure sound volumes while listening to configure all settings for this unit appears. SOURCE 1 1 5 TRANSMIT CODE SET SLEEP RECEIVER HDMI 2 3 4 AV 2 3 4 AUDIO 1 2 V-AUX [ A ] [ B ] DOCK TUNER FM AM PRESET TUNING INFO MEMORY...
Owners Manual
Page 23
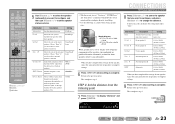
... Description Setting Unit Switches between setting feet (ft) / units (feet / meters). DECODE MUSIC STEREO STRAIGHT BD DVD SETUP SCENE TV CD RADIO OPTION ENTER VOLUME RETURN DISPLAY TOP MENU REC POP-UP MENU MUTE 1 2 3 4 5 6 7 8 9 INPUT MUTE 0 10 TV TV VOL TV CH ENT j Cursor B / C / D / E j ENTER j RETURN 5 Use jCursor B / C to select the speaker (subwoofer) you want to configure, and then use jCursor D / E to play front channel low-frequency components through either of the center speakers. On...
... Description Setting Unit Switches between setting feet (ft) / units (feet / meters). DECODE MUSIC STEREO STRAIGHT BD DVD SETUP SCENE TV CD RADIO OPTION ENTER VOLUME RETURN DISPLAY TOP MENU REC POP-UP MENU MUTE 1 2 3 4 5 6 7 8 9 INPUT MUTE 0 10 TV TV VOL TV CH ENT j Cursor B / C / D / E j ENTER j RETURN 5 Use jCursor B / C to select the speaker (subwoofer) you want to configure, and then use jCursor D / E to play front channel low-frequency components through either of the center speakers. On...
Owners Manual
Page 25
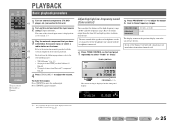
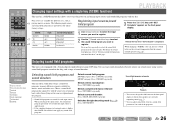
... those frequency ranges. PLAYBACK SOURCE 1 1 5 TRANSMIT CODE SET SLEEP RECEIVER HDMI 2 3 4 AV 2 3 4 AUDIO 1 2 V-AUX [ A ] [ B ] DOCK TUNER FM AM PRESET TUNING INFO MEMORY MOVIE ENHANCER SUR. DECODE MUSIC STEREO STRAIGHT BD DVD SETUP SCENE TV CD RADIO OPTION ENTER VOLUME RETURN DISPLAY TOP MENU REC POP-UP MENU MUTE 1 2 3 4 5 6 7 8 9 INPUT MUTE 0 10 TV TV VOL TV CH ENT d Input selector r VOLUME +/s MUTE Basic playback procedure 1 Turn on the front panel repeatedly to mute the audio output. J1 3 Play the external component...
... those frequency ranges. PLAYBACK SOURCE 1 1 5 TRANSMIT CODE SET SLEEP RECEIVER HDMI 2 3 4 AV 2 3 4 AUDIO 1 2 V-AUX [ A ] [ B ] DOCK TUNER FM AM PRESET TUNING INFO MEMORY MOVIE ENHANCER SUR. DECODE MUSIC STEREO STRAIGHT BD DVD SETUP SCENE TV CD RADIO OPTION ENTER VOLUME RETURN DISPLAY TOP MENU REC POP-UP MENU MUTE 1 2 3 4 5 6 7 8 9 INPUT MUTE 0 10 TV TV VOL TV CH ENT d Input selector r VOLUME +/s MUTE Basic playback procedure 1 Turn on the front panel repeatedly to mute the audio output. J1 3 Play the external component...
Owners Manual
Page 26
... "SET Complete" appears on the front panel display to check what speakers are currently outputting sound (☞p. 7). • You can use switch between the external components that sounds best with one key repeatedly to turn the power on the name or explanation of sound decoders. SCENE BD/DVD g TV CD h RADIO Input HDMI1 AV4 AV3 TUNER Sound field program STRAIGHT STRAIGHT STRAIGHT 5ch Enhancer Registering input sources/sound field program 1 Use dInput selector to select the input source...
... "SET Complete" appears on the front panel display to check what speakers are currently outputting sound (☞p. 7). • You can use switch between the external components that sounds best with one key repeatedly to turn the power on the name or explanation of sound decoders. SCENE BD/DVD g TV CD h RADIO Input HDMI1 AV4 AV3 TUNER Sound field program STRAIGHT STRAIGHT STRAIGHT 5ch Enhancer Registering input sources/sound field program 1 Use dInput selector to select the input source...
Owners Manual
Page 41
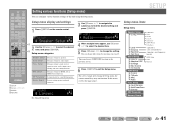
SOURCE 1 1 5 TRANSMIT CODE SET SLEEP RECEIVER HDMI 2 3 4 AV 2 3 4 AUDIO 1 2 V-AUX [ A ] [ B ] DOCK TUNER FM AM PRESET TUNING INFO MEMORY MOVIE ENHANCER SUR. Sets parameters for audio output. You can configure various function settings of this occurs, reselect the input source. If this unit using the Setup menu. Setup Input Rename AutoPowerDown Dimmer DSP Parameter Memory Guard Subwoofer Front Center Sur. DECODE MUSIC STEREO STRAIGHT BD DVD SETUP SCENE TV CD RADIO OPTION ENTER VOLUME RETURN DISPLAY TOP MENU REC POP-UP MENU MUTE 1 2 3 4 5 ...
SOURCE 1 1 5 TRANSMIT CODE SET SLEEP RECEIVER HDMI 2 3 4 AV 2 3 4 AUDIO 1 2 V-AUX [ A ] [ B ] DOCK TUNER FM AM PRESET TUNING INFO MEMORY MOVIE ENHANCER SUR. Sets parameters for audio output. You can configure various function settings of this occurs, reselect the input source. If this unit using the Setup menu. Setup Input Rename AutoPowerDown Dimmer DSP Parameter Memory Guard Subwoofer Front Center Sur. DECODE MUSIC STEREO STRAIGHT BD DVD SETUP SCENE TV CD RADIO OPTION ENTER VOLUME RETURN DISPLAY TOP MENU REC POP-UP MENU MUTE 1 2 3 4 5 ...
Owners Manual
Page 45
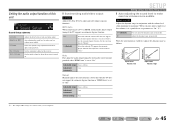
.... Output Level Output Level On Off Input Level Volume: low On Off Input Level Volume: high J 1 : The Adaptive DRC setting is set to use headphones. When you use the automatic lipsync function. Select this unit SETUP Sound Setup VOL. Auto-adjusting the sound level to a TV via HDMI, automatically adjusts output timing if the TV supports an automatic lipsync function. HDMI Auto When connecting to make even low volumes more audible. SW L CR SL SR Sound Setup submenu Lipsync Adaptive DRC D.Range Max Volume Init.Volume Adjusts the delay between audio and video output...
.... Output Level Output Level On Off Input Level Volume: low On Off Input Level Volume: high J 1 : The Adaptive DRC setting is set to use headphones. When you use the automatic lipsync function. Select this unit SETUP Sound Setup VOL. Auto-adjusting the sound level to a TV via HDMI, automatically adjusts output timing if the TV supports an automatic lipsync function. HDMI Auto When connecting to make even low volumes more audible. SW L CR SL SR Sound Setup submenu Lipsync Adaptive DRC D.Range Max Volume Init.Volume Adjusts the delay between audio and video output...
Owners Manual
Page 49
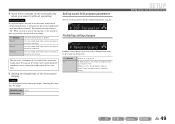
... Settings are not protected. ■ Goes enter standby mode automatically when you leave it without operating AutoPowerDown If you do not operate this unit or use the remote control for an extended period of time, it is returned to "Off." This function's default setting is disabled. Lowering the setting dims the display. Adjustable range -4 to 0 Default setting 0 Setting sound field program parameters You can set to "On," the unit displays "Memory Guard!" Goes into standby mode (Auto Power...
... Settings are not protected. ■ Goes enter standby mode automatically when you leave it without operating AutoPowerDown If you do not operate this unit or use the remote control for an extended period of time, it is returned to "Off." This function's default setting is disabled. Lowering the setting dims the display. Adjustable range -4 to 0 Default setting 0 Setting sound field program parameters You can set to "On," the unit displays "Memory Guard!" Goes into standby mode (Auto Power...
Owners Manual
Page 52
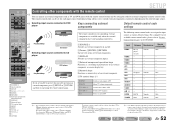
... CODE SET SLEEP RECEIVER HDMI 2 3 4 AV 2 3 4 AUDIO 1 2 V-AUX [ A ] [ B ] DOCK TUNER FM AM PRESET TUNING INFO MEMORY MOVIE ENHANCER SUR. The remote control keys for devices such as TV and DVD player with the remote control of this unit. For a complete list of external components. Yamaha 5089 Yamaha 5085 J 1 : You can register remote control codes for external components to operate this unit by setting the code for external component (remote control code). J 2 : Use A/B for TVs in mA. d Selecting input source connected to DVD player Keys connecting...
... CODE SET SLEEP RECEIVER HDMI 2 3 4 AV 2 3 4 AUDIO 1 2 V-AUX [ A ] [ B ] DOCK TUNER FM AM PRESET TUNING INFO MEMORY MOVIE ENHANCER SUR. The remote control keys for devices such as TV and DVD player with the remote control of this unit. For a complete list of external components. Yamaha 5089 Yamaha 5085 J 1 : You can register remote control codes for external components to operate this unit by setting the code for external component (remote control code). J 2 : Use A/B for TVs in mA. d Selecting input source connected to DVD player Keys connecting...

Owners Manual
Page 55
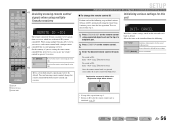
... are connected. A STRAIGHT PHONES SILENT CINEMA INFO MEMORY PRESET FM AM INPUT BD DVD SCENE TV CD TONE CONTROL PROGRAM RADIO STRAIGHT 3 Use PROGRAM to select the item to be set the following items. In the Advanced Setup menu, you wish to change. 5 Switch this unit to "Changing speaker impedance" (☞p. 10). J1 6 MIN 8 MIN (Default) Select the impedance when 6Ω speakers are displayed. REMOTE ID INIT Sets the impedance of a receiver. Setting the impedance of speaker impedance settings, refer to the standby mode, and then switch...
... are connected. A STRAIGHT PHONES SILENT CINEMA INFO MEMORY PRESET FM AM INPUT BD DVD SCENE TV CD TONE CONTROL PROGRAM RADIO STRAIGHT 3 Use PROGRAM to select the item to be set the following items. In the Advanced Setup menu, you wish to change. 5 Switch this unit to "Changing speaker impedance" (☞p. 10). J1 6 MIN 8 MIN (Default) Select the impedance when 6Ω speakers are displayed. REMOTE ID INIT Sets the impedance of a receiver. Setting the impedance of speaker impedance settings, refer to the standby mode, and then switch...
Owners Manual
Page 56
...factory settings. En 56 DECODE MUSIC STEREO STRAIGHT BD DVD SETUP SCENE TV CD RADIO OPTION ENTER VOLUME RETURN DISPLAY TOP MENU REC POP-UP MENU MUTE 1 2 3 4 5 6 7 8 9 INPUT MUTE 0 10 TV TV VOL TV CH ENT n Avoiding crossing remote control signals when using lNumeric keys. To avoid crossing remote control, change the remote control ID Perform each remote control with a unique remote i control ID for both remote control and receiver by default. Registration successful: blinks twice Registration failed: blinks 6 times SOURCE TRANSMIT SLEEP HDMI CODE SET...
...factory settings. En 56 DECODE MUSIC STEREO STRAIGHT BD DVD SETUP SCENE TV CD RADIO OPTION ENTER VOLUME RETURN DISPLAY TOP MENU REC POP-UP MENU MUTE 1 2 3 4 5 6 7 8 9 INPUT MUTE 0 10 TV TV VOL TV CH ENT n Avoiding crossing remote control signals when using lNumeric keys. To avoid crossing remote control, change the remote control ID Perform each remote control with a unique remote i control ID for both remote control and receiver by default. Registration successful: blinks twice Registration failed: blinks 6 times SOURCE TRANSMIT SLEEP HDMI CODE SET...
Owners Manual
Page 61
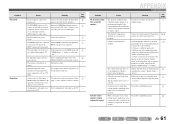
... connected cable, select "Audio In," and component, then it is disabled. input video is not output, the unit may be output from a specific speaker. APPENDIX Troubleshooting Problem No sound is not set to playback through the TV. ("HDMI Setup" → "Audio") to display content on the TV. - Sound may have been selected for some surround decoders, sound from all channels is output from one channel) Speaker output balance is output from certain channels, depending on this unit cannot Use an input source that has signals...
... connected cable, select "Audio In," and component, then it is disabled. input video is not output, the unit may be output from a specific speaker. APPENDIX Troubleshooting Problem No sound is not set to playback through the TV. ("HDMI Setup" → "Audio") to display content on the TV. - Sound may have been selected for some surround decoders, sound from all channels is output from one channel) Speaker output balance is output from certain channels, depending on this unit cannot Use an input source that has signals...
Owners Manual
Page 62
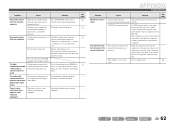
... desired digital audio signal format. Select a desired input source (HDMI1-4 or AV1-2) as a video input and select a audio input source from the subwoofer. APPENDIX Troubleshooting Problem Noise/hum noise is disabled. The volume cannot be played in straight decoding mode and a monaural source is too close to its instruction manual. The source does not contain LFE (☞p. 67) or low frequency signals. The component connected to this unit by digital connection and play back the DTS-CD. Turn on . Sound may result from the surround speakers. A subwoofer...
... desired digital audio signal format. Select a desired input source (HDMI1-4 or AV1-2) as a video input and select a audio input source from the subwoofer. APPENDIX Troubleshooting Problem Noise/hum noise is disabled. The volume cannot be played in straight decoding mode and a monaural source is too close to its instruction manual. The source does not contain LFE (☞p. 67) or low frequency signals. The component connected to this unit by digital connection and play back the DTS-CD. Turn on . Sound may result from the surround speakers. A subwoofer...
Owners Manual
Page 63
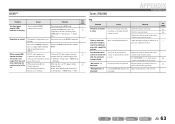
.../AM frequency has been input. Replace the outdoor antenna with the automatic tuning method. Try re-inserting the HDMI cable. - The connected HDMI component Connect an HDMI component that can be obtained even with a good FM antenna. digital copyright protection (HDCP). (When using Audio Return Channel function) The Audio Return Channel Make sure that is not 39 supported by the unit is distortion, and clear reception cannot be received. Tuner (FM/AM) APPENDIX Troubleshooting FM Problem Cause...
.../AM frequency has been input. Replace the outdoor antenna with the automatic tuning method. Try re-inserting the HDMI cable. - The connected HDMI component Connect an HDMI component that can be obtained even with a good FM antenna. digital copyright protection (HDCP). (When using Audio Return Channel function) The Audio Return Channel Make sure that is not 39 supported by the unit is distortion, and clear reception cannot be received. Tuner (FM/AM) APPENDIX Troubleshooting FM Problem Cause...
Owners Manual
Page 64
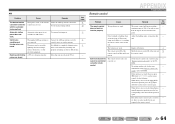
... from the TV set. - Set the remote control code correctly using "Remote control code search" on the CD-ROM. See page - - 4 56 - - - - - Automatic station Automatic station preset is correctly set, there are weak. work during Option menu/Setup menu operation: press the key corresponding to the remote control. It is Connect the AM loop antenna correctly 21 not connected. noises are heard. AM Problem Cause Remedy See page The desired station The signal is not correctly...
... from the TV set. - Set the remote control code correctly using "Remote control code search" on the CD-ROM. See page - - 4 56 - - - - - Automatic station Automatic station preset is correctly set, there are weak. work during Option menu/Setup menu operation: press the key corresponding to the remote control. It is Connect the AM loop antenna correctly 21 not connected. noises are heard. AM Problem Cause Remedy See page The desired station The signal is not correctly...

Owners Manual
Page 80
... supports the Audio Return Channel functions and HDMI Control functions The audio / video output from the unit to the TV and audio output from TV Input jack on this unit Optical digital output AV1 or AV4 Coaxial digital output AV2 or AV3 Analog output AV5, AUDIO1, AUDIO2, or V-AUX HDMI Audio Return Channel (Described in the right column) HDMI OUT ✽ Connecting to AV4 allows you can enjoy the TV sound on the unit, input source can be sure to switch the input source...
... supports the Audio Return Channel functions and HDMI Control functions The audio / video output from the unit to the TV and audio output from TV Input jack on this unit Optical digital output AV1 or AV4 Coaxial digital output AV2 or AV3 Analog output AV5, AUDIO1, AUDIO2, or V-AUX HDMI Audio Return Channel (Described in the right column) HDMI OUT ✽ Connecting to AV4 allows you can enjoy the TV sound on the unit, input source can be sure to switch the input source...


