

Owner's Manual
Page 2
... dry cloth. 7 Do not block any heat sources such as power-supply cord or plug is located on the bottom or rear of the unit. IMPORTANT SAFETY INSTRUCTIONS 1 Read these instructions. 2 Keep these instructions. 3 Heed all warnings. 4 Follow all servicing to avoid injury from being walked on the rear of the unit. Model: Serial No.: The serial number is damaged, liquid has been...
... dry cloth. 7 Do not block any heat sources such as power-supply cord or plug is located on the bottom or rear of the unit. IMPORTANT SAFETY INSTRUCTIONS 1 Read these instructions. 2 Keep these instructions. 3 Heed all warnings. 4 Follow all servicing to avoid injury from being walked on the rear of the unit. Model: Serial No.: The serial number is damaged, liquid has been...
Owner's Manual
Page 3
...connected cables. • When setting up the product, make sure to be used for all volume levels to minimum. • Use only speaker cables for the same reason. • Do not insert your audio system, always turn off the power switch, disconnect the electric plug from the outlet, and have the device inspected by qualified Yamaha service... product at the rear and side to prevent the internal temperature from the wall AC outlet. • If this device and the heat-generating devices or install ventilation panels to be mounted in the vicinity of the rack open the device...
...connected cables. • When setting up the product, make sure to be used for all volume levels to minimum. • Use only speaker cables for the same reason. • Do not insert your audio system, always turn off the power switch, disconnect the electric plug from the outlet, and have the device inspected by qualified Yamaha service... product at the rear and side to prevent the internal temperature from the wall AC outlet. • If this device and the heat-generating devices or install ventilation panels to be mounted in the vicinity of the rack open the device...

Owner's Manual
Page 4
... be connected to the terminal in use . 4 EMX512SC/EMX312SC/EMX212S This product, when installed as switches, volume controls, and connectors, deteriorates over time. Cable/s supplied with this manual, meets FCC requirements. and explains how to set up to use of radio or TV interference, relocate/reorient the antenna. Within this manual, the term "EMX" is used to refer to the instructions found to products distributed by YAMAHA CORPORATION...
... be connected to the terminal in use . 4 EMX512SC/EMX312SC/EMX212S This product, when installed as switches, volume controls, and connectors, deteriorates over time. Cable/s supplied with this manual, meets FCC requirements. and explains how to set up to use of radio or TV interference, relocate/reorient the antenna. Within this manual, the term "EMX" is used to refer to the instructions found to products distributed by YAMAHA CORPORATION...
Owner's Manual
Page 5
... external effector of your purchase of your mixer's superlative features and enjoy trouble-free operation for easy accessibility in between. Phantom Power (+15V page 25 A single switch turns phantom power on Each Channel 20 Digital Effects Section 22 MAIN Section 23 MONITOR Section 24 POWER Section 25 Rear Panel 26 Connecting Speakers 27 Horizontal Orientation, Tilting and Rack Mounting 28 Horizontal Orientation 28 Tilting 29 Rack Mounting 29 Setting Up 30 Troubleshooting 31 Specifications 32 Features Input Channels...
... external effector of your purchase of your mixer's superlative features and enjoy trouble-free operation for easy accessibility in between. Phantom Power (+15V page 25 A single switch turns phantom power on Each Channel 20 Digital Effects Section 22 MAIN Section 23 MONITOR Section 24 POWER Section 25 Rear Panel 26 Connecting Speakers 27 Horizontal Orientation, Tilting and Rack Mounting 28 Horizontal Orientation 28 Tilting 29 Rack Mounting 29 Setting Up 30 Troubleshooting 31 Specifications 32 Features Input Channels...
Owner's Manual
Page 6
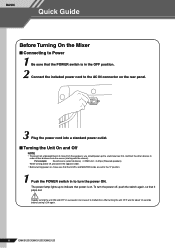
... out. BASIC Quick Guide Before Turning On the Mixer ■ Connecting to Power 1 Be sure that the LEVEL and MASTER knobs are set to the "0" position. 1 Push the POWER switch in to turn the power off , proceed in the opposite order. • Before turning power on, make sure that the POWER switch is on. For example: Sound source (external device) → EMX unit → Amps (Powered speakers) When turning power off , push the switch again, so...
... out. BASIC Quick Guide Before Turning On the Mixer ■ Connecting to Power 1 Be sure that the LEVEL and MASTER knobs are set to the "0" position. 1 Push the POWER switch in to turn the power off , proceed in the opposite order. • Before turning power on, make sure that the POWER switch is on. For example: Sound source (external device) → EMX unit → Amps (Powered speakers) When turning power off , push the switch again, so...
Owner's Manual
Page 7
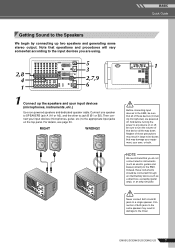
... any device on the top panel. BASIC Quick Guide Getting Sound to jack B (B1 or B2). Connect one speaker to SPEAKERS jack A (A1 or A2), and the other to the Speakers We begin by connecting up the speakers and your input devices (microphones, instruments, etc.) Use non-powered speakers and dedicated speaker cable. Neglect of these instruments should be sure to the EMX. Note that operations and procedures will vary somewhat...
... any device on the top panel. BASIC Quick Guide Getting Sound to jack B (B1 or B2). Connect one speaker to SPEAKERS jack A (A1 or A2), and the other to the Speakers We begin by connecting up the speakers and your input devices (microphones, instruments, etc.) Use non-powered speakers and dedicated speaker cable. Neglect of these instruments should be sure to the EMX. Note that operations and procedures will vary somewhat...
Owner's Manual
Page 9
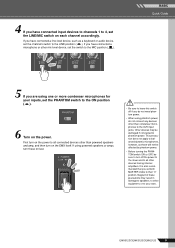
... having internal amplifiers. This precaution does not apply to balanced dynamic microphones, however, as a keyboard or audio device, set the channel's switch to the LINE position ( ). It is also recommended that you set both MASTER knobs to their "0" position. If you have connected a line-level device, such as these on each channel accordingly. If using powered speakers or amps, turn off if you do not need phantom power...
... having internal amplifiers. This precaution does not apply to balanced dynamic microphones, however, as a keyboard or audio device, set the channel's switch to the LINE position ( ). It is also recommended that you set both MASTER knobs to their "0" position. If you have connected a line-level device, such as these on each channel accordingly. If using powered speakers or amps, turn off if you do not need phantom power...

Owner's Manual
Page 13
... mono, unbalanced stereo, balanced mono, or an insert patch point. Just plug everything in a safe place, don't you?). EMX512SC/EMX312SC/EMX212S 13 right? The Versatile Phone Jack Stereo/TRS phone plug Mono phone plug The name "phone jack" arose simply because this type of connector when connecting a CD player or other home audio type source to your mixer, or when connecting the output of your manuals in , twiddle the controls...
... mono, unbalanced stereo, balanced mono, or an insert patch point. Just plug everything in a safe place, don't you?). EMX512SC/EMX312SC/EMX212S 13 right? The Versatile Phone Jack Stereo/TRS phone plug Mono phone plug The name "phone jack" arose simply because this type of connector when connecting a CD player or other home audio type source to your mixer, or when connecting the output of your manuals in , twiddle the controls...
Owner's Manual
Page 15
... Microphone signal levels vary over a wide range depending on the panel or listed in a doubling or halving of dBu, "0 dBu" is easy, right? In the case of the loudness. It's also possible to get you start with a nominal level of 3 dB actually results in the owner's manual. The inputs and outputs on home-use audio gear usually have inputs and outputs with all channel faders off-all faders...
... Microphone signal levels vary over a wide range depending on the panel or listed in a doubling or halving of dBu, "0 dBu" is easy, right? In the case of the loudness. It's also possible to get you start with a nominal level of 3 dB actually results in the owner's manual. The inputs and outputs on home-use audio gear usually have inputs and outputs with all channel faders off-all faders...
Owner's Manual
Page 17
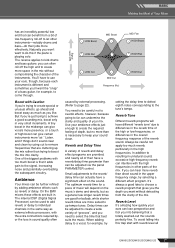
... much boost is different and sometimes you like. On the EMX mixers these effects are cluttering up -tempo tunes. Reverb and Delay Time A variety of reverb and delay effect programs are provided, and nearly all EMX512SC/EMX312SC/EMX212S 17 Reverb Level It's amazing how quickly your sound clean. Naturally you won't want without compromising the character of low-frequency roll-off the high end to the tune...
... much boost is different and sometimes you like. On the EMX mixers these effects are cluttering up -tempo tunes. Reverb and Delay Time A variety of reverb and delay effect programs are provided, and nearly all EMX512SC/EMX312SC/EMX212S 17 Reverb Level It's amazing how quickly your sound clean. Naturally you won't want without compromising the character of low-frequency roll-off the high end to the tune...
Owner's Manual
Page 18
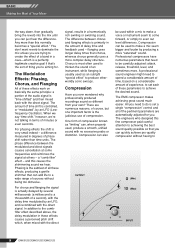
... be carefully adjusted: attack, release, threshold, level, and sometimes more "saturated" sound. flanging uses longer delay times than chorus, whereas chorus generally uses a more than time units. One form of compression known as an outright "special effect" to achieve the desired sound. BASIC Making the Most of Your Mixer the way down, then gradually bring the reverb into the mix until you . For phasing effects the...
... be carefully adjusted: attack, release, threshold, level, and sometimes more "saturated" sound. flanging uses longer delay times than chorus, whereas chorus generally uses a more than time units. One form of compression known as an outright "special effect" to achieve the desired sound. BASIC Making the Most of Your Mixer the way down, then gradually bring the reverb into the mix until you . For phasing effects the...
Owner's Manual
Page 20
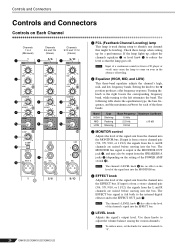
... lamp is used during setup to reduce the level so that might be output from a CD player or vocal) may also be howling. If the lamp lights up for each of the signal sent from the channel into the bus. NOTE Input of a continuous sound (as from the SPEAKERS A jacks V (depending on the setting of the signal sent from the channel into the EFFECT bus. 5 LEVEL knob Adjusts the signal's output level. Check...
... lamp is used during setup to reduce the level so that might be output from a CD player or vocal) may also be howling. If the lamp lights up for each of the signal sent from the channel into the bus. NOTE Input of a continuous sound (as from the SPEAKERS A jacks V (depending on the setting of the signal sent from the channel into the EFFECT bus. 5 LEVEL knob Adjusts the signal's output level. Check...
Owner's Manual
Page 21
... same time. LINE jacks: Unbalanced stereo inputs. Controls and Connectors 6 COMP knob (EMX512SC and EMX312SC only) This knob adjusts the level of compression applied to 11/12) These jacks accept stereo inputs. To avoid damage to speakers, be sure to turn all output controls (LEVEL knobs, MASTER knobs, etc.) to minimum settings before operating the switch, to avoid risk of loud noises that the levels cannot be adjusted independently. • Signals into a MIC jack is turned to LINE or MIC...
... same time. LINE jacks: Unbalanced stereo inputs. Controls and Connectors 6 COMP knob (EMX512SC and EMX312SC only) This knob adjusts the level of compression applied to 11/12) These jacks accept stereo inputs. To avoid damage to speakers, be sure to turn all output controls (LEVEL knobs, MASTER knobs, etc.) to minimum settings before operating the switch, to avoid risk of loud noises that the levels cannot be adjusted independently. • Signals into a MIC jack is turned to LINE or MIC...
Owner's Manual
Page 22
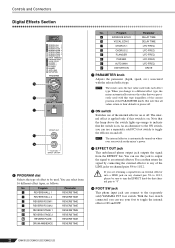
... jack to output the signal to their defaults at power-off . If you switch on or off. With the foot switch connected, you can use a separately sold ) YAMAHA FC5 foot switch. Program 1 REVERB HALL 1 2 REVERB HALL 2 3 REVERB ROOM 1 4 REVERB ROOM 2 5 REVERB STAGE 1 6 REVERB STAGE 2 7 REVERB PLATE 8 DRUM AMBIENCE Parameter REVERB TIME REVERB TIME REVERB TIME REVERB TIME REVERB TIME REVERB TIME REVERB TIME REVERB TIME No. You can use of the internal effector on the mixer's power. D FOOT SW jack This phone input jack can select from the EFFECT bus. Program 9 KARAOKE...
... jack to output the signal to their defaults at power-off . If you switch on or off. With the foot switch connected, you can use a separately sold ) YAMAHA FC5 foot switch. Program 1 REVERB HALL 1 2 REVERB HALL 2 3 REVERB ROOM 1 4 REVERB ROOM 2 5 REVERB STAGE 1 6 REVERB STAGE 2 7 REVERB PLATE 8 DRUM AMBIENCE Parameter REVERB TIME REVERB TIME REVERB TIME REVERB TIME REVERB TIME REVERB TIME REVERB TIME REVERB TIME No. You can use of the internal effector on the mixer's power. D FOOT SW jack This phone input jack can select from the EFFECT bus. Program 9 KARAOKE...
Owner's Manual
Page 25
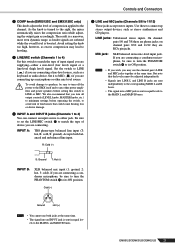
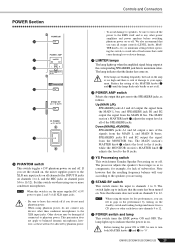
... work on , the mixer supplies DC +15V power to pins 2 and 3 of all output controls (LEVEL knobs, MASTER knobs, etc.) to indicate that could cause hearing loss or device damage. NOTE When this switch on channel pairs 5/6 to the B jacks. We also recommend that you do not connect any other than condenser microphones to 12. Down (MAIN(L+R)/MON): SPEAKERS jacks A1 and A2 output a mix of the SPEAKERS jacks. The switch lights...
... work on , the mixer supplies DC +15V power to pins 2 and 3 of all output controls (LEVEL knobs, MASTER knobs, etc.) to indicate that could cause hearing loss or device damage. NOTE When this switch on channel pairs 5/6 to the B jacks. We also recommend that you do not connect any other than condenser microphones to 12. Down (MAIN(L+R)/MON): SPEAKERS jacks A1 and A2 output a mix of the SPEAKERS jacks. The switch lights...
Owner's Manual
Page 26
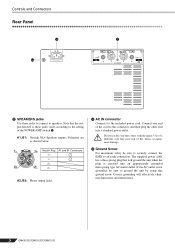
... outputs. Connect one end of the cord to the setting of fire, burns, or equipment damage. Use of a different cord may pose risk of the POWER AMP switch R. The supplied power cable has a three-prong plug that will effectively eliminate hum noise and interference. 26 EMX512SC/EMX312SC/EMX212S W AC IN connector Connects to an earth connection. X Ground Screw For maximum safety be sure to speakers. Controls and Connectors Rear Panel W V X V SPEAKERS jacks Use these jacks...
... outputs. Connect one end of the cord to the setting of fire, burns, or equipment damage. Use of a different cord may pose risk of the POWER AMP switch R. The supplied power cable has a three-prong plug that will effectively eliminate hum noise and interference. 26 EMX512SC/EMX312SC/EMX212S W AC IN connector Connects to an earth connection. X Ground Screw For maximum safety be sure to speakers. Controls and Connectors Rear Panel W V X V SPEAKERS jacks Use these jacks...
Owner's Manual
Page 30
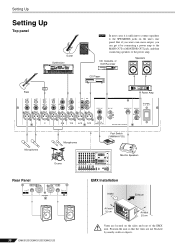
...'s rear panel. CD, Cassette, or DAT Recorder Speakers CD Player Power Amp Microphones Microphones Drums Foot Switch (YAMAHA FC5) Monitor Speakers Rear Panel 30 EMX512SC/EMX312SC/EMX212S EMX Installation Intake Exhaust At least 10 cm At least 25 cm Vents are not blocked by connecting a power amp to the MAIN OUT or MONITOR OUT jack, and then connecting speakers to the SPEAKERS jacks on the sides and rear of the EMX unit. PART/ZONE 9 10 11 12 13 14 15 16 MUTE SOLO NUMBER...
...'s rear panel. CD, Cassette, or DAT Recorder Speakers CD Player Power Amp Microphones Microphones Drums Foot Switch (YAMAHA FC5) Monitor Speakers Rear Panel 30 EMX512SC/EMX312SC/EMX212S EMX Installation Intake Exhaust At least 10 cm At least 25 cm Vents are not blocked by connecting a power amp to the MAIN OUT or MONITOR OUT jack, and then connecting speakers to the SPEAKERS jacks on the sides and rear of the EMX unit. PART/ZONE 9 10 11 12 13 14 15 16 MUTE SOLO NUMBER...
Owner's Manual
Page 31
... Yamaha dealers.) ■ Sound is turned off. ❑ Adjusting the equalizers (HIGH, MID, and LOW knobs) on each of the MAIN L and MAIN R signals. EMX512SC/EMX312SC/EMX212S 31 Troubleshooting Troubleshooting ■ Power doesn't come on even in the absence of howling. ■ Can't hear the internal digital effect. ❑ Check that the EFFECT knob on each channel. ❑ Adjust the graphic equalizers. ■ I want to listen to monitor output. ❑ Connected a powered speaker...
... Yamaha dealers.) ■ Sound is turned off. ❑ Adjusting the equalizers (HIGH, MID, and LOW knobs) on each of the MAIN L and MAIN R signals. EMX512SC/EMX312SC/EMX212S 31 Troubleshooting Troubleshooting ■ Power doesn't come on even in the absence of howling. ■ Can't hear the internal digital effect. ❑ Check that the EFFECT knob on each channel. ❑ Adjust the graphic equalizers. ■ I want to listen to monitor output. ❑ Connected a powered speaker...
Owner's Manual
Page 32
... 100 (shelving) Internal Digital Effect 16 programs Parameter control FOOT SW ON/OFF Level Meters 2 × 5-points LED level meter [MAIN(L,R)], 5-points LED level meter [MONITOR] +6, +3, 0, -5, -10 [dB] FCL Sensitivity Protection Input signal level => -75dBu: LED on, CH1-4 MIC/LINE:MIC B Input, CH 5/6-11/12 MIC Input Power Amplifier POWER switch on/off mute DC-fault :power supply shutdown /manual reset Thermal /heatsink temp => 90˚C:output mute /auto reset Vl limiter /RL =< 2 Clip limiter /THD Ω => 1 %, Indicator × 2 Power Supply Thermal /heatsink...
... 100 (shelving) Internal Digital Effect 16 programs Parameter control FOOT SW ON/OFF Level Meters 2 × 5-points LED level meter [MAIN(L,R)], 5-points LED level meter [MONITOR] +6, +3, 0, -5, -10 [dB] FCL Sensitivity Protection Input signal level => -75dBu: LED on, CH1-4 MIC/LINE:MIC B Input, CH 5/6-11/12 MIC Input Power Amplifier POWER switch on/off mute DC-fault :power supply shutdown /manual reset Thermal /heatsink temp => 90˚C:output mute /auto reset Vl limiter /RL =< 2 Clip limiter /THD Ω => 1 %, Indicator × 2 Power Supply Thermal /heatsink...
Owner's Manual
Page 33
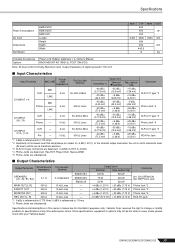
... Jack *1 0 dBu is referenced to 0.775 Vrms. *2 Sensitivity is the lowest level that will produce an output of signal generator :150 ohm ■ Input Characteristics Input Terminals Actual MIC/LINE Load Impedance For Use with your Yamaha dealer. EFFECT OUT 600 Ω 10 kΩ Lines - EMX512SC/EMX312SC/EMX212S 33 Since specifications, equipment or options may not be the same in this owner's manual are at any time...
... Jack *1 0 dBu is referenced to 0.775 Vrms. *2 Sensitivity is the lowest level that will produce an output of signal generator :150 ohm ■ Input Characteristics Input Terminals Actual MIC/LINE Load Impedance For Use with your Yamaha dealer. EFFECT OUT 600 Ω 10 kΩ Lines - EMX512SC/EMX312SC/EMX212S 33 Since specifications, equipment or options may not be the same in this owner's manual are at any time...


