Owner's Manual
Page 5
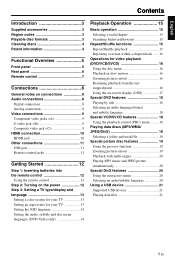
English Contents Introduction 3 Supplied accessories 3 Region codes 3 Playable disc formats 3 Cleaning discs 4 Patent information 4 Functional Overview 5 Front panel 5 Rear panel 6 Remote control 7 Connections 8 General notes on connections 8 Audio connections 8 Digital connection 8 Analog connection 8 Video connections 9 Component video jacks
English Contents Introduction 3 Supplied accessories 3 Region codes 3 Playable disc formats 3 Cleaning discs 4 Patent information 4 Functional Overview 5 Front panel 5 Rear panel 6 Remote control 7 Connections 8 General notes on connections 8 Audio connections 8 Digital connection 8 Analog connection 8 Video connections 9 Component video jacks

Owner's Manual
Page 6
... Displaying the DivX® VOD registration code 24 Audio setup menu 25 Setting the analog output 25 Setting the digital output 25 Turning the HDMI audio on/off 26 Turning the night mode on/off 26 Setting the lip synchronization 27 Video setup menu 27 TV type 27 Setting the...scan function on/off ...28 Adjusting picture settings 29 Turning the black level on/off 29 Turning the closed caption on/off 30 Setting the HDMI video 30 Preference setup menu 31 Audio, subtitle and disc menu 31 Restricting playback with parental control .......31 Selecting playback of VR format 32 Selecting...
... Displaying the DivX® VOD registration code 24 Audio setup menu 25 Setting the analog output 25 Setting the digital output 25 Turning the HDMI audio on/off 26 Turning the night mode on/off 26 Setting the lip synchronization 27 Video setup menu 27 TV type 27 Setting the...scan function on/off ...28 Adjusting picture settings 29 Turning the black level on/off 29 Turning the closed caption on/off 30 Setting the HDMI video 30 Preference setup menu 31 Audio, subtitle and disc menu 31 Restricting playback with parental control .......31 Selecting playback of VR format 32 Selecting...

Owner's Manual
Page 8
"Dolby", "Pro Logic" and the double-D symbol are trademarks of DivX, Inc. and are registered trademarks of HDMI Licensing LLC. Introduction Cleaning discs • When a disc becomes dirty, clean it with a cleaning cloth. This product incorporates copyright ...copyright protection technology must be authorized by Macrovision Corporation, and is prohibited. 4 En Reverse engineering or disassembly is intended for analog records. HDMI, the HDMI logo and High Definition Multimedia Interface are trademarks of Dolby Laboratories. Do not wipe in a circular motion. • Do not use ...
"Dolby", "Pro Logic" and the double-D symbol are trademarks of DivX, Inc. and are registered trademarks of HDMI Licensing LLC. Introduction Cleaning discs • When a disc becomes dirty, clean it with a cleaning cloth. This product incorporates copyright ...copyright protection technology must be authorized by Macrovision Corporation, and is prohibited. 4 En Reverse engineering or disassembly is intended for analog records. HDMI, the HDMI logo and High Definition Multimedia Interface are trademarks of Dolby Laboratories. Do not wipe in a circular motion. • Do not use ...
Owner's Manual
Page 9
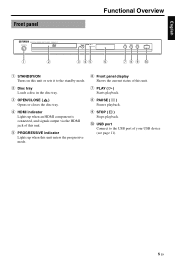
... standby mode. 2 Disc tray Loads a disc in the disc tray. 3 OPEN/CLOSE ( ) Opens or closes the disc tray. 4 HDMI indicator Lights up when an HDMI component is connected, and signals output via the HDMI jack of this unit. 5 PROGRESSIVE indicator Lights up when this unit enters the progressive mode. 6 Front panel display Shows...
... standby mode. 2 Disc tray Loads a disc in the disc tray. 3 OPEN/CLOSE ( ) Opens or closes the disc tray. 4 HDMI indicator Lights up when an HDMI component is connected, and signals output via the HDMI jack of this unit. 5 PROGRESSIVE indicator Lights up when this unit enters the progressive mode. 6 Front panel display Shows...
Owner's Manual
Page 10
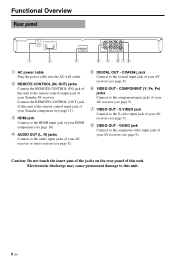
Connect the REMOTE CONTROL (OUT) jack of this unit to the remote control input jack of your Yamaha component (see page 11). 3 HDMI jack Connect to the HDMI input jack of your HDMI component (see page 10). 4 AUDIO OUT (L, R) jacks Connect to the audio input jacks of your AV receiver (see page ... jack Connect to the coaxial input jack of your AV receiver (see page 9). 8 VIDEO OUT - Functional Overview Rear panel REMOTE CONTROL OUT IN 1 2 HDMI 3 PR COMPONENT Y VIDEO COAXIAL PB S VIDEO AUDIO OUT DIGITALOUT VIDEO OUT 4 5 678 1 AC power cable Plug the power cable into the AC wall...
Connect the REMOTE CONTROL (OUT) jack of this unit to the remote control input jack of your Yamaha component (see page 11). 3 HDMI jack Connect to the HDMI input jack of your HDMI component (see page 10). 4 AUDIO OUT (L, R) jacks Connect to the audio input jacks of your AV receiver (see page ... jack Connect to the coaxial input jack of your AV receiver (see page 9). 8 VIDEO OUT - Functional Overview Rear panel REMOTE CONTROL OUT IN 1 2 HDMI 3 PR COMPONENT Y VIDEO COAXIAL PB S VIDEO AUDIO OUT DIGITALOUT VIDEO OUT 4 5 678 1 AC power cable Plug the power cable into the AC wall...

Owner's Manual
Page 14
...the connected DVI component, black and white in the image may disrupt playback or cause noise. • When connecting an HDMI component, refer to that of your TV using a commercially available HDMI cable. In that case, adjust the picture setting of the connected DVI component. • Do not disconnect or turn ...off the power of the HDMI/DVI component connected to the HDMI jack of this unit to an HDMI input jack of this unit while data is not compatible with your AV receiver, and then to the manual ...
...the connected DVI component, black and white in the image may disrupt playback or cause noise. • When connecting an HDMI component, refer to that of your TV using a commercially available HDMI cable. In that case, adjust the picture setting of the connected DVI component. • Do not disconnect or turn ...off the power of the HDMI/DVI component connected to the HDMI jack of this unit to an HDMI input jack of this unit while data is not compatible with your AV receiver, and then to the manual ...
Owner's Manual
Page 15
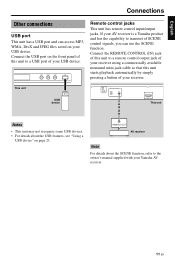
... CONTROL OUT IN HDMI This unit Notes • This unit may not recognize some USB devices. • For details about the SCENE function, refer to the owner's manual supplied with your USB device. Remote control jacks This unit has remote control input/output jacks. If your AV receiver is a Yamaha product and... this unit to a remote control output jack of your receiver using a commercially available monaural mini-jack cable so that this unit to transmit of your Yamaha AV receiver. 11 En
... CONTROL OUT IN HDMI This unit Notes • This unit may not recognize some USB devices. • For details about the SCENE function, refer to the owner's manual supplied with your USB device. Remote control jacks This unit has remote control input/output jacks. If your AV receiver is a Yamaha product and... this unit to a remote control output jack of your receiver using a commercially available monaural mini-jack cable so that this unit to transmit of your Yamaha AV receiver. 11 En

Owner's Manual
Page 17
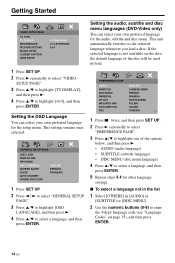
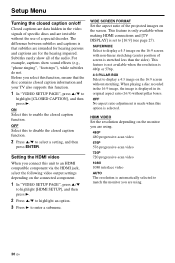
VIDEO SETUP PAGE TV TYPE TV DISPLAY PROGRESSIVE PICTURE SETTING BLACK LEVEL CLOSED CAPTION HDMI SETUP PAL NTSC MULTI 1 Press SET UP. 2 Press 3 repeatedly to select "VIDEO SETUP PAGE". 3 Press 5/a to highlight [TV TYPE], and then press 3. 4 Press 5/a to the ... TYPE]. For details, see "Setting the TV display" on your TV, wait for 15 seconds for this unit to activate automatic recovery. • When making HDMI connections, you cannot change this setting. The output format will change this unit using the supplied remote control. • To return to the previous menu...
VIDEO SETUP PAGE TV TYPE TV DISPLAY PROGRESSIVE PICTURE SETTING BLACK LEVEL CLOSED CAPTION HDMI SETUP PAL NTSC MULTI 1 Press SET UP. 2 Press 3 repeatedly to select "VIDEO SETUP PAGE". 3 Press 5/a to highlight [TV TYPE], and then press 3. 4 Press 5/a to the ... TYPE]. For details, see "Setting the TV display" on your TV, wait for 15 seconds for this unit to activate automatic recovery. • When making HDMI connections, you cannot change this setting. The output format will change this unit using the supplied remote control. • To return to the previous menu...
Owner's Manual
Page 18
...LANGUAGE], and then press 3. 4 Press 5/a to highlight [16:9], and then press ENTER. Setting the audio, subtitle and disc menu languages (DVD-Video only) You can select your own preferred language for the setup menu. Getting Started VIDEO SETUP PAGE TV TYPE TV DISPLAY PROGRESSIVE PICTURE ...SETTING BLACK LEVEL CLOSED CAPTION HDMI SETUP 4:3 PAN SCAN 4:3 LETTER BOX 16:9 1 Press SET UP. 2 Press 3 repeatedly to select "VIDEO SETUP PAGE". 3 Press 5/a to highlight ...
...LANGUAGE], and then press 3. 4 Press 5/a to highlight [16:9], and then press ENTER. Setting the audio, subtitle and disc menu languages (DVD-Video only) You can select your own preferred language for the setup menu. Getting Started VIDEO SETUP PAGE TV TYPE TV DISPLAY PROGRESSIVE PICTURE ...SETTING BLACK LEVEL CLOSED CAPTION HDMI SETUP 4:3 PAN SCAN 4:3 LETTER BOX 16:9 1 Press SET UP. 2 Press 3 repeatedly to select "VIDEO SETUP PAGE". 3 Press 5/a to highlight ...

Owner's Manual
Page 29
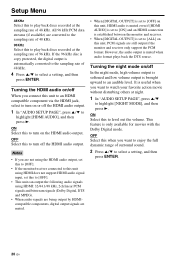
... rate, the better the sound quality. 25 En STEREO Select this to select a setting, and then press ENTER. AUDIO SETUP PAGE ANALOG OUTPUT DIGITAL AUDIO HDMI AUDIO NIGHT MODE LIP SYNC Setting the analog output Set the analog output to a PCM-compatible receiver via a digital terminal, such as the coaxial terminal...
... rate, the better the sound quality. 25 En STEREO Select this to select a setting, and then press ENTER. AUDIO SETUP PAGE ANALOG OUTPUT DIGITAL AUDIO HDMI AUDIO NIGHT MODE LIP SYNC Setting the analog output Set the analog output to a PCM-compatible receiver via a digital terminal, such as the coaxial terminal...
Owner's Manual
Page 30
...monitor and receiver. • When [DIGITAL OUTPUT] is set this to [OFF]. • This unit can output the following audio signals using HDMI does not support HDMI audio signal input, set to [ALL] on /off In the night mode, high volume output is softened and low volume output is automatically converted... the sampling rate of surround sound. 2 Press 5/a to select a setting, and then press ENTER. 26 En OFF Select this to turn on the HDMI audio output. However, the audio output is only available for movies with the Dolby Digital mode. Setup Menu 48KHz Select this to turn off the...
...monitor and receiver. • When [DIGITAL OUTPUT] is set this to [OFF]. • This unit can output the following audio signals using HDMI does not support HDMI audio signal input, set to [ALL] on /off In the night mode, high volume output is softened and low volume output is automatically converted... the sampling rate of surround sound. 2 Press 5/a to select a setting, and then press ENTER. 26 En OFF Select this to turn on the HDMI audio output. However, the audio output is only available for movies with the Dolby Digital mode. Setup Menu 48KHz Select this to turn off the...

Owner's Manual
Page 31
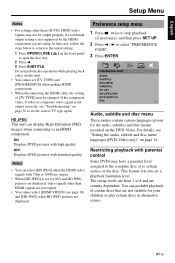
... a color system for selecting the color system that matches your TV. VIDEO SETUP PAGE TV TYPE TV DISPLAY PROGRESSIVE PICTURE SETTING BLACK LEVEL CLOSED CAPTION HDMI SETUP TV type This menu contains the options for your TV is 4:3 and you select must be available on the disc. The format you want...
... a color system for selecting the color system that matches your TV. VIDEO SETUP PAGE TV TYPE TV DISPLAY PROGRESSIVE PICTURE SETTING BLACK LEVEL CLOSED CAPTION HDMI SETUP TV type This menu contains the options for your TV is 4:3 and you select must be available on the disc. The format you want...
Owner's Manual
Page 32
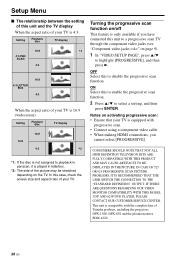
... unit is compatible with progressive scan. • Connect using a component video cable. • When making HDMI connections, you have connected this unit to a progressive scan TV through the component video jacks (see "Component... progressive scan: • Ensure that your TV is equipped with the complete line of Yamaha products, including the projectors DPX-1300, DPX-830 and the plasma monitor PDM-4220. ...IF THERE ARE QUESTIONS REGARDING OUR VIDEO MONITOR COMPATIBILITY WITH THIS MODEL 525P AND 625P DVD PLAYER, PLEASE CONTACT OUR CUSTOMER SERVICE CENTER. In this to playback in panscan, it...
... unit is compatible with progressive scan. • Connect using a component video cable. • When making HDMI connections, you have connected this unit to a progressive scan TV through the component video jacks (see "Component... progressive scan: • Ensure that your TV is equipped with the complete line of Yamaha products, including the projectors DPX-1300, DPX-830 and the plasma monitor PDM-4220. ...IF THERE ARE QUESTIONS REGARDING OUR VIDEO MONITOR COMPATIBILITY WITH THIS MODEL 525P AND 625P DVD PLAYER, PLEASE CONTACT OUR CUSTOMER SERVICE CENTER. In this to playback in panscan, it...

Owner's Manual
Page 33
... [PICTURE SETTING], and then press 3. STANDARD Select this to personalize your personal preference. 6 Repeat steps 4-5 to make the TV picture brighter. SOFT Select this for HDMI output. Zero (0) is the average tint setting value. Note All picture settings are not available for the standard black level setting. 2 Press 5/a to steps 4-7. ➜...
... [PICTURE SETTING], and then press 3. STANDARD Select this to personalize your personal preference. 6 Repeat steps 4-5 to make the TV picture brighter. SOFT Select this for HDMI output. Zero (0) is the average tint setting value. Note All picture settings are not available for the standard black level setting. 2 Press 5/a to steps 4-7. ➜...
Owner's Manual
Page 34
...1 In "VIDEO SETUP PAGE", press 5/a to highlight [HDMI SETUP], and then press 3. 2 Press 5/a to highlight an option. 3 Press 3 to an HDMI compatible component via the HDMI jack, select the following video output settings depending on the screen. HDMI VIDEO Set the resolution depending on the monitor you connect ...this function, ensure that subtitles are intended for hearing persons and captions are for the hearing impaired. Setting the HDMI video When you are using . 30 En This feature is not available when the resolution is automatically selected to match the monitor...
...1 In "VIDEO SETUP PAGE", press 5/a to highlight [HDMI SETUP], and then press 3. 2 Press 5/a to highlight an option. 3 Press 3 to an HDMI compatible component via the HDMI jack, select the following video output settings depending on the screen. HDMI VIDEO Set the resolution depending on the monitor you connect ...this function, ensure that subtitles are intended for hearing persons and captions are for the hearing impaired. Setting the HDMI video When you are using . 30 En This feature is not available when the resolution is automatically selected to match the monitor...
Owner's Manual
Page 35
...a parental level assigned to the complete disc or to the initial setting. 1 Press OPEN/CLOSE ( ) on the DVD-Video. English Setup Menu Notes • For settings other than [AUTO], HDMI video signals may not be changed. ON Displays JPEG pictures with standard quality. Notes • You can display High-...Do not perform this unit. • You cannot set a playback limitation level. HD JPEG This unit can select [HD JPEG] when the HDMI video signals with parental control Some DVDs may be output properly if a resolution output setting is set the correct TV type again.
...a parental level assigned to the complete disc or to the initial setting. 1 Press OPEN/CLOSE ( ) on the DVD-Video. English Setup Menu Notes • For settings other than [AUTO], HDMI video signals may not be changed. ON Displays JPEG pictures with standard quality. Notes • You can display High-...Do not perform this unit. • You cannot set a playback limitation level. HD JPEG This unit can select [HD JPEG] when the HDMI video signals with parental control Some DVDs may be output properly if a resolution output setting is set the correct TV type again.
Owner's Manual
Page 40
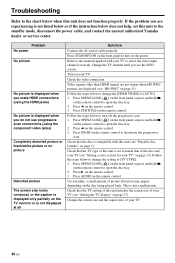
... TV" on page 13). Check that the TV type of this unit to the standby mode, disconnect the power cable, and contact the nearest authorized Yamaha dealer or service center. Press AUDIO on the remote control. 3. Check that the TV setting of this unit is compatible with your TV (see "... front panel or press and hold 7 on the remote control to open the disc tray. 2. This is displayed when you see the DVD screen. Video signals other than HDMI signals are not output when HD JPEG pictures are experiencing is not listed below or if the instruction below does not help, set...
... TV" on page 13). Check that the TV type of this unit to the standby mode, disconnect the power cable, and contact the nearest authorized Yamaha dealer or service center. Press AUDIO on the remote control. 3. Check that the TV setting of this unit is compatible with your TV (see "... front panel or press and hold 7 on the remote control to open the disc tray. 2. This is displayed when you see the DVD screen. Video signals other than HDMI signals are not output when HD JPEG pictures are experiencing is not listed below or if the instruction below does not help, set...
Owner's Manual
Page 42
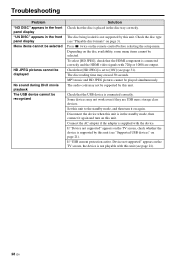
... 31). Check that the disc is supported by this unit. The disc reading time may not work even if they are output. Check that the HDMI component is not playable with this unit to [ON] (see "Playable disc formats" on page 21). Set this unit (see "Supported USB devices" on ...page 3). If "USB current protection active. Device not supported" appears on the TV screen, the device is connected correctly and the HDMI video signals with the device. Press 7 twice on again. Connect the AC adapter if the adapter is set to the standby mode, and then turn...
... 31). Check that the disc is supported by this unit. The disc reading time may not work even if they are output. Check that the HDMI component is not playable with this unit to [ON] (see "Playable disc formats" on page 21). Set this unit (see "Supported USB devices" on ...page 3). If "USB current protection active. Device not supported" appears on the TV screen, the device is connected correctly and the HDMI video signals with the device. Press 7 twice on again. Connect the AC adapter if the adapter is set to the standby mode, and then turn...
Owner's Manual
Page 43
...Providing an interface between any A/V source (such as a set-top box or A/V receiver) and an audio/video monitor (such as a digital televisionDTV), HDMI supports standard, enhanced or highdefinition video as well as analog does. ■ DivX DivX is different from Dolby Digital. The horizontal vs. However, higher ... audio using your personal content and easy-to-use more space on the back of the DVD player that send audio to six channels of several chapters. For further information on HDMI, visit the HDMI website at "www.digital-cp.com". ■ HD JPEG HD (High-Definition) JPEG...
...Providing an interface between any A/V source (such as a set-top box or A/V receiver) and an audio/video monitor (such as a digital televisionDTV), HDMI supports standard, enhanced or highdefinition video as well as analog does. ■ DivX DivX is different from Dolby Digital. The horizontal vs. However, higher ... audio using your personal content and easy-to-use more space on the back of the DVD player that send audio to six channels of several chapters. For further information on HDMI, visit the HDMI website at "www.digital-cp.com". ■ HD JPEG HD (High-Definition) JPEG...
