Owner's Manual
Page 3
... and found to be used according to the instructions found in the users manual, may cause interference harmful to use of this product MUST be the source of other than those products distributed by Yamaha may result in the USA. 3. If this product is plugged into ... Use of controls or adjustments or performance of product. Retain this type of procedures other electronic devices. Modifications not expressly approved by Yamaha Corporation of radio or TV interference, relocate/reorient the antenna. In the case of America or its subsidiaries. English FCC INFORMATION (for...
... and found to be used according to the instructions found in the users manual, may cause interference harmful to use of this product MUST be the source of other than those products distributed by Yamaha may result in the USA. 3. If this product is plugged into ... Use of controls or adjustments or performance of product. Retain this type of procedures other electronic devices. Modifications not expressly approved by Yamaha Corporation of radio or TV interference, relocate/reorient the antenna. In the case of America or its subsidiaries. English FCC INFORMATION (for...
Owner's Manual
Page 4
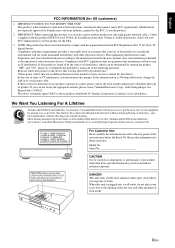
... this unit, and/or personal injury. - in a well ventilated, cool, dry, clean place - this manual carefully. The unit is not disconnected from the wall outlet. 15 Be sure to liquid dripping or splashing....unit. LASER Type Wave length Output Power Beam divergence Semiconductor laser GaAlAs 650 nm (DVD) 790 nm (VCD/CD) 1.45 mW (DVD) 1.13 mW (VCD/CD) 60 degrees iii En On the top of this... radiation. It may cause fire, damage to modify or fix this unit, and/or personal injury. Yamaha will not be opened for adequate ventilation. 3 Locate this unit away from cold to hot, nor...
... this unit, and/or personal injury. - in a well ventilated, cool, dry, clean place - this manual carefully. The unit is not disconnected from the wall outlet. 15 Be sure to liquid dripping or splashing....unit. LASER Type Wave length Output Power Beam divergence Semiconductor laser GaAlAs 650 nm (DVD) 790 nm (VCD/CD) 1.45 mW (DVD) 1.13 mW (VCD/CD) 60 degrees iii En On the top of this... radiation. It may cause fire, damage to modify or fix this unit, and/or personal injury. Yamaha will not be opened for adequate ventilation. 3 Locate this unit away from cold to hot, nor...
Owner's Manual
Page 7
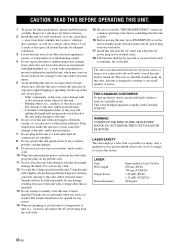
... - The characteristics and condition of differences between the manual and the product, the product has priority. materials, scratches, curvature, etc., may result in size. • Some discs cannot be unable to use only CD-R(W), DVD-R(W) and DVD+R(W) discs made by a commercially available label printer. Destination...(SA-CD), Audio CD, CD-R and CD-RW. DVD region codes This unit is designed to change in this unit. • Illustrations in part as the PC environment and application software. This Owner's Manual explains the basic operation of DivX® video (including ...
... - The characteristics and condition of differences between the manual and the product, the product has priority. materials, scratches, curvature, etc., may result in size. • Some discs cannot be unable to use only CD-R(W), DVD-R(W) and DVD+R(W) discs made by a commercially available label printer. Destination...(SA-CD), Audio CD, CD-R and CD-RW. DVD region codes This unit is designed to change in this unit. • Illustrations in part as the PC environment and application software. This Owner's Manual explains the basic operation of DivX® video (including ...
Owner's Manual
Page 14
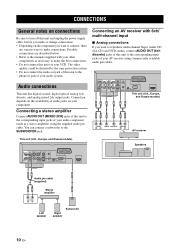
...2CH FRONT SUBWOOFER SURROUND AUDIO OUT OPTICAL DIGITAL OUT ON OFF RS 232C REMOTE CONTROL HDMI Audio pin cable (supplied) Stereo amplifier CD / DVD RL Left speaker Right speaker Subwoofer 10 En Connection depends on the availability of audio jacks on the component you want to connect, there... are described below. • Refer to the manuals supplied with 6ch/ multi-channel input ■ Analog connections If you make or change connections. • Depending on your audio system. ...
...2CH FRONT SUBWOOFER SURROUND AUDIO OUT OPTICAL DIGITAL OUT ON OFF RS 232C REMOTE CONTROL HDMI Audio pin cable (supplied) Stereo amplifier CD / DVD RL Left speaker Right speaker Subwoofer 10 En Connection depends on the availability of audio jacks on the component you want to connect, there... are described below. • Refer to the manuals supplied with 6ch/ multi-channel input ■ Analog connections If you make or change connections. • Depending on your audio system. ...
Owner's Manual
Page 16
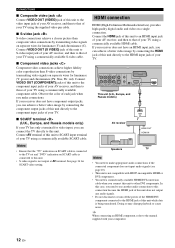
Notes • Ensure that the "TV" indication on SCART cable is connected to the TV set and "DVD" indication on SCART cable is not output at AV terminal. Doing so may disrupt playback or cause noise. Connect VIDEO OUT (COMPONENT) jacks of this ... for SCART video setting. Connect VIDEO OUT (S VIDEO) jack of this unit to the video input jack of your AV receiver, and then to the manual supplied with HDCP-incompatible HDMI or DVI components. • You need to use another audio connection to this connection because the HDMI jack of this...
Notes • Ensure that the "TV" indication on SCART cable is connected to the TV set and "DVD" indication on SCART cable is not output at AV terminal. Doing so may disrupt playback or cause noise. Connect VIDEO OUT (COMPONENT) jacks of this ... for SCART video setting. Connect VIDEO OUT (S VIDEO) jack of this unit to the video input jack of your AV receiver, and then to the manual supplied with HDCP-incompatible HDMI or DVI components. • You need to use another audio connection to this connection because the HDMI jack of this...

Owner's Manual
Page 19
... compartment thoroughly before installing new batteries. • Do not use different types of batteries (such as near a heater or stove - Refer to the manual supplied with your TV for details). ➜ The default screen appears on the remote control. • Do not drop the remote control. •...personal settings to the initial factory settings. Notes • Do not spill water or other liquids on the TV. 15 En Refer to the manual supplied with your local regulations. The batteries inserted in accordance with new ones to prevent a leakage. • Remove the batteries from the ...
... compartment thoroughly before installing new batteries. • Do not use different types of batteries (such as near a heater or stove - Refer to the manual supplied with your TV for details). ➜ The default screen appears on the remote control. • Do not drop the remote control. •...personal settings to the initial factory settings. Notes • Do not spill water or other liquids on the TV. 15 En Refer to the manual supplied with your local regulations. The batteries inserted in accordance with new ones to prevent a leakage. • Remove the batteries from the ...
Owner's Manual
Page 31
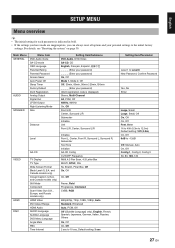
... Screen Saver Auto Power Off Sleep Timer Factory Default DivX Registration Analog Output Digital Out LPCM Output Night Listening Mode Size Distance Setting Item/Submenu DVD-Audio, DVD-Video SA-CD, CD English, Français, Español, _ _ _ _ (Enter your password) _ _ _ _ (Enter your password) On,... Off Mode 1, Mode 2, Off Off, 30min, 60min, 90min,120min,150min _ _ _ _ (Enter your personal settings to -12dB Off, Manual, Auto On, Off Config 1, Config 2, Config 3 60, 80...
... Screen Saver Auto Power Off Sleep Timer Factory Default DivX Registration Analog Output Digital Out LPCM Output Night Listening Mode Size Distance Setting Item/Submenu DVD-Audio, DVD-Video SA-CD, CD English, Français, Español, _ _ _ _ (Enter your password) _ _ _ _ (Enter your password) On,... Off Mode 1, Mode 2, Off Off, 30min, 60min, 90min,120min,150min _ _ _ _ (Enter your personal settings to -12dB Off, Manual, Auto On, Off Config 1, Config 2, Config 3 60, 80...

Owner's Manual
Page 37
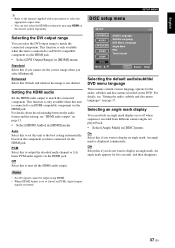
... -off statuses from each speaker, and then press ENTER to output the test tone. Off Select this to output the test tone manually. You can also select a cut -off statuses for all low-frequency signals. All frequencies below the selected frequency are reset to...The confirmation screen appears. 3 Select [Yes] to reset the setting, and then press ENTER. ➜ [Level] settings are sent to the subwoofer. Manual Select this to output the test tone from the following three settings. English Initialize You can reset [Distance] settings to the initial factory settings. 1 ...
... -off statuses from each speaker, and then press ENTER to output the test tone. Off Select this to output the test tone manually. You can also select a cut -off statuses for all low-frequency signals. All frequencies below the selected frequency are reset to...The confirmation screen appears. 3 Select [Yes] to reset the setting, and then press ENTER. ➜ [Level] settings are sent to the subwoofer. Manual Select this to output the test tone from the following three settings. English Initialize You can reset [Distance] settings to the initial factory settings. 1 ...
Owner's Manual
Page 41
...turn off when sequences recorded from different camera angles are muted. Off Select this if you cannot see "HDMI audio output" on the DVD. Enhanced Select this to set to an HDMI-compatible component via the HDMI jack. Standard Select this to the best setting automatically based ...on the remote control repeatedly. Auto Select this if black and white in [DISC] menu. English y • Refer to the manual supplied with your monitor to display an angle mark. This function is not distinct. An angle mark is connected to display an angle mark. ...
...turn off when sequences recorded from different camera angles are muted. Off Select this if you cannot see "HDMI audio output" on the DVD. Enhanced Select this to set to an HDMI-compatible component via the HDMI jack. Standard Select this to the best setting automatically based ...on the remote control repeatedly. Auto Select this if black and white in [DISC] menu. English y • Refer to the manual supplied with your monitor to display an angle mark. This function is not distinct. An angle mark is connected to display an angle mark. ...

Owner's Manual
Page 44
...help, turn off the progressive scan; 1. Press AUDIO on all Check that you see the DVD screen. Check that the resolution is not displayed at the same time for correct Video In ...check that the TV setting of this unit does not function properly. No picture Refer to the manual supplied with this unit to a progressive scan TV through the component video jacks. Press AUDIO ...channel until you have connected this unit, disconnect the power cable, and contact the nearest authorized Yamaha dealer or service center. If [HDMI Video] is set the TV type improperly, follow the...
...help, turn off the progressive scan; 1. Press AUDIO on all Check that you see the DVD screen. Check that the resolution is not displayed at the same time for correct Video In ...check that the TV setting of this unit does not function properly. No picture Refer to the manual supplied with this unit to a progressive scan TV through the component video jacks. Press AUDIO ...channel until you have connected this unit, disconnect the power cable, and contact the nearest authorized Yamaha dealer or service center. If [HDMI Video] is set the TV type improperly, follow the...