Owner's Manual
Page 1
U DVD AUDIO/VIDEO SA-CD PLAYER LECTEUR DVD AUDIO/VIDEO SA-CD DVD-S1800 STANDBY ON HDMI AUDIO DIRECT
U DVD AUDIO/VIDEO SA-CD PLAYER LECTEUR DVD AUDIO/VIDEO SA-CD DVD-S1800 STANDBY ON HDMI AUDIO DIRECT
Owner's Manual
Page 5
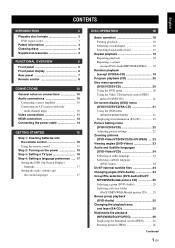
.../DivX®/JPEG) .... 23 Viewing angles (DVD-Video 23 Audio and Subtitle languages (DVD-Video/VCD 24 Selecting an audio language 24 Selecting a subtitle language (DVD-Video 24 DivX® external subtitle files 24 Changing pages (DVD-Audio 24 Group/File selection (DVD-Audio/DivX®/ MP3/WMA/Kodak picture CD 25 Selecting a group (DVD-Audio 25 Selecting a file in a folder...
.../DivX®/JPEG) .... 23 Viewing angles (DVD-Video 23 Audio and Subtitle languages (DVD-Video/VCD 24 Selecting an audio language 24 Selecting a subtitle language (DVD-Video 24 DivX® external subtitle files 24 Changing pages (DVD-Audio 24 Group/File selection (DVD-Audio/DivX®/ MP3/WMA/Kodak picture CD 25 Selecting a group (DVD-Audio 25 Selecting a file in a folder...
Owner's Manual
Page 6
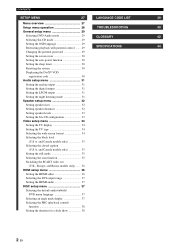
...HDMI setup menu 36 Setting the HDMI video 36 Selecting the DVI output range 37 Setting the HDMI audio 37 DISC setup menu 37 Selecting the default audio/subtitle/ DVD menu language 37 Selecting an angle mark display 37 Selecting the PBC (playback control) function 38 Setting...CONTENTS SETUP MENU 27 LANGUAGE CODE LIST 39 Menu overview 27 Setup menu operation 28 TROUBLESHOOTING 40 General setup menu 29 Selecting DVD-Audio mode 29 GLOSSARY 42 Selecting SA-CD mode 29 Setting the OSD language 29 Restricting playback with parental control ....... 29 ...
...HDMI setup menu 36 Setting the HDMI video 36 Selecting the DVI output range 37 Setting the HDMI audio 37 DISC setup menu 37 Selecting the default audio/subtitle/ DVD menu language 37 Selecting an angle mark display 37 Selecting the PBC (playback control) function 38 Setting...CONTENTS SETUP MENU 27 LANGUAGE CODE LIST 39 Menu overview 27 Setup menu operation 28 TROUBLESHOOTING 40 General setup menu 29 Selecting DVD-Audio mode 29 GLOSSARY 42 Selecting SA-CD mode 29 Setting the OSD language 29 Restricting playback with parental control ....... 29 ...
Owner's Manual
Page 7
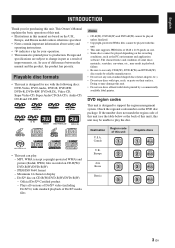
... package. Playable disc formats • This unit is designed for use discs with the following discs: DVD-Video, DVD-Audio, DVD-R, DVD-RW, DVD+R, DVD+RW, DVD+R DL, Video CD, Super Video CD, Super Audio CD (SA-CD), Audio CD, CD-R and CD-RW. The characteristics and condition of differences between the manual and the product, the product has priority...
... package. Playable disc formats • This unit is designed for use discs with the following discs: DVD-Video, DVD-Audio, DVD-R, DVD-RW, DVD+R, DVD+RW, DVD+R DL, Video CD, Super Video CD, Super Audio CD (SA-CD), Audio CD, CD-R and CD-RW. The characteristics and condition of differences between the manual and the product, the product has priority...
Owner's Manual
Page 8
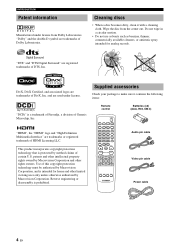
... MULTI 2CH PROG RANDOM REPEAT CLEAR SETUP ENTER SLOW SEARCH A B STOP PAUSE PLAY SKIP TOP MENU ON SCREEN MENU ENTER RETURN SUBTITLE AUDIO ANGLE ZOOM Batteries (x2) (AAA, R03, UM-4) Audio pin cable Video pin cable Power cable 4 En INTRODUCTION Patent information - patents and other limited viewing uses only unless otherwise authorized...
... MULTI 2CH PROG RANDOM REPEAT CLEAR SETUP ENTER SLOW SEARCH A B STOP PAUSE PLAY SKIP TOP MENU ON SCREEN MENU ENTER RETURN SUBTITLE AUDIO ANGLE ZOOM Batteries (x2) (AAA, R03, UM-4) Audio pin cable Video pin cable Power cable 4 En INTRODUCTION Patent information - patents and other limited viewing uses only unless otherwise authorized...
Owner's Manual
Page 9
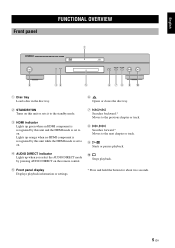
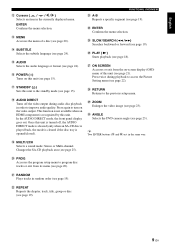
English Front panel FUNCTIONAL OVERVIEW FUNCTIONAL OVERVIEW 1 STANDBY ON HDMI AUDIO DIRECT 2 34 5 6 78 9 0 1 Disc tray Load a disc in the disc tray. 6 Opens...component is recognized by this unit while the HDMI mode is set to on. 4 AUDIO DIRECT indicator Lights up when you select the AUDIO DIRECT mode by this unit or sets it to the standby mode. 3 HDMI ...indicator Lights up green when an HDMI component is recognized by pressing AUDIO DIRECT on the remote control. 7 b/w Searches backward.* Moves to the previous chapter or track. 8 f/a Searches ...
English Front panel FUNCTIONAL OVERVIEW FUNCTIONAL OVERVIEW 1 STANDBY ON HDMI AUDIO DIRECT 2 34 5 6 78 9 0 1 Disc tray Load a disc in the disc tray. 6 Opens...component is recognized by this unit while the HDMI mode is set to on. 4 AUDIO DIRECT indicator Lights up when you select the AUDIO DIRECT mode by this unit or sets it to the standby mode. 3 HDMI ...indicator Lights up green when an HDMI component is recognized by pressing AUDIO DIRECT on the remote control. 7 b/w Searches backward.* Moves to the previous chapter or track. 8 f/a Searches ...
Owner's Manual
Page 10
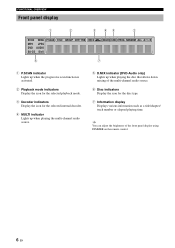
... panel display 1 2 3 45 2 SVCD WMA P.SCAN TITLE GROUP CHP/ TRK MP3 JPEG DVD AUDIO SA-CD DivX 6 D MULTI D.MIX PROG. y You can adjust the brightness of the multi-channel audio source. 6 Disc indicators Display the icon for the selected internal decoder. 4 MULTI indicator Lights ...up when playing the multi-channel audio source. 5 D.MIX indicator (DVD-Audio only) Lights up when playing the disc that allows down mixing...
... panel display 1 2 3 45 2 SVCD WMA P.SCAN TITLE GROUP CHP/ TRK MP3 JPEG DVD AUDIO SA-CD DivX 6 D MULTI D.MIX PROG. y You can adjust the brightness of the multi-channel audio source. 6 Disc indicators Display the icon for the selected internal decoder. 4 MULTI indicator Lights ...up when playing the multi-channel audio source. 5 D.MIX indicator (DVD-Audio only) Lights up when playing the disc that allows down mixing...
Owner's Manual
Page 11
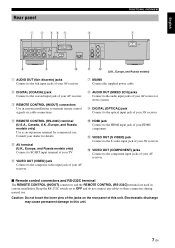
...these connectors during normal use . English Rear panel FUNCTIONAL OVERVIEW 1 2 34 5 6 7 CENTER COAXIAL IN L L AV R R MIXED 2CH FRONT SUBWOOFER SURROUND AUDIO OUT OPTICAL DIGITAL OUT ON OFF RS 232C REMOTE CONTROL HDMI VIDEO PR / CR PB / CB Y S VIDEO COMPONENT VIDEO OUT MAINS 8 9 0 q w... (U.K., Europe, and Russia models) 1 AUDIO OUT (6ch discrete) jacks Connect to the 6ch input jacks of your AV receiver. 7 MAINS Connect the supplied power cable. 2 DIGITAL (COAXIAL) jack...
...these connectors during normal use . English Rear panel FUNCTIONAL OVERVIEW 1 2 34 5 6 7 CENTER COAXIAL IN L L AV R R MIXED 2CH FRONT SUBWOOFER SURROUND AUDIO OUT OPTICAL DIGITAL OUT ON OFF RS 232C REMOTE CONTROL HDMI VIDEO PR / CR PB / CB Y S VIDEO COMPONENT VIDEO OUT MAINS 8 9 0 q w... (U.K., Europe, and Russia models) 1 AUDIO OUT (6ch discrete) jacks Connect to the 6ch input jacks of your AV receiver. 7 MAINS Connect the supplied power cable. 2 DIGITAL (COAXIAL) jack...
Owner's Manual
Page 12
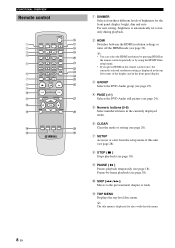
...is displayed in the top left corner of the display and in the front panel display. 3 GROUP Selects the DVD-Audio group (see page 25). 4 PAGE (+/-) Selects the DVD-Audio still picture (see page 24). 5 Numeric buttons (0-9) Select numbered items in the currently displayed menu. 6 CLEAR...o 4 PROG p RANDOM 5 a REPEAT s 6 CLEAR ENTER A B d SETUP SLOW SEARCH f 7 g STOP PAUSE PLAY 8 h 9 0 SKIP q TOP MENU ON SCREEN j w ENTER MENU e RETURN k r SUBTITLE AUDIO ANGLE ZOOM l t ; 1 DIMMER Selects from the setup menu of brightness for discs with the title menu. 8 En
...is displayed in the top left corner of the display and in the front panel display. 3 GROUP Selects the DVD-Audio group (see page 25). 4 PAGE (+/-) Selects the DVD-Audio still picture (see page 24). 5 Numeric buttons (0-9) Select numbered items in the currently displayed menu. 6 CLEAR...o 4 PROG p RANDOM 5 a REPEAT s 6 CLEAR ENTER A B d SETUP SLOW SEARCH f 7 g STOP PAUSE PLAY 8 h 9 0 SKIP q TOP MENU ON SCREEN j w ENTER MENU e RETURN k r SUBTITLE AUDIO ANGLE ZOOM l t ; 1 DIMMER Selects from the setup menu of brightness for discs with the title menu. 8 En
Owner's Manual
Page 13
... playback to the standby mode (see page 19). This function is not available when an HDMI component is opened/closed). k RETURN Returns to improve audio quality. y Two ENTER buttons (w and f) act in the currently displayed menu. r SUBTITLE Selects the subtitle language (see page 20). u STANDBY... h PLAY ( 3 ) Starts playback (see page 21). j ON SCREEN Accesses or exit from its menu (see page 23). ; ANGLE Selects the DVD camera angle (see page 19). o MULTI / 2CH Selects a sound mode: Stereo or Multi-channel. a RANDOM Plays tracks in order to the previous setup menu...
... playback to the standby mode (see page 19). This function is not available when an HDMI component is opened/closed). k RETURN Returns to improve audio quality. y Two ENTER buttons (w and f) act in the currently displayed menu. r SUBTITLE Selects the subtitle language (see page 20). u STANDBY... h PLAY ( 3 ) Starts playback (see page 21). j ON SCREEN Accesses or exit from its menu (see page 23). ; ANGLE Selects the DVD camera angle (see page 19). o MULTI / 2CH Selects a sound mode: Stereo or Multi-channel. a RANDOM Plays tracks in order to the previous setup menu...
Owner's Manual
Page 14
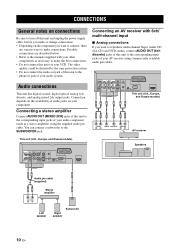
...manuals supplied with 6ch/ multi-channel input ■ Analog connections If you want to reproduce multi-channel Super Audio CD (SA-CD) and DVD-Audio, connect AUDIO OUT (6ch discrete) jacks of this unit to the corresponding input jacks of your AV receiver using the supplied...) Speakers CENTER COAXIAL IN L L AV R R MIXED 2CH FRONT SUBWOOFER SURROUND AUDIO OUT OPTICAL DIGITAL OUT ON OFF RS 232C REMOTE CONTROL HDMI Audio pin cable (supplied) Stereo amplifier CD / DVD RL Left speaker Right speaker Subwoofer 10 En CONNECTIONS CONNECTIONS General notes on connections Be...
...manuals supplied with 6ch/ multi-channel input ■ Analog connections If you want to reproduce multi-channel Super Audio CD (SA-CD) and DVD-Audio, connect AUDIO OUT (6ch discrete) jacks of this unit to the corresponding input jacks of your AV receiver using the supplied...) Speakers CENTER COAXIAL IN L L AV R R MIXED 2CH FRONT SUBWOOFER SURROUND AUDIO OUT OPTICAL DIGITAL OUT ON OFF RS 232C REMOTE CONTROL HDMI Audio pin cable (supplied) Stereo amplifier CD / DVD RL Left speaker Right speaker Subwoofer 10 En CONNECTIONS CONNECTIONS General notes on connections Be...

Owner's Manual
Page 15
...your receiver, the receiver produces a distorted sound or no sound at all. CENTER COAXIAL IN L L AV R R MIXED 2CH FRONT SUBWOOFER SURROUND AUDIO OUT OPTICAL DIGITAL OUT ON OFF RS 232C REMOTE CONTROL HDMI This unit (U.K., Europe, and Russia models) CONNECTIONS Video connections This unit has SCART, ...receiver VIDEO OUT VIDEO IN S VIDEO OUT COMPONENT VIDEO OUT S VIDEO IN COMPONENT VIDEO IN TV 11 En Make sure to select the appropriate audio format from DIGITAL (COAXIAL/OPTICAL) jacks. • If you want to enjoy Dolby Digital, DTS, and MPEG formats, you want to ...
...your receiver, the receiver produces a distorted sound or no sound at all. CENTER COAXIAL IN L L AV R R MIXED 2CH FRONT SUBWOOFER SURROUND AUDIO OUT OPTICAL DIGITAL OUT ON OFF RS 232C REMOTE CONTROL HDMI This unit (U.K., Europe, and Russia models) CONNECTIONS Video connections This unit has SCART, ...receiver VIDEO OUT VIDEO IN S VIDEO OUT COMPONENT VIDEO OUT S VIDEO IN COMPONENT VIDEO IN TV 11 En Make sure to select the appropriate audio format from DIGITAL (COAXIAL/OPTICAL) jacks. • If you want to enjoy Dolby Digital, DTS, and MPEG formats, you want to ...
Owner's Manual
Page 16
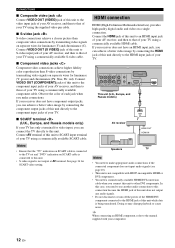
...HDMI input jack, you can connect the TV directly to this unit. HDMI connection HDMI (High-Definition Multimedia Interface) provides high quality digital audio and video on SCART cable is connected to this unit. • S-video signal is being transferred. Connect VIDEO OUT (S VIDEO) ...8226; Ensure that the "TV" indication on SCART cable is connected to the TV set and "DVD" indication on a single connection. CENTER COAXIAL IN L L AV R R MIXED 2CH FRONT SUBWOOFER SURROUND AUDIO OUT OPTICAL DIGITAL OUT ON OFF RS 232C REMOTE CONTROL HDMI This unit (U.K., Europe, and Russia...
...HDMI input jack, you can connect the TV directly to this unit. HDMI connection HDMI (High-Definition Multimedia Interface) provides high quality digital audio and video on SCART cable is connected to this unit. • S-video signal is being transferred. Connect VIDEO OUT (S VIDEO) ...8226; Ensure that the "TV" indication on SCART cable is connected to the TV set and "DVD" indication on a single connection. CENTER COAXIAL IN L L AV R R MIXED 2CH FRONT SUBWOOFER SURROUND AUDIO OUT OPTICAL DIGITAL OUT ON OFF RS 232C REMOTE CONTROL HDMI This unit (U.K., Europe, and Russia...
Owner's Manual
Page 17
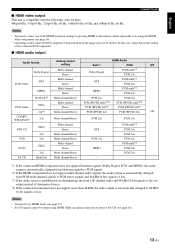
... picture setting of the connected DVI component. ■ HDMI audio output Audio format Analog output setting Auto*1 HDMI Audio PCM Off Dolby Digital Multi-channel Stereo Dolby Digital PCM multi*2 PCM 2ch Multi-channel DTS DTS DVD-Video Stereo PCM multi*2 PCM 2ch MPEG Multi-channel Stereo MPEG... PCM multi*2 PCM 2ch PCM 2ch*4 Multi-channel/Stereo PCM 2ch PCM 2ch DVD-Audio Multi 2ch*4 Multi-channel PCM (PPCM) multi*2,3 PCM (PPCM) multi*2,3 Stereo PCM (PPCM) 2ch*3 PCM (PPCM) 2ch*3 Multi-channel/Stereo PCM...
... picture setting of the connected DVI component. ■ HDMI audio output Audio format Analog output setting Auto*1 HDMI Audio PCM Off Dolby Digital Multi-channel Stereo Dolby Digital PCM multi*2 PCM 2ch Multi-channel DTS DTS DVD-Video Stereo PCM multi*2 PCM 2ch MPEG Multi-channel Stereo MPEG... PCM multi*2 PCM 2ch PCM 2ch*4 Multi-channel/Stereo PCM 2ch PCM 2ch DVD-Audio Multi 2ch*4 Multi-channel PCM (PPCM) multi*2,3 PCM (PPCM) multi*2,3 Stereo PCM (PPCM) 2ch*3 PCM (PPCM) 2ch*3 Multi-channel/Stereo PCM...

Owner's Manual
Page 19
... remote control to turn on this unit. ➜ The front panel display lights up. 5 Set the TV to the correct Video IN channel (e.g., EXT1/2, AV1/2, AUDIO/VIDEO, etc. The batteries inserted in accordance with your personal settings to the initial factory settings. Clean the battery compartment thoroughly before installing new batteries...
... remote control to turn on this unit. ➜ The front panel display lights up. 5 Set the TV to the correct Video IN channel (e.g., EXT1/2, AV1/2, AUDIO/VIDEO, etc. The batteries inserted in accordance with your personal settings to the initial factory settings. Clean the battery compartment thoroughly before installing new batteries...
Owner's Manual
Page 20
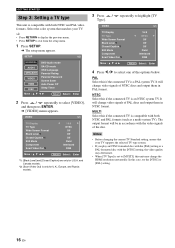
GETTING STARTED Step 3: Setting a TV type This unit is compatible with both NTSC and PAL video formats. SETUP 1/2 GENERAL AUDIO SPEAKER VIDEO HDMI DISC Move : DVD-Audio mode SA-CD mode OSD Language Parental Rating Parental Password Screen Saver Auto Power Off Sleep Timer Return Select : Enter 2 Press / repeatedly to exit from ...
GETTING STARTED Step 3: Setting a TV type This unit is compatible with both NTSC and PAL video formats. SETUP 1/2 GENERAL AUDIO SPEAKER VIDEO HDMI DISC Move : DVD-Audio mode SA-CD mode OSD Language Parental Rating Parental Password Screen Saver Auto Power Off Sleep Timer Return Select : Enter 2 Press / repeatedly to exit from ...
Owner's Manual
Page 21
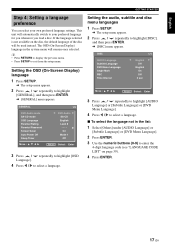
...PBC Time Interval 1/1 English Off English On Off 3 sec Move : Return Select : Enter 3 Press / repeatedly to highlight [AUDIO Language] or [Subtitle Language] or [DVD Menu Language]. 4 Press / to select a language. ■ To select the language not in the system menu will automatically ... then press ENTER. ➜ [DISC] menu appears. The OSD (On-Screen Display) language in the list: 1 Select [Others] under [AUDIO Language] or [Subtitle Language] or [DVD Menu Language]. 2 Press ENTER. 3 Use the numeric buttons (0-9) to select a language. On Mode 1 Off Return Select : Enter 3 Press...
...PBC Time Interval 1/1 English Off English On Off 3 sec Move : Return Select : Enter 3 Press / repeatedly to highlight [AUDIO Language] or [Subtitle Language] or [DVD Menu Language]. 4 Press / to select a language. ■ To select the language not in the system menu will automatically ... then press ENTER. ➜ [DISC] menu appears. The OSD (On-Screen Display) language in the list: 1 Select [Others] under [AUDIO Language] or [Subtitle Language] or [DVD Menu Language]. 2 Press ENTER. 3 Use the numeric buttons (0-9) to select a language. On Mode 1 Off Return Select : Enter 3 Press...
Owner's Manual
Page 23
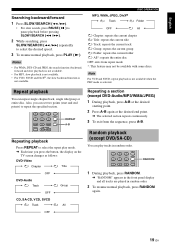
... not available. Also, you press the button, the display on the TV screen changes as follows: DVD-Video Chapter Title OFF DVD-Audio Track Group OFF CD, SA-CD, VCD, SVCD Track All OFF Repeating a section (except DVD-Audio/MP3/WMA/JPEG) 1 During playback, press A-B at the desired starting point. 2 Press A-B again at the desired...
... not available. Also, you press the button, the display on the TV screen changes as follows: DVD-Video Chapter Title OFF DVD-Audio Track Group OFF CD, SA-CD, VCD, SVCD Track All OFF Repeating a section (except DVD-Audio/MP3/WMA/JPEG) 1 During playback, press A-B at the desired starting point. 2 Press A-B again at the desired...
Owner's Manual
Page 25
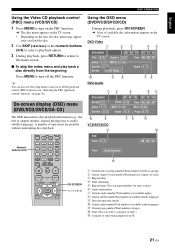
...without interrupting disc playback. On-screen display (OSD) menu (DVD/VCD/SVCD/SA-CD) The OSD menu shows disc playback information (e.g., the title or chapter number, elapsed playing time or audio/ subtitle language). A number of time being displayed on the...10140; A list of available disc information appears on w 21 En DVD-Video 1 23 45 DVD VIDEO 00 : 00 : 10 02 : 15 : 30 Title 1 / 1 Chapter 1 / 7 Time 00 : 00 : 10 Audio 1 / 1 MPEG 5.1 Ch Subtitle 1 / 1 Bitrate 3.072 Mbps Angle 1 / 1 0 DVD-Audio 98 76 12 3 45 DVD AUDIO Group 1 / 1 Audio 1 / 1 Subtitle 1 / 1 00 : 00 : 10...
...without interrupting disc playback. On-screen display (OSD) menu (DVD/VCD/SVCD/SA-CD) The OSD menu shows disc playback information (e.g., the title or chapter number, elapsed playing time or audio/ subtitle language). A number of time being displayed on the...10140; A list of available disc information appears on w 21 En DVD-Video 1 23 45 DVD VIDEO 00 : 00 : 10 02 : 15 : 30 Title 1 / 1 Chapter 1 / 7 Time 00 : 00 : 10 Audio 1 / 1 MPEG 5.1 Ch Subtitle 1 / 1 Bitrate 3.072 Mbps Angle 1 / 1 0 DVD-Audio 98 76 12 3 45 DVD AUDIO Group 1 / 1 Audio 1 / 1 Subtitle 1 / 1 00 : 00 : 10...
Owner's Manual
Page 26
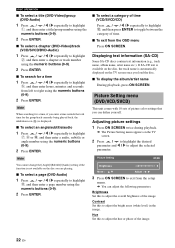
...Press ON SCREEN twice during playback. ➜ The Picture Setting menu appears on the TV screen once you are playing. ■ To select a page (DVD-Audio) 1 Press / / / repeatedly to highlight q, and then enter a page number using the numeric buttons (0-9). 2 Press ENTER. ■ To select a...SA-CD discs contain text information (e.g., track name, album name, artist name etc.). DISC OPERATION ■ To select a title (DVD-Video)/group (DVD-Audio) 1 Press / / / repeatedly to highlight 1, and then enter a title/group number using the numeric buttons (0-9). 2 Press ENTER. ■ To...
...Press ON SCREEN twice during playback. ➜ The Picture Setting menu appears on the TV screen once you are playing. ■ To select a page (DVD-Audio) 1 Press / / / repeatedly to highlight q, and then enter a page number using the numeric buttons (0-9). 2 Press ENTER. ■ To select a...SA-CD discs contain text information (e.g., track name, album name, artist name etc.). DISC OPERATION ■ To select a title (DVD-Video)/group (DVD-Audio) 1 Press / / / repeatedly to highlight 1, and then enter a title/group number using the numeric buttons (0-9). 2 Press ENTER. ■ To...
