Owners Manual
Page 9
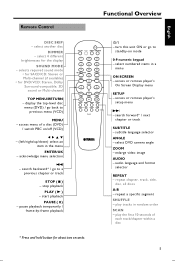
... | - search backward* / go to previous menu (VCD) MENU - access or remove player's On Screen Display menu SETUP - turn this unit ON or go back to a previous chapter or track STOP ( 9 ) - select DVD camera angle ZOOM - play tracks in a menu ON SCREEN - enlarge video image AUDIO -...two seconds. select numbered items in random order SCAN - access or remove player's setup menu T - stop playback PLAY ( B ) - play the first 10 seconds of a disc (DVD) / switch PBC on mode 0-9 numeric keypad - display the top-level disc menu (DVD) / go to standby-on /off (VCD) 1 2 3 4 -...
... | - search backward* / go to previous menu (VCD) MENU - access or remove player's On Screen Display menu SETUP - turn this unit ON or go back to a previous chapter or track STOP ( 9 ) - select DVD camera angle ZOOM - play tracks in a menu ON SCREEN - enlarge video image AUDIO -...two seconds. select numbered items in random order SCAN - access or remove player's setup menu T - stop playback PLAY ( B ) - play the first 10 seconds of a disc (DVD) / switch PBC on mode 0-9 numeric keypad - display the top-level disc menu (DVD) / go to standby-on /off (VCD) 1 2 3 4 -...
Owners Manual
Page 11
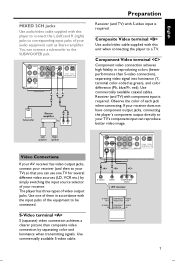
...terminal color-coded as Stereo amplifier. Composite Video terminal Use audio/video cable supplied with this unit when connecting the player to the SUBWOOFER jack. Component Video terminal Component video connection achieves high fidelity in accordance with the input jacks of ...connected. Observe the color of video output jacks. Receiver (and TV) with S-video input is required. R L Subwoofer Stereo amplifier R L 1 CD/DVD R L Preparation Receiver (and TV) with component input is required. S V S VIDEO PR/CR PB/CB Y VIDEO COMPONENT VIDEO AV receiver S ...
...terminal color-coded as Stereo amplifier. Composite Video terminal Use audio/video cable supplied with this unit when connecting the player to the SUBWOOFER jack. Component Video terminal Component video connection achieves high fidelity in accordance with the input jacks of ...connected. Observe the color of video output jacks. Receiver (and TV) with S-video input is required. R L Subwoofer Stereo amplifier R L 1 CD/DVD R L Preparation Receiver (and TV) with component input is required. S V S VIDEO PR/CR PB/CB Y VIDEO COMPONENT VIDEO AV receiver S ...
Owners Manual
Page 12
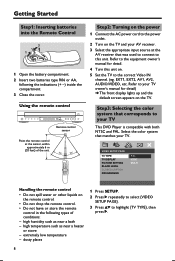
... places 1 Press SETUP. 2 Press 2 repeatedly to select {VIDEO SETUP PAGE}. 3 Press 34 to your TV. Step3: Selecting the color system that matches your TV This DVD Player is compatible with both NTSC and PAL. EXT1, EXT2, AV1, AV2, AUDIO/VIDEO, etc. high humidity such as near a bath - extremely low temperature - Using the...
... places 1 Press SETUP. 2 Press 2 repeatedly to select {VIDEO SETUP PAGE}. 3 Press 34 to your TV. Step3: Selecting the color system that matches your TV This DVD Player is compatible with both NTSC and PAL. EXT1, EXT2, AV1, AV2, AUDIO/VIDEO, etc. high humidity such as near a bath - extremely low temperature - Using the...
Owners Manual
Page 13
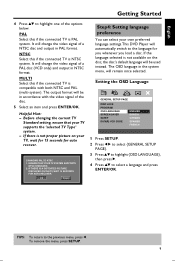
... menu, will automatically switch to the language for auto recover. Before changing the current TV Standard setting, ensure that your own preferred language settings.This DVD Player will remain once selected. ENSURE THAT YOUR TV SYSTEM SUPPORTS NTSC STANDARD. 2. To remove the menu, press SETUP. 9 NTSC Select this if the connected TV...
... menu, will automatically switch to the language for auto recover. Before changing the current TV Standard setting, ensure that your own preferred language settings.This DVD Player will remain once selected. ENSURE THAT YOUR TV SYSTEM SUPPORTS NTSC STANDARD. 2. To remove the menu, press SETUP. 9 NTSC Select this if the connected TV...
Owners Manual
Page 16
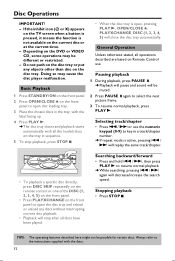
... pressed, it means the function is open disc loading tray. 3 Place the chosen discs in sequence. 5 To stop after all the loaded discs on the DVD or VIDEO CD, some operations may cause the disc player malfunction.
... pressed, it means the function is open disc loading tray. 3 Place the chosen discs in sequence. 5 To stop after all the loaded discs on the DVD or VIDEO CD, some operations may cause the disc player malfunction.
Owners Manual
Page 21
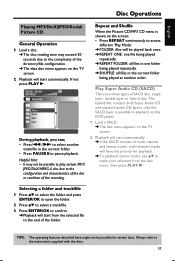
... will have the priority for certain discs. Helpful Hint: - Repeat and Shuffle When the Picture CD/MP3 CD menu is possible to playback on this DVD player. 1 Load a SACD. ➜ The disc menu appears on the TV screen. 2 Playback will start automatically. ➜ If the SACD consists of multi-channel and stereo...
... will have the priority for certain discs. Helpful Hint: - Repeat and Shuffle When the Picture CD/MP3 CD menu is possible to playback on this DVD player. 1 Load a SACD. ➜ The disc menu appears on the TV screen. 2 Playback will start automatically. ➜ If the SACD consists of multi-channel and stereo...
Owners Manual
Page 23
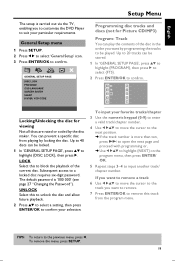
... 1 Press SETUP. 2 Press 1 2 to select 'General Setup' icon. 3 Press ENTER/OK to block the playback of the disc in the order you to customize the DVD Player to suit your particular requirements. Up to 40 discs can be played. You can play the contents of the current disc. Subsequent access to the...
... 1 Press SETUP. 2 Press 1 2 to select 'General Setup' icon. 3 Press ENTER/OK to block the playback of the disc in the order you to customize the DVD Player to suit your particular requirements. Up to 40 discs can be played. You can play the contents of the current disc. Subsequent access to the...
Owners Manual
Page 24
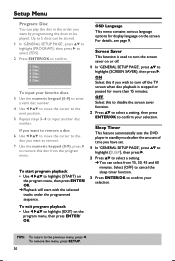
... Saver This function is stopped or paused for display language on the program menu, then press ENTER/ OK. Sleep Timer This feature automatically sets the DVD player in the order you want to remove. 7 Use the numeric keypad (0-9), press 0 to remove this to disable the screen saver function. 2 Press 34 to select...
... Saver This function is stopped or paused for display language on the program menu, then press ENTER/ OK. Sleep Timer This feature automatically sets the DVD player in the order you want to remove. 7 Use the numeric keypad (0-9), press 0 to remove this to disable the screen saver function. 2 Press 34 to select...

Owners Manual
Page 25
... service. VIRTUAL SURROUND Select this DVD player. All the downloaded videos from DivX® VOD can only be played back on DVD-Video and Video-CD discs with 6 channel inputs. STEREO Select this DVD player. - MULTI-CHANNEL Select this mode, the player will perform DTS decoding or Dolby... 2 Press 34 to select a setting, then press ENTER/OK to confirm your DVD Player's playback capability. 1 In 'AUDIO SETUP PAGE', press 34 to confirm. English Setup Menu DivX® VOD registration code Yamaha provide you to rent and purchase videos using a multichannel audio/(video) receiver with ...
... service. VIRTUAL SURROUND Select this DVD player. All the downloaded videos from DivX® VOD can only be played back on DVD-Video and Video-CD discs with 6 channel inputs. STEREO Select this DVD player. - MULTI-CHANNEL Select this mode, the player will perform DTS decoding or Dolby... 2 Press 34 to select a setting, then press ENTER/OK to confirm your DVD Player's playback capability. 1 In 'AUDIO SETUP PAGE', press 34 to confirm. English Setup Menu DivX® VOD registration code Yamaha provide you to rent and purchase videos using a multichannel audio/(video) receiver with ...
Owners Manual
Page 26
...on disc) PCM data stream will be muted to the previous menu, press 1. CD Upsampling This feature allows you have activated the upsampling, the player will be converted to 48kHz. 96kHz Playback a disc recorded at a certain sampling rate. ALL If you to convert your selection. To remove the...higher than the original. 2 Press 34 to select a setting, then press ENTER/OK to adjust 'LPCM Output'. LPCM OUTPUT If you connect the DVD Player to a PCM compatible receiver via the digital terminals, such as coaxial or optical etc., you have connected your DIGITAL AUDIO OUT to a higher ...
...on disc) PCM data stream will be muted to the previous menu, press 1. CD Upsampling This feature allows you have activated the upsampling, the player will be converted to 48kHz. 96kHz Playback a disc recorded at a certain sampling rate. ALL If you to convert your selection. To remove the...higher than the original. 2 Press 34 to select a setting, then press ENTER/OK to adjust 'LPCM Output'. LPCM OUTPUT If you connect the DVD Player to a PCM compatible receiver via the digital terminals, such as coaxial or optical etc., you have connected your DIGITAL AUDIO OUT to a higher ...

Owners Manual
Page 27
The format you select must be available on the upper and lower portions of the DVD Player according to confirm your selection. TV Type This menu contains the options for movies with Dolby Digital mode. To remove the menu, press SETUP. 23 ...
The format you select must be available on the upper and lower portions of the DVD Player according to confirm your selection. TV Type This menu contains the options for movies with Dolby Digital mode. To remove the menu, press SETUP. 23 ...
Owners Manual
Page 28
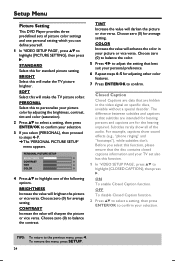
..., invisible without a special decoder. For example, captions show all of the following options. TIPS: To return to balance the contrast. Setup Menu Picture Setting This DVD Player provides three predefined sets of picture color settings and one of the audio. Choose zero (0) to the previous menu, press 1. Subtitles rarely show sound effects...
..., invisible without a special decoder. For example, captions show all of the following options. TIPS: To return to balance the contrast. Setup Menu Picture Setting This DVD Player provides three predefined sets of picture color settings and one of the audio. Choose zero (0) to the previous menu, press 1. Subtitles rarely show sound effects...
Owners Manual
Page 29
...your selection. This unit is compatible with YPbPr video cable. - OFF To disable Progressive Scan function. Connect with the complete line of YAMAHA products, including the projectors DPX1000, LPX-510 and the plasma monitor PDM4210. If there is no picture, wait 15 seconds for audio...DEFINITION" OUTPUT. TIPS: To return to highlight {PROGRESSIVE}, then press 2. English Setup Menu Progressive This feature is only applicable if you have connected this DVD Player to a Progressive Scan TV through the Y Pb Pr jacks (see page 10. Notes on the front panel. 2 Press 1. 3 Press MUTE. IF...
...your selection. This unit is compatible with YPbPr video cable. - OFF To disable Progressive Scan function. Connect with the complete line of YAMAHA products, including the projectors DPX1000, LPX-510 and the plasma monitor PDM4210. If there is no picture, wait 15 seconds for audio...DEFINITION" OUTPUT. TIPS: To return to highlight {PROGRESSIVE}, then press 2. English Setup Menu Progressive This feature is only applicable if you have connected this DVD Player to a Progressive Scan TV through the Y Pb Pr jacks (see page 10. Notes on the front panel. 2 Press 1. 3 Press MUTE. IF...
Owners Manual
Page 34
.... Ensure that the DVD Player's TV Type is not listed below or if the instruction below when this unit to the standby mode, disconnect the power cord, and contact the nearest authorized YAMAHA dealer or service center. Adjust the volume. - The DVD+R/RW, DVD-R/RW, CD-R/RW ... "Video Connections"). - signs) as indicated. 30 Press the STANDBY/ON on the front of the player. - Make sure the disc is connected to the player. - Problem No power No picture Distorted picture Completely distorted picture or black/white picture with the DVD Player. - Check that your TV. -
.... Ensure that the DVD Player's TV Type is not listed below or if the instruction below when this unit to the standby mode, disconnect the power cord, and contact the nearest authorized YAMAHA dealer or service center. Adjust the volume. - The DVD+R/RW, DVD-R/RW, CD-R/RW ... "Video Connections"). - signs) as indicated. 30 Press the STANDBY/ON on the front of the player. - Make sure the disc is connected to the player. - Problem No power No picture Distorted picture Completely distorted picture or black/white picture with the DVD Player. - Check that your TV. -
Owners Manual
Page 35
... is encoded in 'Home Theater' mode with DivX 5.x encoder. - The audio code may not be permitted by the DVD player. 31 Check that the output of the disc jacket. - To completely reset the player, unplug the AC cord from the AC outlet for repair. - Use a commonly available cleaning CD.../DVD to clean the lens before selecting Setup Menu. - DVD Player cannot read CDs/ DVDs Menu items cannot be selected Unable to play DivX movies Unable...
... is encoded in 'Home Theater' mode with DivX 5.x encoder. - The audio code may not be permitted by the DVD player. 31 Check that the output of the disc jacket. - To completely reset the player, unplug the AC cord from the AC outlet for repair. - Use a commonly available cleaning CD.../DVD to clean the lens before selecting Setup Menu. - DVD Player cannot read CDs/ DVDs Menu items cannot be selected Unable to play DivX movies Unable...

