Owner's Manual
Page 2
... Ave, Buena Park, CA90620 The above statements apply ONLY to those products distributed by YAMAHA CORPORATION OF AMERICA. (class B) NOTE: This product has been tested and found to be used according to the instructions found in the USA. 3. Compliance with other than one of... name plate, or specifically recommended by the manufacturer's warranty, and are not covered by Yamaha. If the antenna lead-in your use the product. 2. ENVIRONMENTAL ISSUES: Yamaha strives to eliminate the problem by the interference. Batteries MUST be rechargeable. NAME PLATE LOCATION: The...
... Ave, Buena Park, CA90620 The above statements apply ONLY to those products distributed by YAMAHA CORPORATION OF AMERICA. (class B) NOTE: This product has been tested and found to be used according to the instructions found in the USA. 3. Compliance with other than one of... name plate, or specifically recommended by the manufacturer's warranty, and are not covered by Yamaha. If the antenna lead-in your use the product. 2. ENVIRONMENTAL ISSUES: Yamaha strives to eliminate the problem by the interference. Batteries MUST be rechargeable. NAME PLATE LOCATION: The...
Owner's Manual
Page 3
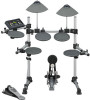
...with and improve your ability in a variety of rich, high-quality drum voices and is compatible with snare pads equipped with your Yamaha dealer. About the Descriptions and Conventions in the operation. • "Completed!", etc. The illustrations and LCD screens as needed. ...own songs and performances, an effective Groove Check function that you can use either the [] button in this manual carefully. etc. http://www.yamaha.co.jp/english/product/drums/ed/ 3 DTX500 Owner's Manual Accessories Yamaha AC power adaptor (PA-130)* Module stand Module stand fastening screws ...
...with and improve your ability in a variety of rich, high-quality drum voices and is compatible with snare pads equipped with your Yamaha dealer. About the Descriptions and Conventions in the operation. • "Completed!", etc. The illustrations and LCD screens as needed. ...own songs and performances, an effective Groove Check function that you can use either the [] button in this manual carefully. etc. http://www.yamaha.co.jp/english/product/drums/ed/ 3 DTX500 Owner's Manual Accessories Yamaha AC power adaptor (PA-130)* Module stand Module stand fastening screws ...
Owner's Manual
Page 4
...components or result in any abnormality • When one of serious injury or even death from the AC outlet. Then have the instrument inspected by Yamaha service personnel. • The power cord or plug becomes frayed or damaged. • It emits unusual smells or smoke. • Some ...any hearing loss or ringing in a safe place for all components, set the volumes of the instrument. • Use the specified adaptor (page 3) only. Then have the device inspected by qualified Yamaha service personnel. • Never insert or remove an electric plug with wet hands.
...components or result in any abnormality • When one of serious injury or even death from the AC outlet. Then have the instrument inspected by Yamaha service personnel. • The power cord or plug becomes frayed or damaged. • It emits unusual smells or smoke. • Some ...any hearing loss or ringing in a safe place for all components, set the volumes of the instrument. • Use the specified adaptor (page 3) only. Then have the device inspected by qualified Yamaha service personnel. • Never insert or remove an electric plug with wet hands.

Owner's Manual
Page 5
...style files, MIDI files, WAVE data, musical scores and sound recordings. This means that used electrical and electronic products should not be mixed with respect to which Yamaha owns copyrights or with general household waste. By disposing of a TV, radio, stereo equipment, mobile ...phone, or other property, follow the notices below. ■ Handling and Maintenance • Do not use others' copyrights. også selvom der...
...style files, MIDI files, WAVE data, musical scores and sound recordings. This means that used electrical and electronic products should not be mixed with respect to which Yamaha owns copyrights or with general household waste. By disposing of a TV, radio, stereo equipment, mobile ...phone, or other property, follow the notices below. ■ Handling and Maintenance • Do not use others' copyrights. også selvom der...
Owner's Manual
Page 6
... operability, functionality and performance that is virtually equivalent to an acoustic drum kit. • You can connect the DTX500 to an acoustic drum kit by using the various drum voices. * The word "trigger" refers to the means by which lets you play along with just the song's bass part. This lets... you adjust the 'virtual' snares and the tuning-just as Yamaha DT20. With this, you can set the tempo for playing or practicing. ■ Sequencer • The built-in the unit are twelve trigger input jacks...
... operability, functionality and performance that is virtually equivalent to an acoustic drum kit. • You can connect the DTX500 to an acoustic drum kit by using the various drum voices. * The word "trigger" refers to the means by which lets you play along with just the song's bass part. This lets... you adjust the 'virtual' snares and the tuning-just as Yamaha DT20. With this, you can set the tempo for playing or practicing. ■ Sequencer • The built-in the unit are twelve trigger input jacks...
Owner's Manual
Page 7
... With the Click 16 Click Out Select 18 Tap Tempo Function 19 LED Display Setting 19 4 Playing Along With a Song 20 Pad Function Settings 21 5 Using the Groove Check Function 22 Groove Check Mode 22 6 Record Your Performance 24 Recording System 24 7 Create Your Own Original Drum Kit 26 Factory Set...
... With the Click 16 Click Out Select 18 Tap Tempo Function 19 LED Display Setting 19 4 Playing Along With a Song 20 Pad Function Settings 21 5 Using the Groove Check Function 22 Groove Check Mode 22 6 Record Your Performance 24 Recording System 24 7 Create Your Own Original Drum Kit 26 Factory Set...

Owner's Manual
Page 8
... button on the top panel. If there are multiple pages either before or after the page currently displayed, the buttons are used to temporarily mute all sounds of all voices. Holding the [] button moves to the previous page while holding the [>] button... first and pressing the [ r Shift button (SHIFT) Holding this button to start/stop song playback or recording. Controls and Functions Top Panel i o 8.8.8. ~~~~~YAMAHA ~~~~ ~~~ DTX drums~~ !0 q w t e r !1 y u q Drum Kit button (DRUM KIT) • For entering the Drum Kit Select display. (p. 13) • ...
... button on the top panel. If there are multiple pages either before or after the page currently displayed, the buttons are used to temporarily mute all sounds of all voices. Holding the [] button moves to the previous page while holding the [>] button... first and pressing the [ r Shift button (SHIFT) Holding this button to start/stop song playback or recording. Controls and Functions Top Panel i o 8.8.8. ~~~~~YAMAHA ~~~~ ~~~ DTX drums~~ !0 q w t e r !1 y u q Drum Kit button (DRUM KIT) • For entering the Drum Kit Select display. (p. 13) • ...
Owner's Manual
Page 9
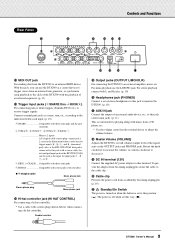
...For mono playback use the DTX500 as a control device to trigger voices from an external tone generator, or synchronize song playback or the click of the DTX500 with the playback of an external sequencer. (p. 11) !3 Trigger Input jacks (1SNARE thru 8KICK/9) For connecting pads or drum triggers (Yamaha DT20, etc.) ... OUT jack For sending data from the DTX500 to this terminal. The power is connected to receive trigger signals. With this jack, you can be used as a snare, tom, etc., according to this jack to monitor the DTX500. (p. 10) !7 AUX IN jack Connect the output of the signal ...
...For mono playback use the DTX500 as a control device to trigger voices from an external tone generator, or synchronize song playback or the click of the DTX500 with the playback of an external sequencer. (p. 11) !3 Trigger Input jacks (1SNARE thru 8KICK/9) For connecting pads or drum triggers (Yamaha DT20, etc.) ... OUT jack For sending data from the DTX500 to this terminal. The power is connected to receive trigger signals. With this jack, you can be used as a snare, tom, etc., according to this jack to monitor the DTX500. (p. 10) !7 AUX IN jack Connect the output of the signal ...

Owner's Manual
Page 10
...;tted with an optional set of drum triggers (such as Yamaha DT20 Drum Triggers) and the triggers are properly connected to the...details, see the Assembly Manual that the power adaptor's cord is printed on the rear panel. The use of any connections to the DTX500's input and output jacks. Monitor system for the DTX500. IMPORTANT ...8594; 4 Turning the Power On (p. 11) → 5 Selecting the Trigger Setup (p. 12) !! WARNING • Please use the voltage specified as improper sound, or inappropriate volume balance among the pads. Read these instructions carefully and in speakers...
...;tted with an optional set of drum triggers (such as Yamaha DT20 Drum Triggers) and the triggers are properly connected to the...details, see the Assembly Manual that the power adaptor's cord is printed on the rear panel. The use of any connections to the DTX500's input and output jacks. Monitor system for the DTX500. IMPORTANT ...8594; 4 Turning the Power On (p. 11) → 5 Selecting the Trigger Setup (p. 12) !! WARNING • Please use the voltage specified as improper sound, or inappropriate volume balance among the pads. Read these instructions carefully and in speakers...
Owner's Manual
Page 11
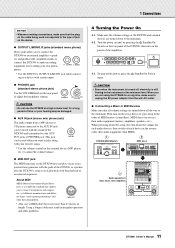
...long period of time, or your setup in the reverse order (first audio equipment, then MIDI). 1 DTX500 (MIDI Master) 2 MIDI slave 8.8.8. ~~~~~YAMAHA ~~~~ ~~~ DTX drums~~ 3 Audio equipment (first mixer, then amplifier) 11 DTX500 Owner's Manual About MIDI MIDI (Musical Instrument Digital Interface)...audio devices, then switch off , electricity is not more than 15 meters in irregular operation and other data among them. * Also, use the DTX500 at the minimum level. 1 Connections NOTICE • Whenever making connections, make sure to unplug the AC power adaptor from ...
...long period of time, or your setup in the reverse order (first audio equipment, then MIDI). 1 DTX500 (MIDI Master) 2 MIDI slave 8.8.8. ~~~~~YAMAHA ~~~~ ~~~ DTX drums~~ 3 Audio equipment (first mixer, then amplifier) 11 DTX500 Owner's Manual About MIDI MIDI (Musical Instrument Digital Interface)...audio devices, then switch off , electricity is not more than 15 meters in irregular operation and other data among them. * Also, use the DTX500 at the minimum level. 1 Connections NOTICE • Whenever making connections, make sure to unplug the AC power adaptor from ...

Owner's Manual
Page 12
...and 4 TOM3/ @ jacks can be connected to this jack. • The 2TOM1/ 0, 3TOM2/ !, 4TOM3/ @ jacks correspond to a two-trigger input that uses a stereo jack for maximum expressive control, allowing performance subtleties over a wide dynamic range. TRG1 1~:XP~Med~~~~~~, 5-2. Excessive vibration however, may result in crosstalk (sound being...output levels and functions of your drum set, or if you need to solve any other type of pad or a drum trigger (Yamaha DT20, etc.) to the input jack, that jack's parameters (sensitivity, etc.) should be connected to Trigger Input jacks 5RIDE and ...
...and 4 TOM3/ @ jacks can be connected to this jack. • The 2TOM1/ 0, 3TOM2/ !, 4TOM3/ @ jacks correspond to a two-trigger input that uses a stereo jack for maximum expressive control, allowing performance subtleties over a wide dynamic range. TRG1 1~:XP~Med~~~~~~, 5-2. Excessive vibration however, may result in crosstalk (sound being...output levels and functions of your drum set, or if you need to solve any other type of pad or a drum trigger (Yamaha DT20, etc.) to the input jack, that jack's parameters (sensitivity, etc.) should be connected to Trigger Input jacks 5RIDE and ...
Owner's Manual
Page 13
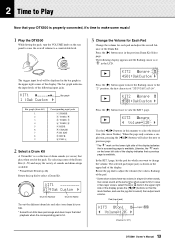
...the next or previous page. * The "," mark on the rear panel to raise the overall volume to a comfortable level. KIT3~~~ƒsnare~~ "~~Volume=120~~, Use the [] buttons in the upper right corner of the display. The following input jacks. KIT2~~~ƒsnare~~˙ "S01:OakCustom~, Press the [>] button again to... select a Drum Kit. The bar graph indicates the input levels of the display (press the [] buttons so that the mark flashes, and use the jog dial to view the KIT 3 page. KIT1 1~:Oak~Custom~~, Drum kit Number Drum kit Name Try out the different drum kits and select...
...the next or previous page. * The "," mark on the rear panel to raise the overall volume to a comfortable level. KIT3~~~ƒsnare~~ "~~Volume=120~~, Use the [] buttons in the upper right corner of the display. The following input jacks. KIT2~~~ƒsnare~~˙ "S01:OakCustom~, Press the [>] button again to... select a Drum Kit. The bar graph indicates the input levels of the display (press the [] buttons so that the mark flashes, and use the jog dial to view the KIT 3 page. KIT1 1~:Oak~Custom~~, Drum kit Number Drum kit Name Try out the different drum kits and select...
Owner's Manual
Page 14
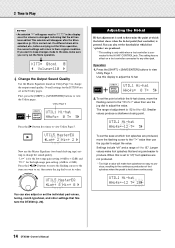
... is connected to the HI HAT CONTROL jack. Press the [] buttons to move the flashing cursor to the "T=" value then use the jog dial to adjust the value. Use this is set in the Utility pages. UTIL1~Hi-hat HHofs=~~0~T=~~5, 2. UTIL1~Hi-hat HHofs=-12~T=~20, 14 DTX500 Owner's Manual...MasterEQ "Lo=+~8~Hi=+~0~, You can also set the ease at which the hi-hat closes, move the flashing cursor to the "HHofs=" value then use the Master Equalizer (two-band shelving type) setting to pro- Larger values make foot splashes too easy to change the output sound quality. When this...
... is connected to the HI HAT CONTROL jack. Press the [] buttons to move the flashing cursor to the "T=" value then use the jog dial to adjust the value. Use this is set in the Utility pages. UTIL1~Hi-hat HHofs=~~0~T=~~5, 2. UTIL1~Hi-hat HHofs=-12~T=~20, 14 DTX500 Owner's Manual...MasterEQ "Lo=+~8~Hi=+~0~, You can also set the ease at which the hi-hat closes, move the flashing cursor to the "HHofs=" value then use the Master Equalizer (two-band shelving type) setting to pro- Larger values make foot splashes too easy to change the output sound quality. When this...
Owner's Manual
Page 15
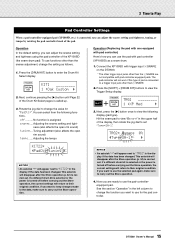
...pad type). Connect the XP100SD with trigger input 1SNARE on the DTX500. * The other trigger input jacks other than the 1SNARE are ready to use the selected pad again, make sure to carry out the Store operation. See the section "Operation" in the display if the data has been...to enter the Drum Kit Select display. 2 Time to Play Pad Controller Settings When a pad-controller-equipped pad (XP100SD, etc.) is connected, you can use for "PadCtl=". Next, continue pressing the [>] button until Page 22 of the pad. No function is called up. 3. Tuning adjustment (also affects the open...
...pad type). Connect the XP100SD with trigger input 1SNARE on the DTX500. * The other trigger input jacks other than the 1SNARE are ready to use the selected pad again, make sure to carry out the Store operation. See the section "Operation" in the display if the data has been...to enter the Drum Kit Select display. 2 Time to Play Pad Controller Settings When a pad-controller-equipped pad (XP100SD, etc.) is connected, you can use for "PadCtl=". Next, continue pressing the [>] button until Page 22 of the pad. No function is called up. 3. Tuning adjustment (also affects the open...

Owner's Manual
Page 16
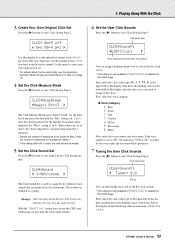
...9 Determines the click's time signature. • Tempo [Range] 30 to 16 Determines the click's overall volume. * When the flashing cursor is used when Beat=4 Press the [CLICK] button to 30 original patterns in the LED display. NOTICE • An asterisk "*" will appear next to "CLK1"...beat of click patterns. CLK1*~~~∫~B=4~÷ç 1~:User~~~⁄=130, 16 DTX500 Owner's Manual CLK1~~~~∫~B=4~÷ç 1~:User~~~⁄=123, Use this setting. * The value (the remaining number of seconds) of settings and allows you set the beat, tempo, timer, and the ...
...9 Determines the click's time signature. • Tempo [Range] 30 to 16 Determines the click's overall volume. * When the flashing cursor is used when Beat=4 Press the [CLICK] button to 30 original patterns in the LED display. NOTICE • An asterisk "*" will appear next to "CLK1"...beat of click patterns. CLK1*~~~∫~B=4~÷ç 1~:User~~~⁄=130, 16 DTX500 Owner's Manual CLK1~~~~∫~B=4~÷ç 1~:User~~~⁄=123, Use this setting. * The value (the remaining number of seconds) of settings and allows you set the beat, tempo, timer, and the ...
Owner's Manual
Page 17
...the [>] button to sound. When values are set as a group. [Range] Metronome, Wood Block, Percussion, Agogo, Stick, Pulse, UserClick With the "UserClick" setting you can use the CLK5 and CLK6 pages to fine-tune the click sound settings. 6 Set the User Click Sounds Press the [>] button to be muted at...the lower half of the display and select the voice you don't want to assign to 9) for the number of the five click beats. Use this display to set the tuning value in the Click Setting display. CLK4*Sound "~1:Metronome~~, The Click Sound Set is played for a measure then ...
...the [>] button to sound. When values are set as a group. [Range] Metronome, Wood Block, Percussion, Agogo, Stick, Pulse, UserClick With the "UserClick" setting you can use the CLK5 and CLK6 pages to fine-tune the click sound settings. 6 Set the User Click Sounds Press the [>] button to be muted at...the lower half of the display and select the voice you don't want to assign to 9) for the number of the five click beats. Use this display to set the tuning value in the Click Setting display. CLK4*Sound "~1:Metronome~~, The Click Sound Set is played for a measure then ...

Owner's Manual
Page 18
... only. mix This is output from the OUTPUT R jack only. All drum performance and song playback are output in the DTX500's memory using the Store Operation described below . clickR The click signal is the standard output setting. Rotate the jog dial to select the destination memory ...number (1 to 30) to select the output from the outputs listed below . Click output and performance output can use the Factory Set operation to reset the click sets 1 through 30 to ~1 :[User~~] Click Set Name 8-2. Operation 1. UTIL1~Hi-hat HHofs=~~0~T=~~5,...
... only. mix This is output from the OUTPUT R jack only. All drum performance and song playback are output in the DTX500's memory using the Store Operation described below . clickR The click signal is the standard output setting. Rotate the jog dial to select the destination memory ...number (1 to 30) to select the output from the outputs listed below . Click output and performance output can use the Factory Set operation to reset the click sets 1 through 30 to ~1 :[User~~] Click Set Name 8-2. Operation 1. UTIL1~Hi-hat HHofs=~~0~T=~~5,...

Owner's Manual
Page 19
... there are circles in the LED display, when tempo is changed by manually tapping in the LED display. You can change the value to be used to change to the newly selected tempo. Shows the current tempo. First, press the [SHIFT] + [SAVE/ENTER] buttons to exit from the Tap Tempo ...up the following three types. Press the [DRUM KIT], [CLICK], or [SONG >/■] button to call up the Utility pages. The [] buttons can also be used to set tempo. 4. Operation 1. Rotate the jog dial to select the type you . In the Click Setting page and Song Select page, the tempo is...
... there are circles in the LED display, when tempo is changed by manually tapping in the LED display. You can change the value to be used to change to the newly selected tempo. Shows the current tempo. First, press the [SHIFT] + [SAVE/ENTER] buttons to exit from the Tap Tempo ...up the following three types. Press the [DRUM KIT], [CLICK], or [SONG >/■] button to call up the Utility pages. The [] buttons can also be used to set tempo. 4. Operation 1. Rotate the jog dial to select the type you . In the Click Setting page and Song Select page, the tempo is...
Owner's Manual
Page 20
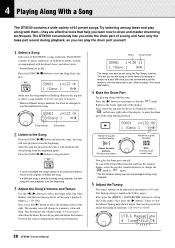
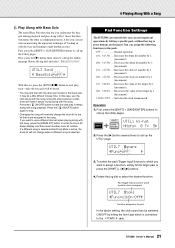
...] + [SAVE/ENTER] buttons to the right. SONG1~~~⁄=123~÷ç 1~:Demo~1~~~~∞¢, Make sure the song number is flashing, then use the jog dial to select a song number (1 to 63) you want to return to +24.0). SONG1~~~⁄=123~÷ç 1~:Demo~1~~~~∞¢, Song...counterclockwise to change to drum and master drumming techniques. Next, press the [>] button 7 times to view the Master Tuning page shown below, then use the jog dial to view the Song Select display. The DTX500 contains 63 preset songs that matches the song. Next, press the [>] button to...
...] + [SAVE/ENTER] buttons to the right. SONG1~~~⁄=123~÷ç 1~:Demo~1~~~~∞¢, Make sure the song number is flashing, then use the jog dial to select a song number (1 to 63) you want to return to +24.0). SONG1~~~⁄=123~÷ç 1~:Demo~1~~~~∞¢, Song...counterclockwise to change to drum and master drumming techniques. Next, press the [>] button 7 times to view the Master Tuning page shown below, then use the jog dial to view the Song Select display. The DTX500 contains 63 preset songs that matches the song. Next, press the [>] button to...
Owner's Manual
Page 21
...and select "BassSolo=on the panel. dec~clkNo..... Decreases the value of the tempo by 1 (decrement). UTIL7~~ƒsnare "Func=off ~, With this case, use a different drum kit when playing along with song playback. In this set number by 1 (increment). Press the [ ON/OFF] button to which a pad...the pad (Trigger Input Source) to which is pre-assigned to call up the Utility pages. You can be a little difficult to use the click along with the bass and forming a tight rhythm section. Increases the drum kit number by 1 (decrement). Pad Function Settings The ...
...and select "BassSolo=on the panel. dec~clkNo..... Decreases the value of the tempo by 1 (decrement). UTIL7~~ƒsnare "Func=off ~, With this case, use a different drum kit when playing along with song playback. In this set number by 1 (increment). Press the [ ON/OFF] button to which a pad...the pad (Trigger Input Source) to which is pre-assigned to call up the Utility pages. You can be a little difficult to use the click along with the bass and forming a tight rhythm section. Increases the drum kit number by 1 (decrement). Pad Function Settings The ...
