

Owner's Manual
Page 3
... q Digital Sound Field Processor (DSP) q Dolby Digital Decoder q Dolby Pro Logic Decoder q DTS Decoder q CINEMA DSP: Theater-like Sound Experience by the Combination of YAMAHA DSP Technology and Dolby Digital, Dolby ...Pro Logic or DTS q Automatic Input Balance Control for Dolby Pro Logic decoding q Test Tone Generator for Easier Speaker Balance Adjustment q Speaker Output Mode Selection q 6-Channel External Decoder Input for Other Future Formats q Video Signal Input/Output Capability (Including S Video Connections) q SLEEP Timer q Universal Remote...
... q Digital Sound Field Processor (DSP) q Dolby Digital Decoder q Dolby Pro Logic Decoder q DTS Decoder q CINEMA DSP: Theater-like Sound Experience by the Combination of YAMAHA DSP Technology and Dolby Digital, Dolby ...Pro Logic or DTS q Automatic Input Balance Control for Dolby Pro Logic decoding q Test Tone Generator for Easier Speaker Balance Adjustment q Speaker Output Mode Selection q 6-Channel External Decoder Input for Other Future Formats q Video Signal Input/Output Capability (Including S Video Connections) q SLEEP Timer q Universal Remote...

Owner's Manual
Page 8
...the remote control. 1 STANDBY/ON Press this switch to turn on the display. The name of the selected input source appears on the display) by pressing EFFECT. 8 When using headphones only, set this selector to select the input source (VCR, VIDEO AUX, TV/DBS, DVD/LD, CD, TUNER, PHONO) that no DSP... program name appears on the display. 6 VOLUME This control is used to raise or lower the volume level. 7 PHONES jack When you can listen to the sound to or watch. The "TAPE/MD MON" indicator lights up on the power of power to receive infrared-signals from the remote control. 2 Remote...
...the remote control. 1 STANDBY/ON Press this switch to turn on the display. The name of the selected input source appears on the display) by pressing EFFECT. 8 When using headphones only, set this selector to select the input source (VCR, VIDEO AUX, TV/DBS, DVD/LD, CD, TUNER, PHONO) that no DSP... program name appears on the display. 6 VOLUME This control is used to raise or lower the volume level. 7 PHONES jack When you can listen to the sound to or watch. The "TAPE/MD MON" indicator lights up on the power of power to receive infrared-signals from the remote control. 2 Remote...

Owner's Manual
Page 10
.... The red "dts" indicator lights up when the built-in Dolby Digital decoder is on . DECODER on the front panel or TAPE/MD on the remote control. 3 indicators Either "dts" indicator lights up when the built-in Dolby Pro Logic decoder is on and the signals of selected input source. 2 ... up when the built-in digital sound field processor is on, and " " lights up when the built-in DTS decoder is turned on the selected DSP program, both " " and " ", or both " " and " " will light up. 5 SLEEP indicator This lights up when the tape deck (or MD recorder, etc.) is selected ...
.... The red "dts" indicator lights up when the built-in Dolby Digital decoder is on . DECODER on the front panel or TAPE/MD on the remote control. 3 indicators Either "dts" indicator lights up when the built-in Dolby Pro Logic decoder is on and the signals of selected input source. 2 ... up when the built-in digital sound field processor is on, and " " lights up when the built-in DTS decoder is turned on the selected DSP program, both " " and " ", or both " " and " " will light up. 5 SLEEP indicator This lights up when the tape deck (or MD recorder, etc.) is selected ...

Owner's Manual
Page 12
...output (or input) terminals of each component to be made correctly, that can be connected to this unit's STANDBY/ON or the provided remote control's POWER and STANDBY. model 1 OUTLET Use these to connect the power cords from your components to this unit and other components,... be sure all connections have YAMAHA components numbered as etc. These outlets will normally minimize hum, but in this unit. * If you have been completed. Turntable DVD player,...
...output (or input) terminals of each component to be made correctly, that can be connected to this unit's STANDBY/ON or the provided remote control's POWER and STANDBY. model 1 OUTLET Use these to connect the power cords from your components to this unit and other components,... be sure all connections have YAMAHA components numbered as etc. These outlets will normally minimize hum, but in this unit. * If you have been completed. Turntable DVD player,...

Owner's Manual
Page 19
... SET MENU once or more to select the setting you can also select the function by pressing . (Pressing goes back one selection.) 19 Front panel Remote control or 4 Repeat steps 2 and 3 to change the settings for "REAR", "MAIN", "BASS" and/or "M.LVL" in the same way.... * After pressing SET MENU once on the remote control. Front panel Remote control or 3 Press + or - English ADJUSTMENT METHOD Adjustments should be made while watching the information on this unit's display. 1 1 23 3 2 ...
... SET MENU once or more to select the setting you can also select the function by pressing . (Pressing goes back one selection.) 19 Front panel Remote control or 4 Repeat steps 2 and 3 to change the settings for "REAR", "MAIN", "BASS" and/or "M.LVL" in the same way.... * After pressing SET MENU once on the remote control. Front panel Remote control or 3 Press + or - English ADJUSTMENT METHOD Adjustments should be made while watching the information on this unit's display. 1 1 23 3 2 ...

Owner's Manual
Page 20
... level should be used. or 1 Set VOLUME to the AMP/TUN or DSP position on . Front panel 2 Turn the power on the remote control. SPEAKER BALANCE ADJUSTMENT This procedure lets you use VOLUME ( ) on the remote control at your listening position to check if the adjustments are satisfactory. 2...5,9 6 3 4 4,7 8 Set the SELECTOR DIAL to the " " position. Front panel Remote control or 3 Select the main speakers to be done at your listening position with the remote control. After completing the adjustment of the output level for the best performance of each speaker. ...
... level should be used. or 1 Set VOLUME to the AMP/TUN or DSP position on . Front panel 2 Turn the power on the remote control. SPEAKER BALANCE ADJUSTMENT This procedure lets you use VOLUME ( ) on the remote control at your listening position to check if the adjustments are satisfactory. 2...5,9 6 3 4 4,7 8 Set the SELECTOR DIAL to the " " position. Front panel Remote control or 3 Select the main speakers to be done at your listening position with the remote control. After completing the adjustment of the output level for the best performance of each speaker. ...

Owner's Manual
Page 21
... main speaker and the right main speaker is the same. Front panel 21 Front panel 6 Turn up the volume. The display changes as shown below. Remote control You will hear a test tone (like pink noise) from each speaker for about two seconds in the SET MENU mode is set to the...
... main speaker and the right main speaker is the same. Front panel 21 Front panel 6 Turn up the volume. The display changes as shown below. Remote control You will hear a test tone (like pink noise) from each speaker for about two seconds in the SET MENU mode is set to the...
Owner's Manual
Page 22
...may also use external power amplifiers, you may decrease the main speaker output level by using VOLUME (or VOLUME ( ) on the display. Remote control Notes • Once you have completed these adjustments, you can only adjust the overall sound level of your audio system by setting "M.LVL... cally output from the left and right main speakers. • If there is insufficient sound output from the selected speaker. appears on the remote control). • If you use their volume controls to be adjusted in the SET MENU mode is automati- 8 Adjust the sound output levels...
...may also use external power amplifiers, you may decrease the main speaker output level by using VOLUME (or VOLUME ( ) on the display. Remote control Notes • Once you have completed these adjustments, you can only adjust the overall sound level of your audio system by setting "M.LVL... cally output from the left and right main speakers. • If there is insufficient sound output from the selected speaker. appears on the remote control). • If you use their volume controls to be adjusted in the SET MENU mode is automati- 8 Adjust the sound output levels...

Owner's Manual
Page 23
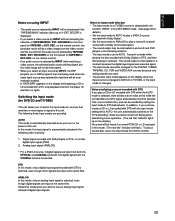
.... English TO PLAY A SOURCE 2 BASIC OPERATION 3 1,7 2 5 8 4 3,4 8 7 When using INPUT. (Turn on the monitor TV for video sources.) Front panel Remote control or 2 Turn the power on. Front panel Remote control or The name of the selected input source will appear on the front panel or EXT. DECODER once or more... on the display. DECODER on the front panel or TAPE/MD on the remote control so that "EXT. on the remote control so that the "TAPE/MD MON" indicator lights up on the display. 23 DECDR" appears on the display.
.... English TO PLAY A SOURCE 2 BASIC OPERATION 3 1,7 2 5 8 4 3,4 8 7 When using INPUT. (Turn on the monitor TV for video sources.) Front panel Remote control or 2 Turn the power on. Front panel Remote control or The name of the selected input source will appear on the front panel or EXT. DECODER once or more... on the display. DECODER on the front panel or TAPE/MD on the remote control so that "EXT. on the remote control so that the "TAPE/MD MON" indicator lights up on the display. 23 DECDR" appears on the display.
Owner's Manual
Page 24
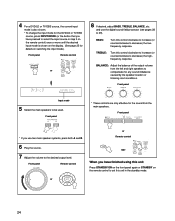
...speaker location or listening room conditions. or 24 BALANCE: Adjust the balance of the output volume from the main speakers. Front panel Remote control or Remote control When you use the digital sound field processor (see pages 28 to the desired output level. BASS: Turn this control ...clockwise to increase (or counterclockwise to set this unit Press STANDBY/ON on the front panel again or STANDBY on the remote control to decrease) the lowfrequency response. and use two main speaker systems, press both A and B. 6 Play the source. 7 Adjust the volume...
...speaker location or listening room conditions. or 24 BALANCE: Adjust the balance of the output volume from the main speakers. Front panel Remote control or Remote control When you use the digital sound field processor (see pages 28 to the desired output level. BASS: Turn this control ...clockwise to increase (or counterclockwise to set this unit Press STANDBY/ON on the front panel again or STANDBY on the remote control to decrease) the lowfrequency response. and use two main speaker systems, press both A and B. 6 Play the source. 7 Adjust the volume...
Owner's Manual
Page 25
on the remote control), the play back result will be interrupted in some LD and DVD players in the following...played, but the video image will not be interrupted. • When you select an input source by INPUT, the DSP program (or no DSP program) that send two or more types of signal to this mode when you select a video source by INPUT ... at the same time. Digital signal encoded with Dolby Digital or DTS, or normal digital input signal (PCM) 2. DEC. on the remote control). • If an audio source is restored. DECODER on the front panel (or TAPE/MD or EXT. English Notes on using...
on the remote control), the play back result will be interrupted in some LD and DVD players in the following...played, but the video image will not be interrupted. • When you select an input source by INPUT, the DSP program (or no DSP program) that send two or more types of signal to this mode when you select a video source by INPUT ... at the same time. Digital signal encoded with Dolby Digital or DTS, or normal digital input signal (PCM) 2. DEC. on the remote control). • If an audio source is restored. DECODER on the front panel (or TAPE/MD or EXT. English Notes on using...

Owner's Manual
Page 26
... to prevent it from records, compact discs, radio, etc. Notes • The settings of DSP and VOLUME, BASS, TREBLE and BALANCE have no effect on a tape deck, MD recorder or VCR connected to this unit. Front panel Remote control or 3 Begin recording on the display. Therefore, when recording or dubbing video signals...
... to prevent it from records, compact discs, radio, etc. Notes • The settings of DSP and VOLUME, BASS, TREBLE and BALANCE have no effect on a tape deck, MD recorder or VCR connected to this unit. Front panel Remote control or 3 Begin recording on the display. Therefore, when recording or dubbing video signals...
Owner's Manual
Page 27
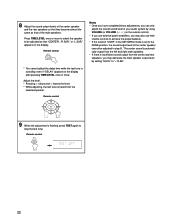
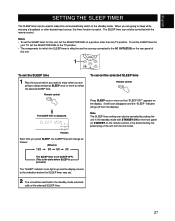
To set the SLEEP timer for your TV, set the SELECTOR DIAL to the TV position. • The components for this timer function is useful. Remote control The SLEEP time is pressed.) The "SLEEP" indicator soon lights up and the display returns to the indication before the SLEEP timer was set. 2 ... want to enjoy when you press SLEEP, the SLEEP time will change as follows: (Minutes) 120 90 60 30 To cancel the selected SLEEP time Remote control Press SLEEP once or more to select the desired SLEEP time. Notes • To set the SELECTOR DIAL to the standby mode automati-
To set the SLEEP timer for your TV, set the SELECTOR DIAL to the TV position. • The components for this timer function is useful. Remote control The SLEEP time is pressed.) The "SLEEP" indicator soon lights up and the display returns to the indication before the SLEEP timer was set. 2 ... want to enjoy when you press SLEEP, the SLEEP time will change as follows: (Minutes) 120 90 60 30 To cancel the selected SLEEP time Remote control Press SLEEP once or more to select the desired SLEEP time. Notes • To set the SELECTOR DIAL to the standby mode automati-

Owner's Manual
Page 30
... DOLBY PRO LOGIC or DOLBY PRO LOGIC ENHANCED, no sound output. Front panel Remote control or or Remote control Press DSP. If desired, adjust the delay time and the output level of each of ...all channels are mixed and are input to this unit is selected, DSP cannot be heard from the main ...and the signals of the selected source encoded with the input source selected at that is set to the DSP position, you what sound processing is being undertaken. 12 3 4 5 1 This lights up in ...
... DOLBY PRO LOGIC or DOLBY PRO LOGIC ENHANCED, no sound output. Front panel Remote control or or Remote control Press DSP. If desired, adjust the delay time and the output level of each of ...all channels are mixed and are input to this unit is selected, DSP cannot be heard from the main ...and the signals of the selected source encoded with the input source selected at that is set to the DSP position, you what sound processing is being undertaken. 12 3 4 5 1 This lights up in ...

Owner's Manual
Page 31
... 1 Press TIME/LEVEL once or more until the name of the item which you want to adjust appears on the remote control, you can adjust the delay time between the main sound and sound effect, and each speaker's output level as follows: DELAY Delay time ...changes as you prefer. 1 2 1 2 Adjustment method When adjusting with the remote control, set the SELECTOR DIAL to the AMP/TUN or DSP position on the setting in the reverse order. * Depending on the remote control. Right rear speaker output level L SUR. Front panel Remote control or or 3 Repeat steps 1 and 2 to adjust the settings...
... 1 Press TIME/LEVEL once or more until the name of the item which you want to adjust appears on the remote control, you can adjust the delay time between the main sound and sound effect, and each speaker's output level as follows: DELAY Delay time ...changes as you prefer. 1 2 1 2 Adjustment method When adjusting with the remote control, set the SELECTOR DIAL to the AMP/TUN or DSP position on the setting in the reverse order. * Depending on the remote control. Right rear speaker output level L SUR. Front panel Remote control or or 3 Repeat steps 1 and 2 to adjust the settings...

Owner's Manual
Page 34
.... If, however, the power plug is disconnected from being decoded and the signals of the selected source encoded with the remote control, set the SELECTOR DIAL to the AMP/TUN or DSP position on . The following the procedure above. * See page 25 for details on this unit's display. or This adjusts the... when Dolby Digital or DTS is being lost when this unit is set in the TIME/LEVEL mode • Functions when using TEST Front panel Remote control or INPUT (Selecting the mode of the TV/DBS input) Choices: AUTO/LAST Preset position: AUTO You can designate the input mode that the...
.... If, however, the power plug is disconnected from being decoded and the signals of the selected source encoded with the remote control, set the SELECTOR DIAL to the AMP/TUN or DSP position on . The following the procedure above. * See page 25 for details on this unit's display. or This adjusts the... when Dolby Digital or DTS is being lost when this unit is set in the TIME/LEVEL mode • Functions when using TEST Front panel Remote control or INPUT (Selecting the mode of the TV/DBS input) Choices: AUTO/LAST Preset position: AUTO You can designate the input mode that the...

Owner's Manual
Page 35
...player, you can preset only one code for one position. (See "SETUP CODES" on page 41 for some DVD players. 3. DSP: This unit can be controlled and DSP programs can be performed for details). 2. Note that the SELECTOR DIAL is set to this case you can preset the code for an... with the manufacturers' codes listed from page 310. SELECTOR DIAL TAPE/MD: The code for a YAMAHA tape deck is displayed in this remote control. The code for a YAMAHA CD player is pressed. 35 If the remote control will flash when the button is preset. A DVD player can be preset by using the ...
...player, you can preset only one code for one position. (See "SETUP CODES" on page 41 for some DVD players. 3. DSP: This unit can be controlled and DSP programs can be performed for details). 2. Note that the SELECTOR DIAL is set to this case you can preset the code for an... with the manufacturers' codes listed from page 310. SELECTOR DIAL TAPE/MD: The code for a YAMAHA tape deck is displayed in this remote control. The code for a YAMAHA CD player is pressed. 35 If the remote control will flash when the button is preset. A DVD player can be preset by using the ...

Owner's Manual
Page 37
...this button to fast forward a tape. 1 POWER This button turns the unit on under factory settings. This button functions as PAUSE/ STOP* for operating YAMAHA CD players under factory settings. 8 (SEARCH) This button initiates a fast-forward search on the CD player. 2 DISC SKIP (+/-) (for a CD ... the button once to give a pause in operation and once more to stop operation. This button functions as PAUSE/STOP* for your tape deck whose remote control has a power button is playing to find the point from which are not described here. Press of a tape. s TAPE/MD 1 TV...
...this button to fast forward a tape. 1 POWER This button turns the unit on under factory settings. This button functions as PAUSE/ STOP* for operating YAMAHA CD players under factory settings. 8 (SEARCH) This button initiates a fast-forward search on the CD player. 2 DISC SKIP (+/-) (for a CD ... the button once to give a pause in operation and once more to stop operation. This button functions as PAUSE/STOP* for your tape deck whose remote control has a power button is playing to find the point from which are not described here. Press of a tape. s TAPE/MD 1 TV...

Owner's Manual
Page 38
If another code for your LD player whose remote control has a power button is preset, the button will turn on if you have preset the code for the YAMAHA LD player. If another code for your TV. Please refer to the owner's manual for those buttons which are not described here. See "... SELECT SET UP TITLE 38 Note: TV POWER, TV VOLUME and TV INPUT function if you have preset the code for your DVD player whose remote control has a power button is preset, the button will turn on under factory settings. The lightly marked buttons do not function. DISC SKIP Note: ...
If another code for your LD player whose remote control has a power button is preset, the button will turn on if you have preset the code for the YAMAHA LD player. If another code for your TV. Please refer to the owner's manual for those buttons which are not described here. See "... SELECT SET UP TITLE 38 Note: TV POWER, TV VOLUME and TV INPUT function if you have preset the code for your DVD player whose remote control has a power button is preset, the button will turn on under factory settings. The lightly marked buttons do not function. DISC SKIP Note: ...
Owner's Manual
Page 40
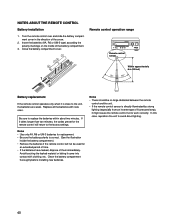
... an extended period of time. • If the batteries have leaked, dispose of the battery compartment. 3. NOTES ABOUT THE REMOTE CONTROL Battery installation Remote control operation range 1. Be sure to avoid direct lighting. Replace all the batteries with clothing, etc. Avoid touching the leaked material... or letting it might cause the remote control not to the unit, the batteries are weak. In this case, reposition the unit to replace the batteries within about two ...
... an extended period of time. • If the batteries have leaked, dispose of the battery compartment. 3. NOTES ABOUT THE REMOTE CONTROL Battery installation Remote control operation range 1. Be sure to avoid direct lighting. Replace all the batteries with clothing, etc. Avoid touching the leaked material... or letting it might cause the remote control not to the unit, the batteries are weak. In this case, reposition the unit to replace the batteries within about two ...


