Owner's Manual
Page 4
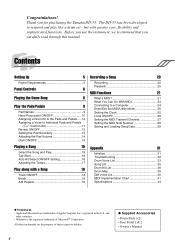
... Drum Stick (x2) • Foot Pedal 1 & 2 • Owner's Manual 4 Contents Setting Up 5 Power Requirements 5 Panel Controls 6 Playing the Demo Song 8 Play the Pads/Pedals 9 Pad Names 9 Hand Percussion ON/OFF 10 Assigning a Drum Kit to the Pads and Pedals .....10 Assigning a Voice to... with greater ease, flexibility and sophisticated functions. Before you use the instrument, we recommend that you for purchasing the Yamaha DD-55. Thank you carefully read through this manual. and other trademarks are trademarks of Microsoft® Corporation. but with a ...
... Drum Stick (x2) • Foot Pedal 1 & 2 • Owner's Manual 4 Contents Setting Up 5 Power Requirements 5 Panel Controls 6 Playing the Demo Song 8 Play the Pads/Pedals 9 Pad Names 9 Hand Percussion ON/OFF 10 Assigning a Drum Kit to the Pads and Pedals .....10 Assigning a Voice to... with greater ease, flexibility and sophisticated functions. Before you use the instrument, we recommend that you for purchasing the Yamaha DD-55. Thank you carefully read through this manual. and other trademarks are trademarks of Microsoft® Corporation. but with a ...

Owner's Manual
Page 6
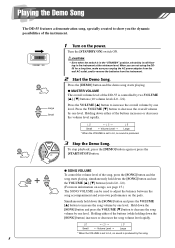
Panel Controls Front Panel !8 888 Pedal 2 Pedal 1 e q 888 w !5 t y u r !2 !4 i o !0 !1 !7 !3 !6 Front Panel q DEMO button 8, 25 w CLICK button 14 e DISPLAY 10 r VOLUME buttons 8 t HAND PERC button 10 y DRUM 1 - 3 buttons 18 u BACKING button 18 i PAD button 11, 14, 27 o KIT button 10, 28 !0 SONG button 8, 15, 16, 17 !1 TEMPO button 17 !2 START/STOP button 8, 15, 25 !3 A-B REPEAT button 19 !4 BREAK/TAP button 16, 18 !5 REC button 20 !6 STANDBY/ON Switch 8, 31 !7 DIAL 10 !8 Drum Pads (x7 9 6
Panel Controls Front Panel !8 888 Pedal 2 Pedal 1 e q 888 w !5 t y u r !2 !4 i o !0 !1 !7 !3 !6 Front Panel q DEMO button 8, 25 w CLICK button 14 e DISPLAY 10 r VOLUME buttons 8 t HAND PERC button 10 y DRUM 1 - 3 buttons 18 u BACKING button 18 i PAD button 11, 14, 27 o KIT button 10, 28 !0 SONG button 8, 15, 16, 17 !1 TEMPO button 17 !2 START/STOP button 8, 15, 25 !3 A-B REPEAT button 19 !4 BREAK/TAP button 16, 18 !5 REC button 20 !6 STANDBY/ON Switch 8, 31 !7 DIAL 10 !8 Drum Pads (x7 9 6
Owner's Manual
Page 8
...SONG] button and press the VOLUME [▲] button to increase the overall volume by two VOLUME buttons (10 volume levels L0 - Playing the Demo Song The DD-55 features a demonstration song, specially created to L0, no sound is produced by one level. Press the VOLUME [▲] button to increase ... again or press the [START/STOP] button. ● SONG VOLUME To control the volume level of the DD-55 is produced. 3 Stop the Demo Song. L9). Press the [DEMO] button and the demo song starts playing. ● MASTER VOLUME The overall volume level of the song, press the [SONG] button ...
...SONG] button and press the VOLUME [▲] button to increase the overall volume by two VOLUME buttons (10 volume levels L0 - Playing the Demo Song The DD-55 features a demonstration song, specially created to L0, no sound is produced by one level. Press the VOLUME [▲] button to increase ... again or press the [START/STOP] button. ● SONG VOLUME To control the volume level of the DD-55 is produced. 3 Stop the Demo Song. L9). Press the [DEMO] button and the demo song starts playing. ● MASTER VOLUME The overall volume level of the song, press the [SONG] button ...
Owner's Manual
Page 12
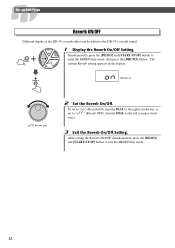
... mode, then press the [DRUM3] button. The current Reverb setting appears in the display. Simultaneously press the [DEMO] and [START/STOP] button to the left (counter-clockwise). 3 Exit the Reverb On/Off Setting. Play ...the Pads/Pedals Reverb ON/OFF Different depths of the DD-55's reverb effect can be added to exit the MIDI/Utility mode. 12 on Reverb on oFF on "... On/Off. After setting the Reverb ON/OFF, simultaneously press the [DEMO] and [START/STOP] button to the DD-55's overall sound. 1 Display the Reverb On/Off Setting.
... mode, then press the [DRUM3] button. The current Reverb setting appears in the display. Simultaneously press the [DEMO] and [START/STOP] button to the left (counter-clockwise). 3 Exit the Reverb On/Off Setting. Play ...the Pads/Pedals Reverb ON/OFF Different depths of the DD-55's reverb effect can be added to exit the MIDI/Utility mode. 12 on Reverb on oFF on "... On/Off. After setting the Reverb ON/OFF, simultaneously press the [DEMO] and [START/STOP] button to the DD-55's overall sound. 1 Display the Reverb On/Off Setting.

Owner's Manual
Page 13
... When you strike two pads simultaneously and hit one with sensors underneath each pad/sensor produces velocity data. With this from happening, the DD-55 is set to ignore hits of the pads not sounding. → Set the pad sensitivity level to 2. When struck, each ... to the vibrations of the pads weakly. When set the sensitivity of the pads (range 0 - 2). After setting the sensitivity, simultaneously press the [DEMO] and [START/STOP] button to the left (counter-clockwise). • Default setting is "1." 3 Exit the sensitivity setting. These problems may inadvertently ...
... When you strike two pads simultaneously and hit one with sensors underneath each pad/sensor produces velocity data. With this from happening, the DD-55 is set to ignore hits of the pads not sounding. → Set the pad sensitivity level to 2. When struck, each ... to the vibrations of the pads weakly. When set the sensitivity of the pads (range 0 - 2). After setting the sensitivity, simultaneously press the [DEMO] and [START/STOP] button to the left (counter-clockwise). • Default setting is "1." 3 Exit the sensitivity setting. These problems may inadvertently ...
Owner's Manual
Page 16
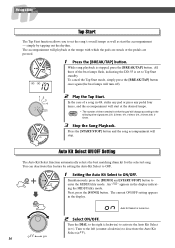
All three of the beat lamps flash, indicating the DD-55 is set the song's overall tempo as well as start at the tempo with which the pads are struck or the pedals are pressed. ...10 1 Press the [BREAK/TAP] button. You can deactivate this feature by tapping out the rhythm. Simultaneously press the [DEMO] and [START/STOP] button to Tap Start standby. Next, press the [SONG] button. The current ON/OFF setting appears in the display indicating the MIDI...
All three of the beat lamps flash, indicating the DD-55 is set the song's overall tempo as well as start at the tempo with which the pads are struck or the pedals are pressed. ...10 1 Press the [BREAK/TAP] button. You can deactivate this feature by tapping out the rhythm. Simultaneously press the [DEMO] and [START/STOP] button to Tap Start standby. Next, press the [SONG] button. The current ON/OFF setting appears in the display indicating the MIDI...
Owner's Manual
Page 17
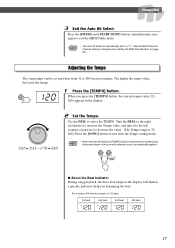
...] button to exit from 32 to decrease the value. (The Tempo range is changed (see "Setting the MIDI Note Number" on page 28). Press the [DEMO] and [START/STOP] buttons simultaneously once again to exit the MIDI/Utility mode. • The Auto Kit Select is automatically applied. ● About the Beat...
...] button to exit from 32 to decrease the value. (The Tempo range is changed (see "Setting the MIDI Note Number" on page 28). Press the [DEMO] and [START/STOP] buttons simultaneously once again to exit the MIDI/Utility mode. • The Auto Kit Select is automatically applied. ● About the Beat...

Owner's Manual
Page 25
... clock or external clock. you have the two devices play mode. After the clock is connected via MIDI to another MIDI device, the DD-55's Song Play or Demo functions will synchronize to the left (counter-clockwise). 3 Exit the MIDI/Utility mode. I " (external), turn the DIAL to the ...), turn the DIAL to enter the MIDI/Utility mode. To exit the MIDI mode, once again simultaneously press the [DEMO] and [START/STOP] buttons. mm Setting the Clock When the DD-55 is set , as a sequencer or rhythm machine - MIDI Functions Enter/Exit the MIDI/Utility Mode Simultaneously press ...
... clock or external clock. you have the two devices play mode. After the clock is connected via MIDI to another MIDI device, the DD-55's Song Play or Demo functions will synchronize to the left (counter-clockwise). 3 Exit the MIDI/Utility mode. I " (external), turn the DIAL to the ...), turn the DIAL to enter the MIDI/Utility mode. To exit the MIDI mode, once again simultaneously press the [DEMO] and [START/STOP] buttons. mm Setting the Clock When the DD-55 is set , as a sequencer or rhythm machine - MIDI Functions Enter/Exit the MIDI/Utility Mode Simultaneously press ...

Owner's Manual
Page 26
...since you'll want to hear the sound of the Local ON/OFF setting, the DD-55's performance data (including demo song data) is always sent to the MIDI OUT terminals for external sequencer applications, you...ON) ..........The internal voices will not produce any sound from the pads and once again by the DD-55 is ON (Local ON). 26 However, data produced by the pad data routed through the MIDI... OUT. However, the data will be played by the DD-55. • Normally, this should be transmitted through the sequencer. MIDI Functions Local ON/OFF The...
...since you'll want to hear the sound of the Local ON/OFF setting, the DD-55's performance data (including demo song data) is always sent to the MIDI OUT terminals for external sequencer applications, you...ON) ..........The internal voices will not produce any sound from the pads and once again by the DD-55 is ON (Local ON). 26 However, data produced by the pad data routed through the MIDI... OUT. However, the data will be played by the DD-55. • Normally, this should be transmitted through the sequencer. MIDI Functions Local ON/OFF The...
Owner's Manual
Page 31
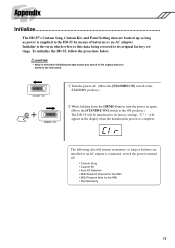
... Initialize The DD-55's Custom Song, Custom Kit, and Panel Setting data are backed up so long as batteries are installed or an AC adaptor is connected, even if the power is turned off . (Move the [STANDBY/ON] switch to the STANDBY position.) w While holding down the [DEMO] button, turn... the power on again. (Move the [STANDBY/ON] switch to the ON position.) The DD-55 will be initialized to its original factory settings. To initialize the DD-55, follow the procedure below. • Keep in mind that initializing...
... Initialize The DD-55's Custom Song, Custom Kit, and Panel Setting data are backed up so long as batteries are installed or an AC adaptor is connected, even if the power is turned off . (Move the [STANDBY/ON] switch to the STANDBY position.) w While holding down the [DEMO] button, turn... the power on again. (Move the [STANDBY/ON] switch to the ON position.) The DD-55 will be initialized to its original factory settings. To initialize the DD-55, follow the procedure below. • Keep in mind that initializing...

Owner's Manual
Page 32
...easily. The MIDI clock has been set of the pads not sounding. Do not attempt to an authorized Yamaha dealer for proper diagnosis and repair. If the suggested remedy is ineffective, take the DD-55 to repair this digital instrument by yourself as serious damage may occur. Cause/Solution This is a normal... to the appropriate pad (see page 25). When the pads are low and should be replaced with a complete set to "000". The song or Demo does not start playback. The batteries are struck, the display is initialized if batteries are in one of six new batteries immediately. Use the PAD...
...easily. The MIDI clock has been set of the pads not sounding. Do not attempt to an authorized Yamaha dealer for proper diagnosis and repair. If the suggested remedy is ineffective, take the DD-55 to repair this digital instrument by yourself as serious damage may occur. Cause/Solution This is a normal... to the appropriate pad (see page 25). When the pads are low and should be replaced with a complete set to "000". The song or Demo does not start playback. The batteries are struck, the display is initialized if batteries are in one of six new batteries immediately. Use the PAD...

Owner's Manual
Page 35
... Nomal Difficult Easy Difficult Nomal Difficult Nomal Difficult Nomal Difficult Nomal Difficult Nomal Demo: These songs demonstrate the drum sounds and rhythms. Pattern: These are ideal for drum practice. Latin: These are included in this type. Appendix Song ... 68 Swing Jazz 1 Difficulty Easy Nomal Easy Nomal Difficult Easy Difficult Nomal Difficult Song No. Song Name Demo 00 Technical Funk 01 Heavy Metal 02 Hyper Dance Mix 03 Latin Fusion 04 Straight Ahead Pattern 05 Simple Rock 06 Pop Rock 07 R&R 1 08...
... Nomal Difficult Easy Difficult Nomal Difficult Nomal Difficult Nomal Difficult Nomal Difficult Nomal Demo: These songs demonstrate the drum sounds and rhythms. Pattern: These are ideal for drum practice. Latin: These are included in this type. Appendix Song ... 68 Swing Jazz 1 Difficulty Easy Nomal Easy Nomal Difficult Easy Difficult Nomal Difficult Song No. Song Name Demo 00 Technical Funk 01 Heavy Metal 02 Hyper Dance Mix 03 Latin Fusion 04 Straight Ahead Pattern 05 Simple Rock 06 Pop Rock 07 R&R 1 08...
Owner's Manual
Page 36
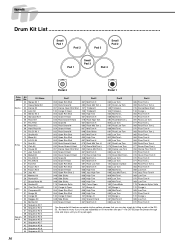
... Low Tom 070 Floor Tom H The Sequential Kit features complete rhythm pattern phrases that you hit a pad repeatedly or hit more than one pad - the DD-55 plays the phrase through once and stops, until you hit a pad again. Appendix Drum Kit List Small Pad 1 Pad 2 Pad 3 Small Pad 2 Pad 1 Small... Pad 3 Pad 4 Cate- Kit gory No. Kit Name 00 Stereo Kit 1 01 Heavy Metal Kit Demo 02 Dance Kit 03 Latin Kit 04 Stereo Kit 2 05 Standard Kit 1 06 Rock Kit 1 07 R & R Kit 08 Rock Kit 2 09 Hard Rock Kit 10...
... Low Tom 070 Floor Tom H The Sequential Kit features complete rhythm pattern phrases that you hit a pad repeatedly or hit more than one pad - the DD-55 plays the phrase through once and stops, until you hit a pad again. Appendix Drum Kit List Small Pad 1 Pad 2 Pad 3 Small Pad 2 Pad 1 Small... Pad 3 Pad 4 Cate- Kit gory No. Kit Name 00 Stereo Kit 1 01 Heavy Metal Kit Demo 02 Dance Kit 03 Latin Kit 04 Stereo Kit 2 05 Standard Kit 1 06 Rock Kit 1 07 R & R Kit 08 Rock Kit 2 09 Hard Rock Kit 10...
Owner's Manual
Page 44
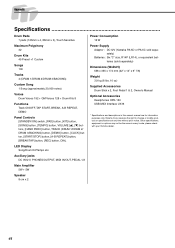
... 2, Owner's Manual Optional Accessories Headphones HPE-150 USB-MIDI Interface UX16 * Specifications and descriptions in every locale, please check with your Yamaha dealer. 44 Appendix Specifications Drum Pads 7 pads (125mm x 4, 88mm x 3), Touch Sensitive Maximum Polyphony 32 Drum Kits 45 Preset ...(approximately 20,000 notes) Voices Drum Voices 192 + GM Voices 128 + Drum Kits 8 Functions Track ON/OFF, TAP START, BREAK, A-B REPEAT, DEMO Panel Controls [STANDBY/ON] switch, [PAD] button, [KIT] button, [SONG] button, [TEMPO] button, VOLUME buttons, [HAND PERC] button, TRACK (...
... 2, Owner's Manual Optional Accessories Headphones HPE-150 USB-MIDI Interface UX16 * Specifications and descriptions in every locale, please check with your Yamaha dealer. 44 Appendix Specifications Drum Pads 7 pads (125mm x 4, 88mm x 3), Touch Sensitive Maximum Polyphony 32 Drum Kits 45 Preset ...(approximately 20,000 notes) Voices Drum Voices 192 + GM Voices 128 + Drum Kits 8 Functions Track ON/OFF, TAP START, BREAK, A-B REPEAT, DEMO Panel Controls [STANDBY/ON] switch, [PAD] button, [KIT] button, [SONG] button, [TEMPO] button, VOLUME buttons, [HAND PERC] button, TRACK (...


