Owner's Manual
Page 2
...ve years. IMPORTANT NOTICE: DO NOT MODIFY THIS UNIT! Modifications not expressly approved by Yamaha may be the source of the product. Cable/s supplied with an amplifier and headphones or speaker/s, ...stand that the charger is recommended by Yamaha. This equipment generates/uses radio frequencies and, if not installed and used . Utilize power outlets that interference will not result in harmful interference with the requirements listed in this type of battery is 300 ohm ribbon lead, change or modify any battery. You should record the model number, serial number...
...ve years. IMPORTANT NOTICE: DO NOT MODIFY THIS UNIT! Modifications not expressly approved by Yamaha may be the source of the product. Cable/s supplied with an amplifier and headphones or speaker/s, ...stand that the charger is recommended by Yamaha. This equipment generates/uses radio frequencies and, if not installed and used . Utilize power outlets that interference will not result in harmful interference with the requirements listed in this type of battery is 300 ohm ribbon lead, change or modify any battery. You should record the model number, serial number...
Owner's Manual
Page 3
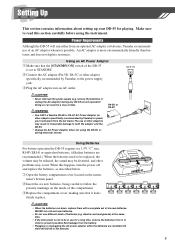
... an AC power adaptor is not to be different from the instrument or an outlet, always hold the plug itself and not the cord. • Do not connect the instrument to the model DD-55C. (4)-7 3 Do not use paint thinners, solvents, cleaning fluids, or chemical-impregnated wiping cloths. YAMAHA CANNOT BE HELD RESPONSIBLE FOR THE ACCIDENTAL LOSS OF IMPORTANT MUSIC DATA! Yamaha cannot...
... an AC power adaptor is not to be different from the instrument or an outlet, always hold the plug itself and not the cord. • Do not connect the instrument to the model DD-55C. (4)-7 3 Do not use paint thinners, solvents, cleaning fluids, or chemical-impregnated wiping cloths. YAMAHA CANNOT BE HELD RESPONSIBLE FOR THE ACCIDENTAL LOSS OF IMPORTANT MUSIC DATA! Yamaha cannot...
Owner's Manual
Page 4
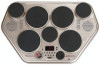
.... ● Supplied Accesoories • Drum Stick (x2) • Foot Pedal 1 & 2 • Owner's Manual 4 The DD-55 has been developed to a Computer 24 Enter/Exit the MIDI/Utility Mode 25 Setting the Clock 25 Local ON/OFF 26 Setting the MIDI Transmit Channel 27 Setting the MIDI Note Number 28 Saving and Loading Song Data 29 Appendix 31 Initialize 31 Troubleshooting 32 Drum Voice List 33 Song List 35 Drum Kit List 36 Drum Map 38 GM Voice List 40 MIDI Implementation Chart 41 Specifications 44 ●...
.... ● Supplied Accesoories • Drum Stick (x2) • Foot Pedal 1 & 2 • Owner's Manual 4 The DD-55 has been developed to a Computer 24 Enter/Exit the MIDI/Utility Mode 25 Setting the Clock 25 Local ON/OFF 26 Setting the MIDI Transmit Channel 27 Setting the MIDI Note Number 28 Saving and Loading Song Data 29 Appendix 31 Initialize 31 Troubleshooting 32 Drum Voice List 33 Song List 35 Drum Kit List 36 Drum Map 38 GM Voice List 40 MIDI Implementation Chart 41 Specifications 44 ●...
Owner's Manual
Page 5
... six new batteries. Make sure to the power supply jack. remove the batteries or unplug the AC adaptor) during electrical storms. Using Batteries For battery operation the DD-55 requires six 1.5V "C" size, R14P (LR14) or equivalent batteries. (Alkaline batteries are installed will run down, replace them with a complete set to STANDBY. NEVER mix old and new batteries. • Do not use different kinds of other problems may be in irreparable damage to power your DD-55...
... six new batteries. Make sure to the power supply jack. remove the batteries or unplug the AC adaptor) during electrical storms. Using Batteries For battery operation the DD-55 requires six 1.5V "C" size, R14P (LR14) or equivalent batteries. (Alkaline batteries are installed will run down, replace them with a complete set to STANDBY. NEVER mix old and new batteries. • Do not use different kinds of other problems may be in irreparable damage to power your DD-55...
Owner's Manual
Page 7
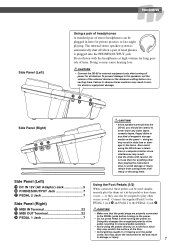
... Pedal 2 while turning the power on a soft floor, since they can be plugged in electric shock or equipment damage. !9 @0 @1 Side Panel (Right) @4 @3 @2 Side Panel (Left) !9 DC IN 12V (AC Adaptor) Jack 5 @0 PHONES/OUTPUT Jack 7 @1 PEDAL 2 Jack 7 Side Panel (Right) @2 MIDI IN Terminal 22 @3 MIDI OUT Terminal 22 @4 PEDAL 1 Jack 7 • Since speakers are properly connected to the speakers, set 's hi-hat pedal or bass drum voices - Do not use them . To prevent damage to the PEDAL jacks before connecting...
... Pedal 2 while turning the power on a soft floor, since they can be plugged in electric shock or equipment damage. !9 @0 @1 Side Panel (Right) @4 @3 @2 Side Panel (Left) !9 DC IN 12V (AC Adaptor) Jack 5 @0 PHONES/OUTPUT Jack 7 @1 PEDAL 2 Jack 7 Side Panel (Right) @2 MIDI IN Terminal 22 @3 MIDI OUT Terminal 22 @4 PEDAL 1 Jack 7 • Since speakers are properly connected to the speakers, set 's hi-hat pedal or bass drum voices - Do not use them . To prevent damage to the PEDAL jacks before connecting...
Owner's Manual
Page 8
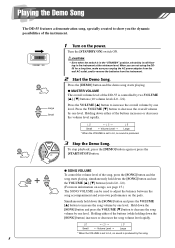
... the Demo Song. Playing the Demo Song The DD-55 features a demonstration song, specially created to show you unplug the AC power adaptor from the wall AC outlet, and/or remove the batteries from the instrument. 2 Start the Demo Song. L9). (For more information on songs, see page 15.) The SONG VOLUME can be used to increase the overall volume by two VOLUME buttons (10 volume levels L0 - Turn the [STANDBY/ON] switch ON...
... the Demo Song. Playing the Demo Song The DD-55 features a demonstration song, specially created to show you unplug the AC power adaptor from the wall AC outlet, and/or remove the batteries from the instrument. 2 Start the Demo Song. L9). (For more information on songs, see page 15.) The SONG VOLUME can be used to increase the overall volume by two VOLUME buttons (10 volume levels L0 - Turn the [STANDBY/ON] switch ON...

Owner's Manual
Page 9
... according to play strongly the volume is soft, and when you play the drum voices. shown, Drum Kit 00 The bass drum voice is struck. Play the Pads/Pedals Strike the pad with your hands, turn the Hand Percussion feature on by pressing Foot Pedal 1. When playing the pads with the supplied drum sticks or your playing; Striking the pad without pressing the pedal produces an open hi-hat sound. Use Foot Pedal 2 to Small Pad 3 (Drum Kit 00). Pad 2 061...
... according to play strongly the volume is soft, and when you play the drum voices. shown, Drum Kit 00 The bass drum voice is struck. Play the Pads/Pedals Strike the pad with your hands, turn the Hand Percussion feature on by pressing Foot Pedal 1. When playing the pads with the supplied drum sticks or your playing; Striking the pad without pressing the pedal produces an open hi-hat sound. Use Foot Pedal 2 to Small Pad 3 (Drum Kit 00). Pad 2 061...
Owner's Manual
Page 10
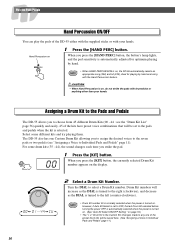
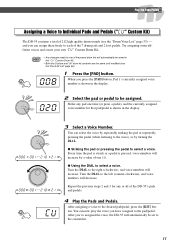
... the power is turned on. (See "Auto Kit Select ON/OFF Setting " on page 16.) • The " CU" Drum Kit is on . Hand Percussion on the display. 00 01 44 CU 2 Select a Drum Kit Number. When you strike the pad. 00 1 Press the [KIT] button. When you to assign the desired voices to the seven pads or two pedals (see the "Drum Kit List" page...
... the power is turned on. (See "Auto Kit Select ON/OFF Setting " on page 16.) • The " CU" Drum Kit is on . Hand Percussion on the display. 00 01 44 CU 2 Select a Drum Kit Number. When you strike the pad. 00 1 Press the [KIT] button. When you to assign the desired voices to the seven pads or two pedals (see the "Drum Kit List" page...
Owner's Manual
Page 11
... 7 drum pads and 2 foot pedals. Every time the pad is struck or a pedal is pressed, voice numbers will decrease. 000 001 210 211 Repeat the previous steps 2 and 3 for any pad one (1). ● Using the DIAL to the pad/pedal. Try assigning some different voices and create your own "CU" Custom Drum Kit. • Any changes made to be set to the left (counter-clockwise), and voice numbers will increase by turning...
... 7 drum pads and 2 foot pedals. Every time the pad is struck or a pedal is pressed, voice numbers will decrease. 000 001 210 211 Repeat the previous steps 2 and 3 for any pad one (1). ● Using the DIAL to the pad/pedal. Try assigning some different voices and create your own "CU" Custom Drum Kit. • Any changes made to be set to the left (counter-clockwise), and voice numbers will increase by turning...
Owner's Manual
Page 15
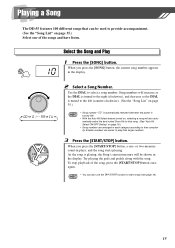
...-clockwise). (See the "Song List" on page 35.) • Song number " 00" is automatically selected whenever the power is playing, the Song's current measure will also automatically select the best suited Drum Kit for that can also use the TAP START function to their complexity. Smaller numbers are arranged in the display. 00 01 99 CU 2 Select a Song Number. Try playing the pads and pedals along with the...
...-clockwise). (See the "Song List" on page 35.) • Song number " 00" is automatically selected whenever the power is playing, the Song's current measure will also automatically select the best suited Drum Kit for that can also use the TAP START function to their complexity. Smaller numbers are arranged in the display. 00 01 99 CU 2 Select a Song Number. Try playing the pads and pedals along with the...
Owner's Manual
Page 16
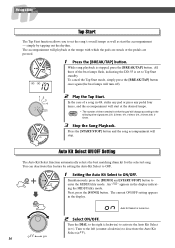
... desired tempo. • The number of a song in 4/4, strike any pad or press any pedal four times, and the accompaniment will change according to enter the MIDI/Utility mode. You can deactivate this feature by tapping out the rhythm. Playing a Song Tap Start The Tap Start function allows you to set to Tap Start standby. While song playback is turned on 16 2 Select ON/OFF. Press the [START/STOP] button and the song accompaniment will turn...
... desired tempo. • The number of a song in 4/4, strike any pad or press any pedal four times, and the accompaniment will change according to enter the MIDI/Utility mode. You can deactivate this feature by tapping out the rhythm. Playing a Song Tap Start The Tap Start function allows you to set to Tap Start standby. While song playback is turned on 16 2 Select ON/OFF. Press the [START/STOP] button and the song accompaniment will turn...

Owner's Manual
Page 18
... standby mode. Play along with a Song Use the pads and pedals to play along with the song accompaniment. • The DD-55 can liven up songs by song accompaniment, pads, foot pedals, and note data received through the MIDI IN jack. During song playback, press the [BREAK/TAP] button. Track ON/OFF The DD-55's song accompaniment consists of the measure you to play a drum fill or drum solo during this break. Break With the Break function, you can play...
... standby mode. Play along with a Song Use the pads and pedals to play along with the song accompaniment. • The DD-55 can liven up songs by song accompaniment, pads, foot pedals, and note data received through the MIDI IN jack. During song playback, press the [BREAK/TAP] button. Track ON/OFF The DD-55's song accompaniment consists of the measure you to play a drum fill or drum solo during this break. Break With the Break function, you can play...
Owner's Manual
Page 20
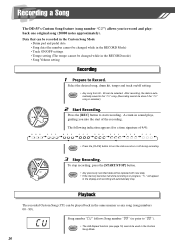
..., tempo and track on or off during recording. 3 Stop Recording. The following indication appears (for a time signature of the recording. A count-in the RECORD mode) • Song Volume setting Recording 1 Prepare to turn the click sound on /off setting. • Any song from 00 - 99 can be recorded in the Custom Song Mode • Drum pad and pedal data • Song data (the number cannot be changed while in sound plays, guiding you to start of 4/4): • Press the [CLICK] button to Record. Data...
..., tempo and track on or off during recording. 3 Stop Recording. The following indication appears (for a time signature of the recording. A count-in the RECORD mode) • Song Volume setting Recording 1 Prepare to turn the click sound on /off setting. • Any song from 00 - 99 can be recorded in the Custom Song Mode • Drum pad and pedal data • Song data (the number cannot be changed while in sound plays, guiding you to start of 4/4): • Press the [CLICK] button to Record. Data...
Owner's Manual
Page 21
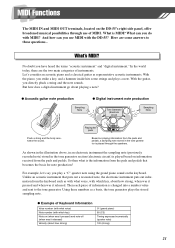
... (grand piano) 60 (C3) Timing expressed numerically (quarter note) 120 (strong) 21 So then what voice, with the DD-55? Using these are some strings and plays a note. MIDI Functions The MIDI IN and MIDI OUT terminals, located on the DD-55's right side panel, offer broadened musical possibilities through the speakers. As shown in the illustration above, in an electronic instrument the sampling note (previously recorded note) stored in the tone...
... (grand piano) 60 (C3) Timing expressed numerically (quarter note) 120 (strong) 21 So then what voice, with the DD-55? Using these are some strings and plays a note. MIDI Functions The MIDI IN and MIDI OUT terminals, located on the DD-55's right side panel, offer broadened musical possibilities through the speakers. As shown in the illustration above, in an electronic instrument the sampling note (previously recorded note) stored in the tone...
Owner's Manual
Page 22
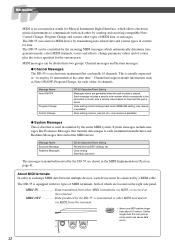
... be controlled by a MIDI cable. MIDI Functions MIDI is an acronym that stands for Musical Instrument Digital Interface, which allows electronic musical instruments to each instrument manufacturer and Realtime Messages that control the MIDI device. Message Name Note ON/OFF Program Change Control Change DD-55 Operation/Panel Setting Messages which are shown in common by transmitting note related data and various types of course play 16 instruments at this terminal. Each message includes a specific note number...
... be controlled by a MIDI cable. MIDI Functions MIDI is an acronym that stands for Musical Instrument Digital Interface, which allows electronic musical instruments to each instrument manufacturer and Realtime Messages that control the MIDI device. Message Name Note ON/OFF Program Change Control Change DD-55 Operation/Panel Setting Messages which are shown in common by transmitting note related data and various types of course play 16 instruments at this terminal. Each message includes a specific note number...
Owner's Manual
Page 23
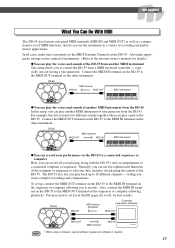
... record). To set the MIDI Transmit Channels on the sequencer or computer (allowing you play another MIDI instrument or tone generator from the DD-55 In this lets you mix two different sounds together when you play the voices and sounds of recording and performance applications. Connect the MIDI IN terminal on the DD-55 to the MIDI OUT terminal on the connected instruments. (Refer to the relevant owner's manuals...
... record). To set the MIDI Transmit Channels on the sequencer or computer (allowing you play another MIDI instrument or tone generator from the DD-55 In this lets you mix two different sounds together when you play the voices and sounds of recording and performance applications. Connect the MIDI IN terminal on the DD-55 to the MIDI OUT terminal on the connected instruments. (Refer to the relevant owner's manuals...

Owner's Manual
Page 24
... software) DD-55 MIDI IN MIDI OUT MIDI OUT MIDI IN ● When using personal computer music software when you use only special MIDI cables. ● Connect the MIDI terminals of the DD-55 to the MIDI terminals of the computer (modem or printer terminal) to the MIDI interface, as shown in the diagram below. Make sure to use the Yamaha UX16, be sure to install the supplied driver on your computer. 24 MIDI Functions Connecting to...
... software) DD-55 MIDI IN MIDI OUT MIDI OUT MIDI IN ● When using personal computer music software when you use only special MIDI cables. ● Connect the MIDI terminals of the DD-55 to the MIDI terminals of the computer (modem or printer terminal) to the MIDI interface, as shown in the diagram below. Make sure to use the Yamaha UX16, be sure to install the supplied driver on your computer. 24 MIDI Functions Connecting to...

Owner's Manual
Page 26
However, the data will not produce any sound from the voices. However, for transmission to external MIDI devices. • The default Local ON/OFF setting is transmitted via the MIDI OUT terminal. After setting the Local ON/OFF, exit the MIDI/Utility mode. • Regardless of the Local ON/OFF setting, the DD-55's performance data (including demo song data) is always sent to the MIDI OUT terminals for external sequencer applications, you...
However, the data will not produce any sound from the voices. However, for transmission to external MIDI devices. • The default Local ON/OFF setting is transmitted via the MIDI OUT terminal. After setting the Local ON/OFF, exit the MIDI/Utility mode. • Regardless of the Local ON/OFF setting, the DD-55's performance data (including demo song data) is always sent to the MIDI OUT terminals for external sequencer applications, you...

Owner's Manual
Page 32
... replaced with a complete set of the pads not sounding. Problem A buzz or click occurs momentarily when the DD-55 is turned ON or OFF The LED display is damaged. The song or Demo does not start playback. Please check the following list before deciding that occurs when the POWER switch is turned ON, and backed up data is initialized if batteries are in the display when the POWER switch is operated...
... replaced with a complete set of the pads not sounding. Problem A buzz or click occurs momentarily when the DD-55 is turned ON or OFF The LED display is damaged. The song or Demo does not start playback. Please check the following list before deciding that occurs when the POWER switch is turned ON, and backed up data is initialized if batteries are in the display when the POWER switch is operated...

Owner's Manual
Page 42
... volume of all channels to be changed simultaneously (Universal System Exclusive). • The values of "mm" is contained in the song data. *4 Exclusive F0H, 7EH, 7FH, 09H, 01H, F7H • This message automatically restores all default settings for the instrument, with the exception of MIDI Master Tuning. Appendix NOTE: *1 Value of Pan for each drum pad and foot pedal is not transmitted via MIDI. *2 The DD...
... volume of all channels to be changed simultaneously (Universal System Exclusive). • The values of "mm" is contained in the song data. *4 Exclusive F0H, 7EH, 7FH, 09H, 01H, F7H • This message automatically restores all default settings for the instrument, with the exception of MIDI Master Tuning. Appendix NOTE: *1 Value of Pan for each drum pad and foot pedal is not transmitted via MIDI. *2 The DD...


