Owner's Manual
Page 2
... safety. Please record the serial number of this Owner's Manual in a safe place for your outlet, consult an electrician for replacement of the obsolete outlet. 10 Protect the power cord from the apparatus. 11 Only use this apparatus during lightning storms or...as radiators, heat registers, stoves, or other . NO USER-SERVICEABLE PARTS INSIDE. REFER SERVICING TO QUALIFIED SERVICE PERSONNEL. • Explanation of important operating and maintenance (servicing) instructions in any heat sources such as power-supply cord or plug is intended to alert you to the presence of uninsulated "...
... safety. Please record the serial number of this Owner's Manual in a safe place for your outlet, consult an electrician for replacement of the obsolete outlet. 10 Protect the power cord from the apparatus. 11 Only use this apparatus during lightning storms or...as radiators, heat registers, stoves, or other . NO USER-SERVICEABLE PARTS INSIDE. REFER SERVICING TO QUALIFIED SERVICE PERSONNEL. • Explanation of important operating and maintenance (servicing) instructions in any heat sources such as power-supply cord or plug is intended to alert you to the presence of uninsulated "...

Owner's Manual
Page 3
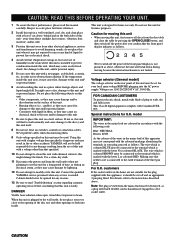
... eliminate the problem by Yamaha Corporation of radio or TV interference, relocate/reorient the antenna. If the antenna lead-in the USA. 3. Since hearing damage from loud sounds is 300 ohm ribbon lead, change the lead-in FCC Regulations, Part 15 for US customers only) 1. In the case of America or its subsidiaries. If you to coaxial type cable. IMPORTANT NOTICE...
... eliminate the problem by Yamaha Corporation of radio or TV interference, relocate/reorient the antenna. If the antenna lead-in the USA. 3. Since hearing damage from loud sounds is 300 ohm ribbon lead, change the lead-in FCC Regulations, Part 15 for US customers only) 1. In the case of America or its subsidiaries. If you to coaxial type cable. IMPORTANT NOTICE...
Owner's Manual
Page 4
... the following code: Blue: NEUTRAL Brown: LIVE As the colours of the wires in the mains lead of humidifier in them . 9 Only voltage specified on switches, controls or connection cables. Getting Started CAUTION: READ THIS BEFORE OPERATING YOUR UNIT. 1 To assure the finest performance, please read 'Troubleshooting' section regarding common operating errors before concluding that this unit is installed to prevent...
... the following code: Blue: NEUTRAL Brown: LIVE As the colours of the wires in the mains lead of humidifier in them . 9 Only voltage specified on switches, controls or connection cables. Getting Started CAUTION: READ THIS BEFORE OPERATING YOUR UNIT. 1 To assure the finest performance, please read 'Troubleshooting' section regarding common operating errors before concluding that this unit is installed to prevent...
Owner's Manual
Page 5
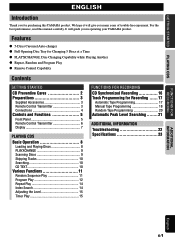
... of trouble-free enjoyment. Disc Changing Capability while Playing Another q Repeat, Random and Program Play q Remote Control Capability Contents GETTING STARTED CD Preventive Cares 2 Preparations 3 Supplied Accessories 3 Remote Control Transmitter 3 Connections 4 Controls and Functions 5 Front Panel 5 Remote Control Transmitter 6 Display 7 PLAYING CDS Basic Operation 8 Loading and Playing Discs 8 PLAYXCHANGE 9 Scanning Discs 9 Skipping Tracks 10 Searching 10 CD TEXT 10 Various Functions 11 Random Sequence Play 11 Program Play 12 Repeat Play 14 Index Search 14 Adjusting...
... of trouble-free enjoyment. Disc Changing Capability while Playing Another q Repeat, Random and Program Play q Remote Control Capability Contents GETTING STARTED CD Preventive Cares 2 Preparations 3 Supplied Accessories 3 Remote Control Transmitter 3 Connections 4 Controls and Functions 5 Front Panel 5 Remote Control Transmitter 6 Display 7 PLAYING CDS Basic Operation 8 Loading and Playing Discs 8 PLAYXCHANGE 9 Scanning Discs 9 Skipping Tracks 10 Searching 10 CD TEXT 10 Various Functions 11 Random Sequence Play 11 Program Play 12 Repeat Play 14 Index Search 14 Adjusting...
Owner's Manual
Page 8
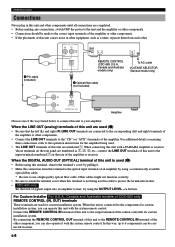
... with a YAMAHA amplifier or receiver whose terminals on the rear of this unit to connect this unit is used (1) • Be sure that the left and right) terminals of the amplifier. by using a commercially available optical fiber cable. * Be sure to use a high quality optical fiber cable. For Custom Installer For U.S.A., Canada and Australia models of CDC-685 only REMOTE CONTROL (IN, OUT) terminals These terminals are numbered as a tuner, separate...
... with a YAMAHA amplifier or receiver whose terminals on the rear of this unit to connect this unit is used (1) • Be sure that the left and right) terminals of the amplifier. by using a commercially available optical fiber cable. * Be sure to use a high quality optical fiber cable. For Custom Installer For U.S.A., Canada and Australia models of CDC-685 only REMOTE CONTROL (IN, OUT) terminals These terminals are numbered as a tuner, separate...
Owner's Manual
Page 9
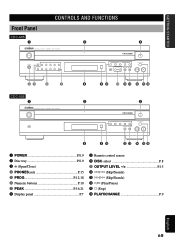
... CONTROLS AND FUNCTIONS Front Panel CDC-685 1 NATURAL SOUND COMPACT DISC PLAYER POWER PHONES PROG 1 2 3 4 5 +10 6 7 8 9 0 PEAK 2 3 DISC 1 2 3 4 5 OUTPUT LEVEL PLAYXCHANGE 45 6 7 CDC-585 1 NATURAL SOUND COMPACT DISC PLAYER POWER 8 9 0 q w e r ty 2 3 DISC 1 2 3 4 5 PLAYXCHANGE 8 90 w e r ty 1 POWER P.8,9 2 Disc tray P.8,9 3 v (Open/Close) 4 PHONES jack P.15 5 PROG P.12,18 6 Numeric buttons P.10 7 PEAK P.16,21 8 Display panel P.7 9 Remote control sensor 0 DISC-select P.8 q OUTPUT LEVEL P.15 w t/e (Skip/Search) e r/y (Skip/Search) r w/d (Play...
... CONTROLS AND FUNCTIONS Front Panel CDC-685 1 NATURAL SOUND COMPACT DISC PLAYER POWER PHONES PROG 1 2 3 4 5 +10 6 7 8 9 0 PEAK 2 3 DISC 1 2 3 4 5 OUTPUT LEVEL PLAYXCHANGE 45 6 7 CDC-585 1 NATURAL SOUND COMPACT DISC PLAYER POWER 8 9 0 q w e r ty 2 3 DISC 1 2 3 4 5 PLAYXCHANGE 8 90 w e r ty 1 POWER P.8,9 2 Disc tray P.8,9 3 v (Open/Close) 4 PHONES jack P.15 5 PROG P.12,18 6 Numeric buttons P.10 7 PEAK P.16,21 8 Display panel P.7 9 Remote control sensor 0 DISC-select P.8 q OUTPUT LEVEL P.15 w t/e (Skip/Search) e r/y (Skip/Search) r w/d (Play...

Owner's Manual
Page 11
... 4 5 6 7 8 9 10 5 3 : 3 8 1112 s Display information at a glance. 6 CDC-685 only Shows the level of signals output into an amplifier or the headphones level adjusted by using the OUTPUT LEVEL -/+ buttons. Since this unit is played, its corresponding number disappears so the number of remaining tracks (and their numbers) can change brightness of the display in three degrees by pressing the TEXT/TIME display mode-select button. E-7 GETTING STARTED Display The display located in the center of this case...
... 4 5 6 7 8 9 10 5 3 : 3 8 1112 s Display information at a glance. 6 CDC-685 only Shows the level of signals output into an amplifier or the headphones level adjusted by using the OUTPUT LEVEL -/+ buttons. Since this unit is played, its corresponding number disappears so the number of remaining tracks (and their numbers) can change brightness of the display in three degrees by pressing the TEXT/TIME display mode-select button. E-7 GETTING STARTED Display The display located in the center of this case...
Owner's Manual
Page 12
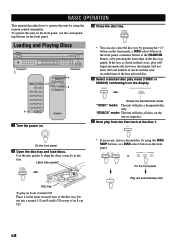
... and Playing Discs NATURAL SOUND COMPACT DISC PLAYER POWER PHONES PROG 1 2 3 4 5 +10 6 7 8 9 0 PEAK DISC 1 2 3 4 5 OUTPUT LEVEL PLAYXCHANGE 1 DISC SCAN DISC SKIP 5 OPEN/ SYNCHRO DIMMER CLOSE TEXT/ TIME PEAK 2,3 REPEAT RANDOM 5 TAPE CLEAR PROG 1 2 3 4 5 6 7 8 9 - - 0 -10 INDEX MODE - MODE 1DISC REP RN 5DISCS S F P SEARCH TITLE ARTIST Shows the selected disc mode. Use the disc guides to operate this unit on the front panel, use the corresponding buttons on top of an 8-cm CD. Disc tray To play a designated disc only. DISC SKIP DISC or...
... and Playing Discs NATURAL SOUND COMPACT DISC PLAYER POWER PHONES PROG 1 2 3 4 5 +10 6 7 8 9 0 PEAK DISC 1 2 3 4 5 OUTPUT LEVEL PLAYXCHANGE 1 DISC SCAN DISC SKIP 5 OPEN/ SYNCHRO DIMMER CLOSE TEXT/ TIME PEAK 2,3 REPEAT RANDOM 5 TAPE CLEAR PROG 1 2 3 4 5 6 7 8 9 - - 0 -10 INDEX MODE - MODE 1DISC REP RN 5DISCS S F P SEARCH TITLE ARTIST Shows the selected disc mode. Use the disc guides to operate this unit on the front panel, use the corresponding buttons on top of an 8-cm CD. Disc tray To play a designated disc only. DISC SKIP DISC or...
Owner's Manual
Page 13
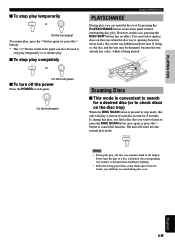
... w button to check discs on the disc tray) When the DISC SCAN button is pressed in the display. s To stop mode, this function. DISC SCAN Notes • During this play, the disc tray numbers blink in stop play completely or On the front panel s To turn for a desired disc (or to cancel this unit will play a section of a disc is finished, the corresponding tray number is changed from flashing to resume play. Scanning Discs...
... w button to check discs on the disc tray) When the DISC SCAN button is pressed in the display. s To stop mode, this function. DISC SCAN Notes • During this play, the disc tray numbers blink in stop play completely or On the front panel s To turn for a desired disc (or to cancel this unit will play a section of a disc is finished, the corresponding tray number is changed from flashing to resume play. Scanning Discs...
Owner's Manual
Page 14
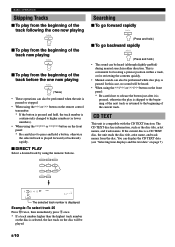
...; These operations can display the CD TEXT data (see "Selecting time displays and the text data" on the front panel: * Be careful not to release the button just after it is pressed, otherwise the play is continuously changed to press and hold .) • The sound can also be played. You can also be heard (although slightly garbled) during manual search in either direction...
...; These operations can display the CD TEXT data (see "Selecting time displays and the text data" on the front panel: * Be careful not to release the button just after it is pressed, otherwise the play is continuously changed to press and hold .) • The sound can also be played. You can also be heard (although slightly garbled) during manual search in either direction...
Owner's Manual
Page 15
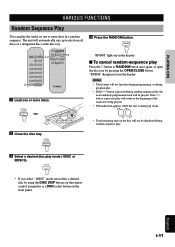
... be played. OPEN/ CLOSE 4 Press the RANDOM button. s To cancel random-sequence play Press the a button or RANDOM button once again, or open the disc tray by using the DISC SKIP buttons on the remote control transmitter or a DISC-select button on the front panel. OPEN/ CLOSE 3 Select a desired disc play mode (1DISC or 5DISCS). PLAYING CDS VARIOUS FUNCTIONS Random Sequence Play You can play the tracks on one or more discs in the display.
... be played. OPEN/ CLOSE 4 Press the RANDOM button. s To cancel random-sequence play Press the a button or RANDOM button once again, or open the disc tray by using the DISC SKIP buttons on the remote control transmitter or a DISC-select button on the front panel. OPEN/ CLOSE 3 Select a desired disc play mode (1DISC or 5DISCS). PLAYING CDS VARIOUS FUNCTIONS Random Sequence Play You can play the tracks on one or more discs in the display.
Owner's Manual
Page 16
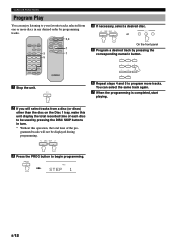
... button to program more discs in turn. * Without this unit display the total recorded time of the pro- PROG 1DISC REP RNDM SAVE BEST EDIT 5 5DISCS S F PROG CD- OUTPUT LEVEL - DISC SCAN DISC SKIP DISC SCAN REPEAT DISC SKIP RANDOM 2,4 7 1 4 If necessary, select a desired disc. VARIOUS FUNCTIONS Program Play You can select the same track again. 7 When the programming is completed, start playing. 2 If you will not be used by pressing the DISC SKIP buttons...
... button to program more discs in turn. * Without this unit display the total recorded time of the pro- PROG 1DISC REP RNDM SAVE BEST EDIT 5 5DISCS S F PROG CD- OUTPUT LEVEL - DISC SCAN DISC SKIP DISC SCAN REPEAT DISC SKIP RANDOM 2,4 7 1 4 If necessary, select a desired disc. VARIOUS FUNCTIONS Program Play You can select the same track again. 7 When the programming is completed, start playing. 2 If you will not be used by pressing the DISC SKIP buttons...
Owner's Manual
Page 17
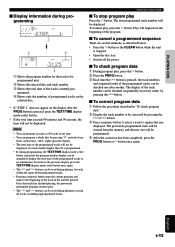
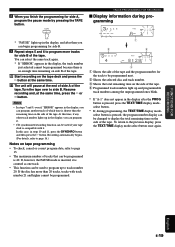
... total time of the programmed tracks will be used during playing to be checked one after the PROG button is stopped. • Open the disc tray. • Switch off the power. s To cancel a programmed sequence There are several methods, as 40 tracks at one time. • You can program a whole disc by pressing the t button. PLAYING CDS s Display information during programming, the TEXT/TIME display mode-select button is pressed, the program number display...
... total time of the programmed tracks will be used during playing to be checked one after the PROG button is stopped. • Open the disc tray. • Switch off the power. s To cancel a programmed sequence There are several methods, as 40 tracks at one time. • You can program a whole disc by pressing the t button. PLAYING CDS s Display information during programming, the TEXT/TIME display mode-select button is pressed, the program number display...
Owner's Manual
Page 18
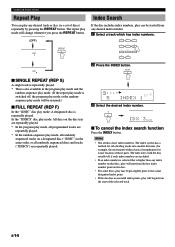
... switched off, the program play mode or the randomsequence play mode will be started from the start from the last index number point on the disc. • For some discs, play may begin slightly prior to the actual designated index point. • If the disc has no encoded index points, play will start of the selected track. The index system has a method for sub...
... switched off, the program play mode or the randomsequence play mode will be started from the start from the last index number point on the disc. • For some discs, play may begin slightly prior to the actual designated index point. • If the disc has no encoded index points, play will start of the selected track. The index system has a method for sub...
Owner's Manual
Page 19
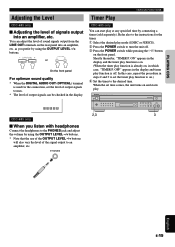
... OUTPUT LEVEL -/+ buttons. * Note that the use of the OUTPUT LEVEL -/+ buttons will also vary the level of output signals can start play mode (1DISC or 5DISCS). 2 Press the POWER switch to turn the unit off . In this case, repeat the procedure in the display. OUTPUT LEVEL - - Refer also to the instructions for the connection, set the timer play function is already on, in the display and timer play function to on the rear panel into an amplifier, etc. NATURAL SOUND COMPACT DISC PLAYER POWER...
... OUTPUT LEVEL -/+ buttons. * Note that the use of the OUTPUT LEVEL -/+ buttons will also vary the level of output signals can start play mode (1DISC or 5DISCS). 2 Press the POWER switch to turn the unit off . In this case, repeat the procedure in the display. OUTPUT LEVEL - - Refer also to the instructions for the connection, set the timer play function is already on, in the display and timer play function to on the rear panel into an amplifier, etc. NATURAL SOUND COMPACT DISC PLAYER POWER...
Owner's Manual
Page 20
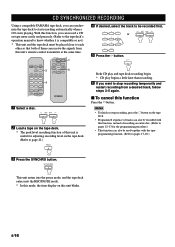
... signals from a desired track, follow steps 3-5 again. OUTPUT LEVEL - s To cancel this unit blinks. With this function, you can synchronize the tape deck to start recording automatically when a CD starts playing. E-16 Using a compatible YAMAHA tape deck, you can record a CD on tape more easily and precisely. (Refer to the tape deck's operation manual to know whether it is useful for adjusting recording level on this function Press the a button. Functions for the programming...
... signals from a desired track, follow steps 3-5 again. OUTPUT LEVEL - s To cancel this unit blinks. With this function, you can synchronize the tape deck to start recording automatically when a CD starts playing. E-16 Using a compatible YAMAHA tape deck, you can record a CD on tape more easily and precisely. (Refer to the tape deck's operation manual to know whether it is useful for adjusting recording level on this function Press the a button. Functions for the programming...
Owner's Manual
Page 21
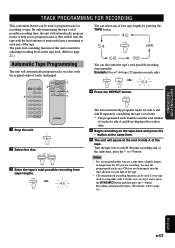
... in step 5 and 6, press the SYNCHRO button and then press the w button. DISC SKIP 3 Enter the tape's total possible recording time (tape length). FUNCTIONS FOR RECORDING TRACK PROGRAMMING FOR RECORDING This convenient feature can be used to program tracks for adjusting recording level on the tape deck. (Refer to program tracks so they will automatically program tracks or help you are displayed for side A and B are recording, because...
... in step 5 and 6, press the SYNCHRO button and then press the w button. DISC SKIP 3 Enter the tape's total possible recording time (tape length). FUNCTIONS FOR RECORDING TRACK PROGRAMMING FOR RECORDING This convenient feature can be used to program tracks for adjusting recording level on the tape deck. (Refer to program tracks so they will automatically program tracks or help you are displayed for side A and B are recording, because...
Owner's Manual
Page 23
... 3 1 Shows the side of the tape. 4 Programmed track numbers light up in the display, you can be programmed next. 2 Shows the selected disc and track number. 3 Shows the total remaining time on the tape deck and press the w button at the same time, press the w or d button. In this time, if any other track number lights up and programmable track numbers among the unprogrammed ones blink. * If "A-1" does not appear...
... 3 1 Shows the side of the tape. 4 Programmed track numbers light up in the display, you can be programmed next. 2 Shows the selected disc and track number. 3 Shows the total remaining time on the tape deck and press the w button at the same time, press the w or d button. In this time, if any other track number lights up and programmable track numbers among the unprogrammed ones blink. * If "A-1" does not appear...
Owner's Manual
Page 25
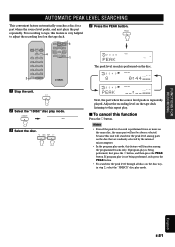
... S F PROG CD- DISC SKIP Next, the part where the source level peaks is being performed, only press the PEAK button. • To search for the peak level through all discs on the tape deck listening to adjust the recording level on the tape deck. If program play is very helpful to this function Press the a button. English E-21 s To cancel this repeat play mode. OUTPUT LEVEL - 2 DISC SCAN DISC SKIP DISC SCAN REPEAT DISC SKIP 3 RANDOM...
... S F PROG CD- DISC SKIP Next, the part where the source level peaks is being performed, only press the PEAK button. • To search for the peak level through all discs on the tape deck listening to adjust the recording level on the tape deck. If program play is very helpful to this function Press the a button. English E-21 s To cancel this repeat play mode. OUTPUT LEVEL - 2 DISC SCAN DISC SKIP DISC SCAN REPEAT DISC SKIP 3 RANDOM...
Owner's Manual
Page 26
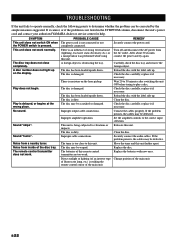
... switch ON when The power cord is not connected or not the POWER switch is striking the remote control sensor of this unit. A disc number does not light up . The disc is too close completely. replace it if necessary. If the problem persists, the cables may be warped. Sound "skips". The tuner is damaged. This unit does not work . Play does not begin. The disc may be defective. Improper cable connections. The disc...
... switch ON when The power cord is not connected or not the POWER switch is striking the remote control sensor of this unit. A disc number does not light up . The disc is too close completely. replace it if necessary. If the problem persists, the cables may be warped. Sound "skips". The tuner is damaged. This unit does not work . Play does not begin. The disc may be defective. Improper cable connections. The disc...


