
Owner's Manual
Page 1
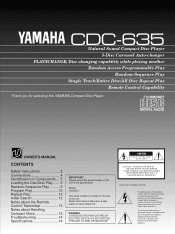
... of uninsulated "dangerous voltage" within an equilateral triangle is located on the rear of important operating and maintenance (servicing) instructions in the space below. Please record the serial number of Components.... 5 Loading the Disc/Disc Play....... 6 Random-Sequence Play .......... 9 Program Play 10 Repeat Play 12 Index Search 12 Notes about the Remote Control Transmitter 13 Notes about Handling Compact Discs 13 Troubleshooting 14 Specifications 14 IMPORTANT! CDC-635 Natural Sound Compact Disc Player 5-Disc Carousel Auto-changer PLAYXCHANGE;
... of uninsulated "dangerous voltage" within an equilateral triangle is located on the rear of important operating and maintenance (servicing) instructions in the space below. Please record the serial number of Components.... 5 Loading the Disc/Disc Play....... 6 Random-Sequence Play .......... 9 Program Play 10 Repeat Play 12 Index Search 12 Notes about the Remote Control Transmitter 13 Notes about Handling Compact Discs 13 Troubleshooting 14 Specifications 14 IMPORTANT! CDC-635 Natural Sound Compact Disc Player 5-Disc Carousel Auto-changer PLAYXCHANGE;
Owner's Manual
Page 2
...rear of the unit should be cleaned only as recommended by items placed upon or against them, paying particular attention to qualified service personnel. 17 Power Lines - or C. An outdoor antenna should be taken so that produce heat. 10 Power Sources...connected to the presence of important operating and maintenance (servicing) instructions in a wet basement, or near water - All warnings on the unit. 11 Power-Cord Protection - The unit should be moved with care. Quick stops, excessive force, and uneven surfaces may impede the flow of this Owner's Manual in installation...
...rear of the unit should be cleaned only as recommended by items placed upon or against them, paying particular attention to qualified service personnel. 17 Power Lines - or C. An outdoor antenna should be taken so that produce heat. 10 Power Sources...connected to the presence of important operating and maintenance (servicing) instructions in a wet basement, or near water - All warnings on the unit. 11 Power-Cord Protection - The unit should be moved with care. Quick stops, excessive force, and uneven surfaces may impede the flow of this Owner's Manual in installation...

Owner's Manual
Page 3
... - WARNING CAUTION Use of controls or adjustments or performance of your equipment by pressing the OPEN/CLOSE button, and then switch off the power if the display is turned off . Laser Diode Properties • Material: GaAlAs • Wavelength: 780nm • Emission Duration: continuous • Laser Output: max. 44.6µW* * This output is faulty. 8. Refer servicing to beam. Avoid sources of about 200mm...
... - WARNING CAUTION Use of controls or adjustments or performance of your equipment by pressing the OPEN/CLOSE button, and then switch off the power if the display is turned off . Laser Diode Properties • Material: GaAlAs • Wavelength: 780nm • Emission Duration: continuous • Laser Output: max. 44.6µW* * This output is faulty. 8. Refer servicing to beam. Avoid sources of about 200mm...

Owner's Manual
Page 4
...) terminals of this unit causes noise to the unit and the amplifier or other component. This unit To AC outlet Connection cord (included) Amplifier 4 q Connect the "LINE OUT" terminals to the operation instructions for the amplifier being used. q If the placement of the amplifier or other . CONNECTIONS q Before making any connections, switch OFF the power to other equipment, such as a tuner, separate them from each other...
...) terminals of this unit causes noise to the unit and the amplifier or other component. This unit To AC outlet Connection cord (included) Amplifier 4 q Connect the "LINE OUT" terminals to the operation instructions for the amplifier being used. q If the placement of the amplifier or other . CONNECTIONS q Before making any connections, switch OFF the power to other equipment, such as a tuner, separate them from each other...
Owner's Manual
Page 5
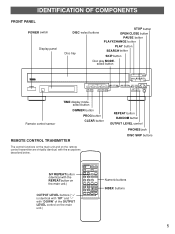
...button RANDOM button OUTPUT LEVEL control PHONES jack DISC SKIP buttons S/F REPEAT button (identical with the REPEAT button on the main unit.) OPEN/CLOSE DIMMER TIME PROG CLEAR MODE S/F REPEAT 1 2 3 +10 4 5 6 7 8 9 0 DISC SKIP PAUSE PLAY SKIP SEARCH INDEX STOP - OUTPUT LEVEL + Numeric buttons INDEX buttons 5 IDENTIFICATION OF COMPONENTS FRONT PANEL POWER switch Display panel DISC -select buttons STOP button OPEN/CLOSE button PAUSE button PLAYXCHANGE button Disc tray PLAY button SEARCH button SKIP button Disc play MODEselect button POWER DISC 1 2 3 4 5 TIME...
...button RANDOM button OUTPUT LEVEL control PHONES jack DISC SKIP buttons S/F REPEAT button (identical with the REPEAT button on the main unit.) OPEN/CLOSE DIMMER TIME PROG CLEAR MODE S/F REPEAT 1 2 3 +10 4 5 6 7 8 9 0 DISC SKIP PAUSE PLAY SKIP SEARCH INDEX STOP - OUTPUT LEVEL + Numeric buttons INDEX buttons 5 IDENTIFICATION OF COMPONENTS FRONT PANEL POWER switch Display panel DISC -select buttons STOP button OPEN/CLOSE button PAUSE button PLAYXCHANGE button Disc tray PLAY button SEARCH button SKIP button Disc play MODEselect button POWER DISC 1 2 3 4 5 TIME...
Owner's Manual
Page 6
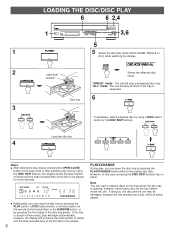
... button without interrupting disc play. Note You can close the disc tray by using a DISC-select button or the DISC SKIP buttons. LOADING THE DISC/DISC PLAY 6 6 2,4 1 1 3,6 5 5 Select the disc play a designated disc only. "SINGLE" mode: The unit will not show the total number of tracks and the total recorded time of the first disc to be damaged, because the tray already has a disc, which is opening, however, never load a disc on the remote control...
... button without interrupting disc play. Note You can close the disc tray by using a DISC-select button or the DISC SKIP buttons. LOADING THE DISC/DISC PLAY 6 6 2,4 1 1 3,6 5 5 Select the disc play a designated disc only. "SINGLE" mode: The unit will not show the total number of tracks and the total recorded time of the first disc to be damaged, because the tray already has a disc, which is opening, however, never load a disc on the remote control...
Owner's Manual
Page 7
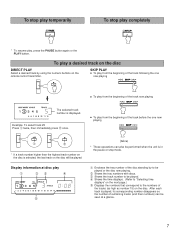
... tray number of the disc standing by using the numeric buttons on the disc. After each track is in the pause or stop play completely * To resume play a desired track on the disc DIRECT PLAY Select a desired track by to be played or the disc now playing. Shows the tray numbers with discs. Ž Shows the track number to be played. Shows the time displays. (Refer to "Selecting time displays" on...
... tray number of the disc standing by using the numeric buttons on the disc. After each track is in the pause or stop play completely * To resume play a desired track on the disc DIRECT PLAY Select a desired track by to be played or the disc now playing. Shows the tray numbers with discs. Ž Shows the track number to be played. Shows the time displays. (Refer to "Selecting time displays" on...
Owner's Manual
Page 8
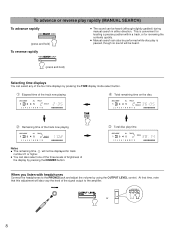
... sound can also be performed while disc play time Notes q The remaining time will not be displayed for reviewing the contents quickly. When you listen with headphones Connect the headphones to the amplifier. - At that time, note that this adjustment will also vary the level of the signal output to the PHONES jack and adjust the volume by pressing the DIMMER button. To advance or reverse play rapidly (MANUAL...
... sound can also be performed while disc play time Notes q The remaining time will not be displayed for reviewing the contents quickly. When you listen with headphones Connect the headphones to the amplifier. - At that time, note that this adjustment will also vary the level of the signal output to the PHONES jack and adjust the volume by pressing the DIMMER button. To advance or reverse play rapidly (MANUAL...

Owner's Manual
Page 9
..." disc play mode is pressed during random-sequence play will be displayed during programmed play. q This indication appears while the unit is pressed, play , the next randomly programmed track will return to 99 tracks). q Total remaining time on again, the unit will begin the random-sequence play automatically. (This feature is available for timer play.) q If the SKIP button is selected, next select a desired disc by using...
..." disc play mode is pressed during random-sequence play will be displayed during programmed play. q This indication appears while the unit is pressed, play , the next randomly programmed track will return to 99 tracks). q Total remaining time on again, the unit will begin the random-sequence play automatically. (This feature is available for timer play.) q If the SKIP button is selected, next select a desired disc by using...
Owner's Manual
Page 10
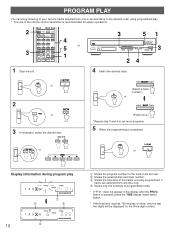
... tracks currently programmed, if tracks are selected from one or several discs in the display after the PROG button is pressed, press the TIME display mode-select button. * If the total time reaches 100 minutes or more, only the last two-digits will be set more programs. 5 When the programming is recommended for the three-digit number. or Display information during program play . * The use of the remote control transmitter is completed; PROGRAM PLAY You...
... tracks currently programmed, if tracks are selected from one or several discs in the display after the PROG button is pressed, press the TIME display mode-select button. * If the total time reaches 100 minutes or more, only the last two-digits will be set more programs. 5 When the programming is recommended for the three-digit number. or Display information during program play . * The use of the remote control transmitter is completed; PROGRAM PLAY You...
Owner's Manual
Page 11
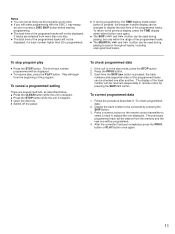
... button. q Press the STOP button while the unit is stopped. Press a numeric button on the remote control transmitter to select a track to the previous display, press the TIME display mode-select button once again. q Switch off the power. Notes q You can set as many as described below. q The total time of the programmed tracks will be displayed, if a track number higher than one time. q To resume play, press the PLAY button. q Open the disc...
... button. q Press the STOP button while the unit is stopped. Press a numeric button on the remote control transmitter to select a track to the previous display, press the TIME display mode-select button once again. q Switch off the power. Notes q You can set as many as described below. q The total time of the programmed tracks will be displayed, if a track number higher than one time. q To resume play, press the PLAY button. q Open the disc...
Owner's Manual
Page 12
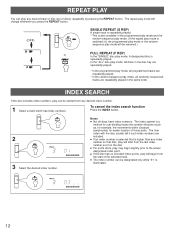
... index number can play mode, all discs have index numbers. In the "ALL" disc play mode: All discs in the programmed-play mode and the random-sequence play mode. (If the repeat play mode is switched off, the programmed-play mode or the randomsequence play will change whenever you press the REPEAT button. (OFF) SINGLE REPEAT (S REP) A single track is repeatedly played. * This is also available in the disc tray are repeatedly played. * In the programmed-play mode, all programmed...
... index number can play mode, all discs have index numbers. In the "ALL" disc play mode: All discs in the programmed-play mode and the random-sequence play mode. (If the repeat play mode is switched off, the programmed-play mode or the randomsequence play will change whenever you press the REPEAT button. (OFF) SINGLE REPEAT (S REP) A single track is repeatedly played. * This is also available in the disc tray are repeatedly played. * In the programmed-play mode, all programmed...

Owner's Manual
Page 13
... by strong lighting (especially an inverter type of a 3-inch CD. 13 NO! q Compact discs are correct. (See the illustration inside the battery compartment.) q Remove the batteries if the remote control transmitter will also play a 3-inch (8-cm) CD Place it come in the illustration, lift the disc out carefully. NOTES ABOUT THE REMOTE CONTROL TRANSMITTER Battery installation 1 3 2 Remote control transmitter operation range Remote control sensor Battery replacement If...
... by strong lighting (especially an inverter type of a 3-inch CD. 13 NO! q Compact discs are correct. (See the illustration inside the battery compartment.) q Remove the batteries if the remote control transmitter will also play a 3-inch (8-cm) CD Place it come in the illustration, lift the disc out carefully. NOTES ABOUT THE REMOTE CONTROL TRANSMITTER Battery installation 1 3 2 Remote control transmitter operation range Remote control sensor Battery replacement If...
Owner's Manual
Page 14
... (with the label side up. No sound. Check the disc carefully; replace it if necessary. Improper output cable connections. Wait 20 to 30 minutes after switching the unit ON before trying to the correct input selection. Clean the disc. Set the amplifier controls to play a disc. Replace the disc. Sound "skips". Improper cable connections. Clean the disc. Move the tuner and player farther apart. PROBABLE CAUSE The power cord is damaged. A foreign object is moisture...
... (with the label side up. No sound. Check the disc carefully; replace it if necessary. Improper output cable connections. Wait 20 to 30 minutes after switching the unit ON before trying to the correct input selection. Clean the disc. Set the amplifier controls to play a disc. Replace the disc. Sound "skips". Improper cable connections. Clean the disc. Move the tuner and player farther apart. PROBABLE CAUSE The power cord is damaged. A foreign object is moisture...


