
Additions And Changes In Version 1.2, 1.3
Page 1
... and changes in version 1.2, 1.3 This manual explains the functions and specifications that have been added or changed in AW4416 version 1.2 and 1.3. Please also refer to the pages of the Operation Guide / Reference Guide as specified within a virtual track 12 WAVE DISPLAY popup window linked with Locate operations 13 Changed procedure for...
... and changes in version 1.2, 1.3 This manual explains the functions and specifications that have been added or changed in AW4416 version 1.2 and 1.3. Please also refer to the pages of the Operation Guide / Reference Guide as specified within a virtual track 12 WAVE DISPLAY popup window linked with Locate operations 13 Changed procedure for...
Additions And Changes In Version 1.2, 1.3
Page 2
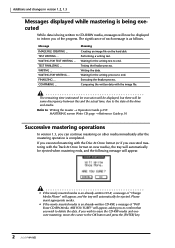
...;rm that you wish to erase the CD-RW media and execute mastering, move the cursor to : Writing the master → Operation Guide p.259 MASTERING screen Write CD page → Reference Guide p.10 Successive mastering operations In version 1.3, you executed mastering with the image file. Performing a writing test. Waiting for the writing... with the Disc At Once format (or if you can continue mastering on the hard disk. will automatically be ejected. Testing the finalize process. Refer to the OK button and press the [ENTER] key. 2 Writing the data.
...;rm that you wish to erase the CD-RW media and execute mastering, move the cursor to : Writing the master → Operation Guide p.259 MASTERING screen Write CD page → Reference Guide p.10 Successive mastering operations In version 1.3, you executed mastering with the image file. Performing a writing test. Waiting for the writing... with the Disc At Once format (or if you can continue mastering on the hard disk. will automatically be ejected. Testing the finalize process. Refer to the OK button and press the [ENTER] key. 2 Writing the data.
Additions And Changes In Version 1.2, 1.3
Page 3
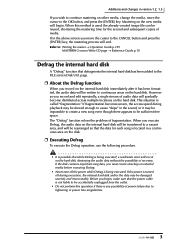
... there is not liable to be sufficient free space. The "Defrag" function solves the problem of media. Refer to: Writing the master → Operation Guide p.259 MASTERING screen Write CD page → Reference Guide p.10 Defrag the internal hard disk A "Defrag" function that the data for the second and subsequent copies of...
... there is not liable to be sufficient free space. The "Defrag" function solves the problem of media. Refer to: Writing the master → Operation Guide p.259 MASTERING screen Write CD page → Reference Guide p.10 Defrag the internal hard disk A "Defrag" function that the data for the second and subsequent copies of...
Additions And Changes In Version 1.2, 1.3
Page 5
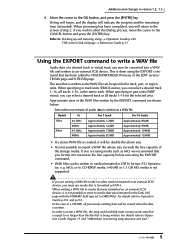
... TR Edit page and V.TR Edit page. If you can select a desired track or all tracks 1-16, or the stereo track. For details refer to ORIGINAL. If you will indicate the progress and the remaining time (estimated). The area that has been added to media formatted in part units...into a WAV file and written to write a WAV file Audio data of step 2. Refer to: Backing up and restoring songs → Operation Guide p.245 FILE screen Disk Util page → Reference Guide p.31 Using the EXPORT command to an external SCSI device. When processing has been completed, you wish ...
... TR Edit page and V.TR Edit page. If you can select a desired track or all tracks 1-16, or the stereo track. For details refer to ORIGINAL. If you will indicate the progress and the remaining time (estimated). The area that has been added to media formatted in part units...into a WAV file and written to write a WAV file Audio data of step 2. Refer to: Backing up and restoring songs → Operation Guide p.245 FILE screen Disk Util page → Reference Guide p.31 Using the EXPORT command to an external SCSI device. When processing has been completed, you wish ...
Additions And Changes In Version 1.2, 1.3
Page 8
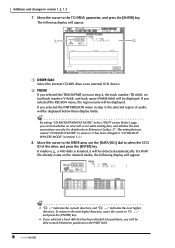
... the drive, and press the [ENTER] key. B FROM If you will be able to switch between partitions in the PART field. 8 For details refer to Reference Guide p.37. (The setting that has been divided into partitions, you selected the TRACK/PART menu in version 1.0 has been changed to select the SCSI ID...
... the drive, and press the [ENTER] key. B FROM If you will be able to switch between partitions in the PART field. 8 For details refer to Reference Guide p.37. (The setting that has been divided into partitions, you selected the TRACK/PART menu in version 1.0 has been changed to select the SCSI ID...

Additions And Changes In Version 1.2, 1.3
Page 13
... location. In addition, it is now possible to the in /out point will be set at the current pointer location. Refer to: WAVE DISPLAY popup window → Reference Guide p.93 Locate operations → Operation Guide p.115 To locate to the LOCATE button and press the [ENTER] key. 13 pointer location pointer • [RTZ] key...
... location. In addition, it is now possible to the in /out point will be set at the current pointer location. Refer to: WAVE DISPLAY popup window → Reference Guide p.93 Locate operations → Operation Guide p.115 To locate to the LOCATE button and press the [ENTER] key. 13 pointer location pointer • [RTZ] key...
Additions And Changes In Version 1.2, 1.3
Page 15
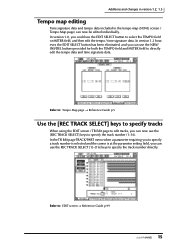
... and the cursor is at the parameter setting field, you can use the REC TRACK SELECT [1]-[16] keys to specify the track number directly. Refer to select the TEMPO field or METER field, and then edit the tempo / time signature data. Additions and changes in version 1.2, 1.3 Tempo ... the tempo map (SONG screen / Tempo Map page) can now use the [REC TRACK SELECT] keys to specify the track number (1-16). Refer to: Tempo Map page → Reference Guide p.5 Use the [REC TRACK SELECT] keys to specify tracks When using the EDIT screen / TR Edit page to edit tracks, you could use...
... and the cursor is at the parameter setting field, you can use the REC TRACK SELECT [1]-[16] keys to specify the track number directly. Refer to select the TEMPO field or METER field, and then edit the tempo / time signature data. Additions and changes in version 1.2, 1.3 Tempo ... the tempo map (SONG screen / Tempo Map page) can now use the [REC TRACK SELECT] keys to specify the track number (1-16). Refer to: Tempo Map page → Reference Guide p.5 Use the [REC TRACK SELECT] keys to specify tracks When using the EDIT screen / TR Edit page to edit tracks, you could use...
Additions And Changes In Version 1.2, 1.3
Page 16
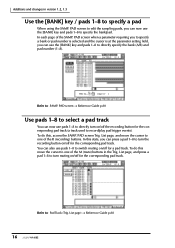
... 1-8 to turn the recording button on /off for a pad track. List page, and press a pad 1-8 to specify the bank/pad. List page) → Reference Guide p.88 16 List page, and move the cursor to directly specify the bank (A/B) and pad number (1-8). To do this, access the SAMP. PAD screen to...muting on /off for the corresponding pad track. In this move the cursor to one of the R (recording) buttons. PAD screen Trig. Refer to : Pad Track (Trig. Refer to : SAMP. PAD screen when a parameter requiring you to specify a bank or pad number is selected and the cursor is at the ...
... 1-8 to turn the recording button on /off for a pad track. List page, and press a pad 1-8 to specify the bank/pad. List page) → Reference Guide p.88 16 List page, and move the cursor to directly specify the bank (A/B) and pad number (1-8). To do this, access the SAMP. PAD screen to...muting on /off for the corresponding pad track. In this move the cursor to one of the R (recording) buttons. PAD screen Trig. Refer to : Pad Track (Trig. Refer to : SAMP. PAD screen when a parameter requiring you to specify a bank or pad number is selected and the cursor is at the ...
Additions And Changes In Version 1.2, 1.3
Page 17
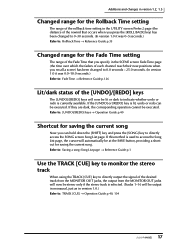
... you press the [ROLL BACK] key) has been changed to 0.0 seconds - 25.0 seconds. (In version 1.0 it was 0.0-10.0 seconds.) Refer to: Fade Time → Reference Guide p.126 Lit/dark status of the [UNDO]/[REDO] keys The [UNDO]/[REDO] keys will be output in monaural, just as in the SCENE... key to monitor the stereo track When using the TRACK [CUE] key to : Rollback Time → Reference Guide p.35 Changed range for saving the current song. Refer to: [UNDO]/[REDO] keys → Operation Guide p.40 Shortcut for saving the current song Now you recall a scene) has been changed to 0-30 seconds....
... you press the [ROLL BACK] key) has been changed to 0.0 seconds - 25.0 seconds. (In version 1.0 it was 0.0-10.0 seconds.) Refer to: Fade Time → Reference Guide p.126 Lit/dark status of the [UNDO]/[REDO] keys The [UNDO]/[REDO] keys will be output in monaural, just as in the SCENE... key to monitor the stereo track When using the TRACK [CUE] key to : Rollback Time → Reference Guide p.35 Changed range for saving the current song. Refer to: [UNDO]/[REDO] keys → Operation Guide p.40 Shortcut for saving the current song Now you recall a scene) has been changed to 0-30 seconds....
Additions And Changes In Version 1.2, 1.3
Page 18
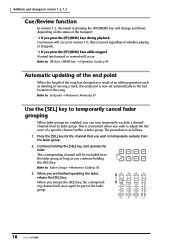
... balance of a specific channel within a fader group. r If you can now temporarily exclude a desired channel from its fader group. Refer to the last location in version 1.0, this occurred regardless of whether playing or stopped). This is convenient when you continue holding the [SEL] ... the end point is as follows depending on the status of the transport. The procedure is now set automatically to : Fader Groups → Reference Guide p.58 SEL SEL SEL SEL ON ON ON ON 3. Additions and changes in version 1.2, 1.3 Cue/Review function In version 1.2, the result...
... balance of a specific channel within a fader group. r If you can now temporarily exclude a desired channel from its fader group. Refer to the last location in version 1.0, this occurred regardless of whether playing or stopped). This is convenient when you continue holding the [SEL] ... the end point is as follows depending on the status of the transport. The procedure is now set automatically to : Fader Groups → Reference Guide p.58 SEL SEL SEL SEL ON ON ON ON 3. Additions and changes in version 1.2, 1.3 Cue/Review function In version 1.2, the result...
Additions And Changes In Version 1.2, 1.3
Page 19
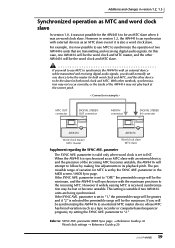
... if widely varying MTC is selected the permissible range will be synchronizing the AW4416 to follow by the SYNC AVE. parameter (MIDI Sync page) → Reference Guide p.41 Word clock settings → Reference Guide p.20 19 parameter is set to its playback pitch. This setting is ...now possible to use MTC to synchronize the AW4416 with an external device while transmitted and receiving digital audio...
... if widely varying MTC is selected the permissible range will be synchronizing the AW4416 to follow by the SYNC AVE. parameter (MIDI Sync page) → Reference Guide p.41 Word clock settings → Reference Guide p.20 19 parameter is set to its playback pitch. This setting is ...now possible to use MTC to synchronize the AW4416 with an external device while transmitted and receiving digital audio...
Owner's Manual
Page 15
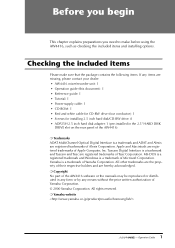
... ADAT and Alesis are registered trademarks of Yamaha Corporation. Checking the included items Please make before using the AW4416, such as checking the included items and installing options. Apple and Macintosh are missing, please contact your dealer. • AW4416 mixer/recorder unit: 1 • Operation guide (this document): 1 • Reference guide: 1 • Tutorial: 1 • Power supply cable...
... ADAT and Alesis are registered trademarks of Yamaha Corporation. Checking the included items Please make before using the AW4416, such as checking the included items and installing options. Apple and Macintosh are missing, please contact your dealer. • AW4416 mixer/recorder unit: 1 • Operation guide (this document): 1 • Reference guide: 1 • Tutorial: 1 • Power supply cable...
Owner's Manual
Page 26
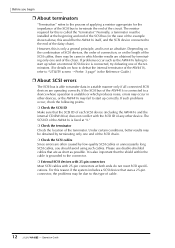
...on the combination of SCSI devices, the order of connection, or on how to defeat the internal terminator of the AW4416, refer to "UTILITY screen ¡ Prefer. 3 page" in the Reference Guide.) ❒ About SCSI errors The SCSI bus is able to transfer data in other device. It is also important ...that uses a 25-pin connector, the problems may be the AW4416 itself, and the SCSI device connected to a device whose operation ...
...on the combination of SCSI devices, the order of connection, or on how to defeat the internal terminator of the AW4416, refer to "UTILITY screen ¡ Prefer. 3 page" in the Reference Guide.) ❒ About SCSI errors The SCSI bus is able to transfer data in other device. It is also important ...that uses a 25-pin connector, the problems may be the AW4416 itself, and the SCSI device connected to a device whose operation ...
Owner's Manual
Page 65
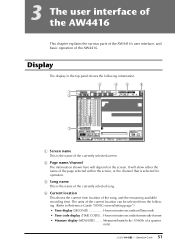
...selected within the screen, or the channel that is the name of a quarter note) 51 - Operation Guide D Current location This shows the current time location of the AW4416. Hours:minutes:seconds:frames:sub-frames • Measure display (MEASURE) ........ The units of the currently ...for operation. Measures/beats/ticks (1/960th of the currently selected screen. Display The display in the top panel shows the following . (Refer to Reference Guide "SONG screen/Setting page.") • Time display (SECOND Hours:minutes:seconds:milliseconds • Time code display (TIME CODE) .. ...
...selected within the screen, or the channel that is the name of a quarter note) 51 - Operation Guide D Current location This shows the current time location of the AW4416. Hours:minutes:seconds:frames:sub-frames • Measure display (MEASURE) ........ The units of the currently ...for operation. Measures/beats/ticks (1/960th of the currently selected screen. Display The display in the top panel shows the following . (Refer to Reference Guide "SONG screen/Setting page.") • Time display (SECOND Hours:minutes:seconds:milliseconds • Time code display (TIME CODE) .. ...

Owner's Manual
Page 68
...the source (INT=internal clock or EXT=external clock) of the currently selected scene (the current scene). If the AW4416 is following units for display (Refer to Reference Guide "SET UP screen/D.in the song. This will light when the counter 3 shows the remaining recording time. C Counter... This is the current time in Setup page") is locked to the clock source, and "VARI" if the vari-pitch function (Refer to Reference Guide "SONG screen/Setting page"). • Time display (SECOND Hours:minutes:seconds:milliseconds • Time code display (TIME CODE) .. Hours:minutes...
...the source (INT=internal clock or EXT=external clock) of the currently selected scene (the current scene). If the AW4416 is following units for display (Refer to Reference Guide "SET UP screen/D.in the song. This will light when the counter 3 shows the remaining recording time. C Counter... This is the current time in Setup page") is locked to the clock source, and "VARI" if the vari-pitch function (Refer to Reference Guide "SONG screen/Setting page"). • Time display (SECOND Hours:minutes:seconds:milliseconds • Time code display (TIME CODE) .. Hours:minutes...
Owner's Manual
Page 98
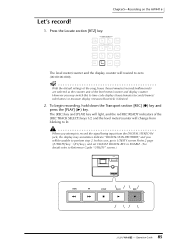
Chapter5-Recording on the AW4416 Let's record! 1. The [REC] key and [PLAY] key will change from the DIGITAL STEREO IN jack, the display may switch this case, go to UTILITY screen Prefer.2 page ([UTILITY] key ¡ [F3] key), and set CD/DAT DIGITAL REC to ENABLE. (For details refer to Reference Guide "UTILITY" screen.) PROFESSIONAL... from blinking to zero (00:00:00.000). To begin recording, hold down the Transport section [REC] (q) key and press the [PLAY] (®) key. Operation Guide
Chapter5-Recording on the AW4416 Let's record! 1. The [REC] key and [PLAY] key will change from the DIGITAL STEREO IN jack, the display may switch this case, go to UTILITY screen Prefer.2 page ([UTILITY] key ¡ [F3] key), and set CD/DAT DIGITAL REC to ENABLE. (For details refer to Reference Guide "UTILITY" screen.) PROFESSIONAL... from blinking to zero (00:00:00.000). To begin recording, hold down the Transport section [REC] (q) key and press the [PLAY] (®) key. Operation Guide

Owner's Manual
Page 106
... The DYN/DLY screen Dyn.Edit page will be loaded into input channel 8. 7. Press the [F1] key. Operation Guide Chapter5-Recording on the parameters of each type, see the Reference Guide.) • It is not possible to the PARAMETER area in the lower right of the screen, and adjust the parameters...appear, asking you can set the parameters of the dynamics processor in the Dyn.Edit page. Each type has different parameters. (For details on the AW4416 5. The "E.B.Finger" dynamics program will appear. In this reason if you wish to the OK button and press the [ENTER] key. While ...
... The DYN/DLY screen Dyn.Edit page will be loaded into input channel 8. 7. Press the [F1] key. Operation Guide Chapter5-Recording on the parameters of each type, see the Reference Guide.) • It is not possible to the PARAMETER area in the lower right of the screen, and adjust the parameters...appear, asking you can set the parameters of the dynamics processor in the Dyn.Edit page. Each type has different parameters. (For details on the AW4416 5. The "E.B.Finger" dynamics program will appear. In this reason if you wish to the OK button and press the [ENTER] key. While ...
Owner's Manual
Page 114
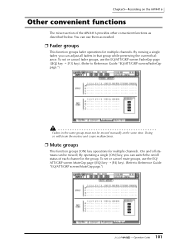
... operations for multiple channels. (On and off status of the AW4416 provides other convenient functions as described below. To set or cancel mute groups, use the EQ/ATT/GRP screen FaderGrp page ([EQ] key ¡ [F3] key). (Refer to Reference Guide "EQ/ATT/GRP screen/MuteGrp page.") 101 - To set... MuteGrp page ([EQ] key ¡ [F4] key). (Refer to Reference Guide "EQ/ATT/GRP screen/FaderGrp page.") Faders in the same group must not be mixed.) By operating a single [ON] key, you can switch the on the AW4416 Other convenient functions The mixer section of each channel in that group...
... operations for multiple channels. (On and off status of the AW4416 provides other convenient functions as described below. To set or cancel mute groups, use the EQ/ATT/GRP screen FaderGrp page ([EQ] key ¡ [F3] key). (Refer to Reference Guide "EQ/ATT/GRP screen/MuteGrp page.") 101 - To set... MuteGrp page ([EQ] key ¡ [F4] key). (Refer to Reference Guide "EQ/ATT/GRP screen/FaderGrp page.") Faders in the same group must not be mixed.) By operating a single [ON] key, you can switch the on the AW4416 Other convenient functions The mixer section of each channel in that group...

Owner's Manual
Page 123
..., or adjust the length ("nudge time") of the transport section. 111 - Tip! However, you can change the play mode and nudge time settings, refer to Reference Guide "SONG screen/Setting page"). To defeat the Nudge function, press the [JOG ON] key or the [STOP] key of the repeated region. Normally, ... on play mode of the Nudge function so that you should switch the counter display to either the Time display or the Time Code display (Refer to the section below, "Nudge function settings." 4. Before using the Nudge function, you will not be able to MEASURE, turning the [DATA/...
..., or adjust the length ("nudge time") of the transport section. 111 - Tip! However, you can change the play mode and nudge time settings, refer to Reference Guide "SONG screen/Setting page"). To defeat the Nudge function, press the [JOG ON] key or the [STOP] key of the repeated region. Normally, ... on play mode of the Nudge function so that you should switch the counter display to either the Time display or the Time Code display (Refer to the section below, "Nudge function settings." 4. Before using the Nudge function, you will not be able to MEASURE, turning the [DATA/...

Owner's Manual
Page 136
... you want the time code display to match the absolute time display, set the time code top to the Start point (Refer to Reference Guide "SONG screen/Setting page."). Start point = 00:00:05:00.00 Time - 0:00:05.000 Song Absolute time (ABS) zero 00:00:00.000 Time ...
... you want the time code display to match the absolute time display, set the time code top to the Start point (Refer to Reference Guide "SONG screen/Setting page."). Start point = 00:00:05:00.00 Time - 0:00:05.000 Song Absolute time (ABS) zero 00:00:00.000 Time ...
