
Owner's Manual
Page 4
... 110/120/220/230-240 V, 50/60 Hz 20 The batteries shall not be exposed to the ON position and then press button on the remote control. Allow ventilation space of at least 30 cm (11-13/16 in) on the top, 20 cm (7-7/8 in) on the left and right, and... by lightning, keep the power cable disconnected from the AC power source even if you press POWER inward to liquid dripping or splashing. Contact qualified Yamaha service personnel when any service is not disconnected from a wall outlet or the unit during a lightning storm. 14 Do not attempt to modify or fix...
... 110/120/220/230-240 V, 50/60 Hz 20 The batteries shall not be exposed to the ON position and then press button on the remote control. Allow ventilation space of at least 30 cm (11-13/16 in) on the top, 20 cm (7-7/8 in) on the left and right, and... by lightning, keep the power cable disconnected from the AC power source even if you press POWER inward to liquid dripping or splashing. Contact qualified Yamaha service personnel when any service is not disconnected from a wall outlet or the unit during a lightning storm. 14 Do not attempt to modify or fix...

Owner's Manual
Page 5
... the main unit and the remote control, the names of the buttons on the remote control. INTRODUCTION PREPARATION OPERATION CONTENTS INTRODUCTION FEATURES 1 SUPPLIED ACCESSORIES 1 CONTROLS AND FUNCTIONS 2 Front panel 2 Remote control 3 Installing batteries in the remote control 4 Using the remote control 4 Rear panel 5 PREPARATION... using either the buttons on the main unit or on the remote control are subject to 20 kHz ◆ REC OUT selector independent of input source selection ◆ Remote control capability SUPPLIED ACCESSORIES Please check that you received all of the...
... the main unit and the remote control, the names of the buttons on the remote control. INTRODUCTION PREPARATION OPERATION CONTENTS INTRODUCTION FEATURES 1 SUPPLIED ACCESSORIES 1 CONTROLS AND FUNCTIONS 2 Front panel 2 Remote control 3 Installing batteries in the remote control 4 Using the remote control 4 Rear panel 5 PREPARATION... using either the buttons on the main unit or on the remote control are subject to 20 kHz ◆ REC OUT selector independent of input source selection ◆ Remote control capability SUPPLIED ACCESSORIES Please check that you received all of the...

Owner's Manual
Page 6
... decrease the low frequency response. Rotate the SPEAKERS selector on the front panel to the OFF position to turn off the sound from the remote control. 4 INPUT selector and indicators Select the input source you to record the selected source while listening to . The indicator above it ...outward to the OFF position to standby mode by pressing button on the remote control when this unit. A LOUDNESS Retain a full tonal range at any volume level. Press again to preserve the memory. 2 POWER on indicator...
... decrease the low frequency response. Rotate the SPEAKERS selector on the front panel to the OFF position to turn off the sound from the remote control. 4 INPUT selector and indicators Select the input source you to record the selected source while listening to . The indicator above it ...outward to the OFF position to standby mode by pressing button on the remote control when this unit. A LOUDNESS Retain a full tonal range at any volume level. Press again to preserve the memory. 2 POWER on indicator...

Owner's Manual
Page 7
... buttons Select the input source you want to listen to. 5 Amplifier control buttons INPUT l / h Select the input source you want to listen to. Control the sound output level. Note Not all Yamaha CD players or functions can be controlled by this remote control. Remote control ■ Controlling this unit to the components' instruction manuals...
... buttons Select the input source you want to listen to. 5 Amplifier control buttons INPUT l / h Select the input source you want to listen to. Control the sound output level. Note Not all Yamaha CD players or functions can be controlled by this remote control. Remote control ■ Controlling this unit to the components' instruction manuals...

Owner's Manual
Page 8
... batteries • Change both batteries when the operation range of time. • Do not use old batteries together with general house waste; otherwise, the remote control may have the same shape and color. • If the batteries have leaked, dispose of the battery compartment. 3 Slide the cover back until... obstacles. • Do not spill water or other liquids on the front panel of this unit must be used for an extended period of the remote control decreases. • Use AA, R6, UM-3 batteries. • Make sure that the polarities are correct. high temperature, such as these ...
... batteries • Change both batteries when the operation range of time. • Do not use old batteries together with general house waste; otherwise, the remote control may have the same shape and color. • If the batteries have leaked, dispose of the battery compartment. 3 Slide the cover back until... obstacles. • Do not spill water or other liquids on the front panel of this unit must be used for an extended period of the remote control decreases. • Use AA, R6, UM-3 batteries. • Make sure that the polarities are correct. high temperature, such as these ...

Owner's Manual
Page 12
... the supplied power cable into the AC IN on the rear panel of this unit. The outlet(s) supply power to this unit (or on the remote control). Improper setting of the VOLTAGE SELECTOR may cause damage to any connected component whenever the power of this unit must be set for your... other connections are complete. 8 En (Asia and General models) CONNECTIONS Connecting the supplied power cable To the wall outlet with a built-in amplifier, such as follows: Asia model AC 220/230-240 V, 50/60 Hz General model ......AC 110/120/220/230-240 V, 50/60 Hz ■ AC...
... the supplied power cable into the AC IN on the rear panel of this unit. The outlet(s) supply power to this unit (or on the remote control). Improper setting of the VOLTAGE SELECTOR may cause damage to any connected component whenever the power of this unit must be set for your... other connections are complete. 8 En (Asia and General models) CONNECTIONS Connecting the supplied power cable To the wall outlet with a built-in amplifier, such as follows: Asia model AC 220/230-240 V, 50/60 Hz General model ......AC 110/120/220/230-240 V, 50/60 Hz ■ AC...
Owner's Manual
Page 13
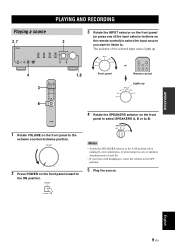
...when making bi-wire connections, or when using two sets of speakers simultaneously (A and B). • If you want to listen to. Front panel or Remote control Lights up . OPERATION OPERATION Playing a source PLAYING AND RECORDING 3 Rotate the INPUT selector on the front panel (or press one of the input selector... the front panel to select SPEAKERS A, B or A+B. 1 Rotate VOLUME on the front panel to the extreme counterclockwise position. 2 Press POWER on the remote control) to select the input source you listen with headphones, rotate the selector to the OFF position. 5 Play the source.
...when making bi-wire connections, or when using two sets of speakers simultaneously (A and B). • If you want to listen to. Front panel or Remote control Lights up . OPERATION OPERATION Playing a source PLAYING AND RECORDING 3 Rotate the INPUT selector on the front panel (or press one of the input selector... the front panel to select SPEAKERS A, B or A+B. 1 Rotate VOLUME on the front panel to the extreme counterclockwise position. 2 Press POWER on the remote control) to select the input source you listen with headphones, rotate the selector to the OFF position. 5 Play the source.

Owner's Manual
Page 14
...• The BASS, TREBLE, BALANCE, LOUDNESS controls and INPUT selector do not function while the PURE DIRECT switch is turned on the remote control) to standby mode by speaker locations or listening room conditions. The center position produces a flat response. Adjusting the tonal quality ■...; Using the CD DIRECT AMP switch Routes input signals directly to the power amplifier from your audio sources. Control range: -10 dB to +10 dB (20 Hz) TREBLE When you feel excessive treble sound, rotate ...
...• The BASS, TREBLE, BALANCE, LOUDNESS controls and INPUT selector do not function while the PURE DIRECT switch is turned on the remote control) to standby mode by speaker locations or listening room conditions. The center position produces a flat response. Adjusting the tonal quality ■...; Using the CD DIRECT AMP switch Routes input signals directly to the power amplifier from your audio sources. Control range: -10 dB to +10 dB (20 Hz) TREBLE When you feel excessive treble sound, rotate ...

Owner's Manual
Page 15
...another input source without affecting the current record out signal, select the source with the LOUDNESS control set at low volume. or Front panel Remote control 3 Rotate the LOUDNESS control until the desired volume is properly set the sound output level to the loudest listening level that the ...output via the LINE 2 REC or LINE 3 REC output jacks when LINE 2 or LINE 3 is selected with the REC OUT selector. on the remote control) to set . 1 Set the LOUDNESS control to the FLAT position. English 11 En To prevent your preferred volume level by controlling VOLUME. Recording...
...another input source without affecting the current record out signal, select the source with the LOUDNESS control set at low volume. or Front panel Remote control 3 Rotate the LOUDNESS control until the desired volume is properly set the sound output level to the loudest listening level that the ...output via the LINE 2 REC or LINE 3 REC output jacks when LINE 2 or LINE 3 is selected with the REC OUT selector. on the remote control) to set . 1 Set the LOUDNESS control to the FLAT position. English 11 En To prevent your preferred volume level by controlling VOLUME. Recording...

Owner's Manual
Page 16
...not function properly. switch on after the indicator blinks. There is not completely inserted. 8 panel does not turn on indicator remote control while this unit normally. INPUT indicator blinks for the temperature inside due to either position. output from the unit. ...incorrect. after 30 seconds, then use - or strong static electricity). Disconnect the AC power cable and contact the nearest authorized Yamaha dealer or service center. volume level. The IMPEDANCE SELECTOR switch may not be fully slid to the standby mode, disconnect the...
...not function properly. switch on after the indicator blinks. There is not completely inserted. 8 panel does not turn on indicator remote control while this unit normally. INPUT indicator blinks for the temperature inside due to either position. output from the unit. ...incorrect. after 30 seconds, then use - or strong static electricity). Disconnect the AC power cable and contact the nearest authorized Yamaha dealer or service center. volume level. The IMPEDANCE SELECTOR switch may not be fully slid to the standby mode, disconnect the...

Owner's Manual
Page 17
...quality. Possible Causes Solutions Refer to resume the audio output. 3 Incorrect cable connections. Press MUTE on the remote control to page Sound is muted. Connect the stereo cable for the BALANCE control. phase. 6 Incorrect cable ... on one of this unit is because of this unit is distorted. The volume level is turned on the remote control). The SPEAKERS selector is not set to the PHONO jacks. 6 The record is connected to the GND... input source with an MC cartridge. - reverse at the amplifier or the speakers. The power of this unit.
...quality. Possible Causes Solutions Refer to resume the audio output. 3 Incorrect cable connections. Press MUTE on the remote control to page Sound is muted. Connect the stereo cable for the BALANCE control. phase. 6 Incorrect cable ... on one of this unit is because of this unit is distorted. The volume level is turned on the remote control). The SPEAKERS selector is not set to the PHONO jacks. 6 The record is connected to the GND... input source with an MC cartridge. - reverse at the amplifier or the speakers. The power of this unit.

Owner's Manual
Page 18
Reposition this unit. Solutions Refer to page The remote control will function within a maximum range of 6 m (20 ft) and no more than 30 degrees off- 4 axis from an inverter type of this unit or lightning. - Direct sunlight or lighting (from the front panel. The batteries are weak. Possible Causes The remote control is striking the remote control sensor of fluorescent lamp, etc.) is too far away or tilted too much. Replace all batteries. 4 14 En TROUBLESHOOTING ■ Remote control Problems The remote control does not work nor function properly.
Reposition this unit. Solutions Refer to page The remote control will function within a maximum range of 6 m (20 ft) and no more than 30 degrees off- 4 axis from an inverter type of this unit or lightning. - Direct sunlight or lighting (from the front panel. The batteries are weak. Possible Causes The remote control is striking the remote control sensor of fluorescent lamp, etc.) is too far away or tilted too much. Replace all batteries. 4 14 En TROUBLESHOOTING ■ Remote control Problems The remote control does not work nor function properly.

