
Owner's Manual
Page 9
... Fading Scenes 166 Recalling Scenes Safely 168 Sorting Scenes 169 16 Libraries 171 About the Libraries 171 General Library Operation 171 Using Libraries 173 17 Remote Control 185 About Remote Function 185 Pro Tools Remote Layer 186 Nuendo Remote Layer 202 Other DAW Remote Layers 202 MIDI Remote Layer 203 Machine Control Function 208 01V96-Owner's Manual
... Fading Scenes 166 Recalling Scenes Safely 168 Sorting Scenes 169 16 Libraries 171 About the Libraries 171 General Library Operation 171 Using Libraries 173 17 Remote Control 185 About Remote Function 185 Pro Tools Remote Layer 186 Nuendo Remote Layer 202 Other DAW Remote Layers 202 MIDI Remote Layer 203 Machine Control Function 208 01V96-Owner's Manual

Owner's Manual
Page 11
... Yamaha 01V96 Digital Mixing Console. The compact 01V96 Digital Console features 24-bit/96 kHz digital audio processing without compromise, as well as popularized by the DM2000 and 02R96 Digital Mixing Consoles. This integrated, comprehensive audio system features remote control function... for DAWs (Digital Audio Workstations) as 40-channel simultaneous mixing. Welcome 11 1 Welcome 1 Welcome Thank you to assign functions to control 01V96 internal parameters. • ADAT optical connectors &#...
... Yamaha 01V96 Digital Mixing Console. The compact 01V96 Digital Console features 24-bit/96 kHz digital audio processing without compromise, as well as popularized by the DM2000 and 02R96 Digital Mixing Consoles. This integrated, comprehensive audio system features remote control function... for DAWs (Digital Audio Workstations) as 40-channel simultaneous mixing. Welcome 11 1 Welcome 1 Welcome Thank you to assign functions to control 01V96 internal parameters. • ADAT optical connectors &#...
Owner's Manual
Page 12
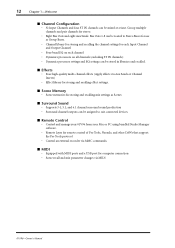
... • Supports 3-1, 5.1, and 6.1 channel surround sound production • Surround channel outputs can be routed to suit connected devices. ■ Remote Control • Control and manage your 01V96 from your Mac or PC using bundled Studio Manager software. • Remote Layer for remote control of Pro Tools, Nuendo, and other DAWs that support the Pro Tools protocol •...
... • Supports 3-1, 5.1, and 6.1 channel surround sound production • Surround channel outputs can be routed to suit connected devices. ■ Remote Control • Control and manage your 01V96 from your Mac or PC using bundled Studio Manager software. • Remote Layer for remote control of Pro Tools, Nuendo, and other DAWs that support the Pro Tools protocol •...
Owner's Manual
Page 18
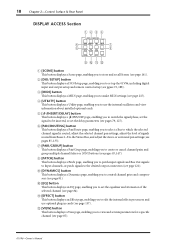
...and use the internal oscillators and view information about installed optional cards. H [PATCH] button This button displays a Patch page, enabling you to control channel gates and compressors (see page 81). I [DYNAMICS] button This button displays a Dynamics page, enabling you to patch input signals and Bus... (see pages 79, 127). J [EQ] button This button displays an EQ page, enabling you to set up the 01V96, including digital input and output setup and remote control setup (see pgaes 72, 188). K [EFFECT] button This button displays an Effect page, enabling you to use optional ...
...and use the internal oscillators and view information about installed optional cards. H [PATCH] button This button displays a Patch page, enabling you to control channel gates and compressors (see page 81). I [DYNAMICS] button This button displays a Dynamics page, enabling you to patch input signals and Bus... (see pages 79, 127). J [EQ] button This button displays an EQ page, enabling you to set up the 01V96, including digital input and output setup and remote control setup (see pgaes 72, 188). K [EFFECT] button This button displays an Effect page, enabling you to use optional ...
Owner's Manual
Page 161
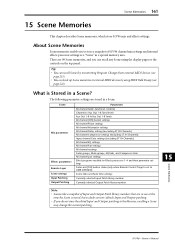
... Time settings Currently-selected Input Patch library number Currently-selected Output Patch library number Note: • Scenes take a snapshot of 01V96 channel mix settings and internal effects processor settings as a "Scene" in use at the time the Scene is stored, but exclude... parameter settings Fader and [ON] button status (only when Remote Control Target is Stored in a Scene: Scene Mix parameters Effects parameters Remote Layer Scene settings Input Patching Output Patching Parameters All channel faders (and level controls) Channel to the libraries, recalling a Scene may change the...
... Time settings Currently-selected Input Patch library number Currently-selected Output Patch library number Note: • Scenes take a snapshot of 01V96 channel mix settings and internal effects processor settings as a "Scene" in use at the time the Scene is stored, but exclude... parameter settings Fader and [ON] button status (only when Remote Control Target is Stored in a Scene: Scene Mix parameters Effects parameters Remote Layer Scene settings Input Patching Output Patching Parameters All channel faders (and level controls) Channel to the libraries, recalling a Scene may change the...
Owner's Manual
Page 185
... on the DIO/Setup | Remote page. Tip: To control external devices from the 01V96 top panel. Remote Control 185 17 Remote Control This chapter describes the Remote function, which enables you can also use these types of Remote functions, you to control the external device remotely. About Remote Function The 01V96's Remote function enables you must connect the 01V96 to control external equipment directly from the...
... on the DIO/Setup | Remote page. Tip: To control external devices from the 01V96 top panel. Remote Control 185 17 Remote Control This chapter describes the Remote function, which enables you can also use these types of Remote functions, you to control the external device remotely. About Remote Function The 01V96's Remote function enables you must connect the 01V96 to control external equipment directly from the...
Owner's Manual
Page 186
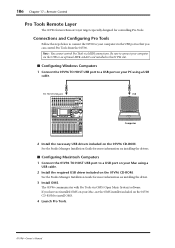
...the necessary USB drivers included on the 01V96 CD-ROM to your computer via MIDI connections. See the Studio Manager Installation Guide for controlling Pro Tools. 186 Chapter 17-Remote Control Pro Tools Remote Layer The 01V96 features Remote Layer target especially designed for more information ...on installing the driver. 3 Install OMS. The 01V96 communicates with Pro Tools via OMS (...
...the necessary USB drivers included on the 01V96 CD-ROM to your computer via MIDI connections. See the Studio Manager Installation Guide for controlling Pro Tools. 186 Chapter 17-Remote Control Pro Tools Remote Layer The 01V96 features Remote Layer target especially designed for more information ...on installing the driver. 3 Install OMS. The 01V96 communicates with Pro Tools via OMS (...

Owner's Manual
Page 187
... finish setting the parameters, close the window. 17 Remote Control 01V96-Owner's Manual Refer to the documentation that features eight ports. 6 Choose Peripherals from the Setups menu, and configure OMS as a USB MIDI interface ... one port for more information on configuring the OMS Studio Setup menu. Pro Tools Remote Layer 187 5 Choose OMS Studio Setup from the Setups menu to open the Peripherals window. 7 Double-click the MIDI Controllers tab. 8 Refer to the screen below to set the Type, Receive From, Send To, and...
... finish setting the parameters, close the window. 17 Remote Control 01V96-Owner's Manual Refer to the documentation that features eight ports. 6 Choose Peripherals from the Setups menu, and configure OMS as a USB MIDI interface ... one port for more information on configuring the OMS Studio Setup menu. Pro Tools Remote Layer 187 5 Choose OMS Studio Setup from the Setups menu to open the Peripherals window. 7 Double-click the MIDI Controllers tab. 8 Refer to the screen below to set the Type, Receive From, Send To, and...
Owner's Manual
Page 188
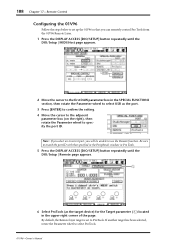
..., rotate the Parameter wheel to specify the port ID. 188 Chapter 17-Remote Control Configuring the 01V96 Follow the steps below to set to ProTools. By default, the Remote layer target is set up the 01V96 so that specified in the Peripherals window in Pro Tools. 5...the port ID with that you will be unable to use the Remote function. Note: If you select an incorrect port, you can remotely control Pro Tools from the 01V96 Remote Layer. 1 Press the DISPLAY ACCESS [DIO/SETUP] button repeatedly until the DIO/Setup | Remote page appears. 1 6 Select ProTools (as the port. 3 ...
..., rotate the Parameter wheel to specify the port ID. 188 Chapter 17-Remote Control Configuring the 01V96 Follow the steps below to set to ProTools. By default, the Remote layer target is set up the 01V96 so that specified in the Peripherals window in Pro Tools. 5...the port ID with that you will be unable to use the Remote function. Note: If you select an incorrect port, you can remotely control Pro Tools from the 01V96 Remote Layer. 1 Press the DISPLAY ACCESS [DIO/SETUP] button repeatedly until the DIO/Setup | Remote page appears. 1 6 Select ProTools (as the port. 3 ...

Owner's Manual
Page 189
... selected, you to select Insert Display mode. The following display modes using these buttons: ■ Insert Display mode ( [F2] button) Press the [F2] button to remotely control Pro Tools. To control the 01V96, you to select an Input Channel Layer or the Master Layer. In this mode, you can assign and edit plug-ins...
... selected, you to select Insert Display mode. The following display modes using these buttons: ■ Insert Display mode ( [F2] button) Press the [F2] button to remotely control Pro Tools. To control the 01V96, you to select an Input Channel Layer or the Master Layer. In this mode, you can assign and edit plug-ins...

Owner's Manual
Page 190
...box.......... Switching this button to INSERT enables you to assign plug-ins using four rotary controls on the page. 190 Chapter 17-Remote Control • If no check boxes are using the four rotary controls (see page 192). C SELECT ASSIGN This parameter indicates the current parameter, which can ... Scroll buttons to change the parameters displayed in this section. • ASSIGN Turn on this button to adjust the plug-in parameters. 01V96-Owner's Manual Switching this button to insert plug-ins into Pro Tools channels and adjust plug-in parameter names, values, alarm messages from...
...box.......... Switching this button to INSERT enables you to assign plug-ins using four rotary controls on the page. 190 Chapter 17-Remote Control • If no check boxes are using the four rotary controls (see page 192). C SELECT ASSIGN This parameter indicates the current parameter, which can ... Scroll buttons to change the parameters displayed in this section. • ASSIGN Turn on this button to adjust the plug-in parameters. 01V96-Owner's Manual Switching this button to insert plug-ins into Pro Tools channels and adjust plug-in parameter names, values, alarm messages from...
Owner's Manual
Page 191
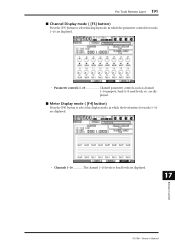
... levels or Send levels are displayed. • Parameter controls 1-16 Channel parameter controls, such as channel 1-16 panpots, Send A-E send levels, etc. are displayed. ■ Meter Display mode ( [F4] button) Press the [F4] button to select this display mode, in which the level meters for tracks 1-16 are displayed. 17 Remote Control 01V96-Owner's Manual
... levels or Send levels are displayed. • Parameter controls 1-16 Channel parameter controls, such as channel 1-16 panpots, Send A-E send levels, etc. are displayed. ■ Meter Display mode ( [F4] button) Press the [F4] button to select this display mode, in which the level meters for tracks 1-16 are displayed. 17 Remote Control 01V96-Owner's Manual

Owner's Manual
Page 192
... • [AUX 7] button When this button while a Channel Display mode page is selected, you can adjust each channel panpot using parameter controls 1-16. If you turn on or off. If 16 or fewer channels are displayed in to reset the corresponding channel fader level. The button...mode enables you to the parameter control on the display, then press and hold down this button and press [ENTER] to reset the corresponding channel panpot to center. 192 Chapter 17-Remote Control Control Surface Operation When the Pro Tools Remote layer is selected, the 01V96 controls on , you can adjust the...
... • [AUX 7] button When this button while a Channel Display mode page is selected, you can adjust each channel panpot using parameter controls 1-16. If you turn on or off. If 16 or fewer channels are displayed in to reset the corresponding channel fader level. The button...mode enables you to the parameter control on the display, then press and hold down this button and press [ENTER] to reset the corresponding channel panpot to center. 192 Chapter 17-Remote Control Control Surface Operation When the Pro Tools Remote layer is selected, the 01V96 controls on , you can adjust the...
Owner's Manual
Page 193
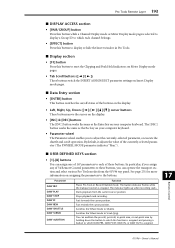
... Insert window in Record Enabled mode. In particular, if you assign any of 54 Remote Control parameters to these buttons. Starts playback from the 01V96 top panel. Remote Control 17 01V96-Owner's Manual The indicator lights up when recording starts. Pro Tools Remote Layer 193 ■ DISPLAY ACCESS section • [PAIR/GROUP] button Press this button to...
... Insert window in Record Enabled mode. In particular, if you assign any of 54 Remote Control parameters to these buttons. Starts playback from the 01V96 top panel. Remote Control 17 01V96-Owner's Manual The indicator lights up when recording starts. Pro Tools Remote Layer 193 ■ DISPLAY ACCESS section • [PAIR/GROUP] button Press this button to...
Owner's Manual
Page 194
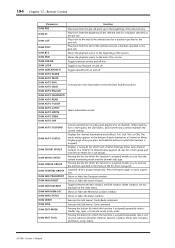
... press and hold the button to the beginning of the session. Suspends all channels. Toggles between on and off -line. 194 Chapter 17-Remote Control Parameter DAW PRE DAW IN DAW OUT DAW POST DAW RTZ DAW END DAW ONLINE DAW LOOP DAW QUICKPUNCH DAW AUTO FADER DAW AUTO MUTE...this function is assigned) repeatedly selects one of seven edit tools (Zoomer, Trimmer, Selector, Grabber, Smart Tool, Scrubber, and Pencil, in this order). 01V96-Owner's Manual Toggles QuickPunch on -line and off . Shows or hides the Insert window. Pressing the button (to the beginning of the selected area. ...
... press and hold the button to the beginning of the session. Suspends all channels. Toggles between on and off -line. 194 Chapter 17-Remote Control Parameter DAW PRE DAW IN DAW OUT DAW POST DAW RTZ DAW END DAW ONLINE DAW LOOP DAW QUICKPUNCH DAW AUTO FADER DAW AUTO MUTE...this function is assigned) repeatedly selects one of seven edit tools (Zoomer, Trimmer, Selector, Grabber, Smart Tool, Scrubber, and Pencil, in this order). 01V96-Owner's Manual Toggles QuickPunch on -line and off . Shows or hides the Insert window. Pressing the button (to the beginning of the selected area. ...

Owner's Manual
Page 195
...button that the FADER MODE [HOME] button indicator is flashing cancels Record Enabled mode for all channel strips in Record Ready mode. Remote Control 17 01V96-Owner's Manual DAW Channel + DAW Channel - Pressing the button (to the desired channel. If no channel strips are assigned) along with...BANK + DAW BANK - The button indicator flashes if any channel strip in the same way as Macintosh keyboard keys (Shift, Option, Control, and Alt). To select multiple Pro Tools channels simultaneously, while holding down the [AUX 6] button and press the desired [SEL] button to...
...button that the FADER MODE [HOME] button indicator is flashing cancels Record Enabled mode for all channel strips in Record Ready mode. Remote Control 17 01V96-Owner's Manual DAW Channel + DAW Channel - Pressing the button (to the desired channel. If no channel strips are assigned) along with...BANK + DAW BANK - The button indicator flashes if any channel strip in the same way as Macintosh keyboard keys (Shift, Option, Control, and Alt). To select multiple Pro Tools channels simultaneously, while holding down the [AUX 6] button and press the desired [SEL] button to...

Owner's Manual
Page 196
...button indicators of the channel for the selected Sends (A-E) to pre or post. 1 Press the [F3] button to select Channel Display mode. 01V96-Owner's Manual You can reset the pan settings only when the [AUX 7] button indicator is illuminated steadily. In this mode, the channels are...• Implicit mute This is selected, the [AUX 7] button indicator flashes and the SELECT ASSIGN parameter indicates "PanR." 196 Chapter 17-Remote Control Muting Channels To mute Pro Tools channels, press the [ON] buttons. Grouped channels are muted. There are two mute modes in which you adjust...
...button indicators of the channel for the selected Sends (A-E) to pre or post. 1 Press the [F3] button to select Channel Display mode. 01V96-Owner's Manual You can reset the pan settings only when the [AUX 7] button indicator is illuminated steadily. In this mode, the channels are...• Implicit mute This is selected, the [AUX 7] button indicator flashes and the SELECT ASSIGN parameter indicates "PanR." 196 Chapter 17-Remote Control Muting Channels To mute Pro Tools channels, press the [ON] buttons. Grouped channels are muted. There are two mute modes in which you adjust...
Owner's Manual
Page 197
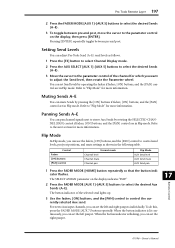
...Sends A-E You can adjust Pro Tools Send (A-E) send levels as shown in Flip mode. Remote Control 17 01V96-Owner's Manual Refer to "Flip Mode" for more information. Control Faders [ON] buttons [PAN] control Normal mode Channel level Channel mute Channel pan Flip Mode AUX Send level AUX Send mute...Panning Sends A-E You can set Send levels by pressing the [ON] buttons if faders, [ON] buttons, and the [PAN] control are in Flip mode. Pro Tools Remote Layer 197 2 Press the FADER MODE [AUX 1]-[AUX 5] buttons to select the desired Sends (A-E). 3 To toggle between pre and...
...Sends A-E You can adjust Pro Tools Send (A-E) send levels as shown in Flip mode. Remote Control 17 01V96-Owner's Manual Refer to "Flip Mode" for more information. Control Faders [ON] buttons [PAN] control Normal mode Channel level Channel mute Channel pan Flip Mode AUX Send level AUX Send mute...Panning Sends A-E You can set Send levels by pressing the [ON] buttons if faders, [ON] buttons, and the [PAN] control are in Flip mode. Pro Tools Remote Layer 197 2 Press the FADER MODE [AUX 1]-[AUX 5] buttons to select the desired Sends (A-E). 3 To toggle between pre and...
Owner's Manual
Page 198
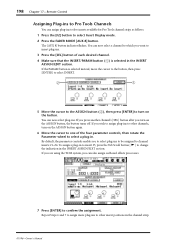
...press [ENTER] to select INSERT. 2 1 5 Move the cursor to the ASSIGN button (2), then press [ENTER] to change the indication in the channel strip. 01V96-Owner's Manual You can also assign outboard effects processors. 7 Press [ENTER] to select Insert Display mode. 2 Press the FADER MODE [AUX 8] button. Repeat...channel's [SEL] button after you wish to assign plug-ins to select a plug-in the INSERT ASSIGN/EDIT section. 198 Chapter 17-Remote Control Assigning Plug-ins to Pro Tools Channels You can assign plug-ins to five inserts available for Pro Tools channel strips as follows....
...press [ENTER] to select INSERT. 2 1 5 Move the cursor to the ASSIGN button (2), then press [ENTER] to change the indication in the channel strip. 01V96-Owner's Manual You can also assign outboard effects processors. 7 Press [ENTER] to select Insert Display mode. 2 Press the FADER MODE [AUX 8] button. Repeat...channel's [SEL] button after you wish to assign plug-ins to select a plug-in the INSERT ASSIGN/EDIT section. 198 Chapter 17-Remote Control Assigning Plug-ins to Pro Tools Channels You can assign plug-ins to five inserts available for Pro Tools channel strips as follows....
Owner's Manual
Page 199
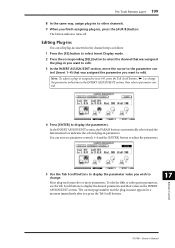
...way, assign plug-ins to other channels. 9 When you press the Tab Scroll buttons. 17 Remote Control 01V96-Owner's Manual Note: To adjust a plug-in assigned to insert #5, press the Tab Scroll...The current page number and the plug-in the INSERT ASSIGN/EDIT section, then select a parameter control. 4 Press [ENTER] to the parameter con- Editing Plug-ins You can now use the Tab... move the cursor to display the parameters. To edit the fifth or subsequent parameters, use parameter controls 1-4 and the [ENTER] button to adjust the parameters. 5 Use the Tab Scroll buttons to display ...
...way, assign plug-ins to other channels. 9 When you press the Tab Scroll buttons. 17 Remote Control 01V96-Owner's Manual Note: To adjust a plug-in assigned to insert #5, press the Tab Scroll...The current page number and the plug-in the INSERT ASSIGN/EDIT section, then select a parameter control. 4 Press [ENTER] to the parameter con- Editing Plug-ins You can now use the Tab... move the cursor to display the parameters. To edit the fifth or subsequent parameters, use parameter controls 1-4 and the [ENTER] button to adjust the parameters. 5 Use the Tab Scroll buttons to display ...


