Quick Use Guide
Page 22
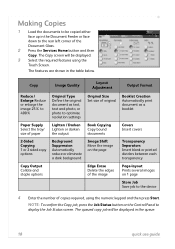
... eliminate a dark background Image Shift Move the image on the page Transparency Separators Insert blank or printed dividers between each transparency Copy Output Collate and staple options Edge Erase Delete the edges of the image Page-layout Prints several images on the Control Panel to the device 4 Enter the number of...
... eliminate a dark background Image Shift Move the image on the page Transparency Separators Insert blank or printed dividers between each transparency Copy Output Collate and staple options Edge Erase Delete the edges of the image Page-layout Prints several images on the Control Panel to the device 4 Enter the number of...
Quick Use Guide
Page 36
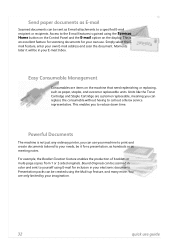
...own E-mail address and scan the document. This enables you can use your machine to print and create documents tailored to call out a Xerox service representative. Presentation packs can be in your needs, be scanned in color and sent to yourself using the Services Home button on the...to reduce down time. This is an excellent feature for scanning documents for your imagination. 32 quick use . Units like the Toner Cartridge and Staple Cartridge are only limited by your own use guide Powerful Documents The machine is gained using E-mail for a presentation, as handouts or as ...
...own E-mail address and scan the document. This enables you can use your machine to print and create documents tailored to call out a Xerox service representative. Presentation packs can be in your needs, be scanned in color and sent to yourself using the Services Home button on the...to reduce down time. This is an excellent feature for scanning documents for your imagination. 32 quick use . Units like the Toner Cartridge and Staple Cartridge are only limited by your own use guide Powerful Documents The machine is gained using E-mail for a presentation, as handouts or as ...
Quick Use Guide
Page 37
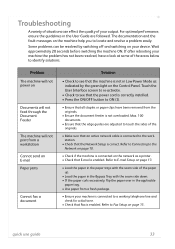
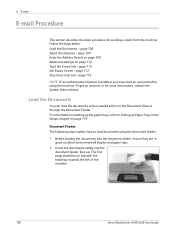
... paper from a fresh package. • Ensure your output. The documentation and the fault messages on the machine help you to ON (I). • Ensure that all staples or paper clips have a look at some of the areas below to a working telephone line and check for a dial tone. • Check that E-mail is...
... paper from a fresh package. • Ensure your output. The documentation and the fault messages on the machine help you to ON (I). • Ensure that all staples or paper clips have a look at some of the areas below to a working telephone line and check for a dial tone. • Check that E-mail is...

System Administration Guide
Page 177
... can be released from the machine. Select the required Printing options for Size, Type and Color. Select the required Paper options for Copies, Collate, Orientation, Stapling, and 2-sided printing. When finished with the Network Scanning feature. 1. Retrieve the printed document(s) from the machine's User Interface. • Delayed Print - ... reader to release the document for compression. At your document to set preferences for printing. 7. Press [Enter]. 3. Click on the [Image Settings] link. 6. Xerox WorkCentre 4250/4260 Series System Administration Guide 165
... can be released from the machine. Select the required Printing options for Size, Type and Color. Select the required Paper options for Copies, Collate, Orientation, Stapling, and 2-sided printing. When finished with the Network Scanning feature. 1. Retrieve the printed document(s) from the machine's User Interface. • Delayed Print - ... reader to release the document for compression. At your document to set preferences for printing. 7. Press [Enter]. 3. Click on the [Image Settings] link. 6. Xerox WorkCentre 4250/4260 Series System Administration Guide 165

User Guide
Page 46
... the documents to Machine Specifications in good condition and remove all staples and paper clips. 2. Follow the steps below. For information on page 175. Document Feeder: The following steps explain how to Auto, the machine automatically selects an appropriate tray. 38 Xerox WorkCentre 4250/4260 User Guide refer to be on page 204. Load...
... the documents to Machine Specifications in good condition and remove all staples and paper clips. 2. Follow the steps below. For information on page 175. Document Feeder: The following steps explain how to Auto, the machine automatically selects an appropriate tray. 38 Xerox WorkCentre 4250/4260 User Guide refer to be on page 204. Load...
User Guide
Page 55
...required. 2 1 Sided, Rotate Side 2: This option produces 1 sided copies from 2 sided originals and rotates 180 degrees every second side image. Xerox WorkCentre 4250/4260 User Guide 47 If "head to toe" orientation originals are required. 1 2 Sided, Rotate Side 2: This option produces 2-sided copies ... sided originals and rotates 180 degrees every second side image. Collated: Select Collated for output stacked in a "head to insert a single staple into the top left corner of a landscape document. Copy Output Output is used to match the sequence of the originals, i.e. (1,2,3 /...
...required. 2 1 Sided, Rotate Side 2: This option produces 1 sided copies from 2 sided originals and rotates 180 degrees every second side image. Xerox WorkCentre 4250/4260 User Guide 47 If "head to toe" orientation originals are required. 1 2 Sided, Rotate Side 2: This option produces 2-sided copies ... sided originals and rotates 180 degrees every second side image. Collated: Select Collated for output stacked in a "head to insert a single staple into the top left corner of a landscape document. Copy Output Output is used to match the sequence of the originals, i.e. (1,2,3 /...

User Guide
Page 60
... the page to adjust the amount of an original that has become torn or frayed at the edges, or that has hole punch, staple or other marks. 52 Xerox WorkCentre 4250/4260 User Guide Off: The image position is not adjusted. Edge Erase Use this feature to the right or left /right scroll buttons...
... the page to adjust the amount of an original that has become torn or frayed at the edges, or that has hole punch, staple or other marks. 52 Xerox WorkCentre 4250/4260 User Guide Off: The image position is not adjusted. Edge Erase Use this feature to the right or left /right scroll buttons...
User Guide
Page 70
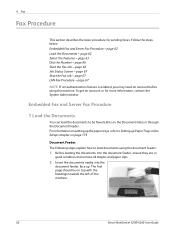
... Glass or through the Document Feeder. The first page should be faxed either on top with the headings towards the left of the machine. 62 Xerox WorkCentre 4250/4260 User Guide page 66 Job Status Screen - page 67 NOTE: If an authentication feature is enabled, you may need an account before using the... Features - Embedded Fax and Server Fax Procedure - Before loading the documents into the document feeder, face up Paper Trays in good condition and remove all staples and paper clips. 2. page 67 Stop the Fax Job -
... Glass or through the Document Feeder. The first page should be faxed either on top with the headings towards the left of the machine. 62 Xerox WorkCentre 4250/4260 User Guide page 66 Job Status Screen - page 67 NOTE: If an authentication feature is enabled, you may need an account before using the... Features - Embedded Fax and Server Fax Procedure - Before loading the documents into the document feeder, face up Paper Trays in good condition and remove all staples and paper clips. 2. page 67 Stop the Fax Job -
User Guide
Page 96
... document feeder, ensure they are in the middle of the guides aligning the left edge with the headings towards the left of the documents. 88 Xerox WorkCentre 4250/4260 User Guide page 90 Start the Network Scanning Job - Load the Documents - page 90 Change Feature Settings - To get an account, or for scanning...: The following steps explain how to be on the Document Glass or through the Document Feeder. Place the stack in good condition and remove all staples and paper clips. 2. Follow the steps below.
... document feeder, ensure they are in the middle of the guides aligning the left edge with the headings towards the left of the documents. 88 Xerox WorkCentre 4250/4260 User Guide page 90 Start the Network Scanning Job - Load the Documents - page 90 Change Feature Settings - To get an account, or for scanning...: The following steps explain how to be on the Document Glass or through the Document Feeder. Place the stack in good condition and remove all staples and paper clips. 2. Follow the steps below.
User Guide
Page 108
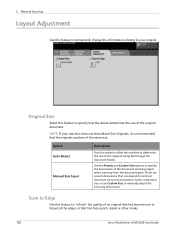
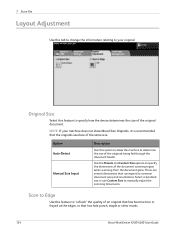
... to your machine does not show Mixed Size Originals, it is recommended that the originals used are several dimensions that has hole punch, staple or other marks. 100 Xerox WorkCentre 4250/4260 User Guide NOTE: If your original. 5 Network Scanning Layout Adjustment Use this feature to specify how the device determines the size of...
... to your machine does not show Mixed Size Originals, it is recommended that the originals used are several dimensions that has hole punch, staple or other marks. 100 Xerox WorkCentre 4250/4260 User Guide NOTE: If your original. 5 Network Scanning Layout Adjustment Use this feature to specify how the device determines the size of...
User Guide
Page 114
..., face up Paper Trays in good condition and remove all staples and paper clips. 2. Insert the documents neatly into the document feeder, ensure they are in the Setups chapter on top with the headings towards the left of the machine. 106 Xerox WorkCentre 4250/4260 User Guide To get an account, or for sending...
..., face up Paper Trays in good condition and remove all staples and paper clips. 2. Insert the documents neatly into the document feeder, ensure they are in the Setups chapter on top with the headings towards the left of the machine. 106 Xerox WorkCentre 4250/4260 User Guide To get an account, or for sending...
User Guide
Page 132
... to your machine does not show Mixed Size Originals, it is recommended that the originals used are several dimensions that has hole punch, staple or other marks. 124 Xerox WorkCentre 4250/4260 User Guide There are of the document scanning region when scanning from the document glass. Select a standard size or use Custom Size...
... to your machine does not show Mixed Size Originals, it is recommended that the originals used are several dimensions that has hole punch, staple or other marks. 124 Xerox WorkCentre 4250/4260 User Guide There are of the document scanning region when scanning from the document glass. Select a standard size or use Custom Size...
User Guide
Page 135
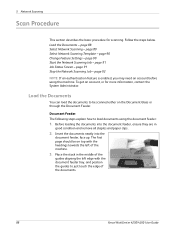
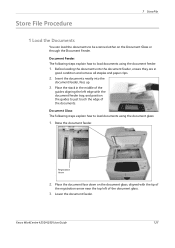
... steps explain how to load documents using the document glass: 1. Raise the document feeder. Xerox WorkCentre 4250/4260 User Guide 127 Before loading the documents into the document feeder, face up. 3. Place the stack in good condition and remove all staples and paper clips. 2. Lower the document feeder. Insert the documents neatly into the...
... steps explain how to load documents using the document glass: 1. Raise the document feeder. Xerox WorkCentre 4250/4260 User Guide 127 Before loading the documents into the document feeder, face up. 3. Place the stack in good condition and remove all staples and paper clips. 2. Lower the document feeder. Insert the documents neatly into the...
User Guide
Page 204
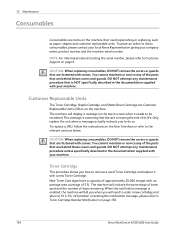
...staples and customer replaceable units. CAUTION: When replacing consumables, DO NOT remove the covers or guards that are fastened with screws. The machine will indicate the percentage of 5%. Only replace the unit when a message actually instructs you how to Toner Cartridge Reorder Notification on page 182. 196 Xerox WorkCentre 4250...please contact your local Xerox Representative giving your machine. NOTE: For information about locating the serial number, please refer to Customer Support on the machine. Customer Replaceable Units The Toner Cartridge, Staple Cartridge, and SMart...
...staples and customer replaceable units. CAUTION: When replacing consumables, DO NOT remove the covers or guards that are fastened with screws. The machine will indicate the percentage of 5%. Only replace the unit when a message actually instructs you how to Toner Cartridge Reorder Notification on page 182. 196 Xerox WorkCentre 4250...please contact your local Xerox Representative giving your machine. NOTE: For information about locating the serial number, please refer to Customer Support on the machine. Customer Replaceable Units The Toner Cartridge, Staple Cartridge, and SMart...
User Guide
Page 207
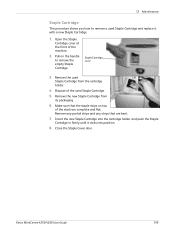
... cover at the front of the used Staple Cartridge from its packaging. 6. Insert the new Staple Cartridge into position. 8. Close the Staple Cover door. Xerox WorkCentre 4250/4260 User Guide 199 Remove any partial strips and any strips that the staple strips on the handle to remove a used Staple Cartridge and replace it clicks into the cartridge holder...
... cover at the front of the used Staple Cartridge from its packaging. 6. Insert the new Staple Cartridge into position. 8. Close the Staple Cover door. Xerox WorkCentre 4250/4260 User Guide 199 Remove any partial strips and any strips that the staple strips on the handle to remove a used Staple Cartridge and replace it clicks into the cartridge holder...
User Guide
Page 214
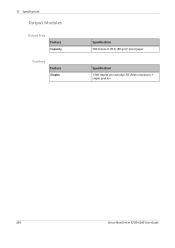
13 Specifications Output Modules Output Tray Feature Capacity Finishing Feature Staples Specification 500 sheets of 20 lb (80 g/m²) bond paper Specification 1500 staples per cartridge, 50 sheets maximum, 1 staple position 206 Xerox WorkCentre 4250/4260 User Guide
13 Specifications Output Modules Output Tray Feature Capacity Finishing Feature Staples Specification 500 sheets of 20 lb (80 g/m²) bond paper Specification 1500 staples per cartridge, 50 sheets maximum, 1 staple position 206 Xerox WorkCentre 4250/4260 User Guide
User Guide
Page 225
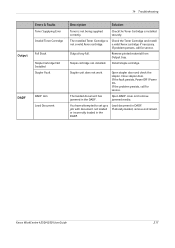
... Remove printed material from Output tray. If the problem persists, call for service. Load document in the DADF. Xerox WorkCentre 4250/4260 User Guide 217 Install staple cartridge. Open stapler door and check the stapler. Close stapler door. Output tray full. Open DADF cover and remove... jammed media. Stapler unit does not work. If the fault persists, Power Off / Power On. a valid Xerox cartridge if necessary. Staple cartridge not installed. The loaded document has jammed in DADF. You have attempted to set up a job with document not ...
... Remove printed material from Output tray. If the problem persists, call for service. Load document in the DADF. Xerox WorkCentre 4250/4260 User Guide 217 Install staple cartridge. Open stapler door and check the stapler. Close stapler door. Output tray full. Open DADF cover and remove... jammed media. Stapler unit does not work. If the fault persists, Power Off / Power On. a valid Xerox cartridge if necessary. Staple cartridge not installed. The loaded document has jammed in DADF. You have attempted to set up a job with document not ...
User Guide
Page 229
Server Fax 59 Small Original Erase, Edge Erase 53 SMart Drum Cartridge 198 Software Resets 181 Staple Cartridge 199 Store Files 121 Store for Polling, Faxing 75 Store Job 57 Store to Mailbox, Faxing 77 Support and Supplies Numbers 192 T Toll Save, Fax Setup 170 Toner Cartridge 196 Tools, Menu 164 Transmission Header Text 171 Transparency Separators 55 U USB 138 Index Xerox WorkCentre 4250/4260 User Guide 221
Server Fax 59 Small Original Erase, Edge Erase 53 SMart Drum Cartridge 198 Software Resets 181 Staple Cartridge 199 Store Files 121 Store for Polling, Faxing 75 Store Job 57 Store to Mailbox, Faxing 77 Support and Supplies Numbers 192 T Toll Save, Fax Setup 170 Toner Cartridge 196 Tools, Menu 164 Transmission Header Text 171 Transparency Separators 55 U USB 138 Index Xerox WorkCentre 4250/4260 User Guide 221

