Use & Care Guide
Page 1
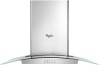
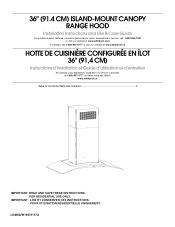
...UNIQUEMENT. 36" (91.4 CM) ISLAND-MOUNT CANOPY RANGE HOOD Installation Instructions and Use & Care Guide For questions about features, operation/performance, parts, accessories or service, call: 1-800-253-1301 or visit our website at www.whirlpool.com In Canada, call 1-800-807-6777 or visit our ...RE CONFIGURÉE EN ÎLOT 36" (91,4 CM) Instructions d'installation et Guide d'utilisation et d'entretien Au Canada, pour assistance, installation ou service, composer le 1-800-807-6777 ou visiter notre site Web à www.whirlpool.ca Table of Contents/Table des matières 2 IMPORTANT: READ...
...UNIQUEMENT. 36" (91.4 CM) ISLAND-MOUNT CANOPY RANGE HOOD Installation Instructions and Use & Care Guide For questions about features, operation/performance, parts, accessories or service, call: 1-800-253-1301 or visit our website at www.whirlpool.com In Canada, call 1-800-807-6777 or visit our ...RE CONFIGURÉE EN ÎLOT 36" (91,4 CM) Instructions d'installation et Guide d'utilisation et d'entretien Au Canada, pour assistance, installation ou service, composer le 1-800-807-6777 ou visiter notre site Web à www.whirlpool.ca Table of Contents/Table des matières 2 IMPORTANT: READ...
Use & Care Guide
Page 2
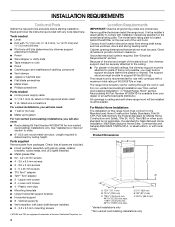
... 4 Tools and Parts 4 Location Requirements 4 Venting Requirements 5 Electrical Requirements 6 INSTALLATION INSTRUCTIONS 7 Prepare Location 7 Assemble Range Hood 8 Install Range Hood 8 Make Electrical Connection 9 Install Duct Covers 10 Complete Installation 11 RANGE HOOD USE 12 Range Hood Controls 12 RANGE HOOD CARE 13 Cleaning 13 WIRING DIAGRAM 14 ASSISTANCE OR SERVICE 15 In the U.S.A 15 ...
... 4 Tools and Parts 4 Location Requirements 4 Venting Requirements 5 Electrical Requirements 6 INSTALLATION INSTRUCTIONS 7 Prepare Location 7 Assemble Range Hood 8 Install Range Hood 8 Make Electrical Connection 9 Install Duct Covers 10 Complete Installation 11 RANGE HOOD USE 12 Range Hood Controls 12 RANGE HOOD CARE 13 Cleaning 13 WIRING DIAGRAM 14 ASSISTANCE OR SERVICE 15 In the U.S.A 15 ...
Use & Care Guide
Page 3
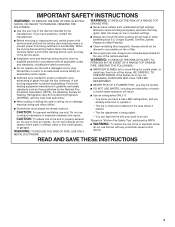
If you have a class ABC extinguisher, and you already know how to the service panel. ■ Installation work and electrical wiring must always be allowed to exhaust hazardous or explosive materials and vapors. When the service disconnecting means cannot be locked,... gases through the flue (chimney) of fire and to duct air outside - Do not use only. READ AND SAVE THESE INSTRUCTIONS 3 Discard fan or return to prevent backdrafting. IMPORTANT SAFETY INSTRUCTIONS WARNING: TO REDUCE THE RISK OF FIRE, ELECTRIC SHOCK, OR INJURY TO PERSONS, OBSERVE THE FOLLOWING: ■ Use this ...
If you have a class ABC extinguisher, and you already know how to the service panel. ■ Installation work and electrical wiring must always be allowed to exhaust hazardous or explosive materials and vapors. When the service disconnecting means cannot be locked,... gases through the flue (chimney) of fire and to duct air outside - Do not use only. READ AND SAVE THESE INSTRUCTIONS 3 Discard fan or return to prevent backdrafting. IMPORTANT SAFETY INSTRUCTIONS WARNING: TO REDUCE THE RISK OF FIRE, ELECTRIC SHOCK, OR INJURY TO PERSONS, OBSERVE THE FOLLOWING: ■ Use this ...
Use & Care Guide
Page 4
... located behind the plaster or drywall. Upper vent covers ■ 2 - Canopy hood location should be sealed. Read and follow the instructions provided with canopy glass, retainer brackets, rubber seals, and LED lights installed. ■ Metal grease filter ■ 60 - 4.2 x 8 mm screws ■ 4 - 3.5 x 6.5 mm screws ■ ...■ T20®† Torx® adapter ■ 2 - Tools needed ■ Level ■ Drill with back draft damper installed. ■ 2 - 3.5 x 9.5 mm mounting screws †®TORX and T20 are registered trademarks of the vent hood. If ...
... located behind the plaster or drywall. Upper vent covers ■ 2 - Canopy hood location should be sealed. Read and follow the instructions provided with canopy glass, retainer brackets, rubber seals, and LED lights installed. ■ Metal grease filter ■ 60 - 4.2 x 8 mm screws ■ 4 - 3.5 x 6.5 mm screws ■ ...■ T20®† Torx® adapter ■ 2 - Tools needed ■ Level ■ Drill with back draft damper installed. ■ 2 - 3.5 x 9.5 mm mounting screws †®TORX and T20 are registered trademarks of the vent hood. If ...
Use & Care Guide
Page 7
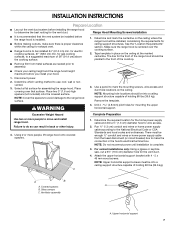
... to mark the mounting screws, wire access and duct hole locations on the ceiling at the marked centerline. C Complete Preparation 1. A B A A. INSTALLATION INSTRUCTIONS Prepare Location ■ Lay out the vent duct system before installing the range hood to determine the best routing for the vent duct. 4. Place two 3" (7.6 cm) high spacers (not included) onto...
... to mark the mounting screws, wire access and duct hole locations on the ceiling at the marked centerline. C Complete Preparation 1. A B A A. INSTALLATION INSTRUCTIONS Prepare Location ■ Lay out the vent duct system before installing the range hood to determine the best routing for the vent duct. 4. Place two 3" (7.6 cm) high spacers (not included) onto...
Use & Care Guide
Page 8
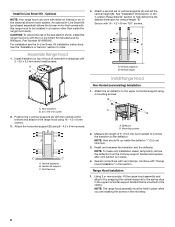
...Whirlpool, Part Number W10692945. Position the 4 vertical supports (A) with 2 - 3.5 x 9.5 mm sheet metal screws. Deflector B. Continue with either an internal or an inline (external) blower motor system. Vertical supports B. Vertical supports B. NOTE: To make vent installation...® screws. NOTE: The range hood assembly must be installed in the upper horizontal support bracket that comes with vent clamps. Vent transition B. 3.5 x 9.5 mm screw 2. For installation see the In-Line Smart Kit installation instructions. Install In-Line Smart Kit - Assemble Range Hood 1. Attach ...
...Whirlpool, Part Number W10692945. Position the 4 vertical supports (A) with 2 - 3.5 x 9.5 mm sheet metal screws. Deflector B. Continue with either an internal or an inline (external) blower motor system. Vertical supports B. Vertical supports B. NOTE: To make vent installation...® screws. NOTE: The range hood assembly must be installed in the upper horizontal support bracket that comes with vent clamps. Vent transition B. 3.5 x 9.5 mm screw 2. For installation see the In-Line Smart Kit installation instructions. Install In-Line Smart Kit - Assemble Range Hood 1. Attach ...
Use & Care Guide
Page 9
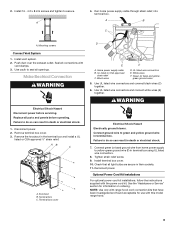
... together. 6. Failure to seal all connections with this model range hood. 9 Optional Power Cord Kit Installations For optional power cord kit installations, follow the instructions supplied with range hood cord connection kits that all parts and panels before servicing. See the "Assistance or... Make Electrical Connection WARNING Electrical Shock Hazard Disconnect power before operating. Replace all light bulbs are secure in the terminal box and install a UL listed or CSA approved ¹⁄₂" strain relief. Disconnect power. 2. Remove terminal box cover. 3. Remove ...
... together. 6. Failure to seal all connections with this model range hood. 9 Optional Power Cord Kit Installations For optional power cord kit installations, follow the instructions supplied with range hood cord connection kits that all parts and panels before servicing. See the "Assistance or... Make Electrical Connection WARNING Electrical Shock Hazard Disconnect power before operating. Replace all light bulbs are secure in the terminal box and install a UL listed or CSA approved ¹⁄₂" strain relief. Disconnect power. 2. Remove terminal box cover. 3. Remove ...
Use & Care Guide
Page 13
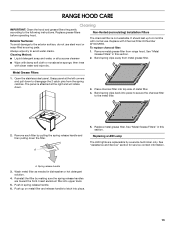
...solution. 4. It should last up on metal filter and release handle to latch into place to secure the charcoal filter to the following instructions. Bend spring clips away from metal grease filter. ■ Wipe with damp soft cloth or nonabrasive sponge, then rinse with normal use... the 2 catch pins from range hood. Cleaning Method: ■ Liquid detergent soap and water, or all-purpose cleanser Non-Vented (recirculating) Installation Filters The charcoal filter is attached at the left corners and pull down to 6 months with clean water and wipe dry. Replace grease filters before...
...solution. 4. It should last up on metal filter and release handle to latch into place to secure the charcoal filter to the following instructions. Bend spring clips away from metal grease filter. ■ Wipe with damp soft cloth or nonabrasive sponge, then rinse with normal use... the 2 catch pins from range hood. Cleaning Method: ■ Liquid detergent soap and water, or all-purpose cleanser Non-Vented (recirculating) Installation Filters The charcoal filter is attached at the left corners and pull down to 6 months with clean water and wipe dry. Replace grease filters before...
Use & Care Guide
Page 16
... warranty is provided exclusively by Whirlpool. 7. Service to product failure. 11. house wiring, fuses or water inlet hoses). 4. Food or medicine loss due to correct improper product maintenance or installation, installation not in this major appliance, you also may have other rights that comes with published user, operator or installation instructions. 2. Removal or reinstallation of...
... warranty is provided exclusively by Whirlpool. 7. Service to product failure. 11. house wiring, fuses or water inlet hoses). 4. Food or medicine loss due to correct improper product maintenance or installation, installation not in this major appliance, you also may have other rights that comes with published user, operator or installation instructions. 2. Removal or reinstallation of...

Warranty Information
Page 1
... section of the original unit's warranty period. Please take a few minutes to use inconsistent with published user, operator or installation instructions. 2. and Canada, direct all requests for appliances with products not approved by Whirlpool. 7. ONE YEAR LIMITED WARRANTY WHAT IS COVERED WHAT IS NOT COVERED For one year from state to state or...
... section of the original unit's warranty period. Please take a few minutes to use inconsistent with published user, operator or installation instructions. 2. and Canada, direct all requests for appliances with products not approved by Whirlpool. 7. ONE YEAR LIMITED WARRANTY WHAT IS COVERED WHAT IS NOT COVERED For one year from state to state or...

