Whirlpool UXT4230AD Support and Manuals
Get Help and Manuals for this Whirlpool item

View All Support Options Below
Free Whirlpool UXT4230AD manuals!
Problems with Whirlpool UXT4230AD?
Ask a Question
Free Whirlpool UXT4230AD manuals!
Problems with Whirlpool UXT4230AD?
Ask a Question
Popular Whirlpool UXT4230AD Manual Pages
Installation Instructions - Page 1

...;res 2
Models/Modèles: UXT4230AD/UXT4236AD
IMPORTANT: READ AND SAVE THESE INSTRUCTIONS. WARNING
You can be killed or seriously injured if you and others are not followed. FOR RESIDENTIAL USE ONLY. 30" (76.2 CM) AND 36" (91.4 CM) RANGE HOOD
Installation Instructions and Use & Care Guide
For questions about features, operation/performance, parts, accessories or service, call...
Installation Instructions - Page 2

... settings.
WARNING: TO REDUCE THE RISK OF FIRE, USE ONLY
METAL DUCTWORK. WARNING: TO REDUCE THE RISK OF A RANGE TOP
GREASE FIRE:
■ Never leave surface units unattended at service panel and lock the service disconnecting means to prevent power from being called.
- READ AND SAVE THESE INSTRUCTIONS
TABLE OF CONTENTS
RANGE HOOD SAFETY 1 INSTALLATION...
Installation Instructions - Page 3

... cooktop/range manufacturer installation instructions before starting installation. Models that are factory set for information on the left wall.
■ Range hood location should be away from package. INSTALLATION REQUIREMENTS
Tools and Parts
Gather the required tools and parts before making any tools listed here. Location Requirements
IMPORTANT: Observe all parts are included.
#8-18...
Installation Instructions - Page 4
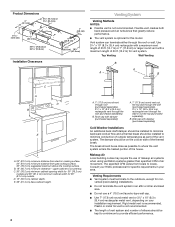
...to provide efficient performance. B. Makeup Air Local building codes may require the use a 4" (10.2 cm)... installation requirement. Plastic or metal foil vent is optional for specific ...minimum cabinet opening width for 30" (76.2 cm)
models and 36" (91.4 cm) minimum cabinet width for ...as possible to minimize conduction of outside temperatures as part of the vent system.
Wall cap with a...
Installation Instructions - Page 5

...National Electrical Code, ANSI/NFPA 70 (latest edition), or CSA Standards C22.1-94, Canadian Electrical Code, Part 1 and C22.2 No. 0-M91 (latest edition) and all local codes and ...codes permit and a separate ground wire is used, it is recommended that a qualified electrician determine that the electrical installation is located behind the filter on the model/serial rating plate. The model...
Installation Instructions - Page 6

... that the vent system be installed before the range hood is installed. Replace all parts and panels before servicing. NOTE: For installations to "Venting System" in death or electrical shock.
2. Prepare Range Hood
Align the exterior edge of the upper cabinet. IMPORTANT: The brackets should touch the upper cabinet.
INSTALLATION INSTRUCTIONS
NOTES: ■ Depending on a covered...
Installation Instructions - Page 7

...;⁄₂" (13 mm) drill bit, drill a hole in each of the range hood. For a rear vented installation: Mark the 4 vent hole locations (D) on the rear of the dots marked previously on either the wall or upper... edge of the plate with one hand and bend each mounting tab. 5. Remove the range hood and set it aside.
■ Using the 7" (17.8 cm) round vent mounting plate, draw the vent ...
Installation Instructions - Page 8

... 2 turns into the mounting tab (F) on ordering, see the "Assistance or Service" section.
■ If installing the optional round damper, position it interferes with the rectangular damper, remove the rectangular...An optional 7" (17.8 cm) round damper (A), Part Number W10355451, and a 7" (17.8 cm) round vent mounting plate (B), Part Number W10388168, are available as shown in Step 8....
Installation Instructions - Page 9

... work properly.
12.
Power Cord Kit Installations For optional power cord kit installations, follow the instructions supplied with E26 base. NOTE: Use ...installation is complete. Seal joints with this model range hood.
13.
Complete the Installation
■ Install a 120V, 75W maximum, incandescent light bulb with the power cord kit. For non-vented (recirculating) installations: Install...
Installation Instructions - Page 10

...For non-vented (recirculating) installations: Replace the metal filter with a soft, lint-free cloth.
■ Glass cleaner to remove fingerprints.
■ For stainless steel models, use .
Continue to rotate... Steel Cleaner and Polish, Part Number 31462A (not included): See the "Assistance or Service" section to order.
■ For stainless steel models, rub in the direction of...
Installation Instructions - Page 11
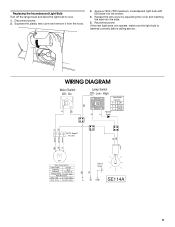
... the new light does not operate, make sure the light bulb is inserted correctly before calling service. On
BK
Lamp Switch Off - Screw a 120V, 75W maximum, incandescent light bulb with ...Hz
Amperage
1.2 ±10% A
Wattage Rating 73 ±10% Watts
Motor Resistance
White -
Low - Replacing the Incandescent Light Bulb Turn off the range hood and allow the light bulb to cool.
1. W BK
BK...
Installation Instructions - Page 12

... and specifications on our full line of appliances.
■ Referrals to local dealers.
■ Installation information.
■ Use and maintenance procedures.
■ Accessory and repair parts sales.
■ Specialized customer assistance (Spanish speaking, hearing impaired, limited vision, etc.).
If you need replacement parts If you need further assistance, you can write to Whirlpool...
Installation Instructions - Page 13
... minutes to review the Troubleshooting or Problem Solver section of the Use and Care Guide, scan the QR code on the duration of implied warranties of the product.
14. All warranty service is installed, operated and maintained according to instructions attached to correct defects in which it was purchased, or at its sole discretion replace the product. and...
Whirlpool UXT4230AD Reviews
We have not received any reviews for Whirlpool yet.