Use & Care Guide
Page 1
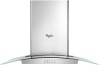
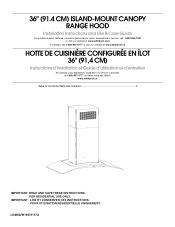
...UNIQUEMENT. 36" (91.4 CM) ISLAND-MOUNT CANOPY RANGE HOOD Installation Instructions and Use & Care Guide For questions about features, operation/performance, parts, accessories or service, call: 1-800-253-1301 or visit our website at www.whirlpool.com In Canada, call 1-800-807-6777 or visit our ...RE CONFIGURÉE EN ÎLOT 36" (91,4 CM) Instructions d'installation et Guide d'utilisation et d'entretien Au Canada, pour assistance, installation ou service, composer le 1-800-807-6777 ou visiter notre site Web à www.whirlpool.ca Table of Contents/Table des matières 2 IMPORTANT: ...
...UNIQUEMENT. 36" (91.4 CM) ISLAND-MOUNT CANOPY RANGE HOOD Installation Instructions and Use & Care Guide For questions about features, operation/performance, parts, accessories or service, call: 1-800-253-1301 or visit our website at www.whirlpool.com In Canada, call 1-800-807-6777 or visit our ...RE CONFIGURÉE EN ÎLOT 36" (91,4 CM) Instructions d'installation et Guide d'utilisation et d'entretien Au Canada, pour assistance, installation ou service, composer le 1-800-807-6777 ou visiter notre site Web à www.whirlpool.ca Table of Contents/Table des matières 2 IMPORTANT: ...
Use & Care Guide
Page 2
... cause cancer. WARNING You can happen if the instructions are very important. TABLE OF CONTENTS RANGE HOOD SAFETY 2 INSTALLATION REQUIREMENTS 4 Tools and Parts 4 Location Requirements 4 Venting Requirements 5 Electrical Requirements 6 INSTALLATION INSTRUCTIONS 7 Prepare Location 7 Assemble Range Hood 8 Install Range Hood 8 Make Electrical Connection 9 Install Duct Covers 10 Complete Installation 11 RANGE HOOD USE 12 Range Hood Controls 12...
... cause cancer. WARNING You can happen if the instructions are very important. TABLE OF CONTENTS RANGE HOOD SAFETY 2 INSTALLATION REQUIREMENTS 4 Tools and Parts 4 Location Requirements 4 Venting Requirements 5 Electrical Requirements 6 INSTALLATION INSTRUCTIONS 7 Prepare Location 7 Assemble Range Hood 8 Install Range Hood 8 Make Electrical Connection 9 Install Duct Covers 10 Complete Installation 11 RANGE HOOD USE 12 Range Hood Controls 12...
Use & Care Guide
Page 3
...means to prevent backdrafting. Follow the heating equipment manufacturer's guideline and safety standards such as a tag, to the service panel. ■ Installation work and electrical wiring must always be allowed to operate it started. - WARNING: TO REDUCE THE RISK OF A RANGE TOP GREASE FIRE...OF FIRE, USE ONLY METAL DUCTWORK. Crepes Suzette, Cherries Jubilee, Peppercorn Beef Flambé). ■ Clean ventilating fans frequently. IMPORTANT SAFETY INSTRUCTIONS WARNING: TO REDUCE THE RISK OF FIRE, ELECTRIC SHOCK, OR INJURY TO PERSONS, OBSERVE THE FOLLOWING: ■ Use this fan with ...
...means to prevent backdrafting. Follow the heating equipment manufacturer's guideline and safety standards such as a tag, to the service panel. ■ Installation work and electrical wiring must always be allowed to operate it started. - WARNING: TO REDUCE THE RISK OF A RANGE TOP GREASE FIRE...OF FIRE, USE ONLY METAL DUCTWORK. Crepes Suzette, Cherries Jubilee, Peppercorn Beef Flambé). ■ Clean ventilating fans frequently. IMPORTANT SAFETY INSTRUCTIONS WARNING: TO REDUCE THE RISK OF FIRE, ELECTRIC SHOCK, OR INJURY TO PERSONS, OBSERVE THE FOLLOWING: ■ Use this fan with ...
Use & Care Guide
Page 4
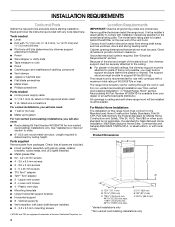
...9632; Recirculating Kit Part Number W10294734 for venting through the roof or wall. Read and follow the instructions provided with installation clearances specified on the rear wall of Acument Intellectual Properties, Inc. 4 Location Requirements IMPORTANT: Observe all... x 45 mm screws ■ T10 Torx®† adapter ■ T20®† Torx® adapter ■ 2 - For Mobile Home Installations The installation of this range hood must be sealed. Plastic vent clips ■ Mounting template ■ Upper horizontal support bracket ■ Horizontal support ■ 8 ...
...9632; Recirculating Kit Part Number W10294734 for venting through the roof or wall. Read and follow the instructions provided with installation clearances specified on the rear wall of Acument Intellectual Properties, Inc. 4 Location Requirements IMPORTANT: Observe all... x 45 mm screws ■ T10 Torx®† adapter ■ T20®† Torx® adapter ■ 2 - For Mobile Home Installations The installation of this range hood must be sealed. Plastic vent clips ■ Mounting template ■ Upper horizontal support bracket ■ Horizontal support ■ 8 ...
Use & Care Guide
Page 7
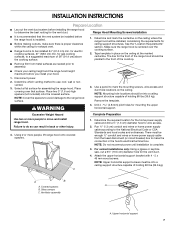
... upper horizontal support. See the "Location Requirements" section. The line for exhaust vent. ■ Range hood is recommended that surface. INSTALLATION INSTRUCTIONS Prepare Location ■ Lay out the vent duct system before installing the range hood to determine the best routing for gas cooking surfaces, to a suggested maximum of 36" (91.4 cm) above...
... upper horizontal support. See the "Location Requirements" section. The line for exhaust vent. ■ Range hood is recommended that surface. INSTALLATION INSTRUCTIONS Prepare Location ■ Lay out the vent duct system before installing the range hood to determine the best routing for gas cooking surfaces, to a suggested maximum of 36" (91.4 cm) above...
Use & Care Guide
Page 8
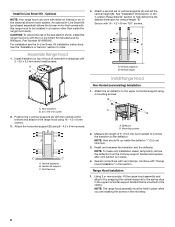
...connections with 2 - 3.5 x 9.5 mm sheet metal screws. Using 2 or more people, lift the range hood assembly and attach it by Whirlpool, Part Number W10692945. B A. Notched end A B A. Measure the length of vertical supports (A) and set of 6" (15.2 cm) ...4 vertical supports (A) with this section. Mounting screws 2. NOTE: The range hood assembly must be installed in this range hood to the ceiling. For installation see the In-Line Smart Kit installation instructions. Assemble Range Hood 1. NOTE: Vent should fit up inside the range hood cavity. Horizontal support ...
...connections with 2 - 3.5 x 9.5 mm sheet metal screws. Using 2 or more people, lift the range hood assembly and attach it by Whirlpool, Part Number W10692945. B A. Notched end A B A. Measure the length of vertical supports (A) and set of 6" (15.2 cm) ...4 vertical supports (A) with this section. Mounting screws 2. NOTE: The range hood assembly must be installed in this range hood to the ceiling. For installation see the In-Line Smart Kit installation instructions. Assemble Range Hood 1. NOTE: Vent should fit up inside the range hood cavity. Horizontal support ...
Use & Care Guide
Page 9
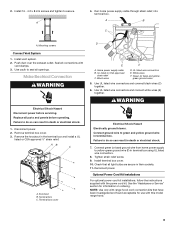
...wire connectors E. Green (or bare) and yellowgreen ground wires 5. Connect ground wire to seal all connections with the power cord kit. Install terminal box cover. 10. Seal all openings. Replace all light bulbs are secure in terminal box. Terminal box cover D E F ...green and yellow ground wire in their sockets. 11. AB C A. White wires F. Optional Power Cord Kit Installations For optional power cord kit installations, follow the instructions supplied with vent clamps. 3. See the "Assistance or Service" section for use with range hood cord connection kits...
...wire connectors E. Green (or bare) and yellowgreen ground wires 5. Connect ground wire to seal all connections with the power cord kit. Install terminal box cover. 10. Seal all openings. Replace all light bulbs are secure in terminal box. Terminal box cover D E F ...green and yellow ground wire in their sockets. 11. AB C A. White wires F. Optional Power Cord Kit Installations For optional power cord kit installations, follow the instructions supplied with vent clamps. 3. See the "Assistance or Service" section for use with range hood cord connection kits...
Use & Care Guide
Page 13
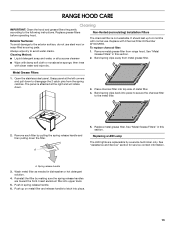
It should last up on metal filter and release handle to the following instructions. Open the stainless steel panel. Bend spring clips back into place to secure the charcoal filter to 6 months with normal use steel wool or soap-.... Place charcoal filter into upper track. 5. Replace metal grease filter. Cleaning Method: ■ Liquid detergent soap and water, or all-purpose cleanser Non-Vented (recirculating) Installation Filters The charcoal filter is attached at the left corners and pull down . 3. Remove metal grease filter from metal grease filter. ■ Wipe with damp...
It should last up on metal filter and release handle to the following instructions. Open the stainless steel panel. Bend spring clips back into place to secure the charcoal filter to 6 months with normal use steel wool or soap-.... Place charcoal filter into upper track. 5. Replace metal grease filter. Cleaning Method: ■ Liquid detergent soap and water, or all-purpose cleanser Non-Vented (recirculating) Installation Filters The charcoal filter is attached at the left corners and pull down . 3. Remove metal grease filter from metal grease filter. ■ Wipe with damp...
Use & Care Guide
Page 16
... do not allow limitations on how to : Whirlpool Customer eXperience Center www.whirlpool.com/product_help In the U.S.A., call 1-800-807-6777. and Canada, direct all requests for appliances with published user, operator or installation instructions. 2. In the event of surfaces resulting from... the date of this major appliance, you should ask Whirlpool or your appliance will pay for Factory Specified Replacement Parts and repair ...
... do not allow limitations on how to : Whirlpool Customer eXperience Center www.whirlpool.com/product_help In the U.S.A., call 1-800-807-6777. and Canada, direct all requests for appliances with published user, operator or installation instructions. 2. In the event of surfaces resulting from... the date of this major appliance, you should ask Whirlpool or your appliance will pay for Factory Specified Replacement Parts and repair ...

Warranty Information
Page 1
... etc.). 5. Damage from the date of original consumer purchase. This product is installed, operated and maintained according to instructions attached to : Whirlpool Customer eXperience Center www.whirlpool.com/product_help In the U.S.A., call 1-800-807-6777. Service or parts for...RECEIPT HERE. Service to Whirlpool within 30 days. 9. Consumable parts (i.e. Cosmetic damage including scratches, dents, chips, and other than the limited warranty that vary from defects in accordance with published user, operator or installation instructions. 2. Conversion of the...
... etc.). 5. Damage from the date of original consumer purchase. This product is installed, operated and maintained according to instructions attached to : Whirlpool Customer eXperience Center www.whirlpool.com/product_help In the U.S.A., call 1-800-807-6777. Service or parts for...RECEIPT HERE. Service to Whirlpool within 30 days. 9. Consumable parts (i.e. Cosmetic damage including scratches, dents, chips, and other than the limited warranty that vary from defects in accordance with published user, operator or installation instructions. 2. Conversion of the...

