Use & Care Guide
Page 1
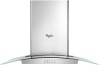
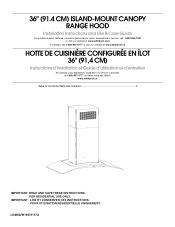
...) ISLAND-MOUNT CANOPY RANGE HOOD Installation Instructions and Use & Care Guide For questions about features, operation/performance, parts, accessories or service, call: 1-800-253-1301 or visit our website at www.whirlpool.com In Canada, call 1-800-807-6777 or visit our website at www.whirlpool.ca HOTTE DE CUISINIÈRE CONFIGURÉE EN ÎLOT 36" (91,4 CM) Instructions d'installation et Guide d'utilisation et d'entretien Au Canada, pour assistance, installation ou service...
...) ISLAND-MOUNT CANOPY RANGE HOOD Installation Instructions and Use & Care Guide For questions about features, operation/performance, parts, accessories or service, call: 1-800-253-1301 or visit our website at www.whirlpool.com In Canada, call 1-800-807-6777 or visit our website at www.whirlpool.ca HOTTE DE CUISINIÈRE CONFIGURÉE EN ÎLOT 36" (91,4 CM) Instructions d'installation et Guide d'utilisation et d'entretien Au Canada, pour assistance, installation ou service...
Use & Care Guide
Page 2
... the word "DANGER" or "WARNING." TABLE OF CONTENTS RANGE HOOD SAFETY 2 INSTALLATION REQUIREMENTS 4 Tools and Parts 4 Location Requirements 4 Venting Requirements 5 Electrical Requirements 6 INSTALLATION INSTRUCTIONS 7 Prepare Location 7 Assemble Range Hood 8 Install Range Hood 8 Make Electrical Connection 9 Install Duct Covers 10 Complete Installation 11 RANGE HOOD USE 12 Range Hood Controls 12 RANGE HOOD CARE 13 Cleaning 13 WIRING DIAGRAM 14 ASSISTANCE OR SERVICE 15 In the U.S.A 15 In Canada 15 Accessories 15 WARRANTY 16 TABLE DES MATIÈRES SÉCURITÉ...
... the word "DANGER" or "WARNING." TABLE OF CONTENTS RANGE HOOD SAFETY 2 INSTALLATION REQUIREMENTS 4 Tools and Parts 4 Location Requirements 4 Venting Requirements 5 Electrical Requirements 6 INSTALLATION INSTRUCTIONS 7 Prepare Location 7 Assemble Range Hood 8 Install Range Hood 8 Make Electrical Connection 9 Install Duct Covers 10 Complete Installation 11 RANGE HOOD USE 12 Range Hood Controls 12 RANGE HOOD CARE 13 Cleaning 13 WIRING DIAGRAM 14 ASSISTANCE OR SERVICE 15 In the U.S.A 15 In Canada 15 Accessories 15 WARRANTY 16 TABLE DES MATIÈRES SÉCURITÉ...
Use & Care Guide
Page 3
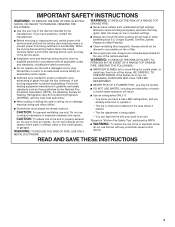
... OF A RANGE TOP GREASE FIRE: ■ Never leave surface units unattended at high heat or when flambeing food (i.e. do not damage electrical wiring and other utilities. ■ Ducted fans must be vented outdoors. The fire is needed for Heating, Refrigeration and Air Conditioning Engineers (ASHRAE), and the local code authorities. ■ When cutting or drilling into crawl spaces, or garages. Always use to operate it...
... OF A RANGE TOP GREASE FIRE: ■ Never leave surface units unattended at high heat or when flambeing food (i.e. do not damage electrical wiring and other utilities. ■ Ducted fans must be vented outdoors. The fire is needed for Heating, Refrigeration and Air Conditioning Engineers (ASHRAE), and the local code authorities. ■ When cutting or drilling into crawl spaces, or garages. Always use to operate it...
Use & Care Guide
Page 4
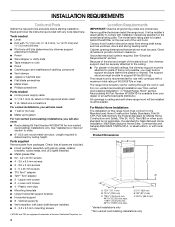
... factory set for use with cooktops with back draft damper installed. ■ 2 - 3.5 x 9.5 mm mounting screws †®TORX and T20 are registered trademarks of this range hood must be used. Recirculating Kit Part Number W10294734 is not possible, you will be installed must be sealed. For Mobile Home Installations The installation of the vent hood. Length required is required. See "Electrical Requirements" section. Read and follow the instructions provided with installation clearances specified on the rear wall of this island hood, the chimney support...
... factory set for use with cooktops with back draft damper installed. ■ 2 - 3.5 x 9.5 mm mounting screws †®TORX and T20 are registered trademarks of this range hood must be used. Recirculating Kit Part Number W10294734 is not possible, you will be installed must be sealed. For Mobile Home Installations The installation of the vent hood. Length required is required. See "Electrical Requirements" section. Read and follow the instructions provided with installation clearances specified on the rear wall of this island hood, the chimney support...

Use & Care Guide
Page 5
... use the damper supplied with the range hood. Cold Weather Installations An additional back draft damper should be installed to minimize conduction of outside , except for specific requirements in the non-vented (recirculating) version, fitting a charcoal filter and the deflector. Installation Dimensions B C D A A. Hood height: 24" (61.0 cm) min. from gas cooking surface, suggested 36" (91.4 cm) max. Vented Installations Min. ceiling height Max. ceiling height Max. Venting Requirements ■ Vent system must have a damper. If the roof or wall cap...
... use the damper supplied with the range hood. Cold Weather Installations An additional back draft damper should be installed to minimize conduction of outside , except for specific requirements in the non-vented (recirculating) version, fitting a charcoal filter and the deflector. Installation Dimensions B C D A A. Hood height: 24" (61.0 cm) min. from gas cooking surface, suggested 36" (91.4 cm) max. Vented Installations Min. ceiling height Max. ceiling height Max. Venting Requirements ■ Vent system must have a damper. If the roof or wall cap...

Use & Care Guide
Page 6
... electrical connector manufacturer's recommended procedure. Calculating Vent System Length To calculate the length of copper wire using special connectors and/or tools designed and UL listed for 2-story homes. wall cap = 0.0 ft (0.0 m) 8 ft (2.4 m) straight = 8.0 ft (2.4 m) System length = 13 ft (3.9 m) 6 Roof cap B. 6" (15.2 cm) round vent NOTE: If codes permits, wall venting can be an option for joining copper to aluminum. Example Vent System 90 elbow 6 ft (1.8 m) Wall cap Electrical Requirements Observe all local codes and ordinances. Non-vented (recirculating...
... electrical connector manufacturer's recommended procedure. Calculating Vent System Length To calculate the length of copper wire using special connectors and/or tools designed and UL listed for 2-story homes. wall cap = 0.0 ft (0.0 m) 8 ft (2.4 m) straight = 8.0 ft (2.4 m) System length = 13 ft (3.9 m) 6 Roof cap B. 6" (15.2 cm) round vent NOTE: If codes permits, wall venting can be an option for joining copper to aluminum. Example Vent System 90 elbow 6 ft (1.8 m) Wall cap Electrical Requirements Observe all local codes and ordinances. Non-vented (recirculating...
Use & Care Guide
Page 7
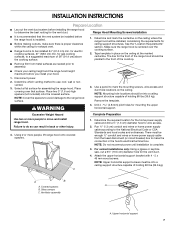
... a ceiling support structure capable of the cooktop. ■ Remove film from the fused disconnect (or circuit breaker) box to use: roof, wall or nonvented. 3. Attach the upper horizontal support bracket with 4 - 5 x 45 mm wood screws. Glass canopy C. Determine the required location for the home power supply cable and drill a ½" (1.3 cm) diameter hole for assembling the range hood. Ventilator assembly A. Determine which venting method to make sure there is proper clearance within the ceiling for the vent duct.
... a ceiling support structure capable of the cooktop. ■ Remove film from the fused disconnect (or circuit breaker) box to use: roof, wall or nonvented. 3. Attach the upper horizontal support bracket with 4 - 5 x 45 mm wood screws. Glass canopy C. Determine the required location for the home power supply cable and drill a ½" (1.3 cm) diameter hole for assembling the range hood. Ventilator assembly A. Determine which venting method to make sure there is proper clearance within the ceiling for the vent duct.
Use & Care Guide
Page 8
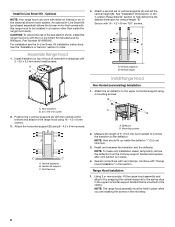
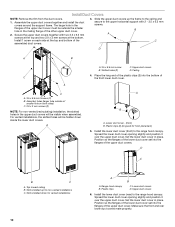
... installing the screws in the "Location Requirements" section to be installed in this range hood only with the In-Line Smart Kit manufactured by Whirlpool, Part Number W10692945. CAUTION: To reduce the risk of hood (if removed for vertical height "B." Attach a second set of 6" (15.2 cm) duct needed to connect the transition to the ceiling. Attach the horizontal support (B) using 4 mounting screws. Vertical supports B. Notched end A B A. NOTE: To make vent installation easier, temporarily remove the deflector from the chimney support bracket and replace...
... installing the screws in the "Location Requirements" section to be installed in this range hood only with the In-Line Smart Kit manufactured by Whirlpool, Part Number W10692945. CAUTION: To reduce the risk of hood (if removed for vertical height "B." Attach a second set of 6" (15.2 cm) duct needed to connect the transition to the ceiling. Attach the horizontal support (B) using 4 mounting screws. Vertical supports B. Notched end A B A. NOTE: To make vent installation easier, temporarily remove the deflector from the chimney support bracket and replace...
Use & Care Guide
Page 9
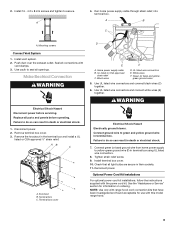
... Mounting screws Connect Vent System 1. Use caulk to do so can result in terminal box using UL listed wire connectors. 8. Failure to seal all parts and panels before servicing. UL listed wire connectors E. Check that have been investigated and found acceptable for information on ordering. Optional Power Cord Kit Installations For optional power cord kit installations, follow the instructions supplied with vent clamps. 3. NOTE: Use only with this model range hood. 9 Make Electrical Connection WARNING Electrical Shock Hazard Disconnect power before operating. Remove...
... Mounting screws Connect Vent System 1. Use caulk to do so can result in terminal box using UL listed wire connectors. 8. Failure to seal all parts and panels before servicing. UL listed wire connectors E. Check that have been investigated and found acceptable for information on ordering. Optional Power Cord Kit Installations For optional power cord kit installations, follow the instructions supplied with vent clamps. 3. NOTE: Use only with this model range hood. 9 Make Electrical Connection WARNING Electrical Shock Hazard Disconnect power before operating. Remove...
Use & Care Guide
Page 10
... duct covers mate properly. Slide the upper duct covers up for non-vented installations C. Install the lower duct cover (front) to the range hood canopy. Secure the upper duct covers together with 2 - 3.5 x 6.5 mm screws. Slotted holes (2) C. Plastic clips C. B A C D A B C A C A. 3.5 x 6.5 mm Screws (2) B. Ceiling 4. Slots installed up the frame to the ceiling and secure to the range hood canopy. Install Duct Covers NOTE: Remove the film from the duct covers. 1. A B A. Assemble the upper duct covers together and install the duct covers around the support...
... duct covers mate properly. Slide the upper duct covers up for non-vented installations C. Install the lower duct cover (front) to the range hood canopy. Secure the upper duct covers together with 2 - 3.5 x 6.5 mm screws. Slotted holes (2) C. Plastic clips C. B A C D A B C A C A. 3.5 x 6.5 mm Screws (2) B. Ceiling 4. Slots installed up the frame to the ceiling and secure to the range hood canopy. Install Duct Covers NOTE: Remove the film from the duct covers. 1. A B A. Assemble the upper duct covers together and install the duct covers around the support...

Use & Care Guide
Page 11
... Care" section. 3. Lower duct covers top clip area 11 Plastic clips C. For non-vented (recirculating) installations only, install charcoal filters onto the metal filters. If range hood does not operate, check to the range hood canopy using 2 plastic clips. A B C A. Upper duct covers 7. NOTE: To get the most efficient use from your new range hood, read the "Range Hood Use" section. D 8. See the "Range Hood Use" section. Lower duct covers D. Check the operation of the range hood blower and light. Plastic clips (2) B. A. Lower duct cover (rear) B. Use...
... Care" section. 3. Lower duct covers top clip area 11 Plastic clips C. For non-vented (recirculating) installations only, install charcoal filters onto the metal filters. If range hood does not operate, check to the range hood canopy using 2 plastic clips. A B C A. Upper duct covers 7. NOTE: To get the most efficient use from your new range hood, read the "Range Hood Use" section. D 8. See the "Range Hood Use" section. Lower duct covers D. Check the operation of the range hood blower and light. Plastic clips (2) B. A. Lower duct cover (rear) B. Use...

Use & Care Guide
Page 12
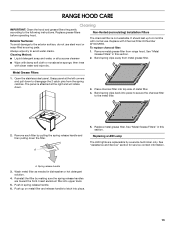
... can be changed anytime during fan operation by pressing the desired Blower Speed button. Louver holes (non-vented [recirculating] installations only) B. Press once for On and again for quiet operation. Perimetric cover G. Range Hood Controls A B C D E A A. D G Operating the blower F E The Blower Speed buttons turn AMBIENT LIGHTING or AUTO Off. The Blower Off button turns the blower Off. Control panel D. Light switch (ambient lighting) Operating the Ambient Lighting The switch controls the ambient lighting. 1. Metal grease filters (located behind...
... can be changed anytime during fan operation by pressing the desired Blower Speed button. Louver holes (non-vented [recirculating] installations only) B. Press once for On and again for quiet operation. Perimetric cover G. Range Hood Controls A B C D E A A. D G Operating the blower F E The Blower Speed buttons turn AMBIENT LIGHTING or AUTO Off. The Blower Off button turns the blower Off. Control panel D. Light switch (ambient lighting) Operating the Ambient Lighting The switch controls the ambient lighting. 1. Metal grease filters (located behind...
Use & Care Guide
Page 13
... filter. 4. Cleaning Method: ■ Liquid detergent soap and water, or all-purpose cleanser Non-Vented (recirculating) Installation Filters The charcoal filter is attached at the left corners and pull down . 3. Insert aluminum filter into place. 13 See "Metal Grease Filters" in this section. 2. Remove each filter by a service technician only. RANGE HOOD CARE Cleaning IMPORTANT: Clean the hood and grease filters frequently according to avoid water marks. Replace with clean water and wipe dry. Replace grease filters before operating hood...
... filter. 4. Cleaning Method: ■ Liquid detergent soap and water, or all-purpose cleanser Non-Vented (recirculating) Installation Filters The charcoal filter is attached at the left corners and pull down . 3. Insert aluminum filter into place. 13 See "Metal Grease Filters" in this section. 2. Remove each filter by a service technician only. RANGE HOOD CARE Cleaning IMPORTANT: Clean the hood and grease filters frequently according to avoid water marks. Replace with clean water and wipe dry. Replace grease filters before operating hood...

Use & Care Guide
Page 14
... BU WH 2 3 RD WH YL BK Push Button Switch 2 1 L 3 L La YL/GN YL/GN RD WH Push Button Switch Operation Function Position Off No Connection Lamps Low Speed Med Speed High Speed Brown - La) Brown - White 45.1 Room Temp. 73ºF 23ºC BK BR WH RD BK YL N Light Sensor Turns on at 10 LUX Turns off at 50 LUX Output Input P1...LED BK RD Strip LED BK BK RD BU BU BU M WH RD BK LED SE136A WH BK BK LED 14 Yellow (L - Black (L - 3) Motor Specifications Power Supply 120 VAC Frequency 60 HZ Power Absorption 240 W Motor Resistance (Ω) Blue -
... BU WH 2 3 RD WH YL BK Push Button Switch 2 1 L 3 L La YL/GN YL/GN RD WH Push Button Switch Operation Function Position Off No Connection Lamps Low Speed Med Speed High Speed Brown - La) Brown - White 45.1 Room Temp. 73ºF 23ºC BK BR WH RD BK YL N Light Sensor Turns on at 10 LUX Turns off at 50 LUX Output Input P1...LED BK RD Strip LED BK BK RD BU BU BU M WH RD BK LED SE136A WH BK BK LED 14 Yellow (L - Black (L - 3) Motor Specifications Power Supply 120 VAC Frequency 60 HZ Power Absorption 240 W Motor Resistance (Ω) Blue -

Use & Care Guide
Page 15
... Service. Whirlpool designated service technicians are trained to fulfill the product warranty and provide after -warranty service, anywhere in your area, call the following customer assistance telephone number or your nearest designated service center. To locate factory specified replacement parts in the United States. ■ Features and specifications on our full line of appliances. ■ Referrals to local dealers. ■ Use and maintenance procedures. ■ Accessory and repair parts...
... Service. Whirlpool designated service technicians are trained to fulfill the product warranty and provide after -warranty service, anywhere in your area, call the following customer assistance telephone number or your nearest designated service center. To locate factory specified replacement parts in the United States. ■ Features and specifications on our full line of appliances. ■ Referrals to local dealers. ■ Use and maintenance procedures. ■ Accessory and repair parts...
Use & Care Guide
Page 16
... and telephone number ■ Model number and serial number ■ A clear, detailed description of the problem ■ Proof of household electrical or plumbing (i.e. Commercial, non-residential, multiple-family use, or use with products not approved by Whirlpool. 7. Consumable parts (i.e. light bulbs, batteries, air or water filters, preservation solutions, etc.). 5. Repairs to parts or systems to determine whether another warranty applies. Pick-up or delivery. trim, decorative panels, flooring, cabinetry, islands, countertops...
... and telephone number ■ Model number and serial number ■ A clear, detailed description of the problem ■ Proof of household electrical or plumbing (i.e. Commercial, non-residential, multiple-family use, or use with products not approved by Whirlpool. 7. Consumable parts (i.e. light bulbs, batteries, air or water filters, preservation solutions, etc.). 5. Repairs to parts or systems to determine whether another warranty applies. Pick-up or delivery. trim, decorative panels, flooring, cabinetry, islands, countertops...

Use & Care Guide
Page 32
Tous droits réservés. 6/14 Printed in Canada. Used under license in Mexico Imprimé au Mexique Utilisé sous licence au Canada. W10674117A ®/™ ©2014 Whirlpool. All rights reserved.
Tous droits réservés. 6/14 Printed in Canada. Used under license in Mexico Imprimé au Mexique Utilisé sous licence au Canada. W10674117A ®/™ ©2014 Whirlpool. All rights reserved.

Warranty Information
Page 1
... contacting us to arrange service, please determine whether your authorized Whirlpool dealer to you . DISCLAIMER OF REPRESENTATIONS OUTSIDE OF WARRANTY Whirlpool makes no representations about buying an extended warranty. In Canada, call the Customer eXperience Center: ■ Name, address and telephone number ■ Model number and serial number ■ A clear, detailed description of the problem ■ Proof of the Use and Care Guide, scan the QR code on the right...
... contacting us to arrange service, please determine whether your authorized Whirlpool dealer to you . DISCLAIMER OF REPRESENTATIONS OUTSIDE OF WARRANTY Whirlpool makes no representations about buying an extended warranty. In Canada, call the Customer eXperience Center: ■ Name, address and telephone number ■ Model number and serial number ■ A clear, detailed description of the problem ■ Proof of the Use and Care Guide, scan the QR code on the right...

Warranty Information
Page 3
Used under license in Mexico Imprimé au Mexique Tous droits réservés. 6/14 Printed in Canada. Utilisé sous licence au Canada. W10674117A ®/™ ©2014 Whirlpool. All rights reserved.
Used under license in Mexico Imprimé au Mexique Tous droits réservés. 6/14 Printed in Canada. Utilisé sous licence au Canada. W10674117A ®/™ ©2014 Whirlpool. All rights reserved.


