Use & Care Guide
Page 1
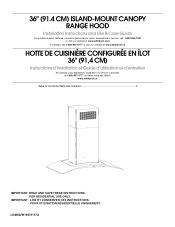
..., call 1-800-807-6777 or visit our website at www.whirlpool.ca HOTTE DE CUISINIÈRE CONFIGURÉE EN ÎLOT 36" (91,4 CM) Instructions d'installation et Guide d'utilisation et d'entretien Au Canada, pour assistance, installation ou service, composer le 1-800-807-6777 ou visiter notre ...site Web à www.whirlpool.ca Table of Contents/Table des matières 2 IMPORTANT: READ ...
..., call 1-800-807-6777 or visit our website at www.whirlpool.ca HOTTE DE CUISINIÈRE CONFIGURÉE EN ÎLOT 36" (91,4 CM) Instructions d'installation et Guide d'utilisation et d'entretien Au Canada, pour assistance, installation ou service, composer le 1-800-807-6777 ou visiter notre ...site Web à www.whirlpool.ca Table of Contents/Table des matières 2 IMPORTANT: READ ...
Use & Care Guide
Page 2
... U.S.A 15 In Canada 15 Accessories 15 WARRANTY 16 TABLE DES MATIÈRES SÉCURITÉ DE LA HOTTE DE CUISINIÈRE 17 EXIGENCES D'INSTALLATION 19 Outils et pièces 19 Exigences d'emplacement 19 Exigences concernant l'évacuation 20 Spécifications électriques 21 INSTRUCTIONS...
... U.S.A 15 In Canada 15 Accessories 15 WARRANTY 16 TABLE DES MATIÈRES SÉCURITÉ DE LA HOTTE DE CUISINIÈRE 17 EXIGENCES D'INSTALLATION 19 Outils et pièces 19 Exigences d'emplacement 19 Exigences concernant l'évacuation 20 Spécifications électriques 21 INSTRUCTIONS...
Use & Care Guide
Page 3
... to exhaust hazardous or explosive materials and vapors. Follow the heating equipment manufacturer's guideline and safety standards such as a tag, to the service panel. ■ Installation work and electrical wiring must always be sure to accumulate on low or medium settings. ■ Always turn off at service panel and lock the...
... to exhaust hazardous or explosive materials and vapors. Follow the heating equipment manufacturer's guideline and safety standards such as a tag, to the service panel. ■ Installation work and electrical wiring must always be sure to accumulate on low or medium settings. ■ Always turn off at service panel and lock the...
Use & Care Guide
Page 4
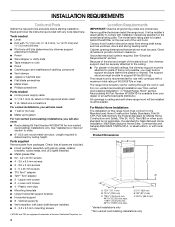
...; Flat-blade screwdriver ■ Metal snips ■ Phillips screwdriver Parts needed ■ Level ■ Drill with canopy glass, retainer brackets, rubber seals, and LED lights installed. ■ Metal grease filter ■ 60 - 4.2 x 8 mm screws ■ 4 - 3.5 x 6.5 mm screws ■ 2 - 2.9 x 3 mm screws ■ 4 -... build a support structure behind the left filter on the model/serial rating plate. For non-vented (recirculating) Installation see "Non-vented (recirculating) Installation" in ceiling and wall where range hood will also need : ■ 1 wall or roof cap ■...
...; Flat-blade screwdriver ■ Metal snips ■ Phillips screwdriver Parts needed ■ Level ■ Drill with canopy glass, retainer brackets, rubber seals, and LED lights installed. ■ Metal grease filter ■ 60 - 4.2 x 8 mm screws ■ 4 - 3.5 x 6.5 mm screws ■ 2 - 2.9 x 3 mm screws ■ 4 -... build a support structure behind the left filter on the model/serial rating plate. For non-vented (recirculating) Installation see "Non-vented (recirculating) Installation" in ceiling and wall where range hood will also need : ■ 1 wall or roof cap ■...

Use & Care Guide
Page 5
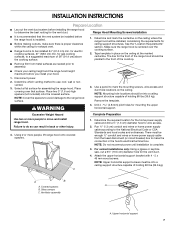
...distance "C": 24" (61.0 cm) from electric cooking surface, 27" (68.6 cm) from your HVAC professional for different ceiling heights. Vented Installations Min. ceiling height Max. The hood exhaust opening around the cap. ■ The size of the range hood and the cooking surface. Flexible... vent creates back pressure and air turbulence that greatly reduce performance. Installation Dimensions B C D A A. See the following chart. Hood height: 24" (61.0 cm) min. Makeup Air Local building codes may ...
...distance "C": 24" (61.0 cm) from electric cooking surface, 27" (68.6 cm) from your HVAC professional for different ceiling heights. Vented Installations Min. ceiling height Max. The hood exhaust opening around the cap. ■ The size of the range hood and the cooking surface. Flexible... vent creates back pressure and air turbulence that greatly reduce performance. Installation Dimensions B C D A A. See the following chart. Hood height: 24" (61.0 cm) min. Makeup Air Local building codes may ...

Use & Care Guide
Page 6
... of the system you need, add the equivalent feet (meters) for each vent piece used , it is recommended that a qualified electrician determine that the electrical installation is adequate. Ensure that the ground path is adequate and in the system. A copy of 35 ft (10.7 m). 1 - 90° elbow = 5.0 ft (1.5 m) 1 - Deflector B. 6" (15.2 cm...
... of the system you need, add the equivalent feet (meters) for each vent piece used , it is recommended that a qualified electrician determine that the electrical installation is adequate. Ensure that the ground path is adequate and in the system. A copy of 35 ft (10.7 m). 1 - 90° elbow = 5.0 ft (1.5 m) 1 - Deflector B. 6" (15.2 cm...
Use & Care Guide
Page 7
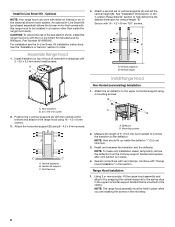
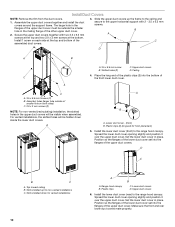
...) conduit and wires or home power supply cable according to the National Electrical Code or CSA Standards and local codes and ordinances. For vented installations only: Using a jigsaw or keyhole saw, cut a 6½" (16.5 cm) diameter hole for assembling the range hood. Upper horizontal support...upper horizontal support. Place two 3" (7.6 cm) high spacers (not included) onto the covered surface. NOTE: Mounting hole locations should be installed, considering the requirements for the front of the range hood should be into a ceiling support structure capable of holding 80 lbs (36.6 kg...
...) conduit and wires or home power supply cable according to the National Electrical Code or CSA Standards and local codes and ordinances. For vented installations only: Using a jigsaw or keyhole saw, cut a 6½" (16.5 cm) diameter hole for assembling the range hood. Upper horizontal support...upper horizontal support. Place two 3" (7.6 cm) high spacers (not included) onto the covered surface. NOTE: Mounting hole locations should be installed, considering the requirements for the front of the range hood should be into a ceiling support structure capable of holding 80 lbs (36.6 kg...
Use & Care Guide
Page 8
... with "Range Hood Installation" in the upper horizontal support bracket that comes with this range hood to be held in place while you are installing the screws in place. 4. Using 2 or more people, lift the range hood assembly and attach it by Whirlpool, Part Number W10692945.... NOTE: To make vent installation easier, temporarily remove the deflector from the chimney support bracket and replace after vent section is mounted to the range hood using 8...
... with "Range Hood Installation" in the upper horizontal support bracket that comes with this range hood to be held in place while you are installing the screws in place. 4. Using 2 or more people, lift the range hood assembly and attach it by Whirlpool, Part Number W10692945.... NOTE: To make vent installation easier, temporarily remove the deflector from the chimney support bracket and replace after vent section is mounted to the range hood using 8...
Use & Care Guide
Page 9
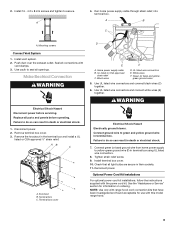
... duct over the exhaust outlet. Seal all openings. Black wires D. UL listed wire connectors E. Optional Power Cord Kit Installations For optional power cord kit installations, follow the instructions supplied with vent clamps. 3. Run home power supply cable through strain relief, into terminal box. ... cord connection kits that all parts and panels before servicing. Failure to green and yellow ground wire in the terminal box and install a UL listed or CSA approved ¹⁄₂" strain relief. Check that have been investigated and found acceptable for information on...
... duct over the exhaust outlet. Seal all openings. Black wires D. UL listed wire connectors E. Optional Power Cord Kit Installations For optional power cord kit installations, follow the instructions supplied with vent clamps. 3. Run home power supply cable through strain relief, into terminal box. ... cord connection kits that all parts and panels before servicing. Failure to green and yellow ground wire in the terminal box and install a UL listed or CSA approved ¹⁄₂" strain relief. Check that have been investigated and found acceptable for information on...
Use & Care Guide
Page 10
...lower duct cover opening slightly and position it over the upper duct cover. A A. 3.5 x 6.5 mm screw B. Plastic clips (2) (long end for vented installations 10 A B A. Range hood canopy B. Plastic clips C. Upper duct covers 6. Position so the flanges of the lower duct cover set into the flanges of... the upper duct covers. Slide the upper duct covers up for non-vented installations C. For vented installations, the slotted holes will be visible when assembled. Upper duct covers D. Lower duct cover - (front) B. Set the lower ...
...lower duct cover opening slightly and position it over the upper duct cover. A A. 3.5 x 6.5 mm screw B. Plastic clips (2) (long end for vented installations 10 A B A. Range hood canopy B. Plastic clips C. Upper duct covers 6. Position so the flanges of the lower duct cover set into the flanges of... the upper duct covers. Slide the upper duct covers up for non-vented installations C. For vented installations, the slotted holes will be visible when assembled. Upper duct covers D. Lower duct cover - (front) B. Set the lower ...

Use & Care Guide
Page 11
...Care" section. 2. See the "Range Hood Use" section. Lower duct cover (rear) B. Upper duct covers 7. For non-vented (recirculating) installations only, install charcoal filters onto the metal filters. See the "Range Hood Care" section. 3. Check the operation of the range hood blower and light. ...Lower duct covers top clip area 11 Plastic clips C. Lower duct covers D. A B Complete Installation 1. NOTE: To get the most efficient use from your new range hood, read the "Range Hood Use" section. Plastic clips (2) B. NOTE:...
...Care" section. 2. See the "Range Hood Use" section. Lower duct cover (rear) B. Upper duct covers 7. For non-vented (recirculating) installations only, install charcoal filters onto the metal filters. See the "Range Hood Care" section. 3. Check the operation of the range hood blower and light. ...Lower duct covers top clip area 11 Plastic clips C. Lower duct covers D. A B Complete Installation 1. NOTE: To get the most efficient use from your new range hood, read the "Range Hood Use" section. Plastic clips (2) B. NOTE:...

Use & Care Guide
Page 12
... On/Off light button controls both lights. D G Operating the blower F E The Blower Speed buttons turn AMBIENT LIGHTING or AUTO Off. Louver holes (non-vented [recirculating] installations only) B. Duct covers C. Perimetric cover G. Press once for On and again for quiet operation. A. NOTE: When the Ambient Lighting is placed in the AUTO setting...
... On/Off light button controls both lights. D G Operating the blower F E The Blower Speed buttons turn AMBIENT LIGHTING or AUTO Off. Louver holes (non-vented [recirculating] installations only) B. Duct covers C. Perimetric cover G. Press once for On and again for quiet operation. A. NOTE: When the Ambient Lighting is placed in the AUTO setting...
Use & Care Guide
Page 13
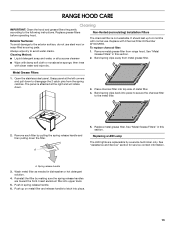
.... Remove each filter by a service technician only. Spring release handle 3. Cleaning Method: ■ Liquid detergent soap and water, or all-purpose cleanser Non-Vented (recirculating) Installation Filters The charcoal filter is attached at the left corners and pull down . 3. To replace charcoal filter: 1. Place charcoal filter into place. 13 Wash metal...
.... Remove each filter by a service technician only. Spring release handle 3. Cleaning Method: ■ Liquid detergent soap and water, or all-purpose cleanser Non-Vented (recirculating) Installation Filters The charcoal filter is attached at the left corners and pull down . 3. To replace charcoal filter: 1. Place charcoal filter into place. 13 Wash metal...

Use & Care Guide
Page 15
... LP Customer eXperience Centre toll free: 1-800-807-6777, or visit our website at www.whirlpool.com. Whirlpool designated service technicians are trained to local dealers. ■ Installation information. ■ Use and maintenance procedures. ■ Accessory and repair parts sales. ■ Specialized customer assistance (Spanish speaking, hearing impaired, limited vision, etc.). Call the...
... LP Customer eXperience Centre toll free: 1-800-807-6777, or visit our website at www.whirlpool.com. Whirlpool designated service technicians are trained to local dealers. ■ Installation information. ■ Use and maintenance procedures. ■ Accessory and repair parts sales. ■ Specialized customer assistance (Spanish speaking, hearing impaired, limited vision, etc.). Call the...
Use & Care Guide
Page 16
... fire, floods, acts of the Use and Care Guide, scan the QR code on how to correct improper product maintenance or installation, installation not in which it was purchased, or at its sole discretion replace the product. Discoloration, rust or oxidation of merchantability or ...workmanship and is intended for warranty service to product failure. 11. In the U.S. Food or medicine loss due to : Whirlpool Customer eXperience Center www.whirlpool.com/product_help In the U.S.A., call 1-800-253-1301. This warranty gives you specific legal rights, and you . Consumable parts...
... fire, floods, acts of the Use and Care Guide, scan the QR code on how to correct improper product maintenance or installation, installation not in which it was purchased, or at its sole discretion replace the product. Discoloration, rust or oxidation of merchantability or ...workmanship and is intended for warranty service to product failure. 11. In the U.S. Food or medicine loss due to : Whirlpool Customer eXperience Center www.whirlpool.com/product_help In the U.S.A., call 1-800-253-1301. This warranty gives you specific legal rights, and you . Consumable parts...

Warranty Information
Page 1
...purchase, when this major appliance is installed, operated and maintained according to instructions attached to or furnished with the product, Whirlpool Corporation or Whirlpool Canada LP (hereafter "Whirlpool") will be provided by our authorized Whirlpool Service Providers. Service must be warranted...and repair labor to correct improper product maintenance or installation, installation not in materials and workmanship and is used in the country in fixtures (i.e. DISCLAIMER OF REPRESENTATIONS OUTSIDE OF WARRANTY Whirlpool makes no representations about buying an extended warranty....
...purchase, when this major appliance is installed, operated and maintained according to instructions attached to or furnished with the product, Whirlpool Corporation or Whirlpool Canada LP (hereafter "Whirlpool") will be provided by our authorized Whirlpool Service Providers. Service must be warranted...and repair labor to correct improper product maintenance or installation, installation not in materials and workmanship and is used in the country in fixtures (i.e. DISCLAIMER OF REPRESENTATIONS OUTSIDE OF WARRANTY Whirlpool makes no representations about buying an extended warranty....
