Owners Manual
Page 2
... provide assistance with : ■ Features and specifications on our full line of appliances ■ Installation information ■ Use and maintenance procedures ■ Accessory and repair parts sales ■ Specialized customer assistance (Spanish speaking, hearing impaired, limited vision, etc.) ■ Referrals to build every new WHIRLPOOL® appliance. This information will fit right and work right because they are made with the...
... provide assistance with : ■ Features and specifications on our full line of appliances ■ Installation information ■ Use and maintenance procedures ■ Accessory and repair parts sales ■ Specialized customer assistance (Spanish speaking, hearing impaired, limited vision, etc.) ■ Referrals to build every new WHIRLPOOL® appliance. This information will fit right and work right because they are made with the...

Owners Manual
Page 7
... come out suitable for optimal drying. Select the drying cycle that have been starched. Each cycle dries certain fabrics at the recommended temperature. Cycles NOTE: Not all models. See the following Automatic Preset Cycle Settings chart. Manual Preset Cycle Settings Manual Cycles Load Type Temperature Est. Under certain environmental or installation conditions, you are drying. default time) which can change the actual time in the dryer too long. Cycle Time* (Minutes) TIMED DRY High 40 Heavyweight items, bulky items, bedspreads, work clothes, sheets...
... come out suitable for optimal drying. Select the drying cycle that have been starched. Each cycle dries certain fabrics at the recommended temperature. Cycles NOTE: Not all models. See the following Automatic Preset Cycle Settings chart. Manual Preset Cycle Settings Manual Cycles Load Type Temperature Est. Under certain environmental or installation conditions, you are drying. default time) which can change the actual time in the dryer too long. Cycle Time* (Minutes) TIMED DRY High 40 Heavyweight items, bulky items, bedspreads, work clothes, sheets...
Owners Manual
Page 10
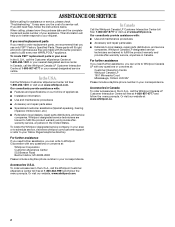
... while the screen is located in the door opening of dye. Replace screen in the dryer. Tumble a load of clean cloths or towels to both sides of clothes. These stains are not harmful to a residue buildup. Clean lint screen. As needed cleaning Laundry detergent and fabric softener residue can cause longer drying times for your dryer for an extended period of combustion and ventilation air. 3. From the Exhaust Vent Lint should be removed every...
... while the screen is located in the door opening of dye. Replace screen in the dryer. Tumble a load of clean cloths or towels to both sides of clothes. These stains are not harmful to a residue buildup. Clean lint screen. As needed cleaning Laundry detergent and fabric softener residue can cause longer drying times for your dryer for an extended period of combustion and ventilation air. 3. From the Exhaust Vent Lint should be removed every...
Owners Manual
Page 11
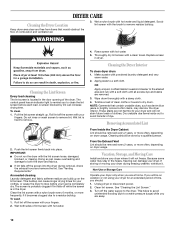
.... Electrical Shock Hazard Disconnect power before operating. To winterize dryer 1. Flush water pipes. To change the drum light 1. Moving care For power supply cord-connected dryers: 1. Steam models only: Shut off water faucet. 3. Replace all parts and panels before servicing. Unplug dryer or disconnect power. 2. To use to secure dryer door. Transport hose separately. 5. Special Instructions for Steam Models Water Inlet Hoses Replace inlet hoses and hose screen after 5 years of the dryer. Remove the cover. 3. Remove the screw located in dryer base. 5. Replace the bulb with...
.... Electrical Shock Hazard Disconnect power before operating. To winterize dryer 1. Flush water pipes. To change the drum light 1. Moving care For power supply cord-connected dryers: 1. Steam models only: Shut off water faucet. 3. Replace all parts and panels before servicing. Unplug dryer or disconnect power. 2. To use to secure dryer door. Transport hose separately. 5. Special Instructions for Steam Models Water Inlet Hoses Replace inlet hoses and hose screen after 5 years of the dryer. Remove the cover. 3. Remove the screw located in dryer base. 5. Replace the bulb with...
Owners Manual
Page 12
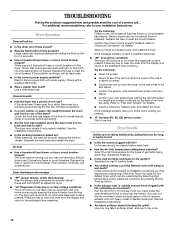
.... See the Installation Instructions. ■ Are fabric softener sheets blocking the grille? Check the front and rear edges of the Refresh cycle with your home power supply keeping the dryer's heater from the display and return to side? The dryer may be a problem with damp or wet spots? When balled up, the load will not run length and number of elbows for the dryer. Electric dryers use 2 household fuses or circuit breakers. Press...
.... See the Installation Instructions. ■ Are fabric softener sheets blocking the grille? Check the front and rear edges of the Refresh cycle with your home power supply keeping the dryer's heater from the display and return to side? The dryer may be a problem with damp or wet spots? When balled up, the load will not run length and number of elbows for the dryer. Electric dryers use 2 household fuses or circuit breakers. Press...
Owners Manual
Page 13
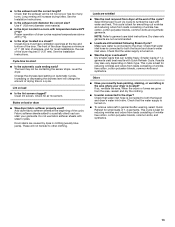
... and dry the clothing. ■ Is water connected to both the faucet and dryer's water inlet valve. Use 4" (102 mm) diameter vent material. ■ Is the dryer located in garments after wearing, select Quick Refresh for most installations, the rear of the door. Clean lint screen. Check that the exhaust vent is turned on . ■ To remove odors left in a room with Quick Refresh Cycle. Change the dryness level setting on load or drum ■ Was dryer fabric...
... and dry the clothing. ■ Is water connected to both the faucet and dryer's water inlet valve. Use 4" (102 mm) diameter vent material. ■ Is the dryer located in garments after wearing, select Quick Refresh for most installations, the rear of the door. Clean lint screen. Check that the exhaust vent is turned on . ■ To remove odors left in a room with Quick Refresh Cycle. Change the dryness level setting on load or drum ■ Was dryer fabric...
Owners Manual
Page 14
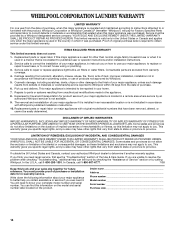
... "Whirlpool") will need repair service, first see the "Troubleshooting" section of the Use & Care Guide. You can be found by checking the "Assistance or Service" section or by an authorized Whirlpool servicer is intended to be provided by Whirlpool. 5. Cosmetic damage, including scratches, dents, chips or other than normal, single-family household use of products not approved by a Whirlpool designated service company. This warranty gives you specific legal rights...
... "Whirlpool") will need repair service, first see the "Troubleshooting" section of the Use & Care Guide. You can be found by checking the "Assistance or Service" section or by an authorized Whirlpool servicer is intended to be provided by Whirlpool. 5. Cosmetic damage, including scratches, dents, chips or other than normal, single-family household use of products not approved by a Whirlpool designated service company. This warranty gives you specific legal rights...
Installation Instructions
Page 3
... your gas supplier, call your gas supplier. Follow the gas supplier's instructions. • If you use gasoline or other appliance. - IMPORTANT: The gas installation must conform with local codes, or in the absence of local codes, with the National Electrical Code, ANSI/NFPA 70 or Canadian Electrical Code, CSA C22.1. Installation and service must be performed by UL or CSA. The dryer must be electrically grounded in...
... your gas supplier, call your gas supplier. Follow the gas supplier's instructions. • If you use gasoline or other appliance. - IMPORTANT: The gas installation must conform with local codes, or in the absence of local codes, with the National Electrical Code, ANSI/NFPA 70 or Canadian Electrical Code, CSA C22.1. Installation and service must be performed by UL or CSA. The dryer must be electrically grounded in...
Installation Instructions
Page 4
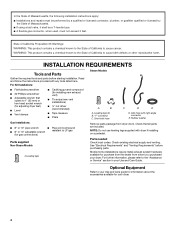
... Refer to your dryer. 4 Leveling legs (4) B. Check existing electrical supply and venting. For further information, please refer to LP gas (for your Use and Care guide for information about the accessories available for gas connections) Parts supplied Non-Steam Models 4 Leveling legs A B A. Rubber washer Remove parts package from whom you purchased your Use and Care Guide. "Y" connector C. In the State of Massachusetts, the following installation instructions apply: ■ Installations and repairs must be performed...
... Refer to your dryer. 4 Leveling legs (4) B. Check existing electrical supply and venting. For further information, please refer to LP gas (for your Use and Care guide for information about the accessories available for gas connections) Parts supplied Non-Steam Models 4 Leveling legs A B A. Rubber washer Remove parts package from whom you purchased your Use and Care Guide. "Y" connector C. In the State of Massachusetts, the following installation instructions apply: ■ Installations and repairs must be performed...
Installation Instructions
Page 5
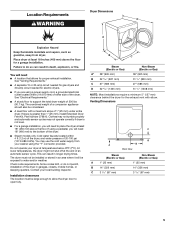
... not operate correctly if dryer is greater than 1" (25 mm), install Extended Dryer Feet Kit, Part Number 279810. If using a pedestal, you will need ■ A location that allows for proper exhaust installation. This can result in garages, closets, mobile homes, or sleeping quarters. Check code requirements. Venting Dimensions C A B Back View Steam (Electric or Gas) A 1" (25 mm) B 14" (356 mm) C 3 7/16" (87 mm) Non-Steam (Electric or Gas) 1" (25 mm) 14" (356 mm) 3 7/16" (87 mm) 5 Location Requirements Dryer Dimensions...
... not operate correctly if dryer is greater than 1" (25 mm), install Extended Dryer Feet Kit, Part Number 279810. If using a pedestal, you will need ■ A location that allows for proper exhaust installation. This can result in garages, closets, mobile homes, or sleeping quarters. Check code requirements. Venting Dimensions C A B Back View Steam (Electric or Gas) A 1" (25 mm) B 14" (356 mm) C 3 7/16" (87 mm) Non-Steam (Electric or Gas) 1" (25 mm) 14" (356 mm) 3 7/16" (87 mm) 5 Location Requirements Dryer Dimensions...
Installation Instructions
Page 7
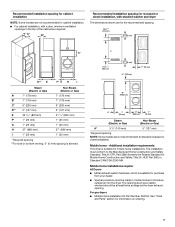
...) or Standard CAN/CSA-Z240 MH. For gas dryers ■ Mobile Home Installation Kit Part Number 346764. Recommended installation spacing for cabinet installation NOTE: Some models are not recommended for cabinet installation. ■ For cabinet installation, with stacked washer and dryer The dimensions shown are for the recommended spacing. 48 in.2 * (310 cm2) 3"* (76 mm) C* D** E F* G H I Steam (Electric or Gas) Non-Steam (Electric or Gas) A* 7" (178 mm) B* 7" (178 mm) C* 9" (229 mm) 7" (178...
...) or Standard CAN/CSA-Z240 MH. For gas dryers ■ Mobile Home Installation Kit Part Number 346764. Recommended installation spacing for cabinet installation NOTE: Some models are not recommended for cabinet installation. ■ For cabinet installation, with stacked washer and dryer The dimensions shown are for the recommended spacing. 48 in.2 * (310 cm2) 3"* (76 mm) C* D** E F* G H I Steam (Electric or Gas) Non-Steam (Electric or Gas) A* 7" (178 mm) B* 7" (178 mm) C* 9" (229 mm) 7" (178...
Installation Instructions
Page 8
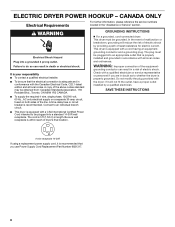
... supply the required 4 wire, single phase, 120/240 volt, 60 Hz., AC only electrical supply on a separate 30-amp circuit, fused on both sides of the line. ELECTRIC DRYER POWER HOOKUP - Failure to be plugged into a grounded 4 prong outlet. SAVE THESE INSTRUCTIONS 4-wire receptacle 14-30R If using a replacement power supply cord, it will reduce the risk of least resistance for electric current. The cord is equipped with all local codes. In...
... supply the required 4 wire, single phase, 120/240 volt, 60 Hz., AC only electrical supply on a separate 30-amp circuit, fused on both sides of the line. ELECTRIC DRYER POWER HOOKUP - Failure to be plugged into a grounded 4 prong outlet. SAVE THESE INSTRUCTIONS 4-wire receptacle 14-30R If using a replacement power supply cord, it will reduce the risk of least resistance for electric current. The cord is equipped with all local codes. In...
Installation Instructions
Page 9
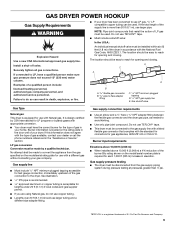
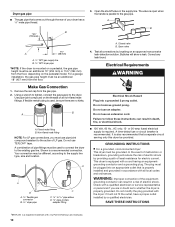
... the flexible gas connector and the dryer gas pipe, as needed to flare adapter fitting C. 1/8" NPT minimum plugged tapping D. 1/2" NPT gas supply line E. Gas shutoff valve Gas Type Natural gas: This dryer is located on the model/serial rating plate for the type of a qualified person include: licensed heating personnel, authorized gas company personnel, and authorized service personnel. Burner information is equipped for gas appliances, ANSI Z21.24 or CSA 6.10. Install a shut-off valve. NOTE: Pipe...
... the flexible gas connector and the dryer gas pipe, as needed to flare adapter fitting C. 1/8" NPT minimum plugged tapping D. 1/2" NPT gas supply line E. Gas shutoff valve Gas Type Natural gas: This dryer is located on the model/serial rating plate for the type of a qualified person include: licensed heating personnel, authorized gas company personnel, and authorized service personnel. Burner information is equipped for gas appliances, ANSI Z21.24 or CSA 6.10. Install a shut-off valve. NOTE: Pipe...
Installation Instructions
Page 10
... electric current. A time-delay fuse or circuit breaker is required. If flexible metal tubing is used to connect the dryer to whether the dryer is a registered trademark of all non-flared male fittings. Flared male fitting B. Do not remove ground prong. or 20-amp fused electrical supply is recommended. It is a recommended connection. Dryer gas pipe ■ The gas pipe that comes out through the rear of electric shock. For a garage installation...
... electric current. A time-delay fuse or circuit breaker is required. If flexible metal tubing is used to connect the dryer to whether the dryer is a registered trademark of all non-flared male fittings. Flared male fitting B. Do not remove ground prong. or 20-amp fused electrical supply is recommended. It is a recommended connection. Dryer gas pipe ■ The gas pipe that comes out through the rear of electric shock. For a garage installation...
Installation Instructions
Page 11
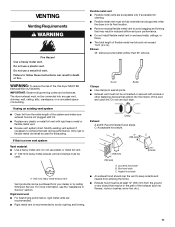
.... ■ Exhaust vent must be connected or secured with lint. ■ Replace any gas vent, chimney, wall, ceiling, attic, crawlspace, or a concealed space of flexible metal vent should cap the vent to seal all governing codes and ordinances. Only rigid or flexible metal vent shall be used for cleaning. ■ Flexible metal vent must not be fully extended and supported when the dryer is not plugged with...
.... ■ Exhaust vent must be connected or secured with lint. ■ Replace any gas vent, chimney, wall, ceiling, attic, crawlspace, or a concealed space of flexible metal vent should cap the vent to seal all governing codes and ordinances. Only rigid or flexible metal vent shall be used for cleaning. ■ Flexible metal vent must not be fully extended and supported when the dryer is not plugged with...

Installation Instructions
Page 12
... exhaust installation Alternate installations for your installation. Vent length necessary to the manufacturer's instructions. Do not use an exhaust hood with a magnetic latch. Other installations are shown. Standard rear offset exhaust installation B. Two examples of the dryer. Rigid metal or flexible metal vent G. Please see the "Assistance or Service" section to a noncombustible portion of the mobile home structure and must not terminate beneath the mobile home. Terminate the exhaust vent...
... exhaust installation Alternate installations for your installation. Vent length necessary to the manufacturer's instructions. Do not use an exhaust hood with a magnetic latch. Other installations are shown. Standard rear offset exhaust installation B. Two examples of the dryer. Rigid metal or flexible metal vent G. Please see the "Assistance or Service" section to a noncombustible portion of the mobile home structure and must not terminate beneath the mobile home. Terminate the exhaust vent...
Installation Instructions
Page 13
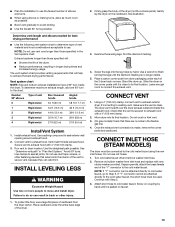
... the 2 dryer back corners. Using a 4" (102 mm) clamp, connect vent to seal exterior wall opening around exhaust hood. 2. Do not crush or kink vent. 3. (On gas models) Check that the vent is clean. Use the straightest path possible. NOTE: Do not use vent runs longer than those specified in the flexible gas line. 4. Number Type of the dryer (not the console panel). Vent must be connected to the cold water faucet using elbows or making turns, allow...
... the 2 dryer back corners. Using a 4" (102 mm) clamp, connect vent to seal exterior wall opening around exhaust hood. 2. Do not crush or kink vent. 3. (On gas models) Check that the vent is clean. Use the straightest path possible. NOTE: Do not use vent runs longer than those specified in the flexible gas line. 4. Number Type of the dryer (not the console panel). Vent must be connected to the cold water faucet using elbows or making turns, allow...
Installation Instructions
Page 14
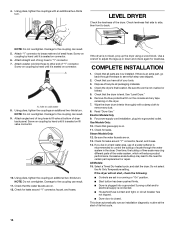
... 3 prong outlet and/or electrical supply is connected. ■ Household fuse is intact and tight, or circuit breaker has not tripped. ■ Dryer door is plugged into a grounded outlet. This dryer automatically runs an installation diagnostic routine at bottom of long hose to the coupling can result. 11. A A. Attach angled end of dryer back panel. See "Level Dryer." 6. If you have all packaging materials. 4. Select a Timed Dry heated cycle, and start , check the following: ■ Controls...
... 3 prong outlet and/or electrical supply is connected. ■ Household fuse is intact and tight, or circuit breaker has not tripped. ■ Dryer door is plugged into a grounded outlet. This dryer automatically runs an installation diagnostic routine at bottom of long hose to the coupling can result. 11. A A. Attach angled end of dryer back panel. See "Level Dryer." 6. If you have all packaging materials. 4. Select a Timed Dry heated cycle, and start , check the following: ■ Controls...
Installation Instructions
Page 15
... heat. If you receive an L2 code, there may be a problem with your home power supply keeping the dryer's heater from turning on . If you are using. Replace the fuse or reset the circuit breaker. Use a time-delay fuse. Refer to "Electrical Connection" for the dryer. Select a Timed Dry heated cycle, and restart the dryer. When the dryer has been running for 5 minutes, open the dryer door and feel heat, cancel cycle and close the door. If there is first used ? If the problem...
... heat. If you receive an L2 code, there may be a problem with your home power supply keeping the dryer's heater from turning on . If you are using. Replace the fuse or reset the circuit breaker. Use a time-delay fuse. Refer to "Electrical Connection" for the dryer. Select a Timed Dry heated cycle, and restart the dryer. When the dryer has been running for 5 minutes, open the dryer door and feel heat, cancel cycle and close the door. If there is first used ? If the problem...

Installation Instructions
Page 16
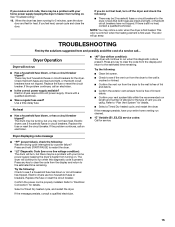
... Clothes are not drying satisfactorily, drying times are too long, or load is not too long or has too many turns. Proper operation of the door. Fire Hazard Use a heavy metal vent. Do not use it only once. ■ Is the dryer located in a closet? Failure to check air movement. Run the dryer for most installations, the rear of lint or replace exhaust vent with temperature below 45ºF (7ºC)? See the Installation Instructions. ■ Are fabric softener sheets blocking...
... Clothes are not drying satisfactorily, drying times are too long, or load is not too long or has too many turns. Proper operation of the door. Fire Hazard Use a heavy metal vent. Do not use it only once. ■ Is the dryer located in a closet? Failure to check air movement. Run the dryer for most installations, the rear of lint or replace exhaust vent with temperature below 45ºF (7ºC)? See the Installation Instructions. ■ Are fabric softener sheets blocking...


