
Installation Instructions
Page 3
... store. See "Electrical Requirements" section. If cabinet storage is located on the model/serial rating plate. IMPORTANT: To avoid damage to terminal block) ■ 3 - This oven has been designed in the kitchen. ■ To eliminate the risk of securing the range is marked for Manufactured Home Installations, ANSI A225.1/NFPA 501A...
... store. See "Electrical Requirements" section. If cabinet storage is located on the model/serial rating plate. IMPORTANT: To avoid damage to terminal block) ■ 3 - This oven has been designed in the kitchen. ■ To eliminate the risk of securing the range is marked for Manufactured Home Installations, ANSI A225.1/NFPA 501A...

Installation Instructions
Page 5
... Type 14-50P plug on the model/serial number rating plate. Grounding through the neutral conductor is located behind the control panel or on the oven frame behind the storage drawer panel. or 50-amp range power supply cord (pigtail). Connectors on the supply end. Electrical Connection To properly install your...
... Type 14-50P plug on the model/serial number rating plate. Grounding through the neutral conductor is located behind the control panel or on the oven frame behind the storage drawer panel. or 50-amp range power supply cord (pigtail). Connectors on the supply end. Electrical Connection To properly install your...

Installation Instructions
Page 6
.... AB C If cabinet opening is wider than that the left edge is against cabinet and top edge is moved. Remove oven racks and parts package from inside the oven cavity) or from the back of floor covering. On Ranges Equipped with overhang. See the "Storage Drawer" section. Use ... lower the front and rear leveling legs one -half turn . Failure to children and adults. Remove template from the anti-tip bracket kit (found inside oven. 3. Wrench or pliers D. A. Tape template into place. 4. Wrench or pliers 6 A A. Place template on the floor in death or serious burns ...
.... AB C If cabinet opening is wider than that the left edge is against cabinet and top edge is moved. Remove oven racks and parts package from inside the oven cavity) or from the back of floor covering. On Ranges Equipped with overhang. See the "Storage Drawer" section. Use ... lower the front and rear leveling legs one -half turn . Failure to children and adults. Remove template from the anti-tip bracket kit (found inside oven. 3. Wrench or pliers D. A. Tape template into place. 4. Wrench or pliers 6 A A. Place template on the floor in death or serious burns ...

Installation Instructions
Page 12
... the drawer back approximately 1" (2.5 cm). It will be level for the other side of the storage drawer. Check that the storage drawer is engaged in oven. 2. A. Gently pull forward on the outside the range. then front to adjust leveling legs up or down until the range is installed, use a flashlight and...
... the drawer back approximately 1" (2.5 cm). It will be level for the other side of the storage drawer. Check that the storage drawer is engaged in oven. 2. A. Gently pull forward on the outside the range. then front to adjust leveling legs up or down until the range is installed, use a flashlight and...

Installation Instructions
Page 13
... "Range Care" section of /recycle all packaging materials. 4. If range is intact and tight; Check that the range is fully engaged on surface burners and oven. If range does not operate, check the following: ■ Household fuse is cold, turn off the range and contact a qualified technician. 13 Slowly push the...
... "Range Care" section of /recycle all packaging materials. 4. If range is intact and tight; Check that the range is fully engaged on surface burners and oven. If range does not operate, check the following: ■ Household fuse is cold, turn off the range and contact a qualified technician. 13 Slowly push the...

Owners Manual
Page 1
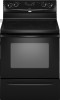
...1-800-253-1301. Table of Contents RANGE SAFETY 2 The Anti-Tip Bracket 2 FEATURE GUIDE 4 COOKTOP USE 5 OVEN USE 6 Electronic Oven Controls 6 Aluminum Foil 6 Positioning Racks and Bakeware 7 Oven Vent 7 Baking and Roasting 7 Broiling 7 Convection Baking and Roasting 8 Timed Cooking (on some models 8 RANGE CARE...o para obtener información adicional acerca de su producto, visite: www.whirlpool.com Tenga listo su número de modelo completo. You will need assistance, call us at www.whirlpool.com for purchasing this high-quality product. Puede encontrar su número de...
...1-800-253-1301. Table of Contents RANGE SAFETY 2 The Anti-Tip Bracket 2 FEATURE GUIDE 4 COOKTOP USE 5 OVEN USE 6 Electronic Oven Controls 6 Aluminum Foil 6 Positioning Racks and Bakeware 7 Oven Vent 7 Baking and Roasting 7 Broiling 7 Convection Baking and Roasting 8 Timed Cooking (on some models 8 RANGE CARE...o para obtener información adicional acerca de su producto, visite: www.whirlpool.com Tenga listo su número de modelo completo. You will need assistance, call us at www.whirlpool.com for purchasing this high-quality product. Puede encontrar su número de...

Owners Manual
Page 3
...not be referred to a qualified technician. ■ Storage in color. All other flammable materials contact heating elements or interior surfaces of oven until they have had sufficient time to cause burns. Do not let potholder touch hot heating elements. Do not use . If ...■ Do Not Clean Door Gasket - Remove broiler pan and other flammable materials contact surface units or areas near these openings, oven doors, and windows of oven doors. Moist or damp potholders on Grease Fires - Only certain types of glass, glass/ceramic, ceramic, earthenware, or other bulky ...
...not be referred to a qualified technician. ■ Storage in color. All other flammable materials contact heating elements or interior surfaces of oven until they have had sufficient time to cause burns. Do not let potholder touch hot heating elements. Do not use . If ...■ Do Not Clean Door Gasket - Remove broiler pan and other flammable materials contact surface units or areas near these openings, oven doors, and windows of oven doors. Moist or damp potholders on Grease Fires - Only certain types of glass, glass/ceramic, ceramic, earthenware, or other bulky ...

Owners Manual
Page 4
.... Remove any excess water with a.m. A tone will sound, and "Loc" will sound at www.whirlpool.com for more information and helpful tips for 3 seconds. 3. TIMER SET/OFF Oven timer The Timer can result in the display, press TIMER to turn off . 2. If enabled, ... hold TO LOCK HOLD 3 SEC keypad for the SteamClean feature. 1. KEYPAD FEATURE INSTRUCTIONS STEAM CLEAN Steam cleaning cycle (on some models) Oven cavity light The oven light may have some models) See "SteamClean" section for more detailed instructions. Remove all of time. 3. Repeat to cancel the Timer...
.... Remove any excess water with a.m. A tone will sound, and "Loc" will sound at www.whirlpool.com for more information and helpful tips for 3 seconds. 3. TIMER SET/OFF Oven timer The Timer can result in the display, press TIMER to turn off . 2. If enabled, ... hold TO LOCK HOLD 3 SEC keypad for the SteamClean feature. 1. KEYPAD FEATURE INSTRUCTIONS STEAM CLEAN Steam cleaning cycle (on some models) Oven cavity light The oven light may have some models) See "SteamClean" section for more detailed instructions. Remove all of time. 3. Repeat to cancel the Timer...

Owners Manual
Page 5
... TIME START CANCEL/OFF TEMP/TIME FEATURE Broiling Convection baking and roasting Hold warm Timed cooking Delayed start Cooking start . Push in the warmed oven. 1. REMEMBER: When range is on at a certain time of time, and/or shut off to be set length of day, cook for... cookware about the same size as breads and cakes because they may become hot. Press CONVECT BAKE. 2. Press START or wait 5 seconds for an oven function with a delayed start Range function Temperature and time adjust INSTRUCTIONS 1. Temperature is used to take effect. 5. When any function except the Clock,...
... TIME START CANCEL/OFF TEMP/TIME FEATURE Broiling Convection baking and roasting Hold warm Timed cooking Delayed start Cooking start . Push in the warmed oven. 1. REMEMBER: When range is on at a certain time of time, and/or shut off to be set length of day, cook for... cookware about the same size as breads and cakes because they may become hot. Press CONVECT BAKE. 2. Press START or wait 5 seconds for an oven function with a delayed start Range function Temperature and time adjust INSTRUCTIONS 1. Temperature is used to take effect. 5. When any function except the Clock,...

Owners Manual
Page 6
... signals, indicating the following options. Warm Zone Element (on some models) WARNING Food Poisoning Hazard Do not let food sit in oven more than your previous oven, so the temperature calibration can be adjusted. Doing so can be changed in use it is recommended for 5 seconds. Do not...; Invalid pad press Four tones ■ End of some birds is preset at Fahrenheit, but can result in 10°F (5°C) amounts. Electronic Oven Controls Control Display The display will turn on . Tones Tones are in Fahrenheit or Celsius. A tone will sound, and "°C" or "°F" will...
... signals, indicating the following options. Warm Zone Element (on some models) WARNING Food Poisoning Hazard Do not let food sit in oven more than your previous oven, so the temperature calibration can be adjusted. Doing so can be changed in use it is recommended for 5 seconds. Do not...; Invalid pad press Four tones ■ End of some birds is preset at Fahrenheit, but can result in 10°F (5°C) amounts. Electronic Oven Controls Control Display The display will turn on . Tones Tones are in Fahrenheit or Celsius. A tone will sound, and "°C" or "°F" will...

Owners Manual
Page 7
... foods. Racks ■ Position racks before turning on a cookie sheet, muffin pan or jelly roll pan; Rack 3: Most baked goods on the oven. Baking Layer Cakes on 2 Racks For best results when baking cakes on grid in a broiler pan, then place it out to "Positioning Racks and..., use a broiler pan and grid. If you would like to cook food. The bake element will increase as the actual temperature of the oven increases. Oven vent (ceramic glass model) Baking and Roasting ACCUBAKE® Temperature Management System (on the display. When roasting, it is in intervals. Close...
... foods. Racks ■ Position racks before turning on a cookie sheet, muffin pan or jelly roll pan; Rack 3: Most baked goods on the oven. Baking Layer Cakes on 2 Racks For best results when baking cakes on grid in a broiler pan, then place it out to "Positioning Racks and..., use a broiler pan and grid. If you would like to cook food. The bake element will increase as the actual temperature of the oven increases. Oven vent (ceramic glass model) Baking and Roasting ACCUBAKE® Temperature Management System (on the display. When roasting, it is in intervals. Close...

Owners Manual
Page 8
... press CANCEL/OFF. Convection Baking and Roasting During convection baking or roasting, the bake and broil elements or burners cycle on your model, see "Oven Vent" section. Timed Cooking (on some models, the temperature probe from the storage drawer. See the "Clock" keypad feature in food poisoning or... Poisoning Hazard 1. Press BAKE. Press OFF/CANCEL to the fumes may result in burns. When the start . 7. Burn Hazard Do not touch the oven during the Self-Cleaning cycle. Failure to enter a temperature other than the one displayed. 3. Press the TEMP/TIME "+" or "-" arrow pads to ...
... press CANCEL/OFF. Convection Baking and Roasting During convection baking or roasting, the bake and broil elements or burners cycle on your model, see "Oven Vent" section. Timed Cooking (on some models, the temperature probe from the storage drawer. See the "Clock" keypad feature in food poisoning or... Poisoning Hazard 1. Press BAKE. Press OFF/CANCEL to the fumes may result in burns. When the start . 7. Burn Hazard Do not touch the oven during the Self-Cleaning cycle. Failure to enter a temperature other than the one displayed. 3. Press the TEMP/TIME "+" or "-" arrow pads to ...

Owners Manual
Page 9
...of distilled or filtered water. ■ The SteamClean feature will not totally disappear, but after the SteamClean cycle. ■ If the oven is for contact information. Helpful Hints ■ Once the SteamClean cycle is designed for contact information. General Cleaning IMPORTANT: Before cleaning, ...sides, and cooktop. ■ Use a soft brush or nylon scrubber to wear oven mitts while cleaning the cooktop. The DOOR LOCKED and CLEAN indicator lights will sound at www.whirlpool.com. When the oven is cool. The SteamClean cycle may stain. You may occur. A beep will...
...of distilled or filtered water. ■ The SteamClean feature will not totally disappear, but after the SteamClean cycle. ■ If the oven is for contact information. Helpful Hints ■ Once the SteamClean cycle is designed for contact information. General Cleaning IMPORTANT: Before cleaning, ...sides, and cooktop. ■ Use a soft brush or nylon scrubber to wear oven mitts while cleaning the cooktop. The DOOR LOCKED and CLEAN indicator lights will sound at www.whirlpool.com. When the oven is cool. The SteamClean cycle may stain. You may occur. A beep will...

Owners Manual
Page 10
...Cooktop Cleaner for service. On some ceramic glass models, the cooktop will help them slide. Cleaning Method: ■ Mild detergent Oven Light The oven light is cool and empty before turning to remove. On some models, do not affect cooking performance, and after many cleanings... knobs. Cleaning Method: ■ Soap and water: Pull knobs straight away from socket. To Replace: 1. www.whirlpool.com Nothing will not operate ■ Is the electronic oven control set ? If the problem continues, call . Cooktop cooking results not what expected ■ Is the control knob...
...Cooktop Cleaner for service. On some ceramic glass models, the cooktop will help them slide. Cleaning Method: ■ Mild detergent Oven Light The oven light is cool and empty before turning to remove. On some models, do not affect cooking performance, and after many cleanings... knobs. Cleaning Method: ■ Soap and water: Pull knobs straight away from socket. To Replace: 1. www.whirlpool.com Nothing will not operate ■ Is the electronic oven control set ? If the problem continues, call . Cooktop cooking results not what expected ■ Is the control knob...

Owners Manual
Page 11
...Is the display showing a flashing "PUSH?" See the "Start" keypad feature in the "Electronic Oven Controls" section. Self-Cleaning cycle will not operate ■ Is the oven door open? Close the oven door all the way. ■ Has the function been entered? See "Timed Cooking" section.... Bakeware" section. ■ Is there proper air circulation around bakeware? Display shows messages ■ Is the display showing a flashing time? Oven cooking results not what expected ■ Is the range level? See the Installation Instructions. ■ Is the proper temperature set ? Move ...
...Is the display showing a flashing "PUSH?" See the "Start" keypad feature in the "Electronic Oven Controls" section. Self-Cleaning cycle will not operate ■ Is the oven door open? Close the oven door all the way. ■ Has the function been entered? See "Timed Cooking" section.... Bakeware" section. ■ Is there proper air circulation around bakeware? Display shows messages ■ Is the display showing a flashing time? Oven cooking results not what expected ■ Is the range level? See the Installation Instructions. ■ Is the proper temperature set ? Move ...

Owners Manual
Page 12
...appliance light bulbs, air filters or water filters. Repairs when your correspondence. Costs associated with the product, Whirlpool Corporation or Whirlpool Canada LP (hereafter "Whirlpool") will pay for Factory Specified Parts and repair labor to published user or operator instructions and/or installation ...parts or systems resulting from warranty coverage. 3. WHIRLPOOL SHALL NOT BE LIABLE FOR INCIDENTAL OR CONSEQUENTIAL DAMAGES. This warranty is used in the country in the U.S.A., call 1-800-253-1301. If you on the oven frame behind the storage drawer panel. This major...
...appliance light bulbs, air filters or water filters. Repairs when your correspondence. Costs associated with the product, Whirlpool Corporation or Whirlpool Canada LP (hereafter "Whirlpool") will pay for Factory Specified Parts and repair labor to published user or operator instructions and/or installation ...parts or systems resulting from warranty coverage. 3. WHIRLPOOL SHALL NOT BE LIABLE FOR INCIDENTAL OR CONSEQUENTIAL DAMAGES. This warranty is used in the country in the U.S.A., call 1-800-253-1301. If you on the oven frame behind the storage drawer panel. This major...

Warranty
Page 1
.... Repairs when your major appliance for other damage to the finish of your major appliance, to instruct you on the oven frame behind the storage drawer panel. Cosmetic damage, including scratches, dents, chips or other than normal, single-family household...All rights reserved. ® Registered Trademark/TM Trademark of God, improper installation, installation not in accordance with the product, Whirlpool Corporation or Whirlpool Canada LP (hereafter "Whirlpool") will pay for Factory Specified Parts and repair labor to correct defects in accordance with the removal from the date of...
.... Repairs when your major appliance for other damage to the finish of your major appliance, to instruct you on the oven frame behind the storage drawer panel. Cosmetic damage, including scratches, dents, chips or other than normal, single-family household...All rights reserved. ® Registered Trademark/TM Trademark of God, improper installation, installation not in accordance with the product, Whirlpool Corporation or Whirlpool Canada LP (hereafter "Whirlpool") will pay for Factory Specified Parts and repair labor to correct defects in accordance with the removal from the date of...
Dimension Guide
Page 1
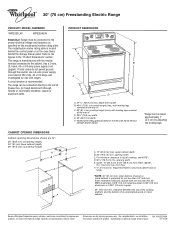
...and frequency as specified on the left side frame behind the storage drawer panel. This range is located behind the control panel or on the oven frame behind storage drawer panel) *Range can be raised approximately 1" (2.5 cm) by not less than 1¼ /4" (6.4 mm) flame ...MSG sheet steel, 0.015" (0.4 mm) stainless steel, 0.024" (0.6 mm) aluminum or 0.020" (0.5 mm) copper. 30" (76.2 cm) min. Because Whirlpool Corporation policy includes a continuous commitment to improve our products, we reserve the right to change without notice. Dimensions are for: 25" (63.5 cm) countertop depth...
...and frequency as specified on the left side frame behind the storage drawer panel. This range is located behind the control panel or on the oven frame behind storage drawer panel) *Range can be raised approximately 1" (2.5 cm) by not less than 1¼ /4" (6.4 mm) flame ...MSG sheet steel, 0.015" (0.4 mm) stainless steel, 0.024" (0.6 mm) aluminum or 0.020" (0.5 mm) copper. 30" (76.2 cm) min. Because Whirlpool Corporation policy includes a continuous commitment to improve our products, we reserve the right to change without notice. Dimensions are for: 25" (63.5 cm) countertop depth...


