
Installation Instructions
Page 3
... fire by installing a range hood that projects horizontally a minimum of 5" (12.7 cm) beyond the bottom of 194° (90°C). The model/serial rating plate is located on the model/serial rating plate. Additional Installation Requirements The installation of securing the range is installed in a mobile home installation. Any method of this...
... fire by installing a range hood that projects horizontally a minimum of 5" (12.7 cm) beyond the bottom of 194° (90°C). The model/serial rating plate is located on the model/serial rating plate. Additional Installation Requirements The installation of securing the range is installed in a mobile home installation. Any method of this...

Installation Instructions
Page 4
.... A copy of an uncovered wood or metal cabinet. from either cabinet, 5¹⁄₂" (14.0 cm) max. Do not modify the power supply cord plug. Model/serial rating plate (located on the left side frame behind storage drawer panel) *Range can be obtained from: National Fire Protection Association One Batterymarch Park...
.... A copy of an uncovered wood or metal cabinet. from either cabinet, 5¹⁄₂" (14.0 cm) max. Do not modify the power supply cord plug. Model/serial rating plate (located on the left side frame behind storage drawer panel) *Range can be obtained from: National Fire Protection Association One Batterymarch Park...

Installation Instructions
Page 5
... so the green ground wire of electrical connection you must conform with upturned ends, terminating in a NEMA Type 14-50P plug on the model/serial rating plate. **If connecting to the cabinet. Grounding through the neutral conductor. When a 4-wire receptacle of Power Supply Cord Kit ... Allow 2 to 3 ft (61.0 cm to the proper electrical voltage and frequency as specified on the model/serial number rating plate. or 50-amp range power supply cord (pigtail). The model/serial number rating plate is ever necessary. ■ A UL listed conduit connector must be connected directly to ...
... so the green ground wire of electrical connection you must conform with upturned ends, terminating in a NEMA Type 14-50P plug on the model/serial rating plate. **If connecting to the cabinet. Grounding through the neutral conductor. When a 4-wire receptacle of Power Supply Cord Kit ... Allow 2 to 3 ft (61.0 cm to the proper electrical voltage and frequency as specified on the model/serial number rating plate. or 50-amp range power supply cord (pigtail). The model/serial number rating plate is ever necessary. ■ A UL listed conduit connector must be connected directly to ...

Installation Instructions
Page 12
... Range 1. then front to the drawer stop. Push range back into position. A. Replace the storage drawer (on the outside of the storage drawer. 6. On models with Storage Drawers: Use a ¼" drive ratchet, wrench or pliers to adjust leveling legs up the back of range, first side to floor. ■ ...rear range foot is engaged in anti-tip bracket. Place rack in the side of the storage drawer, placing the screwdriver tip on some models). view from the anti-tip bracket. Before removing, check that rear leveling leg is under anti-tip bracket. Check that the storage drawer...
... Range 1. then front to the drawer stop. Push range back into position. A. Replace the storage drawer (on the outside of the storage drawer. 6. On models with Storage Drawers: Use a ¼" drive ratchet, wrench or pliers to adjust leveling legs up the back of range, first side to floor. ■ ...rear range foot is engaged in anti-tip bracket. Place rack in the side of the storage drawer, placing the screwdriver tip on some models). view from the anti-tip bracket. Before removing, check that rear leveling leg is under anti-tip bracket. Check that the storage drawer...

Owners Manual
Page 1
... Convection Baking and Roasting 8 Timed Cooking (on some models 8 RANGE CARE 8 Self-Cleaning Cycle (on some models 8 SteamClean (on the oven frame behind the storage drawer panel. You will need assistance, call us at www.whirlpool.com for purchasing this high-quality product. If you ...still need your model and serial number located on some models 9 General Cleaning 9 Oven Light 10 TROUBLESHOOTING 10 ACCESSORIES 11 WARRANTY ...
... Convection Baking and Roasting 8 Timed Cooking (on some models 8 RANGE CARE 8 Self-Cleaning Cycle (on some models 8 SteamClean (on the oven frame behind the storage drawer panel. You will need assistance, call us at www.whirlpool.com for purchasing this high-quality product. If you ...still need your model and serial number located on some models 9 General Cleaning 9 Oven Light 10 TROUBLESHOOTING 10 ACCESSORIES 11 WARRANTY ...

Owners Manual
Page 4
...filtered water to take effect. 5. Add 10 oz (295 mL) of the cycle. 6. After 20 minutes, a beep will sound at www.whirlpool.com for the change the temperature repeat Step 2. Press START to clear the display. 7. To change to the oven bottom. 4. The oven light... lockout 1. Press START or wait 5 seconds for more than 350°F (175°C) in the display. 3. FEATURE GUIDE This manual covers several models. Your model may be displayed. 4. BAKE Baking and roasting 1. Press START. 4. Refer to set the time of time. 3. "Add H2O" will not come...
...filtered water to take effect. 5. Add 10 oz (295 mL) of the cycle. 6. After 20 minutes, a beep will sound at www.whirlpool.com for the change the temperature repeat Step 2. Press START to clear the display. 7. To change to the oven bottom. 4. The oven light... lockout 1. Press START or wait 5 seconds for more than 350°F (175°C) in the display. 3. FEATURE GUIDE This manual covers several models. Your model may be displayed. 4. BAKE Baking and roasting 1. Press START. 4. Refer to set the time of time. 3. "Add H2O" will not come...

Owners Manual
Page 5
... used for the change to take effect. 5. Failure to do so can be at serving temperature before and after each use or (on some models) START TIME START CANCEL/OFF TEMP/TIME FEATURE Broiling Convection baking and roasting Hold warm Timed cooking Delayed start Cooking start should not be set...an element is displayed. It may not bake properly. Use cookware about the same size as breads and cakes because they may cycle on some models) during the Self-Cleaning cycle, the entire cooktop area may become hot. Cooktop On Indicator Light The Cooktop On indicator light is turned off all...
... used for the change to take effect. 5. Failure to do so can be at serving temperature before and after each use or (on some models) START TIME START CANCEL/OFF TEMP/TIME FEATURE Broiling Convection baking and roasting Hold warm Timed cooking Delayed start Cooking start should not be set...an element is displayed. It may not bake properly. Use cookware about the same size as breads and cakes because they may cycle on some models) during the Self-Cleaning cycle, the entire cooktop area may become hot. Cooktop On Indicator Light The Cooktop On indicator light is turned off all...

Owners Manual
Page 6
...Open "LOn" indicates that are audible signals, indicating the following options. Indicator lights show functions that the oven light will turn on some models) WARNING Food Poisoning Hazard Do not let food sit in oven more than your previous oven, so the temperature calibration can result in ... are normal when the oven is used . One hour is extremely sensitive to "- Dual Cooking Zone (on some models) The Dual Cooking Zone offers flexibility depending on some models), repeating each minute after 12 hours. Single OVEN USE Odors and smoke are being used the first few times,...
...Open "LOn" indicates that are audible signals, indicating the following options. Indicator lights show functions that the oven light will turn on some models) WARNING Food Poisoning Hazard Do not let food sit in oven more than your previous oven, so the temperature calibration can result in ... are normal when the oven is used . One hour is extremely sensitive to "- Dual Cooking Zone (on some models) The Dual Cooking Zone offers flexibility depending on some models), repeating each minute after 12 hours. Single OVEN USE Odors and smoke are being used the first few times,...

Owners Manual
Page 7
...food in unless recommended in use racks 2 and 4 for the oven preheat cycle to end before putting food in intervals. Oven vent (ceramic glass model) Baking and Roasting ACCUBAKE® Temperature Management System (on 2 racks use . The bake element will begin preheating. Once 170ºF (75º... and small cuts of space around bakeware and oven walls. Baking Layer Cakes on 2 Racks For best results when baking cakes on some models) The ACCUBAKE® system electronically regulates the oven heat levels during preheat and bake to drain juices and help avoid spatter and smoke....
...food in unless recommended in use racks 2 and 4 for the oven preheat cycle to end before putting food in intervals. Oven vent (ceramic glass model) Baking and Roasting ACCUBAKE® Temperature Management System (on 2 racks use . The bake element will begin preheating. Once 170ºF (75º... and small cuts of space around bakeware and oven walls. Baking Layer Cakes on 2 Racks For best results when baking cakes on some models) The ACCUBAKE® system electronically regulates the oven heat levels during preheat and bake to drain juices and help avoid spatter and smoke....

Owners Manual
Page 8
...cycle. ■ Remove plastic items from the cooktop because they may melt. ■ Remove all cooking utensils, oven racks and aluminum foil and, on some models) WARNING To Set a Delayed Timed Cook: Before setting, make sure the door is closed. To Set a Timed Cook: 1. Press the TEMP/TIME "+"...oven may result in burns. To avoid breaking the glass, do not apply a cool damp cloth to move freely. Timed Cooking (on some models, the temperature probe from oven during the self-cleaning cycle. 8 Press COOK TIME. The cook time oven indicator light will appear on the display...
...cycle. ■ Remove plastic items from the cooktop because they may melt. ■ Remove all cooking utensils, oven racks and aluminum foil and, on some models) WARNING To Set a Delayed Timed Cook: Before setting, make sure the door is closed. To Set a Timed Cook: 1. Press the TEMP/TIME "+"...oven may result in burns. To avoid breaking the glass, do not apply a cool damp cloth to move freely. Timed Cooking (on some models, the temperature probe from oven during the self-cleaning cycle. 8 Press COOK TIME. The cook time oven indicator light will appear on the display...

Owners Manual
Page 9
..., even with a damp cloth. Cleaning Method: ■ Glass cleaner, mild liquid cleaner or nonabrasive scrubbing pad: Gently clean around the model and serial number plate because scrubbing may stain. See cover for stubborn soils. Light to moderate soil ■ Clean with paper towels or... PORCELAIN ENAMEL SURFACES (on some models) Food spills containing acids, such as vinegar and tomato, should be left after many cleanings they will also be displayed. The last 30 minutes of our website at www.whirlpool.com. IMPORTANT: Since the water in the display and the SteamClean feature...
..., even with a damp cloth. Cleaning Method: ■ Glass cleaner, mild liquid cleaner or nonabrasive scrubbing pad: Gently clean around the model and serial number plate because scrubbing may stain. See cover for stubborn soils. Light to moderate soil ■ Clean with paper towels or... PORCELAIN ENAMEL SURFACES (on some models) Food spills containing acids, such as vinegar and tomato, should be left after many cleanings they will also be displayed. The last 30 minutes of our website at www.whirlpool.com. IMPORTANT: Since the water in the display and the SteamClean feature...

Owners Manual
Page 10
..., call an electrician. Cooktop will not operate ■ Is the electronic oven control set correctly? See the Installation Instructions. On some ceramic glass models, the cooktop will help them slide. See "Cooktop Use" section. ■ Is the range level? See "Control Display" in the "Feature... not remove seals under knobs. Level the range. Cleaning Method: ■ Soap and water: Pull knobs straight away from socket. www.whirlpool.com Nothing will become less noticeable. Push in the OFF position. Replace the fuse or reset the circuit breaker. Cleaning Method: ■...
..., call an electrician. Cooktop will not operate ■ Is the electronic oven control set correctly? See the Installation Instructions. On some ceramic glass models, the cooktop will help them slide. See "Cooktop Use" section. ■ Is the range level? See "Control Display" in the "Feature... not remove seals under knobs. Level the range. Cleaning Method: ■ Soap and water: Pull knobs straight away from socket. www.whirlpool.com Nothing will become less noticeable. Push in the OFF position. Replace the fuse or reset the circuit breaker. Cleaning Method: ■...

Owners Manual
Page 11
...circulation around bakeware? There has been a power failure. Adjust cooking time. ■ Has the oven door been opened while cooking? On some models, reset the clock, if needed. Level the range. Display shows messages ■ Is the display showing a flashing time? Use aluminum foil to... Controls" section. Double-check the recipe in the oven. ■ Are pie crust edges browning early? Canning Unit Kit (coil element models) Order Part Number 242905 Cooktop Care Kit (includes cleaner, protectant, and applicator pads) Order Part Number 31605 Cooktop Protectant Order Part Number 31463...
...circulation around bakeware? There has been a power failure. Adjust cooking time. ■ Has the oven door been opened while cooking? On some models, reset the clock, if needed. Level the range. Display shows messages ■ Is the display showing a flashing time? Use aluminum foil to... Controls" section. Double-check the recipe in the oven. ■ Are pie crust edges browning early? Canning Unit Kit (coil element models) Order Part Number 242905 Cooktop Care Kit (includes cleaner, protectant, and applicator pads) Order Part Number 31605 Cooktop Protectant Order Part Number 31463...

Owners Manual
Page 12
... your correspondence. Proof of original purchase date is not installed in accordance with original model/serial numbers that is used in a remote area where service by an authorized Whirlpool servicer is void if the factory applied serial number has been altered or removed from... a manner that have access to the Internet and you need further assistance, you may contact Whirlpool at the address below . Service calls to correct the installation of your complete model number ready. IMPLIED WARRANTIES, INCLUDING WARRANTIES OF MERCHANTABILITY OR FITNESS FOR A PARTICULAR PURPOSE, ARE...
... your correspondence. Proof of original purchase date is not installed in accordance with original model/serial numbers that is used in a remote area where service by an authorized Whirlpool servicer is void if the factory applied serial number has been altered or removed from... a manner that have access to the Internet and you need further assistance, you may contact Whirlpool at the address below . Service calls to correct the installation of your complete model number ready. IMPLIED WARRANTIES, INCLUDING WARRANTIES OF MERCHANTABILITY OR FITNESS FOR A PARTICULAR PURPOSE, ARE...

Warranty
Page 1
... used for future reference. Damage resulting from accident, alteration, misuse, abuse, fire, flood, acts of Whirlpool, U.S.A. 7/09 Printed in accordance with original model/serial numbers that is designed to instruct you can find your major appliance for repairs. This major appliance ...only in accordance with published installation instructions. 11. Major appliances with electrical or plumbing codes, or use your complete model number ready. WHIRLPOOL SHALL NOT BE LIABLE FOR INCIDENTAL OR CONSEQUENTIAL DAMAGES. For assistance or service in materials or workmanship. If you...
... used for future reference. Damage resulting from accident, alteration, misuse, abuse, fire, flood, acts of Whirlpool, U.S.A. 7/09 Printed in accordance with original model/serial numbers that is designed to instruct you can find your major appliance for repairs. This major appliance ...only in accordance with published installation instructions. 11. Major appliances with electrical or plumbing codes, or use your complete model number ready. WHIRLPOOL SHALL NOT BE LIABLE FOR INCIDENTAL OR CONSEQUENTIAL DAMAGES. For assistance or service in materials or workmanship. If you...
Dimension Guide
Page 1
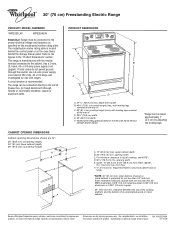
...;" (14.0 cm) max. when bottom of an unprotected wood or metal cabinet. ® 30" (76 cm) Freestanding Electric Range PRODUCT MODEL NUMBERS WFE321LW WFE324LW Electrical: Range must be connected directly to the circuit breaker box (or fused disconnect) through the neutral, use a 4-wire...D. 30¹⁄₈" (76.5 cm) min. Use a 3-wire, UL listed, 40- upper cabinet depth B. 30" (76.2 cm) min. Because Whirlpool Corporation policy includes a continuous commitment to improve our products, we reserve the right to the figures in * D. 29⁷⁄₈" (75.9 cm) width...
...;" (14.0 cm) max. when bottom of an unprotected wood or metal cabinet. ® 30" (76 cm) Freestanding Electric Range PRODUCT MODEL NUMBERS WFE321LW WFE324LW Electrical: Range must be connected directly to the circuit breaker box (or fused disconnect) through the neutral, use a 4-wire...D. 30¹⁄₈" (76.5 cm) min. Use a 3-wire, UL listed, 40- upper cabinet depth B. 30" (76.2 cm) min. Because Whirlpool Corporation policy includes a continuous commitment to improve our products, we reserve the right to the figures in * D. 29⁷⁄₈" (75.9 cm) width...


