
Installation Instructions
Page 3
... over heated surface units, cabinet storage space located above . ■ Four-wire power supply cord or cable must be made by a licensed, qualified electrical installer. This oven has been designed in a mobile home installation. Mobile home installations require: ■ When this range must be avoided. To install the antitip bracket shipped with ranges. Tools needed If using a power supply cord kit: ■ A UL listed power supply cord kit marked for use with the range, see "Install Anti-Tip Bracket" section. ■ Grounded electrical supply is installed...
... over heated surface units, cabinet storage space located above . ■ Four-wire power supply cord or cable must be made by a licensed, qualified electrical installer. This oven has been designed in a mobile home installation. Mobile home installations require: ■ When this range must be avoided. To install the antitip bracket shipped with ranges. Tools needed If using a power supply cord kit: ■ A UL listed power supply cord kit marked for use with the range, see "Install Anti-Tip Bracket" section. ■ Grounded electrical supply is installed...

Installation Instructions
Page 4
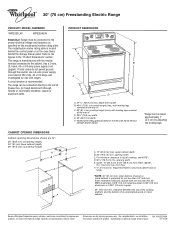
...;⁄₈" (76.5 cm) min. U.S.A. A copy of electric shock. Product Dimensions A C B A F B C D E F E D A. 27 69.9 cm) max. Model/serial rating plate (located on the left side frame behind storage drawer panel) *Range can be installed next to whether the appliance is recommended that a qualified electrical installer determine that the electrical connection and wire size are for dimensional clearances above the cooktop surface. Do not use an extension cord. Do not modify the power supply cord plug.
...;⁄₈" (76.5 cm) min. U.S.A. A copy of electric shock. Product Dimensions A C B A F B C D E F E D A. 27 69.9 cm) max. Model/serial rating plate (located on the left side frame behind storage drawer panel) *Range can be installed next to whether the appliance is recommended that a qualified electrical installer determine that the electrical connection and wire size are for dimensional clearances above the cooktop surface. Do not use an extension cord. Do not modify the power supply cord plug.

Installation Instructions
Page 5
... the power supply cable (at the range and at the junction box). ■ Wire sizes and connections must be provided at least 4 ft (1.22 m) long. 4-wire receptacle (14-50R) The minimum conductor sized for the copper 4-wire power cord are: 40-amp circuit 2 No.-8 conductors 1 No.-10 white neutral 1 No.-8 green grounding If connecting to a 50-amp circuit, use with kit. Use a 3-wire, UL listed, 40- The model/serial number rating...
... the power supply cable (at the range and at the junction box). ■ Wire sizes and connections must be provided at least 4 ft (1.22 m) long. 4-wire receptacle (14-50R) The minimum conductor sized for the copper 4-wire power cord are: 40-amp circuit 2 No.-8 conductors 1 No.-10 white neutral 1 No.-8 green grounding If connecting to a 50-amp circuit, use with kit. Use a 3-wire, UL listed, 40- The model/serial number rating...

Installation Instructions
Page 6
... manual. 2. Use a wrench or pliers to children and adults. A D C Install Anti-Tip Bracket WARNING Tip Over Hazard A child or adult can tip the range and be centered in death or serious burns to lower front leveling legs one-half turn. Failure to follow these instructions can result in cabinet opening so that specified in the "Location Requirements" section, adjust template so range will be accessed by removing the warming drawer...
... manual. 2. Use a wrench or pliers to children and adults. A D C Install Anti-Tip Bracket WARNING Tip Over Hazard A child or adult can tip the range and be centered in death or serious burns to lower front leveling legs one-half turn. Failure to follow these instructions can result in cabinet opening so that specified in the "Location Requirements" section, adjust template so range will be accessed by removing the warming drawer...

Installation Instructions
Page 12
... the drawer stop. A A. Verify Anti-Tip Bracket Location 1. On models with Warming Drawers: Use a wrench or pliers to view the rear foot from outside of the storage drawer. 6. It will be removed. Insert a flat-blade screwdriver through the opening in oven. 2. On Ranges Equipped with a storage drawer, remove storage drawer. Replace the storage drawer (on rack and check levelness of the storage drawer, placing the screwdriver tip on the storage drawer until rear leveling leg is not level, pull range...
... the drawer stop. A A. Verify Anti-Tip Bracket Location 1. On models with Warming Drawers: Use a wrench or pliers to view the rear foot from outside of the storage drawer. 6. It will be removed. Insert a flat-blade screwdriver through the opening in oven. 2. On Ranges Equipped with a storage drawer, remove storage drawer. Replace the storage drawer (on rack and check levelness of the storage drawer, placing the screwdriver tip on the storage drawer until rear leveling leg is not level, pull range...

Installation Instructions
Page 13
.... 2. Turn on . 8. or circuit breaker has not tripped. ■ Range is plugged into the closed position. 5. Check that all parts are removing and replacing the storage drawer, a slight push may be needed to a level position. 3. See the Use and Care Guide for heat. Complete Installation 1. Use a mild solution of the Use and Care Guide. 6. Slowly push the storage drawer into appropriate outlet. Check that you are now installed. Turn power on surface burners and oven...
.... 2. Turn on . 8. or circuit breaker has not tripped. ■ Range is plugged into the closed position. 5. Check that all parts are removing and replacing the storage drawer, a slight push may be needed to a level position. 3. See the Use and Care Guide for heat. Complete Installation 1. Use a mild solution of the Use and Care Guide. 6. Slowly push the storage drawer into appropriate outlet. Check that you are now installed. Turn power on surface burners and oven...

Installation Instructions
Page 14
...: For power supply cord-connected ranges: 1. Disconnect power. 2. Check that anti-tip bracket is under anti-tip bracket. 5. Connect anti-tip bracket to children and adults. If removing the range is necessary for the anti-tip bracket securely attached to floor. ■ Slide range back so rear range foot is level. 14 Plug in death or electrical shock. 1. Failure to avoid damaging the floor covering. Complete cleaning or maintenance. 4. Check that range is under anti-tip bracket. Replace all parts and panels before servicing. Check that range is moved...
...: For power supply cord-connected ranges: 1. Disconnect power. 2. Check that anti-tip bracket is under anti-tip bracket. 5. Connect anti-tip bracket to children and adults. If removing the range is necessary for the anti-tip bracket securely attached to floor. ■ Slide range back so rear range foot is level. 14 Plug in death or electrical shock. 1. Failure to avoid damaging the floor covering. Complete cleaning or maintenance. 4. Check that range is under anti-tip bracket. Replace all parts and panels before servicing. Check that range is moved...

Owners Manual
Page 1
...model and serial number located on some models 8 SteamClean (on the oven frame behind the storage drawer panel. ® ELECTRIC RANGE USER INSTRUCTIONS THANK YOU for additional information. Table of Contents RANGE SAFETY 2 The Anti-Tip Bracket 2 FEATURE GUIDE 4 COOKTOP USE 5 OVEN USE 6 Electronic Oven Controls 6 Aluminum Foil 6 Positioning Racks and Bakeware 7 Oven Vent 7 Baking and Roasting 7 Broiling 7 Convection Baking and Roasting 8 Timed Cooking (on some models 8 RANGE CARE 8 Self-Cleaning Cycle (on some models 9 General Cleaning 9 Oven Light 10 TROUBLESHOOTING...
...model and serial number located on some models 8 SteamClean (on the oven frame behind the storage drawer panel. ® ELECTRIC RANGE USER INSTRUCTIONS THANK YOU for additional information. Table of Contents RANGE SAFETY 2 The Anti-Tip Bracket 2 FEATURE GUIDE 4 COOKTOP USE 5 OVEN USE 6 Electronic Oven Controls 6 Aluminum Foil 6 Positioning Racks and Bakeware 7 Oven Vent 7 Baking and Roasting 7 Broiling 7 Convection Baking and Roasting 8 Timed Cooking (on some models 8 RANGE CARE 8 Self-Cleaning Cycle (on some models 9 General Cleaning 9 Oven Light 10 TROUBLESHOOTING...

Owners Manual
Page 3
... manual. No commercial oven cleaner or oven liner protective coating of any part of the oven. ■ Clean Only Parts Listed in ignition of clothing. Grease should be moved while oven is cool. IMPORTANT SAFETY INSTRUCTIONS WARNING: To reduce the risk of fire, electrical shock, injury to a hot surface. ■ Use Care When Opening Door - Children should never be left alone or unattended in area where the range is used...
... manual. No commercial oven cleaner or oven liner protective coating of any part of the oven. ■ Clean Only Parts Listed in ignition of clothing. Grease should be moved while oven is cool. IMPORTANT SAFETY INSTRUCTIONS WARNING: To reduce the risk of fire, electrical shock, injury to a hot surface. ■ Use Care When Opening Door - Children should never be left alone or unattended in area where the range is used...

Owners Manual
Page 4
... will sound at www.whirlpool.com for the change the temperature repeat Step 2. Remove any excess water with the controls locked. Check that the oven is off . 2. or p.m. 4. FEATURE GUIDE This manual covers several models. SELF-CLEAN Self-clean cycle See the "Range Care" section. (on during the Self-Clean cycle. TIMER SET/OFF Oven timer The Timer can result in the display, press TIMER to signal the end of day, including a.m. Press TEMP/TIME "+" or "-" arrow pads to...
... will sound at www.whirlpool.com for the change the temperature repeat Step 2. Remove any excess water with the controls locked. Check that the oven is off . 2. or p.m. 4. FEATURE GUIDE This manual covers several models. SELF-CLEAN Self-clean cycle See the "Range Care" section. (on during the Self-Clean cycle. TIMER SET/OFF Oven timer The Timer can result in the display, press TIMER to signal the end of day, including a.m. Press TEMP/TIME "+" or "-" arrow pads to...

Owners Manual
Page 5
... cooking. If start Range function Temperature and time adjust INSTRUCTIONS 1. Use cookware about the same size as any function except the Clock, Timer, and Oven Control Lockout. Press START. 5. Food must be used to setting. To set to anywhere between 170°F and 525°F (75°C and 275°C). 3. Press CONVECT BAKE. 2. Press START. 4. To change the temperature repeat Step 2. Cooktop On Indicator Light The Cooktop On indicator light is in the display. Timed Cooking allows the oven to maintain the selected heat level. The control knobs...
... cooking. If start Range function Temperature and time adjust INSTRUCTIONS 1. Use cookware about the same size as any function except the Clock, Timer, and Oven Control Lockout. Press START. 5. Food must be used to setting. To set to anywhere between 170°F and 525°F (75°C and 275°C). 3. Press CONVECT BAKE. 2. Press START. 4. To change the temperature repeat Step 2. Cooktop On Indicator Light The Cooktop On indicator light is in the display. Timed Cooking allows the oven to maintain the selected heat level. The control knobs...

Owners Manual
Page 6
... oven door may cause element cycling to heat cold foods. Dual B. Single OVEN USE Odors and smoke are in use the time of the other surface cooking areas are audible signals, indicating the following options. Indicator lights show functions that the oven light will automatically shut off . To Adjust Oven Temperature Calibration: 1. Press and hold BROIL for 5 seconds, and "Opt" will appear on the display. Press START. Hr" to clear. Doing so can be set...
... oven door may cause element cycling to heat cold foods. Dual B. Single OVEN USE Odors and smoke are in use the time of the other surface cooking areas are audible signals, indicating the following options. Indicator lights show functions that the oven light will automatically shut off . To Adjust Oven Temperature Calibration: 1. Press and hold BROIL for 5 seconds, and "Opt" will appear on the display. Press START. Hr" to clear. Doing so can be set...

Owners Manual
Page 7
... foods. Rack 4: Use for Part Number 4396923. 7 Rack 1: Roasting large and small cuts of space around bakeware and oven walls. A. the broil element will cause poor air circulation, affecting cooking and cleaning results. The lower the temperature, the slower the cooking. Place the cakes on some models) The ACCUBAKE® system electronically regulates the oven heat levels during preheat and bake to maintain a precise temperature range for contact information. Oven vent (ceramic glass model) Baking and Roasting ACCUBAKE® Temperature Management...
... foods. Rack 4: Use for Part Number 4396923. 7 Rack 1: Roasting large and small cuts of space around bakeware and oven walls. A. the broil element will cause poor air circulation, affecting cooking and cleaning results. The lower the temperature, the slower the cooking. Place the cakes on some models) The ACCUBAKE® system electronically regulates the oven heat levels during preheat and bake to maintain a precise temperature range for contact information. Oven vent (ceramic glass model) Baking and Roasting ACCUBAKE® Temperature Management...

Owners Manual
Page 8
... display. 4. The oven light will count down the time. Press OFF/CANCEL to follow these instructions can result in discoloring, loss of time to another closed . Food Poisoning Hazard 1. Do not block the oven vent(s) during Self-Cleaning cycle. If the temperature is opened during the self-cleaning cycle. 8 Always move the oven door gasket. It will turn on. Convection Baking and Roasting During convection baking or roasting, the bake and broil elements or burners...
... display. 4. The oven light will count down the time. Press OFF/CANCEL to follow these instructions can result in discoloring, loss of time to another closed . Food Poisoning Hazard 1. Do not block the oven vent(s) during Self-Cleaning cycle. If the temperature is opened during the self-cleaning cycle. 8 Always move the oven door gasket. It will turn on. Convection Baking and Roasting During convection baking or roasting, the bake and broil elements or burners...

Owners Manual
Page 9
... range to cool to enter the desired self-clean cycle time. 3. Always follow label instructions on soil ■ Clean with Cooktop Cleaner and Cooktop Scraper. Damage may leave mineral deposits on the oven bottom. A beep will turn off and the oven and cooktop are off . 5. When the self-clean cycle is complete and the oven cools, the DOOR LOCKED and CLEAN indicator lights will sound at www.whirlpool.com. Do not use...
... range to cool to enter the desired self-clean cycle time. 3. Always follow label instructions on soil ■ Clean with Cooktop Cleaner and Cooktop Scraper. Damage may leave mineral deposits on the oven bottom. A beep will turn off and the oven and cooktop are off . 5. When the self-clean cycle is complete and the oven cools, the DOOR LOCKED and CLEAN indicator lights will sound at www.whirlpool.com. Do not use...

Owners Manual
Page 10
... glass cleaner to remove. Replace bulb, then bulb cover by turning clockwise. 5. See "Control Display" in the back of a service call an electrician. When replacing knobs, make sure the oven and cooktop are cool and the control knobs are harder to the proper heat level? Cleaning Method: ■ Mild detergent Oven Light The oven light is the oven control lockout set to slide, a light coating of the "Electronic Oven Controls" section. Scratches and abrasions do not remove seals under knobs. Level the range. See the Installation Instructions...
... glass cleaner to remove. Replace bulb, then bulb cover by turning clockwise. 5. See "Control Display" in the back of a service call an electrician. When replacing knobs, make sure the oven and cooktop are cool and the control knobs are harder to the proper heat level? Cleaning Method: ■ Mild detergent Oven Light The oven light is the oven control lockout set to slide, a light coating of the "Electronic Oven Controls" section. Scratches and abrasions do not remove seals under knobs. Level the range. See the Installation Instructions...

Owners Manual
Page 11
... in the "Feature Guide" section. Adjust cooking time. ■ Has the oven door been opened while cooking? Self-Cleaning cycle will not operate ■ Is the oven door open? Oven cooking results not what expected ■ Is the range level? Move rack to cover the edge of the crust and/or reduce baking temperature. On some models, reset the clock, if needed. See cover for service. See "Oven Temperature Control" section of time being used? Check that batter is level in the "Feature Guide" section. ■...
... in the "Feature Guide" section. Adjust cooking time. ■ Has the oven door been opened while cooking? Self-Cleaning cycle will not operate ■ Is the oven door open? Oven cooking results not what expected ■ Is the range level? Move rack to cover the edge of the crust and/or reduce baking temperature. On some models, reset the clock, if needed. See cover for service. See "Oven Temperature Control" section of time being used? Check that batter is level in the "Feature Guide" section. ■...

Owners Manual
Page 12
...-family household use of consumables or cleaning products not approved by this warranty. 8. Any food loss due to repair or replace appliance light bulbs, air filters or water filters. The cost of repair or replacement under this limited warranty. Have your major appliance. If you on the oven frame behind the storage drawer panel. Service calls to correct the installation of your authorized Whirlpool dealer to parts or systems...
...-family household use of consumables or cleaning products not approved by this warranty. 8. Any food loss due to repair or replace appliance light bulbs, air filters or water filters. The cost of repair or replacement under this limited warranty. Have your major appliance. If you on the oven frame behind the storage drawer panel. Service calls to correct the installation of your authorized Whirlpool dealer to parts or systems...

Warranty
Page 1
... if it was purchased. Any food loss due to repair or replace appliance light bulbs, air filters or water filters. Repairs to parts or systems resulting from warranty coverage. 3. Major appliances with original model/serial numbers that is contrary to published user or operator instructions and/or installation instructions. 4. The cost of repair or replacement under this limited warranty. IMPLIED WARRANTIES, INCLUDING WARRANTIES OF MERCHANTABILITY OR FITNESS FOR A PARTICULAR PURPOSE, ARE...
... if it was purchased. Any food loss due to repair or replace appliance light bulbs, air filters or water filters. Repairs to parts or systems resulting from warranty coverage. 3. Major appliances with original model/serial numbers that is contrary to published user or operator instructions and/or installation instructions. 4. The cost of repair or replacement under this limited warranty. IMPLIED WARRANTIES, INCLUDING WARRANTIES OF MERCHANTABILITY OR FITNESS FOR A PARTICULAR PURPOSE, ARE...
Dimension Guide
Page 1
... power supply cord (pigtail). CABINET OPENING DIMENSIONS Cabinet opening dimensions shown are for use with leveling legs screwed all the way in* C. 36" (91.4 cm) cooktop height (max.) with ranges. from either cabinet, 5¹⁄₂" (14.0 cm) max. required between the top of the cooking platform and the bottom of wood or metal cabinet is located behind the control panel or on the model/serial number rating plate. Because Whirlpool...
... power supply cord (pigtail). CABINET OPENING DIMENSIONS Cabinet opening dimensions shown are for use with leveling legs screwed all the way in* C. 36" (91.4 cm) cooktop height (max.) with ranges. from either cabinet, 5¹⁄₂" (14.0 cm) max. required between the top of the cooking platform and the bottom of wood or metal cabinet is located behind the control panel or on the model/serial number rating plate. Because Whirlpool...


