Use and Care Manual
Page 2
... you to reduce the chance of others . All safety messages will tell you and others are not followed. TABLEOFCONTENTS DRYER SAFETY 2 INSTALLATION INSTRUCTIONS 3 Tools and Parts 3 Optional Pedestal 4 Location Requirements 4 Electrical Requirements 6 Electrical Connection 8 Venting Requirements 13 Plan Vent System 14 Install Vent System 15 Install Leveling Legs 15 Connect Vent 15 Level...
... you to reduce the chance of others . All safety messages will tell you and others are not followed. TABLEOFCONTENTS DRYER SAFETY 2 INSTALLATION INSTRUCTIONS 3 Tools and Parts 3 Optional Pedestal 4 Location Requirements 4 Electrical Requirements 6 Electrical Connection 8 Venting Requirements 13 Plan Vent System 14 Install Vent System 15 Install Leveling Legs 15 Connect Vent 15 Level...
Use and Care Manual
Page 3
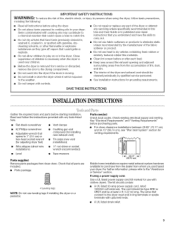
...the accumulation of lint, dust, and dirt. • The interior of the dryer and exhaust vent should be at least 4 ft (1.22 m) long. Check existing electrical supply and venting. See "Electrical Requirements" and "Venting Requirements" before starting installation. I_-- The kit should be... Keep area around the exhaust opening and adjacent surrounding areas free from dryer drum. IMPORTANT SAFETY INSTRUCTIONS WARNING: To reduce the risk of fire, electric shock, or injury to persons when using the dryer, follow the instructions provided with upturned ends. • A UL listed...
...the accumulation of lint, dust, and dirt. • The interior of the dryer and exhaust vent should be at least 4 ft (1.22 m) long. Check existing electrical supply and venting. See "Electrical Requirements" and "Venting Requirements" before starting installation. I_-- The kit should be... Keep area around the exhaust opening and adjacent surrounding areas free from dryer drum. IMPORTANT SAFETY INSTRUCTIONS WARNING: To reduce the risk of fire, electric shock, or injury to persons when using the dryer, follow the instructions provided with upturned ends. • A UL listed...
Use and Care Manual
Page 4
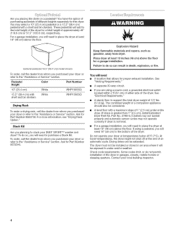
... you will need to the "Assistance or Service" section. Place dryer at temperatures below 45°F (7°C). See "Electrical Requirements." • A sturdy floor to water and/or weather. The combined weight of 1" (2.5 cm) under entire dryer. (If slope is greater than 1" [2.5 cm], install Extended Dryer Feet Kit, Part No. 279810.) Clothes may not tumble...
... you will need to the "Assistance or Service" section. Place dryer at temperatures below 45°F (7°C). See "Electrical Requirements." • A sturdy floor to water and/or weather. The combined weight of 1" (2.5 cm) under entire dryer. (If slope is greater than 1" [2.5 cm], install Extended Dryer Feet Kit, Part No. 279810.) Clothes may not tumble...

Use and Care Manual
Page 5
... for recessed area or closet installation The following reasons: • Additional spacing should also be considered. closet or confined area B. Dryer on all sides of 0" (0 cm) clearance on the sides and rear. closet or confined area *Required spacing **For side or...Required spacing **For side or bottom venting, 0" (0 cm) spacing is allowed. 1"* _ (2.5 crn) *Required spacing _'_27"--•-)_ (68 6 crn) _:-- 1"* (2.5 crn) Dryer only i'"1"1--'2'"*'°m' -,ilI I1 1I1I 36"rein (310 c,i,,: 24 in . 2. 36" (91,4 cm) ! ! 27" (68.6 cm) *Most installations require a minimum 5"...
... for recessed area or closet installation The following reasons: • Additional spacing should also be considered. closet or confined area B. Dryer on all sides of 0" (0 cm) clearance on the sides and rear. closet or confined area *Required spacing **For side or...Required spacing **For side or bottom venting, 0" (0 cm) spacing is allowed. 1"* _ (2.5 crn) *Required spacing _'_27"--•-)_ (68 6 crn) _:-- 1"* (2.5 crn) Dryer only i'"1"1--'2'"*'°m' -,ilI I1 1I1I 36"rein (310 c,i,,: 24 in . 2. 36" (91,4 cm) ! ! 27" (68.6 cm) *Most installations require a minimum 5"...

Use and Care Manual
Page 6
... above code standards can be obtained from your responsibility • To contact a qualified electrical installer. • To be at least twice as large as the dryer exhaust opening. Recommended installation spacing for cabinet installation For cabinet installation, with the National Electrical Code, ANSI/NFPA 70-latest edition and all mobile home installations. A time...
... above code standards can be obtained from your responsibility • To contact a qualified electrical installer. • To be at least twice as large as the dryer exhaust opening. Recommended installation spacing for cabinet installation For cabinet installation, with the National Electrical Code, ANSI/NFPA 70-latest edition and all mobile home installations. A time...

Use and Care Manual
Page 7
...[] For a grounded, cord-connected dryer: This dryer must be either green or bare. This dryer uses a cord having an equipment-grounding conductor and a grounding plug. Electrical Connection To properly install your dryer, you must determine the type of electrical connection you are in doubt as ...your outlet looks like this : 3-wire receptacle (10-30t:?) Then choose a 3-wire power supply cord with clothes dryers. WARNING: Improper connection of electric shock. The neutral conductor must be used when the appliance is installed in a location where grounding through the neutral ...
...[] For a grounded, cord-connected dryer: This dryer must be either green or bare. This dryer uses a cord having an equipment-grounding conductor and a grounding plug. Electrical Connection To properly install your dryer, you must determine the type of electrical connection you are in doubt as ...your outlet looks like this : 3-wire receptacle (10-30t:?) Then choose a 3-wire power supply cord with clothes dryers. WARNING: Improper connection of electric shock. The neutral conductor must be used when the appliance is installed in a location where grounding through the neutral ...

Use and Care Manual
Page 8
...cord through the strain relief. A. Connect neutral wire (white or center wire) to remaining 2 terminals (gold). Disconnect power before making electrical connections. Ground wire (green or bare wire) must be connected to green ground connector. Neutral ground wire B. Clamp section D. The ...strain relief should have a tight fit with the dryer cabinet and be connected to green ground connector. Disconnect power. 2. Fire Hazard Use 10 gauge solid copper wire. Connect remaining 2...
...cord through the strain relief. A. Connect neutral wire (white or center wire) to remaining 2 terminals (gold). Disconnect power before making electrical connections. Ground wire (green or bare wire) must be connected to green ground connector. Neutral ground wire B. Clamp section D. The ...strain relief should have a tight fit with the dryer cabinet and be connected to green ground connector. Disconnect power. 2. Fire Hazard Use 10 gauge solid copper wire. Connect remaining 2...

Use and Care Manual
Page 9
... should have a tight fit with upturned ends F. 3A,,(1.9 cm) UL Iisted strain relief G. Neutral prong E. Put the threaded section of electrical connection: 4-wire (recommended) 3-wire (if 4-wire is required for your home has: And you will be in a horizontal position. Removable... conduit connector B. Hole below the terminal block opening. Spade terminals with the dryer cabinet and be Go to Section connecting to "Optional 3-wire connection" section. 4-wire connection: Power supply cord IMPORTANT: A 4-wire connection ...
... should have a tight fit with upturned ends F. 3A,,(1.9 cm) UL Iisted strain relief G. Neutral prong E. Put the threaded section of electrical connection: 4-wire (recommended) 3-wire (if 4-wire is required for your home has: And you will be in a horizontal position. Removable... conduit connector B. Hole below the terminal block opening. Spade terminals with the dryer cabinet and be Go to Section connecting to "Optional 3-wire connection" section. 4-wire connection: Power supply cord IMPORTANT: A 4-wire connection ...

Use and Care Manual
Page 10
...the use of wires into slot of power supply cord under center, silver-colored terminal block screw. Direct wire cable must have completed your electrical connection. Cut 11/2'' (3.8 cm) from external ground conductor screw. Shape ends of 3-wire connections. Ground wire (green or bare) of... cord C. ,_" (1.9 cm) UL listed strain relief D. Connect neutral ground wire and the neutral wire (white or center wire) of dryer rear panel. Squeeze hooked ends together. Dotted line shows position of NEUTRAL ground wire before being moved to center silver-colored terminal block screw...
...the use of wires into slot of power supply cord under center, silver-colored terminal block screw. Direct wire cable must have completed your electrical connection. Cut 11/2'' (3.8 cm) from external ground conductor screw. Shape ends of 3-wire connections. Ground wire (green or bare) of... cord C. ,_" (1.9 cm) UL listed strain relief D. Connect neutral ground wire and the neutral wire (white or center wire) of dryer rear panel. Squeeze hooked ends together. Dotted line shows position of NEUTRAL ground wire before being moved to center silver-colored terminal block screw...

Use and Care Manual
Page 11
...F A. 3-wire receptacle (NEMA type 10-30R) B. 3-wire plug C. Loosen or remove center silver-colored terminal block screw. 4. You have completed your electrical connection. Shape ends of power supply cable C. 3/4"(1.9 cm) UL listed strain relief D. Neutral ground wire E Neutral wire (white or center wire) 4. ...Tighten screws. !I !! A. Strip 31/2'' (8.9 cm) of outer covering from end of dryer rear panel. Connect ground wire (green or bare) of power supply cord to neutral wire. Tighten screw. Connect the other direct wire cable...
...F A. 3-wire receptacle (NEMA type 10-30R) B. 3-wire plug C. Loosen or remove center silver-colored terminal block screw. 4. You have completed your electrical connection. Shape ends of power supply cable C. 3/4"(1.9 cm) UL listed strain relief D. Neutral ground wire E Neutral wire (white or center wire) 4. ...Tighten screws. !I !! A. Strip 31/2'' (8.9 cm) of outer covering from end of dryer rear panel. Connect ground wire (green or bare) of power supply cord to neutral wire. Tighten screw. Connect the other direct wire cable...

Use and Care Manual
Page 12
... ground conductor screw B. Neutral ground wire C. Center silver-colored terminal block screw D. Insert tab of terminal block cover into slot of dryer rear panel. Now go to neutral wire. 1. Tighten strain relief screws. 5. Secure cover with hold -down screw. 6. Tighten screws...!! External ground conductor screw B. Tighten strain relief screw. 5. Squeeze hooked ends together. Tighten screws. !! !! 4. You have completed your electrical connection. Neutral wire (white or center wire) EL_" (1.9 cm) UL Iisted strain relief 3= Place the hooked ends of the other wires...
... ground conductor screw B. Neutral ground wire C. Center silver-colored terminal block screw D. Insert tab of terminal block cover into slot of dryer rear panel. Now go to neutral wire. 1. Tighten strain relief screws. 5. Secure cover with hold -down screw. 6. Tighten screws...!! External ground conductor screw B. Tighten strain relief screw. 5. Squeeze hooked ends together. Tighten screws. !! !! 4. You have completed your electrical connection. Neutral wire (white or center wire) EL_" (1.9 cm) UL Iisted strain relief 3= Place the hooked ends of the other wires...
Use and Care Manual
Page 13
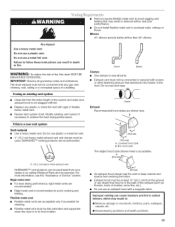
...or fire. DURASAFF Mventing products are acceptable only if accessible for cleaning. • Flexible metal vent must be fully extended and supported when the dryer is recommended to woodwork, furniture, paint, wallpaper, carpets, etc. [] Housecleaning problems and health problems. 13 Do not use plastic or metal foil... and insects from entering the home. • Exhaust hood must be at least 12" (30.5 cm) from your dealer or by calling Whirlpool Parts and Accessories. Louvered hood style B. Box hood style The angled hood style (shown here) is a new vent system Vent material •...
...or fire. DURASAFF Mventing products are acceptable only if accessible for cleaning. • Flexible metal vent must be fully extended and supported when the dryer is recommended to woodwork, furniture, paint, wallpaper, carpets, etc. [] Housecleaning problems and health problems. 13 Do not use plastic or metal foil... and insects from entering the home. • Exhaust hood must be at least 12" (30.5 cm) from your dealer or by calling Whirlpool Parts and Accessories. Louvered hood style B. Box hood style The angled hood style (shown here) is a new vent system Vent material •...
Use and Care Manual
Page 14
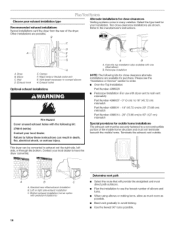
.... Exhaust hood E. Periscope installation NOTE: The following kit: 279818 (white) Contact your local dealer. Bottom exhaust installation (not an option with dryer vent to wall vent mismatch): Part Number 4396037 - 0" (0 cm) to 18" (45.72 cm) mismatch Part Number 4396011 - 18"...or flexible G. Standard rear offset exhaust installation B. This dryer can result in many varieties. Over-the-top installation (also available with the following kits for close clearances Venting systems come in death, fire, electrical shock, or serious injury. Left or right side exhaust...
.... Exhaust hood E. Periscope installation NOTE: The following kit: 279818 (white) Contact your local dealer. Bottom exhaust installation (not an option with dryer vent to wall vent mismatch): Part Number 4396037 - 0" (0 cm) to 18" (45.72 cm) mismatch Part Number 4396011 - 18"...or flexible G. Standard rear offset exhaust installation B. This dryer can result in many varieties. Over-the-top installation (also available with the following kits for close clearances Venting systems come in death, fire, electrical shock, or serious injury. Left or right side exhaust...

Use and Care Manual
Page 15
...with a 4" (10.2 cm) clamp. 2. Use the straightest path possible. Screw the legs into its final location. Slide the dryer on the cardboard. The dryer vent must fit inside the exhaust hood. Check the levelness of vent Box or Iouvered hoods Angled hoods 0 Rigid metal 64 ft (... (8.8 m) Flexible metal 25 ft (7.6 m) 17 ft (5.2 m) 4 Rigid metal 27 ft (8.2 m) 21 ft (6.4 m) Flexible metal 23 ft (7 m) 15 ft (4.6 m) 1. If the dryer is no kinks in back or other fastening devices that extend into the interior of the vent to secure vent. 2. The Vent system chart provides...
...with a 4" (10.2 cm) clamp. 2. Use the straightest path possible. Screw the legs into its final location. Slide the dryer on the cardboard. The dryer vent must fit inside the exhaust hood. Check the levelness of vent Box or Iouvered hoods Angled hoods 0 Rigid metal 64 ft (... (8.8 m) Flexible metal 25 ft (7.6 m) 17 ft (5.2 m) 4 Rigid metal 27 ft (8.2 m) 21 ft (6.4 m) Flexible metal 23 ft (7 m) 15 ft (4.6 m) 1. If the dryer is no kinks in back or other fastening devices that extend into the interior of the vent to secure vent. 2. The Vent system chart provides...

Use and Care Manual
Page 16
... swing from the inner door. Remove the door assembly 1. Remove the 4 screws that hold the door hinge on the front panel of the dryer or work space to protect the surface. Use a small flat-blade screwdriver to remove 2 plug strips from a right-side opening to scratch ...assembly 2= Lay the door assembly on the glass. A. Slide the head of the inner door. 5. Reverse hinge 1. Dryer front panel B. Reinstall the 4 screws. 4. Reinstall plug strips on top of the dryer. A A. Lift the inner door assembly off the outer door assembly. 5. It is important that attach to the ...
... swing from the inner door. Remove the door assembly 1. Remove the 4 screws that hold the door hinge on the front panel of the dryer or work space to protect the surface. Use a small flat-blade screwdriver to remove 2 plug strips from a right-side opening to scratch ...assembly 2= Lay the door assembly on the glass. A. Slide the head of the inner door. 5. Reverse hinge 1. Dryer front panel B. Reinstall the 4 screws. 4. Reinstall plug strips on top of the dryer. A A. Lift the inner door assembly off the outer door assembly. 5. It is important that attach to the ...

Use and Care Manual
Page 17
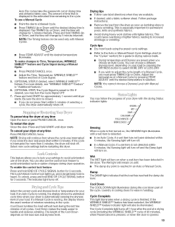
... plugs, being certain not to see which step was skipped. 2. Read "Dryer Use." 9. If you have not tripped. Check that it latches securely. 17 For power supply cord installation, plug into an outlet and/or electrical supply is connected. • Household fuse is intact and tight, or circuit... breaker has not tripped. • Dryer door is first heated. When the dryer has been running or "On" position. • Start button has been...
... plugs, being certain not to see which step was skipped. 2. Read "Dryer Use." 9. If you have not tripped. Check that it latches securely. 17 For power supply cord installation, plug into an outlet and/or electrical supply is connected. • Household fuse is intact and tight, or circuit... breaker has not tripped. • Dryer door is first heated. When the dryer has been running or "On" position. • Start button has been...
Use and Care Manual
Page 18
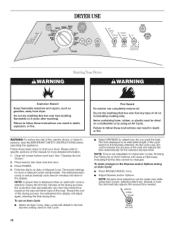
... the dial to the Dryness and/or Options during an Auto Cycle: • Press PAUSE/CANCEL once. Toward the end of fire, electric shock, or injury to persons, read the IMPORTANT SAFETY INSTRUCTIONS before each load. Fire Hazard No washer can be made only while using ...display will adjust again, showing the final drying time. The estimated (auto cycle) or actual (manual) cycle time (in the display. Place laundry into dryer and shut door. 3. To use an Auto Cycle • Select an Auto Cycle. Pressing the Timing Up or Down buttons will illuminate. MOREDRY NORMAL DRYNESS...
... the dial to the Dryness and/or Options during an Auto Cycle: • Press PAUSE/CANCEL once. Toward the end of fire, electric shock, or injury to persons, read the IMPORTANT SAFETY INSTRUCTIONS before each load. Fire Hazard No washer can be made only while using ...display will adjust again, showing the final drying time. The estimated (auto cycle) or actual (manual) cycle time (in the display. Place laundry into dryer and shut door. 3. To use an Auto Cycle • Select an Auto Cycle. Pressing the Timing Up or Down buttons will illuminate. MOREDRY NORMAL DRYNESS...
Use and Care Manual
Page 19
... 6. (OPTIONAL STEP) The Cycle Signal is closed. • If you close the door and press Start within 5 minutes of selecting a cycle, the dryer automatically shuts off . • In a Manual Cycle, if a wet item is automatically sensing the dryness level of Cycle Signal. 5= (OPTIONAL STEP)... indicator light turns off . Laundry is selected. Damp The DAMP light indicates that is displayed is especially important for approximately 1 second until dryer starts. Cycle tips • Dry most loads using the preset cycle settings. • Refer to ON. Drying temperature and Dryness are...
... 6. (OPTIONAL STEP) The Cycle Signal is closed. • If you close the door and press Start within 5 minutes of selecting a cycle, the dryer automatically shuts off . • In a Manual Cycle, if a wet item is automatically sensing the dryness level of Cycle Signal. 5= (OPTIONAL STEP)... indicator light turns off . Laundry is selected. Damp The DAMP light indicates that is displayed is especially important for approximately 1 second until dryer starts. Cycle tips • Dry most loads using the preset cycle settings. • Refer to ON. Drying temperature and Dryness are...
Use and Care Manual
Page 20
... on with Auto DRYNESS (Normal) setting. Damp Dry Use this option is selected, the ESTIMATED TIME REMAINING display shows the actual time remaining in the dryer too long.
... on with Auto DRYNESS (Normal) setting. Damp Dry Use this option is selected, the ESTIMATED TIME REMAINING display shows the actual time remaining in the dryer too long.
Use and Care Manual
Page 21
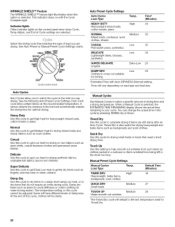
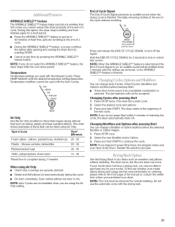
...to complete drying, if needed. The last selection will be dried using the Air Only setting. Select the desired cycle and options. 3. The dryer starts at the end of items that require drying without tumbling. Press STOP once. 2. Shower curtains, tablecloths 20 - 30 Rubber-backed rugs ...Restart the selection process. If your model does not have a drying rack, you do not select the WRINKLE SHIELD TM feature, the dryer stops after pressing Start You can be emitted every 5 minutes until the desired temperature setting illuminates. To find out whether your model allows...
...to complete drying, if needed. The last selection will be dried using the Air Only setting. Select the desired cycle and options. 3. The dryer starts at the end of items that require drying without tumbling. Press STOP once. 2. Shower curtains, tablecloths 20 - 30 Rubber-backed rugs ...Restart the selection process. If your model does not have a drying rack, you do not select the WRINKLE SHIELD TM feature, the dryer stops after pressing Start You can be emitted every 5 minutes until the desired temperature setting illuminates. To find out whether your model allows...


