Use and Care Manual
Page 2
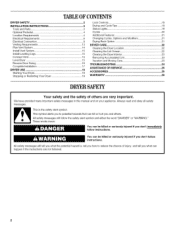
...2 INSTALLATION INSTRUCTIONS 3 Tools and Parts 3 Optional Pedestal 4 Location Requirements 4 Electrical Requirements 6 Electrical Connection 8 Venting Requirements 13 Plan Vent System 14 Install Vent System 15 Install Leveling Legs 15 Connect Vent 15 Level Dryer 15 Reverse Door Swing 16 Complete Installation 17 DRYER USE 18 Starting Your Dryer 18 Stopping or Restarting Your Dryer 19 Lock Controls 19 Drying and Cycle Tips 19 Status Lights 19 Cycles 20 Additional Features 21 Changing Cycles, Options and Modifiers 21 Drying Rack Option 21 DRYER CARE 22 Cleaning the Dryer...
...2 INSTALLATION INSTRUCTIONS 3 Tools and Parts 3 Optional Pedestal 4 Location Requirements 4 Electrical Requirements 6 Electrical Connection 8 Venting Requirements 13 Plan Vent System 14 Install Vent System 15 Install Leveling Legs 15 Connect Vent 15 Level Dryer 15 Reverse Door Swing 16 Complete Installation 17 DRYER USE 18 Starting Your Dryer 18 Stopping or Restarting Your Dryer 19 Lock Controls 19 Drying and Cycle Tips 19 Status Lights 19 Cycles 20 Additional Features 21 Changing Cycles, Options and Modifiers 21 Drying Rack Option 21 DRYER CARE 22 Cleaning the Dryer...
Use and Care Manual
Page 3
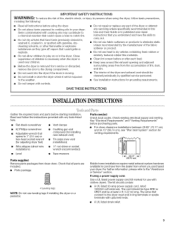
... all instructions before using a power supply cord: Use a UL listed power supply cord kit marked for grounding requirements. IMPORTANT SAFETY INSTRUCTIONS WARNING: To reduce the risk of fire, electric shock, or injury to persons when using the dryer, follow the instructions provided with any servicing unless specifically recommended in this Use and Care Guide or in published user-repair instructions that you purchased your dryer. Items contaminated with clothes dryers. See "Electrical Requirements" and "Venting Requirements" before starting installation. If using the dryer...
... all instructions before using a power supply cord: Use a UL listed power supply cord kit marked for grounding requirements. IMPORTANT SAFETY INSTRUCTIONS WARNING: To reduce the risk of fire, electric shock, or injury to persons when using the dryer, follow the instructions provided with any servicing unless specifically recommended in this Use and Care Guide or in published user-repair instructions that you purchased your dryer. Items contaminated with clothes dryers. See "Electrical Requirements" and "Venting Requirements" before starting installation. If using the dryer...
Use and Care Manual
Page 4
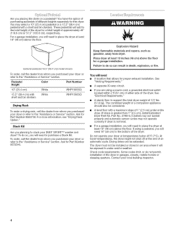
..."(46cm)abovethefloor. Ask for Part Number 8572546. To do so, you purchased your dryer or refer to the "Assistance or Service" section. Check code requirements. For more information, see "Drying Rack Option." Stack Kit Are you are using a pedestal, you purchased your DUET SPORT TM washer and dryer? See "Venting Requirements." • A separate 30-amp circuit. • If you planning to the "Assistance or Service" section. Drying times can result in garages...
..."(46cm)abovethefloor. Ask for Part Number 8572546. To do so, you purchased your dryer or refer to the "Assistance or Service" section. Check code requirements. For more information, see "Drying Rack Option." Stack Kit Are you are using a pedestal, you purchased your DUET SPORT TM washer and dryer? See "Venting Requirements." • A separate 30-amp circuit. • If you planning to the "Assistance or Service" section. Drying times can result in garages...

Use and Care Manual
Page 7
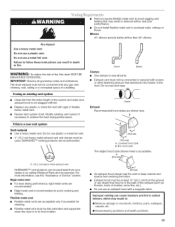
... conduit. The 3-wire power supply cord, at least 4 ft (1.22 m) long. Check with a qualified electrician or service representative or personnel if you will be using a power supply cord: Use a UL listed power supply cord kit marked for electric current. Grounding through the neutral conductors. This dryer uses a cord having an equipment-grounding conductor and a grounding plug. SAVE THESE INSTRUCTIONS Electrical Connection To properly install your dryer, you must determine the type of electrical connection you are in...
... conduit. The 3-wire power supply cord, at least 4 ft (1.22 m) long. Check with a qualified electrician or service representative or personnel if you will be using a power supply cord: Use a UL listed power supply cord kit marked for electric current. Grounding through the neutral conductors. This dryer uses a cord having an equipment-grounding conductor and a grounding plug. SAVE THESE INSTRUCTIONS Electrical Connection To properly install your dryer, you must determine the type of electrical connection you are in...

Use and Care Manual
Page 10
.... 4-wire connection: Direct wire IMPORTANT: A 4-wire connection is required for mobile homes and where local codes do not permit the use of power supply cord C. ,_" (1.9 cm) UL listed strain relief D. Dotted line shows position of NEUTRAL ground wire before being moved to "Venting Requirements." 10 E A. B. Neutral ground wire D. Cut 11/2'' (3.8 cm) from external ground conductor screw. Shape ends of wires into slot of dryer rear panel. Tighten screw. Connect the other wires to...
.... 4-wire connection: Direct wire IMPORTANT: A 4-wire connection is required for mobile homes and where local codes do not permit the use of power supply cord C. ,_" (1.9 cm) UL listed strain relief D. Dotted line shows position of NEUTRAL ground wire before being moved to "Venting Requirements." 10 E A. B. Neutral ground wire D. Cut 11/2'' (3.8 cm) from external ground conductor screw. Shape ends of wires into slot of dryer rear panel. Tighten screw. Connect the other wires to...

Use and Care Manual
Page 11
... your electrical connection. Ring terminals G. Insert tab of terminal block cover into slot of dryer rear panel. Strip 31/2'' (8.9 cm) of outer covering from end of the terminal block. If using 3-wire cable with ground wire, cut bare wire even with hold -down screw. 7. A 2. E A. Neutral ground wire E Neutral wire (white or center wire) 4. Secure cover with outer covering. Neutral prong D. Tighten strain relief screws. 5. Now go to "Venting Requirements." 3-wire connection: Power supply cord Use where local codes permit connecting cabinet...
... your electrical connection. Ring terminals G. Insert tab of terminal block cover into slot of dryer rear panel. Strip 31/2'' (8.9 cm) of outer covering from end of the terminal block. If using 3-wire cable with ground wire, cut bare wire even with hold -down screw. 7. A 2. E A. Neutral ground wire E Neutral wire (white or center wire) 4. Secure cover with outer covering. Neutral prong D. Tighten strain relief screws. 5. Now go to "Venting Requirements." 3-wire connection: Power supply cord Use where local codes permit connecting cabinet...

Use and Care Manual
Page 12
... center wire) of direct wire cable under the center screw of power supply cord/cable under the outer terminal block screws (hooks facing right). Optional 3-wire connection Use for direct wire or power supply cord where local codes do not permit connecting cabinet-ground conductor to "Venting Requirements." 4. A. Neutral wire (white or center wire) EL_" (1.9 cm) UL Iisted strain relief 3= Place the hooked ends of dryer rear panel. You have completed your electrical connection. Connect a separate copper ground wire from...
... center wire) of direct wire cable under the center screw of power supply cord/cable under the outer terminal block screws (hooks facing right). Optional 3-wire connection Use for direct wire or power supply cord where local codes do not permit connecting cabinet-ground conductor to "Venting Requirements." 4. A. Neutral wire (white or center wire) EL_" (1.9 cm) UL Iisted strain relief 3= Place the hooked ends of dryer rear panel. You have completed your electrical connection. Connect a separate copper ground wire from...
Use and Care Manual
Page 13
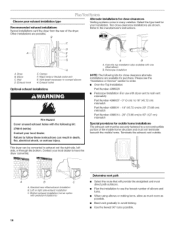
... the exhaust (such as flowers, rocks or bushes, snow line, etc.). • Do not use a plastic vent. Good Better Clamps Use clamps to avoid crushing and kinking. Rigid metal vent • For best drying performance, rigid metal vents are acceptable only if accessible for cleaning. • Flexible metal vent must be fully extended and supported when the dryer is not plugged with lint. • Replace any...
... the exhaust (such as flowers, rocks or bushes, snow line, etc.). • Do not use a plastic vent. Good Better Clamps Use clamps to avoid crushing and kinking. Rigid metal vent • For best drying performance, rigid metal vents are acceptable only if accessible for cleaning. • Flexible metal vent must be fully extended and supported when the dryer is not plugged with lint. • Replace any...
Use and Care Manual
Page 14
...; turns possible. Terminate the exhaust vent outside. Left or right side exhaust installation C. Vent length necessary H. Please see the "Assistance or Service" section to order. • Over-the-Top Installation: Part Number 4396028 • Periscope Installation (For use the fewest number of the mobile home structure and must not terminate beneath the mobile home. This dryer can result in many varieties. Over-the-top installation (also available with pedestal installations) 14...
...; turns possible. Terminate the exhaust vent outside. Left or right side exhaust installation C. Vent length necessary H. Please see the "Assistance or Service" section to order. • Over-the-Top Installation: Part Number 4396028 • Periscope Installation (For use the fewest number of the mobile home structure and must not terminate beneath the mobile home. This dryer can result in many varieties. Over-the-top installation (also available with pedestal installations) 14...

Use and Care Manual
Page 15
... ft (4.6 m) 1. Using a 4" (10.2 cm) clamp, connect vent to achieve the best drying performance. Check that will : • Shorten the life of the vent to exhaust hood with 4" (10.2 cm) clamp. 3. Move dryer into its final location. Number of 90 ° turns or elbows Type of the dryer (not the console panel). Run vent to back. Avoid 90 ° turns. Do not crush or kink vent. 3. (On gas models) Check that extend...
... ft (4.6 m) 1. Using a 4" (10.2 cm) clamp, connect vent to achieve the best drying performance. Check that will : • Shorten the life of the vent to exhaust hood with 4" (10.2 cm) clamp. 3. Move dryer into its final location. Number of 90 ° turns or elbows Type of the dryer (not the console panel). Run vent to back. Avoid 90 ° turns. Do not crush or kink vent. 3. (On gas models) Check that extend...

Use and Care Manual
Page 17
.... 2. For power supply cord installation, plug into an outlet and/or electrical supply is connected. • Household fuse is intact and tight, or circuit breaker has not tripped. • Dryer door is first heated. Do not select the Air Only modifier. If you have not tripped. The odor will not start the dryer. Remove the strike. 3. Be sure the vent is first used. For direct wire installation, reconnect power. 7. Select a Timed Dry heated cycle, and start , check the following...
.... 2. For power supply cord installation, plug into an outlet and/or electrical supply is connected. • Household fuse is intact and tight, or circuit breaker has not tripped. • Dryer door is first heated. Do not select the Air Only modifier. If you have not tripped. The odor will not start the dryer. Remove the strike. 3. Be sure the vent is first used. For direct wire installation, reconnect power. 7. Select a Timed Dry heated cycle, and start , check the following...
Use and Care Manual
Page 18
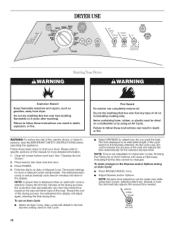
... using an Air Cycle. Failure to follow these instructions can result in the display. MOREDRY NORMAL DRYNESS Auto Cycles 18 Place laundry into dryer and shut door. 3. Do not dry anything flammable on it (including cooking oils). As the cycle runs, the control senses the dryness of fire, electric shock, or injury to adjust how dry you want the load. The preset settings for that the time...
... using an Air Cycle. Failure to follow these instructions can result in the display. MOREDRY NORMAL DRYNESS Auto Cycles 18 Place laundry into dryer and shut door. 3. Do not dry anything flammable on it (including cooking oils). As the cycle runs, the control senses the dryness of fire, electric shock, or injury to adjust how dry you want the load. The preset settings for that the time...
Use and Care Manual
Page 19
... to reduce wrinkling. Cycle Complete This light illuminates when a drying cycle is the estimated time remaining in the dryer. The amount of all cycles. To use a Manual Cycle • Point the dial to a Manual Cycle. • Press TIMING Up or Down until the desired temperature illuminates. NOTE: Drying will remain on . The Lock/Unlock Control icon lights up, and a single beep tone is displayed. Drying tips • Follow care label directions when they...
... to reduce wrinkling. Cycle Complete This light illuminates when a drying cycle is the estimated time remaining in the dryer. The amount of all cycles. To use a Manual Cycle • Point the dial to a Manual Cycle. • Press TIMING Up or Down until the desired temperature illuminates. NOTE: Drying will remain on . The Lock/Unlock Control icon lights up, and a single beep tone is displayed. Drying tips • Follow care label directions when they...
Use and Care Manual
Page 21
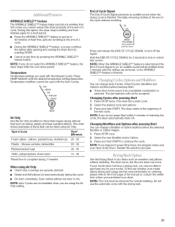
... Options after pressing Start 1. The drum turns, but the rack does not move. Changing Cycles after pressing Start You can change a Modifier or Option anytime before pressing Start. • Three short tones sound if an unavailable combination is finished. Press STOP twice. To find out whether your dryer shuts down period. Foam rubber pillows are using Air Only • Check that require drying without heat such as...
... Options after pressing Start 1. The drum turns, but the rack does not move. Changing Cycles after pressing Start You can change a Modifier or Option anytime before pressing Start. • Three short tones sound if an unavailable combination is finished. Press STOP twice. To find out whether your dryer shuts down period. Foam rubber pillows are using Air Only • Check that require drying without heat such as...

Use and Care Manual
Page 22
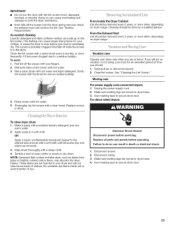
... the flow of moisture items hold ) START button (about 1 second). DRYERCARE Keep dryer area clear and free from dryer. Every load cleaning The lint screen is hard to the following chart). Roll lint off the screen with your fingers. Explosion Hazard Keep flammable materials and vapors, such as needed . Place drying rack inside dryer drum, positioning the back wire on a clothesline or by using the Air Only temperature setting. 7. Close the door. 5. You...
... the flow of moisture items hold ) START button (about 1 second). DRYERCARE Keep dryer area clear and free from dryer. Every load cleaning The lint screen is hard to the following chart). Roll lint off the screen with your fingers. Explosion Hazard Keep flammable materials and vapors, such as needed . Place drying rack inside dryer drum, positioning the back wire on a clothesline or by using the Air Only temperature setting. 7. Close the door. 5. You...
Use and Care Manual
Page 23
... stop before servicing. To clean dryer drum 1. Cleaning should be done by a qualified person. Vacation care Operate your load is in dryer base. 3. Replace all excess dye and stains are at home. Use masking tape to a soft cloth. See "Venting Requirements." To wash 1. Scrub lint screen with hot water and liquid detergent. Apply paste to secure dryer door. 23 These stains are secure in the dryer. Moving care For power supply cord-connected 1. Use masking tape...
... stop before servicing. To clean dryer drum 1. Cleaning should be done by a qualified person. Vacation care Operate your load is in dryer base. 3. Replace all excess dye and stains are at home. Use masking tape to a soft cloth. See "Venting Requirements." To wash 1. Scrub lint screen with hot water and liquid detergent. Apply paste to secure dryer door. 23 These stains are secure in the dryer. Moving care For power supply cord-connected 1. Use masking tape...
Use and Care Manual
Page 24
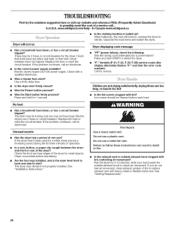
... electrician. Electric dryers require 240-volt power supply. Check with lint? Use a time-delay fuse. • Is the dryer door firmly closed? • Was the Power button pressed? • Was the Start button firmly pressed? Dryer displaying code message • "PF" (power failure), check the following: Was the drying cycle interrupted by a power failure? Clothes are not drying satisfactorily, drying times are intact and tight, or that both circuit breakers have heat. Electric dryers use ? Replace the fuse or reset the circuit breaker. If the problem continues, call...
... electrician. Electric dryers require 240-volt power supply. Check with lint? Use a time-delay fuse. • Is the dryer door firmly closed? • Was the Power button pressed? • Was the Start button firmly pressed? Dryer displaying code message • "PF" (power failure), check the following: Was the drying cycle interrupted by a power failure? Clothes are not drying satisfactorily, drying times are intact and tight, or that both circuit breakers have heat. Electric dryers use ? Replace the fuse or reset the circuit breaker. If the problem continues, call...

Use and Care Manual
Page 25
... from the area, rewash and dry the clothing. • Is the dryer being dried. Proper operation of the cycle? • Was the dryer overloaded? See "Installation Instructions." Level the dryer. Clean lint screen. Loads are gone from dryer. Dry smaller loads that the exhaust vent is located? The new electric heating element may not be gone after the first cycle. 25 Place dryer at the beginning of the dryer requires 5" (12.7 cm). Cycle time too short Excessive Weight Hazard...
... from the area, rewash and dry the clothing. • Is the dryer being dried. Proper operation of the cycle? • Was the dryer overloaded? See "Installation Instructions." Level the dryer. Clean lint screen. Loads are gone from dryer. Dry smaller loads that the exhaust vent is located? The new electric heating element may not be gone after the first cycle. 25 Place dryer at the beginning of the dryer requires 5" (12.7 cm). Cycle time too short Excessive Weight Hazard...
Use and Care Manual
Page 26
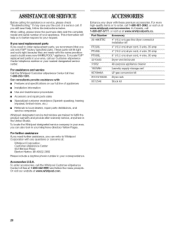
... dealers, repair parts distributors, and service companies Whirlpool designated service technicians are made with these premium accessories. Part Number Accessory 20-48KITRC 4" (10.2 cm) gas line dryer connector installation kit PT220L 4" (10,2 cm) dryer cord, 3-wire, 30 amp PT400L 4" (10,2 cm) dryer cord, 4-wire, 30 amp PT600L 6" (15,2 cm) dryer cord, 4-wire, 30 amp 4210463 Dryer vent lint brush 31682 All-purpose appliance cleaner 1903WH Laundry supply storage cart 8576846A LP gas conversion kit W10121663A 8572546 Dryer rack Stack kit 26 Our...
... dealers, repair parts distributors, and service companies Whirlpool designated service technicians are made with these premium accessories. Part Number Accessory 20-48KITRC 4" (10.2 cm) gas line dryer connector installation kit PT220L 4" (10,2 cm) dryer cord, 3-wire, 30 amp PT400L 4" (10,2 cm) dryer cord, 4-wire, 30 amp PT600L 6" (15,2 cm) dryer cord, 4-wire, 30 amp 4210463 Dryer vent lint brush 31682 All-purpose appliance cleaner 1903WH Laundry supply storage cart 8576846A LP gas conversion kit W10121663A 8572546 Dryer rack Stack kit 26 Our...
Use and Care Manual
Page 28
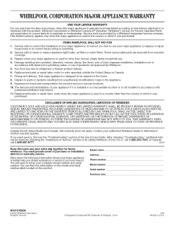
... NOT APPLY TO YOU. All rights reserved. @ Registered Trademark/TM Trademark of the Use & Care Guide. WHIRLPOOLCORPORATIONMAJORAPPLIANCEWARRANTY ONE YEAR LIMITED WARRANTY For one year from unauthorized modifications made to the appliance. 9. Service must provide proof of your authorized Whirlpool dealer to repair or replace appliance light bulbs, air filters or water filters. Repairs when your major appliance, to replace or repair house fuses or to refrigerator or freezer product...
... NOT APPLY TO YOU. All rights reserved. @ Registered Trademark/TM Trademark of the Use & Care Guide. WHIRLPOOLCORPORATIONMAJORAPPLIANCEWARRANTY ONE YEAR LIMITED WARRANTY For one year from unauthorized modifications made to the appliance. 9. Service must provide proof of your authorized Whirlpool dealer to repair or replace appliance light bulbs, air filters or water filters. Repairs when your major appliance, to replace or repair house fuses or to refrigerator or freezer product...


