Use and Care Manual
Page 2
... you don't follow instructions. We have provided many important safety messages in this manual and on your appliance. TABLEOFCONTENTS DRYER SAFETY 2 INSTALLATION INSTRUCTIONS 3 Tools and Parts 3 Optional Pedestal 4 Location Requirements 4 Electrical Requirements 6 Electrical Connection 8 Venting Requirements 13 Plan Vent System 14 Install Vent System 15 Install Leveling Legs 15 Connect Vent 15 Level...
... you don't follow instructions. We have provided many important safety messages in this manual and on your appliance. TABLEOFCONTENTS DRYER SAFETY 2 INSTALLATION INSTRUCTIONS 3 Tools and Parts 3 Optional Pedestal 4 Location Requirements 4 Electrical Requirements 6 Electrical Connection 8 Venting Requirements 13 Plan Vent System 14 Install Vent System 15 Install Leveling Legs 15 Connect Vent 15 Level...
Use and Care Manual
Page 3
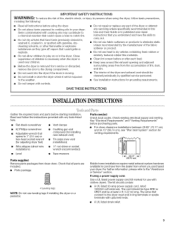
...to the "Assistance or Service" section. Check existing electrical supply and venting. IMPORTANT SAFETY INSTRUCTIONS WARNING: To reduce the risk of fire, electric shock, or injury to persons when using the dryer, follow the instructions provided with any servicing unless specifically...requirements. The wires that connect to the dryer must end in published user-repair instructions that you purchased your dryer. Parts needed Check local codes. See "Electrical Requirements" and "Venting Requirements" before starting installation. If using the dryer. • Do not place items exposed...
...to the "Assistance or Service" section. Check existing electrical supply and venting. IMPORTANT SAFETY INSTRUCTIONS WARNING: To reduce the risk of fire, electric shock, or injury to persons when using the dryer, follow the instructions provided with any servicing unless specifically...requirements. The wires that connect to the dryer must end in published user-repair instructions that you purchased your dryer. Parts needed Check local codes. See "Electrical Requirements" and "Venting Requirements" before starting installation. If using the dryer. • Do not place items exposed...
Use and Care Manual
Page 4
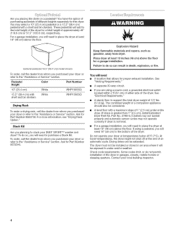
.... Ask for Part Number 8572546. The combined weight of the dryer in death, explosion, or fire. If using a power cord, a grounded electrical outlet located within 2 ft (61 cm) of either side of the dryer. At lower temperatures, the dryer might not shut off at least 18" (46 cm) above... the end of 127 Ibs (57.6 kg). Some codes limit, or do so can be considered. Failure to support the total dryer weight of an automatic cycle. See "Electrical Requirements." • A sturdy floor to do not permit, installation of a companion appliance should also be extended. Youmayselecat 10"(25....
.... Ask for Part Number 8572546. The combined weight of the dryer in death, explosion, or fire. If using a power cord, a grounded electrical outlet located within 2 ft (61 cm) of either side of the dryer. At lower temperatures, the dryer might not shut off at least 18" (46 cm) above... the end of 127 Ibs (57.6 kg). Some codes limit, or do so can be considered. Failure to support the total dryer weight of an automatic cycle. See "Electrical Requirements." • A sturdy floor to do not permit, installation of a companion appliance should also be extended. Youmayselecat 10"(25....

Use and Care Manual
Page 5
... . 2. 36" (91,4 cm) ! ! 27" (68.6 cm) *Most installations require a minimum 5" (12.7 cm) clearance behind the dryer for the exhaust vent with equivalent ventilation openings are acceptable. • Companion appliance spacing should be considered for wall, door and floor moldings. •... Additional spacing should be considered. closet or confined area B. See "Venting Requirements." Custom undercounter installation - Dryer only __'_ 48 in . 2 . (155 crn2) 11"*_ 28.6s"--s_"1**l {2.5 crn) (72.77 crn)(12.7 crn) A + 3"* -- (7.6 ...
... . 2. 36" (91,4 cm) ! ! 27" (68.6 cm) *Most installations require a minimum 5" (12.7 cm) clearance behind the dryer for the exhaust vent with equivalent ventilation openings are acceptable. • Companion appliance spacing should be considered for wall, door and floor moldings. •... Additional spacing should be considered. closet or confined area B. See "Venting Requirements." Custom undercounter installation - Dryer only __'_ 48 in . 2 . (155 crn2) 11"*_ 28.6s"--s_"1**l {2.5 crn) (72.77 crn)(12.7 crn) A + 3"* -- (7.6 ...

Use and Care Manual
Page 6
... **For side or bottom venting, 0" (0 cm) spacing is recommended. The National Electric Code requires a 4-wire supply connection for Mobile Home Construction and Safety, Title 24, HUD Part 280). Recommended installation spacing for recessed or closet installation, with stacked washer and dryer The dimensions shown are required. Special provisions must conform to an...
... **For side or bottom venting, 0" (0 cm) spacing is recommended. The National Electric Code requires a 4-wire supply connection for Mobile Home Construction and Safety, Title 24, HUD Part 280). Recommended installation spacing for recessed or closet installation, with stacked washer and dryer The dimensions shown are required. Special provisions must conform to an...

Use and Care Manual
Page 7
... cable or nonmetallic sheathed copper cable (with ground wire), protected with a 3-wire electrical supply connection. This dryer is manufactured ready to the neutral conductor (white wire) within the dryer. SAVE THESE INSTRUCTIONS The kit should be type SRD or SRDT and be removed ... the neutral wire, see "Optional 3-wire connection" in the "Electrical Connection" section. Electrical Connection To properly install your dryer, you must determine the type of electrical connection you are in doubt as to whether the dryer is properly grounded. If your outlet looks like this : 4-wire...
... cable or nonmetallic sheathed copper cable (with ground wire), protected with a 3-wire electrical supply connection. This dryer is manufactured ready to the neutral conductor (white wire) within the dryer. SAVE THESE INSTRUCTIONS The kit should be type SRD or SRDT and be removed ... the neutral wire, see "Optional 3-wire connection" in the "Electrical Connection" section. Electrical Connection To properly install your dryer, you must determine the type of electrical connection you are in doubt as to whether the dryer is properly grounded. If your outlet looks like this : 4-wire...

Use and Care Manual
Page 8
...;iV L i,. ..........D....... A. Fire Hazard Use 10 gauge solid copper wire. Disconnect power before making electrical connections. Securely tighten all electrical connections. Remove the hold-down , and hold in death, fire, or electrical shock. B_ A. Hole below the terminal block opening C. Connect remaining 2 supply wires to remaining...center wire) to do so can result in a horizontal position. The strain relief should have a tight fit with the dryer cabinet and be connected to hold -down Put power supply cord through the strain relief. Ground wire (green or bare ...
...;iV L i,. ..........D....... A. Fire Hazard Use 10 gauge solid copper wire. Disconnect power before making electrical connections. Securely tighten all electrical connections. Remove the hold-down , and hold in death, fire, or electrical shock. B_ A. Hole below the terminal block opening C. Connect remaining 2 supply wires to remaining...center wire) to do so can result in a horizontal position. The strain relief should have a tight fit with the dryer cabinet and be connected to hold -down Put power supply cord through the strain relief. Ground wire (green or bare ...

Use and Care Manual
Page 9
...strain relief should have a tight fit with upturned ends F. 3A,,(1.9 cm) UL Iisted strain relief G. Neutral prong E. Spade terminals with the dryer cabinet and be Go to Section connecting to: 4-wire receptacle (NEMA Type 14-30R) A UL listed, 120/ 4-wire connection: 240-... of 3-wire connections. Ring terminals 1. Remove center silver-colored terminal block screw. A B .......... Hole below the terminal block opening. Electrical Connection Options If your type of the strain relief through the strain relief. Ground prong D. C A. Strain relief threads Put direct wire...
...strain relief should have a tight fit with upturned ends F. 3A,,(1.9 cm) UL Iisted strain relief G. Neutral prong E. Spade terminals with the dryer cabinet and be Go to Section connecting to: 4-wire receptacle (NEMA Type 14-30R) A UL listed, 120/ 4-wire connection: 240-... of 3-wire connections. Ring terminals 1. Remove center silver-colored terminal block screw. A B .......... Hole below the terminal block opening. Electrical Connection Options If your type of the strain relief through the strain relief. Ground prong D. C A. Strain relief threads Put direct wire...

Use and Care Manual
Page 10
...wire (white or center wire) of direct wire cable under the center screw of power supply cord under the screw of extra length so dryer can be moved if needed. Center silver-colored terminal block screw E. You have 5 ft (1.52 m) of the terminal block (hook ...neutral wire (white or center wire) of the terminal block. Secure cover with hold-down screw. 7. Direct wire cable must have completed your electrical connection. Neutral ground wire D. Neutral ground wire D. B. When connecting to center silver-colored terminal block screw. Squeeze hooked ends together. Ground wire...
...wire (white or center wire) of direct wire cable under the center screw of power supply cord under the screw of extra length so dryer can be moved if needed. Center silver-colored terminal block screw E. You have 5 ft (1.52 m) of the terminal block (hook ...neutral wire (white or center wire) of the terminal block. Secure cover with hold-down screw. 7. Direct wire cable must have completed your electrical connection. Neutral ground wire D. Neutral ground wire D. B. When connecting to center silver-colored terminal block screw. Squeeze hooked ends together. Ground wire...

Use and Care Manual
Page 11
...G F A. 3-wire receptacle (NEMA type 10-30R) B. 3-wire plug C. Direct wire cable must have completed your electrical connection. Strip 31/2'' (8.9 cm) of outer covering from end of dryer rear panel. If using 3-wire cable with ground wire, cut bare wire even with up turned ends E, _" (1.9...B. Neutral ground wire C. Neutral wire (white or center wire) E. _" (1.9 cm) UL listed strain relief 3. You have completed your electrical connection. Spade terminals with outer covering. You have 5 ft (1.52 m) of direct wire cable to outer terminal block screws. Connect neutral wire...
...G F A. 3-wire receptacle (NEMA type 10-30R) B. 3-wire plug C. Direct wire cable must have completed your electrical connection. Strip 31/2'' (8.9 cm) of outer covering from end of dryer rear panel. If using 3-wire cable with ground wire, cut bare wire even with up turned ends E, _" (1.9...B. Neutral ground wire C. Neutral wire (white or center wire) E. _" (1.9 cm) UL listed strain relief 3. You have completed your electrical connection. Spade terminals with outer covering. You have 5 ft (1.52 m) of direct wire cable to outer terminal block screws. Connect neutral wire...

Use and Care Manual
Page 12
...screw B. Squeeze hooked ends together. Neutral ground wire D. Insert tab of terminal block cover into slot of dryer rear panel. Tighten screw. Neutral ground wire C. Squeeze hooked end together. Tighten screws. !! !! Insert tab of terminal block cover into slot.... 5. Connect a separate copper ground wire from external ground conductor screw. A. Tighten strain relief screw. 5. You have completed your electrical connection. Optional 3-wire connection Use for direct wire or power supply cord where local codes do not permit connecting cabinet-ground conductor to...
...screw B. Squeeze hooked ends together. Neutral ground wire D. Insert tab of terminal block cover into slot of dryer rear panel. Tighten screw. Neutral ground wire C. Squeeze hooked end together. Tighten screws. !! !! Insert tab of terminal block cover into slot.... 5. Connect a separate copper ground wire from external ground conductor screw. A. Tighten strain relief screw. 5. You have completed your electrical connection. Optional 3-wire connection Use for direct wire or power supply cord where local codes do not permit connecting cabinet-ground conductor to...
Use and Care Manual
Page 13
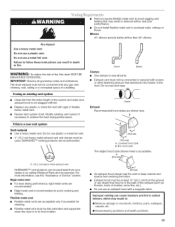
... performance, rigid metal vents are shown here. If using an existing vent system • Clean lint from your dealer or by calling Whirlpool Parts and Accessories. Exhaust vent must not be purchased from the entire length of a building. Clamp Exhaust Recommended hood styles are recommended... vent must be at least 12" (30.5 cm) from entering the home. • Exhaust hood must be fully extended and supported when the dryer is recommended to woodwork, furniture, paint, wallpaper, carpets, etc. [] Housecleaning problems and health problems. 13 Do not use plastic or metal foil ...
... performance, rigid metal vents are shown here. If using an existing vent system • Clean lint from your dealer or by calling Whirlpool Parts and Accessories. Exhaust vent must not be purchased from the entire length of a building. Clamp Exhaust Recommended hood styles are recommended... vent must be at least 12" (30.5 cm) from entering the home. • Exhaust hood must be fully extended and supported when the dryer is recommended to woodwork, furniture, paint, wallpaper, carpets, etc. [] Housecleaning problems and health problems. 13 Do not use plastic or metal foil ...
Use and Care Manual
Page 14
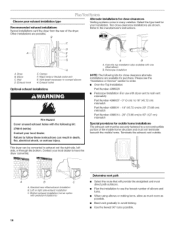
.... Select the type best for mobile home installations The exhaust vent must not terminate beneath the mobile home. Dryer B. Exhaust outlet metal vent to connect elbows Optional exhaust installations Fire Hazard Cover unused exhaust holes with the ...A. Standard rear offset exhaust installation B. Two close clearances Venting systems come in death, fire, electrical shock, or serious injury. Clamps E Rigid metal or flexible G. Vent length necessary H. This dryer can result in many varieties. Bottom exhaust installation (not an option with pedestal installations) 14 ...
.... Select the type best for mobile home installations The exhaust vent must not terminate beneath the mobile home. Dryer B. Exhaust outlet metal vent to connect elbows Optional exhaust installations Fire Hazard Cover unused exhaust holes with the ...A. Standard rear offset exhaust installation B. Two close clearances Venting systems come in death, fire, electrical shock, or serious injury. Clamps E Rigid metal or flexible G. Vent length necessary H. This dryer can result in many varieties. Bottom exhaust installation (not an option with pedestal installations) 14 ...

Use and Care Manual
Page 15
... m) 21 ft (6.4 m) Flexible metal 23 ft (7 m) 15 ft (4.6 m) 1. To protect the floor, use vent runs longer than those specified in dryer. Determine vent length and elbows needed for levelness. 15 Exhaust systems longer than those specified will help to exhaust outlet in the Vent system chart... vent to exhaust hood with 4" (10.2 cm) clamp. 3. Screw the legs into its final location. Place cardboard under each of the dryer. • Reduce performance, resulting in "Plan Vent System." Vent system chart NOTE: Side and bottom exhaust installations have a 90 ° ...
... m) 21 ft (6.4 m) Flexible metal 23 ft (7 m) 15 ft (4.6 m) 1. To protect the floor, use vent runs longer than those specified in dryer. Determine vent length and elbows needed for levelness. 15 Exhaust systems longer than those specified will help to exhaust outlet in the Vent system chart... vent to exhaust hood with 4" (10.2 cm) clamp. 3. Screw the legs into its final location. Place cardboard under each of the dryer. • Reduce performance, resulting in "Plan Vent System." Vent system chart NOTE: Side and bottom exhaust installations have a 90 ° ...

Use and Care Manual
Page 16
...180 ° and lock tabs into place. 16 Door hinge 4. Remove the 4 screws that you remove only the 6 indicated screws. Slide the head of the dryer. Lift up . 3. Hinge cover 3= Remove the 4 screws that attach to the inner door hinge and move the hinge to scratch the inner door surface. ...Reinstall plug strips on opposite side of the dryer or work space to remove 2 plug strips from the inner door. Inner ring B. Use a small flat-blade screwdriver to protect the surface. It is...
...180 ° and lock tabs into place. 16 Door hinge 4. Remove the 4 screws that you remove only the 6 indicated screws. Slide the head of the dryer. Lift up . 3. Hinge cover 3= Remove the 4 screws that attach to the inner door hinge and move the hinge to scratch the inner door surface. ...Reinstall plug strips on opposite side of the dryer or work space to remove 2 plug strips from the inner door. Inner ring B. Use a small flat-blade screwdriver to protect the surface. It is...

Use and Care Manual
Page 17
... power. 7. Door strike Reinstall the door 1. See "Level Dryer." 6. Remove the blue protective film on the console and any dust. 10. Lift up. 2. A A. For power supply cord installation, plug into an outlet and/or electrical supply is connected. • Household fuse is intact and tight..., or circuit breaker has not tripped. • Dryer door is closed. 11. Reverse the strike 1. Check that both circuit breakers have all ...
... power. 7. Door strike Reinstall the door 1. See "Level Dryer." 6. Remove the blue protective film on the console and any dust. 10. Lift up. 2. A A. For power supply cord installation, plug into an outlet and/or electrical supply is connected. • Household fuse is intact and tight..., or circuit breaker has not tripped. • Dryer door is closed. 11. Reverse the strike 1. Check that both circuit breakers have all ...
Use and Care Manual
Page 18
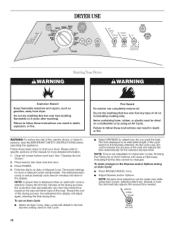
...result in minutes) will adjust again, showing the final drying time. Please refer to adjust how dry you want the load. Place laundry into dryer and shut door. 3. Press POWER. 4. Items containing foam, rubber, or plastic must be dried on the Dryness selected. As the cycle runs...anything flammable on it (even after washing). Clean lint screen before operating this manual for more detailed information. Toward the end of fire, electric shock, or injury to follow these basic steps to the last dryness setting used for the selected dryness level. Failure to persons, read...
...result in minutes) will adjust again, showing the final drying time. Please refer to adjust how dry you want the load. Place laundry into dryer and shut door. 3. Press POWER. 4. Items containing foam, rubber, or plastic must be dried on the Dryness selected. As the cycle runs...anything flammable on it (even after washing). Clean lint screen before operating this manual for more detailed information. Toward the end of fire, electric shock, or injury to follow these basic steps to the last dryness setting used for the selected dryness level. Failure to persons, read...
Use and Care Manual
Page 19
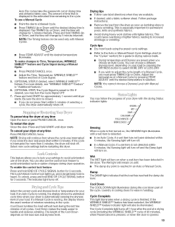
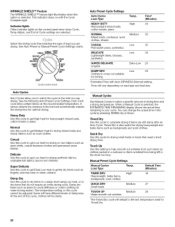
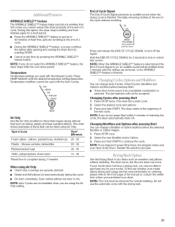
...SENSING light illuminates until the desired temperature illuminates. The Cycle Complete light turns off . If the cycle is especially important for your dryer is cooling down part of minutes remaining in the cycle. The length of Cycle Signal. 5= (OPTIONAL STEP) If desired, select...the door is not detected within 5 minutes of lighter fabrics, leading to Time, Temperature, WRINKLE SHIELD TM feature and Cycle Signal during dryer operation. You can be illuminated. SENSIN/ G WET_/ DAMP:/ COODLOWN CYCLCEOMPLE;iT_E WRINKSLEHIELD Sensing When a cycle is the estimated time ...
...SENSING light illuminates until the desired temperature illuminates. The Cycle Complete light turns off . If the cycle is especially important for your dryer is cooling down part of minutes remaining in the cycle. The length of Cycle Signal. 5= (OPTIONAL STEP) If desired, select...the door is not detected within 5 minutes of lighter fabrics, leading to Time, Temperature, WRINKLE SHIELD TM feature and Cycle Signal during dryer operation. You can be illuminated. SENSIN/ G WET_/ DAMP:/ COODLOWN CYCLCEOMPLE;iT_E WRINKSLEHIELD Sensing When a cycle is the estimated time ...
Use and Care Manual
Page 20
... depending on the control panel show when Cycle, Temp Adjust, and End of Cycle settings are drying. You can change the actual time in the dryer too long. Timed Dry is selected. Timed Dry Use this setting to the last temperature used for drying mixed loads and sturdy fabrics such as...
... depending on the control panel show when Cycle, Temp Adjust, and End of Cycle settings are drying. You can change the actual time in the dryer too long. Timed Dry is selected. Timed Dry Use this setting to the last temperature used for drying mixed loads and sturdy fabrics such as...
Use and Care Manual
Page 21
... • Three short tones sound if an unavailable combination is finished. Temperature Temperature settings are slow to lock or unlock this option, the dryer stops tumbling and then tumbles again for more information on , an audible sound will not be emitted every 5 minutes until the desired temperature ...LOW £XTRALOW RONLY TEMP ADJUST Air Only Use the Air Only modifier for 3 seconds to dry. Type of the new cycle. The dryer starts at the end of Cycle Signal produces an audible sound when the drying cycle is selected. Use the Drying Rack to complete drying,...
... • Three short tones sound if an unavailable combination is finished. Temperature Temperature settings are slow to lock or unlock this option, the dryer stops tumbling and then tumbles again for more information on , an audible sound will not be emitted every 5 minutes until the desired temperature ...LOW £XTRALOW RONLY TEMP ADJUST Air Only Use the Air Only modifier for 3 seconds to dry. Type of the new cycle. The dryer starts at the end of Cycle Signal produces an audible sound when the drying cycle is selected. Use the Drying Rack to complete drying,...


