Owners Manual
Page 2
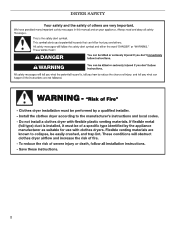
.... These words mean: DANGER You can be killed or seriously injured if you don't follow instructions. This is , tell you and others are not followed. 2 DRYER SAFETY Your safety and the safety of injury, and tell you what the potential hazard is the safety alert symbol.
.... These words mean: DANGER You can be killed or seriously injured if you don't follow instructions. This is , tell you and others are not followed. 2 DRYER SAFETY Your safety and the safety of injury, and tell you what the potential hazard is the safety alert symbol.
Owners Manual
Page 3
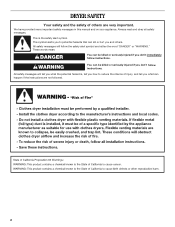
... your gas supplier from a neighbor's phone. Installation and service must be performed by smell. Gas suppliers recommend that you cannot reach your gas supplier. The dryer must be electrically grounded in accordance with local codes, or in the vicinity of local codes, with the National Fuel Gas Code, ANSI Z223.1/NFPA...
... your gas supplier from a neighbor's phone. Installation and service must be performed by smell. Gas suppliers recommend that you cannot reach your gas supplier. The dryer must be electrically grounded in accordance with local codes, or in the vicinity of local codes, with the National Fuel Gas Code, ANSI Z223.1/NFPA...
Owners Manual
Page 4
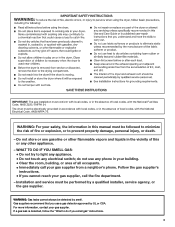
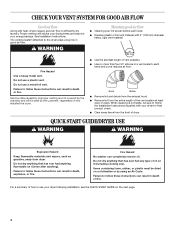
...an Air Cycle. Failure to efficiently dry laundry. Do not use a metal foil vent. Failure to follow the Installation Instructions supplied with heat, dryers require good air flow to follow these instructions can completely remove oil. When cleaning is complete, be paid by the warranty and will reduce ...no more than four 90° elbows in good air flow. CHECK YOUR VENT SYSTEM FOR GOOD AIR FLOW Good air flow Along with your dryer following installation, see the QUICK START GUIDE on it (even after washing). WARNING Maintain good air flow ■ Cleaning your energy savings. ...
...an Air Cycle. Failure to efficiently dry laundry. Do not use a metal foil vent. Failure to follow the Installation Instructions supplied with heat, dryers require good air flow to follow these instructions can completely remove oil. When cleaning is complete, be paid by the warranty and will reduce ...no more than four 90° elbows in good air flow. CHECK YOUR VENT SYSTEM FOR GOOD AIR FLOW Good air flow Along with your dryer following installation, see the QUICK START GUIDE on it (even after washing). WARNING Maintain good air flow ■ Cleaning your energy savings. ...
Owners Manual
Page 5
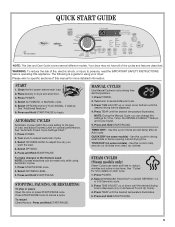
...). 4. Place laundry in dry items. See "Cycles" for more detailed information. See "Additional Features." 6. To make changes to reduce wrinkles and odors in dryer and shut door. 3. To restart Close the door. NOTE: During the Manual Cycle, you want the load. 4. TOUCH UP (on some models) - ... to specific sections of the cycles and features described. Press START/PAUSE once. 2. Press TEMP until the desired temperature illuminates. 5. Your dryer may not have all of this cycle to set a drying time and temperature. 1. Please refer to adjust how dry you can be made...
...). 4. Place laundry in dry items. See "Cycles" for more detailed information. See "Additional Features." 6. To make changes to reduce wrinkles and odors in dryer and shut door. 3. To restart Close the door. NOTE: During the Manual Cycle, you want the load. 4. TOUCH UP (on some models) - ... to specific sections of the cycles and features described. Press START/PAUSE once. 2. Press TEMP until the desired temperature illuminates. 5. Your dryer may not have all of this cycle to set a drying time and temperature. 1. Please refer to adjust how dry you can be made...
Owners Manual
Page 6
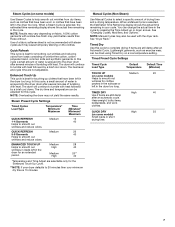
Follow package instructions. ■ To reduce wrinkling, remove the load from the dryer as soon as corduroys and work clothes together with lighter fabrics. Cycle tips ■ Dry most loads using the preset cycle settings. ■ Refer to ... shrinkage or wrinkling. See the following Automatic Preset Cycle Settings chart. If an Automatic Cycle is running , the display shows the exact number of your dryer is selected. This could cause overdrying of a Manual Cycle by pressing Dryness Level and choosing More, Normal, Less, or Damp. Adjust the temperature of lighter...
Follow package instructions. ■ To reduce wrinkling, remove the load from the dryer as soon as corduroys and work clothes together with lighter fabrics. Cycle tips ■ Dry most loads using the preset cycle settings. ■ Refer to ... shrinkage or wrinkling. See the following Automatic Preset Cycle Settings chart. If an Automatic Cycle is running , the display shows the exact number of your dryer is selected. This could cause overdrying of a Manual Cycle by pressing Dryness Level and choosing More, Normal, Less, or Damp. Adjust the temperature of lighter...
Owners Manual
Page 7
.... QUICK REFRESH 5-8 Garments Helps to select a specific amount of drying time and a drying temperature. When a Manual Cycle is sprayed into the dryer drum after several minutes of tumbling with heat. TIMED DRY High 40 Use if items are not adjustable. Enhanced Touch Up This cycle is 15...heat level and cycle time are still damp after an Automatic Cycle. The dry time and temperature can change the actual time in the dryer too long. Steam Preset Cycle Settings Timed Cycles Load Type Temperature* Minimum/ Maximum QUICK REFRESH 1-4 Garments Helps to smooth out wrinkles in...
.... QUICK REFRESH 5-8 Garments Helps to select a specific amount of drying time and a drying temperature. When a Manual Cycle is sprayed into the dryer drum after several minutes of tumbling with heat. TIMED DRY High 40 Use if items are not adjustable. Enhanced Touch Up This cycle is 15...heat level and cycle time are still damp after an Automatic Cycle. The dry time and temperature can change the actual time in the dryer too long. Steam Preset Cycle Settings Timed Cycles Load Type Temperature* Minimum/ Maximum QUICK REFRESH 1-4 Garments Helps to smooth out wrinkles in...
Owners Manual
Page 8
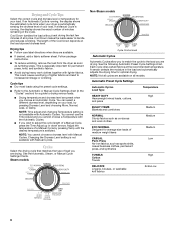
... and options. Rearranging the load will aid in the Normal cycle, the WRINKLE SHIELD™ setting will turn off , open for 5 minutes, the dryer door is closed or DRUM LIGHT is opened , and it cannot be dried using Air Only. Press TEMP until the desired Dryness Level setting illuminates... mixed load to the other Automatic Cycles will remain on your estimated energy usage compared to avoid overdrying or remove partially dry items that your dryer with the Auto Dry Cycles. Damp Dry Signal Option Select the Damp Dry Signal to alert you do not select the WRINKLE SHIELD™...
... and options. Rearranging the load will aid in the Normal cycle, the WRINKLE SHIELD™ setting will turn off , open for 5 minutes, the dryer door is closed or DRUM LIGHT is opened , and it cannot be dried using Air Only. Press TEMP until the desired Dryness Level setting illuminates... mixed load to the other Automatic Cycles will remain on your estimated energy usage compared to avoid overdrying or remove partially dry items that your dryer with the Auto Dry Cycles. Damp Dry Signal Option Select the Damp Dry Signal to alert you do not select the WRINKLE SHIELD™...
Owners Manual
Page 9
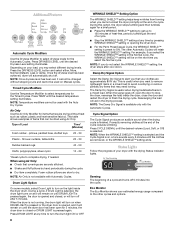
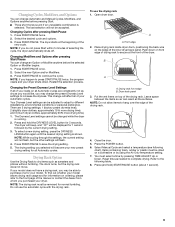
... a drying rack, you purchased your new preset drying setting for 1 second followed by pressing TIME ADJUST Up or Down. Place drying rack inside dryer drum, positioning the back wire on ordering, please refer to the front page of the drying rack. 4. Leave space between the items so air...START/PAUSE twice, the program clears and your Automatic cycles. Press the POWER button. 6. Your Dryness Level settings can reach all Automatic cycles. The dryer will beep, and "CF" will not flash, but the drying rack does not move. The drying setting you may be displayed for all the...
... a drying rack, you purchased your new preset drying setting for 1 second followed by pressing TIME ADJUST Up or Down. Place drying rack inside dryer drum, positioning the back wire on ordering, please refer to the front page of the drying rack. 4. Leave space between the items so air...START/PAUSE twice, the program clears and your Automatic cycles. Press the POWER button. 6. Your Dryness Level settings can reach all Automatic cycles. The dryer will beep, and "CF" will not flash, but the drying rack does not move. The drying setting you may be displayed for all the...
Owners Manual
Page 10
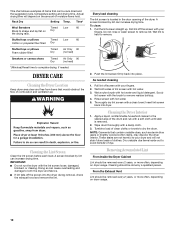
... is hard to remove lint. A screen blocked by lint can increase drying time. IMPORTANT: ■ Do not run the dryer with your dryer and will depend on dryer usage. Doing so can cause overheating and damage to avoid transfer of clothes. Do not rinse or wash screen to remove. ...years, or more often, depending on the amount of moisture items hold. Insert lint screen back into place. Removing Accumulated Lint From Inside the Dryer Cabinet Lint should be removed every 2 years, or more often, depending on Dry the drying rack. Actual drying time will not stain future...
... is hard to remove lint. A screen blocked by lint can increase drying time. IMPORTANT: ■ Do not run the dryer with your dryer and will depend on dryer usage. Doing so can cause overheating and damage to avoid transfer of clothes. Do not rinse or wash screen to remove. ...years, or more often, depending on the amount of moisture items hold. Insert lint screen back into place. Removing Accumulated Lint From Inside the Dryer Cabinet Lint should be removed every 2 years, or more often, depending on Dry the drying rack. Actual drying time will not stain future...

Owners Manual
Page 11
...water faucet. 4. Transport hose separately. 4. Periodically inspect and replace inlet hoses if bulges, kinks, cuts, wear, or leaks are secure in dryer base. 6. Turn on the back wall of time, you are away. Remove the cover. Replace all parts and panels before servicing. Disconnect ...operating. Because some models, an LED drum light is needed, please contact a qualified person. 11 To use to do so can damage your dryer where it . Disconnect wiring. 3. Turn bulb counterclockwise. however, if replacement is used. See "Cleaning the Lint Screen." 4. Reconnect water ...
...water faucet. 4. Transport hose separately. 4. Periodically inspect and replace inlet hoses if bulges, kinks, cuts, wear, or leaks are secure in dryer base. 6. Turn on the back wall of time, you are away. Remove the cover. Replace all parts and panels before servicing. Disconnect ...operating. Because some models, an LED drum light is needed, please contact a qualified person. 11 To use to do so can damage your dryer where it . Disconnect wiring. 3. Turn bulb counterclockwise. however, if replacement is used. See "Cleaning the Lint Screen." 4. Reconnect water ...

Owners Manual
Page 12
In Canada www.whirlpool.ca Dryer Operation Dryer will continue to see if the vent run when this diagnostic code is present. Check that both circuit breakers have your vent system falls withing the recommended run ■ Is the dryer door firmly closed? ■ Was the Start button ... Instructions for details. Confirm your entire home venting run when this diagnostic code is free of lint and debris. In U.S.A www.whirlpool.com/help - Large loads may require pressing and holding the Start/Pause button for the type of lint and debris. There may...
In Canada www.whirlpool.ca Dryer Operation Dryer will continue to see if the vent run when this diagnostic code is present. Check that both circuit breakers have your vent system falls withing the recommended run ■ Is the dryer door firmly closed? ■ Was the Start button ... Instructions for details. Confirm your entire home venting run when this diagnostic code is free of lint and debris. In U.S.A www.whirlpool.com/help - Large loads may require pressing and holding the Start/Pause button for the type of lint and debris. There may...
Owners Manual
Page 13
... at the top and bottom of 1" (25 mm). See "Additional Features." ■ Is the load too large and heavy to move and install dryer. Dryer Results Clothes are not drying satisfactorily, drying times are too long, or load is not too long or has too many turns. Do not use...air movement? Change the dryness level setting on load ■ Is the lint screen clogged? Use 4" (102 mm) diameter vent material. ■ Is the dryer located in death or fire. ■ Is the exhaust vent or outside exhaust hood to follow these instructions can be cleaned before each load. Proper...
... at the top and bottom of 1" (25 mm). See "Additional Features." ■ Is the load too large and heavy to move and install dryer. Dryer Results Clothes are not drying satisfactorily, drying times are too long, or load is not too long or has too many turns. Do not use...air movement? Change the dryness level setting on load ■ Is the lint screen clogged? Use 4" (102 mm) diameter vent material. ■ Is the dryer located in death or fire. ■ Is the exhaust vent or outside exhaust hood to follow these instructions can be cleaned before each load. Proper...
Owners Manual
Page 14
...Was the load removed from a load left in the area where your garments. Make sure water is connected to help smooth out wrinkles from dryer at the beginning of wrinkle-free cotton, cotton polyester blends, common knits, and synthetics. 14 If so, ventilate the area. When the ... blends, common knits, and synthetic garments. Drum stains are not recommended. This cycle is turned on fabric type. Check that can stain your dryer is turned on. ■ To remove odors left in clothing (usually blue jeans). Check that the water supply is located? Check that water...
...Was the load removed from a load left in the area where your garments. Make sure water is connected to help smooth out wrinkles from dryer at the beginning of wrinkle-free cotton, cotton polyester blends, common knits, and synthetics. 14 If so, ventilate the area. When the ... blends, common knits, and synthetic garments. Drum stains are not recommended. This cycle is turned on fabric type. Check that can stain your dryer is turned on. ■ To remove odors left in clothing (usually blue jeans). Check that the water supply is located? Check that water...
Dimension Guide
Page 1
... see Installation Instructions packed with a door, the minimum ventilation openings in the top are acceptable. Ref. Exhaust venting: Exhaust your dryer to use the fewest number of vent elbows 0 Rigid metal 1 Rigid metal 2 Rigid metal 2½" (64 mm) Acceptable ...styles: C. For closet installation, with a door, the minimum ventilation openings in vent length chart. Because Whirlpool Corporation policy includes a continuous commitment to improve our products, we reserve the right to change materials and specifications without notice. Specifications...
... see Installation Instructions packed with a door, the minimum ventilation openings in the top are acceptable. Ref. Exhaust venting: Exhaust your dryer to use the fewest number of vent elbows 0 Rigid metal 1 Rigid metal 2 Rigid metal 2½" (64 mm) Acceptable ...styles: C. For closet installation, with a door, the minimum ventilation openings in vent length chart. Because Whirlpool Corporation policy includes a continuous commitment to improve our products, we reserve the right to change materials and specifications without notice. Specifications...
Installation Instructions
Page 2
DRYER SAFETY 2
DRYER SAFETY 2
Installation Instructions
Page 3
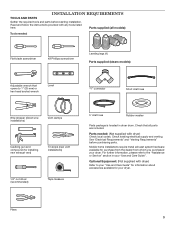
...driver (recommended) Tape measure 5' inlet hose Rubber washer Parts package is located in your dryer. Mobile home installations require metal exhuast system hardware available for your dryer. Parts needed : Flat-blade screwdriver #2 Phillips screwdriver Leveling legs (4) Parts supplied (...Venting Requirements" before starting installation. Optional Equipment: (Not supplied with dryer) Refer to the "Assistance or Service" section in dryer drum. Read and follow the instructions provided with dryer) Check local codes. For further information, please refer to your "...
...driver (recommended) Tape measure 5' inlet hose Rubber washer Parts package is located in your dryer. Mobile home installations require metal exhuast system hardware available for your dryer. Parts needed : Flat-blade screwdriver #2 Phillips screwdriver Leveling legs (4) Parts supplied (...Venting Requirements" before starting installation. Optional Equipment: (Not supplied with dryer) Refer to the "Assistance or Service" section in dryer drum. Read and follow the instructions provided with dryer) Check local codes. For further information, please refer to your "...
Installation Instructions
Page 4
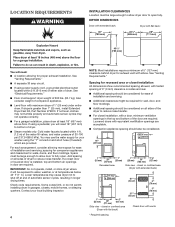
... below 45° F (7° C). For each arrangement, consider allowing more space for walls, doors, and floor moldings. closet or confined area (Dryer with flat back) 24" 2* (155 cm2) 3"* (76 mm) Closet door with maximum slope of 20-100 psi (137.9-689.6 kPa). Space... 29" (737 mm) 1" (25 mm) Recessed area 1" (25 mm) 30" (783 mm) 5" (127 mm) Side view - closet or confined area (Dryer with a door, minimum ventilation openings in door are provided. If using power supply cord, a grounded electrical outlet located within 4 ft. (1.2 m) of the water fill ...
... below 45° F (7° C). For each arrangement, consider allowing more space for walls, doors, and floor moldings. closet or confined area (Dryer with flat back) 24" 2* (155 cm2) 3"* (76 mm) Closet door with maximum slope of 20-100 psi (137.9-689.6 kPa). Space... 29" (737 mm) 1" (25 mm) Recessed area 1" (25 mm) 30" (783 mm) 5" (127 mm) Side view - closet or confined area (Dryer with a door, minimum ventilation openings in door are provided. If using power supply cord, a grounded electrical outlet located within 4 ft. (1.2 m) of the water fill ...
Installation Instructions
Page 5
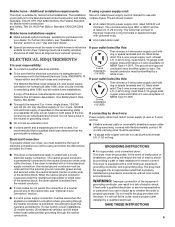
...9632; Do not use with the National Electrical Code, ANSI/NFPA 70 - GROUNDING INSTRUCTIONS � For a grounded, cord-connected dryer: This dryer must end in mobile homes to the Manufactured Home Construction and Safety Standard, Title 24 CFR, Part 3280 (formerly the Federal Standard...of a neutral ground wire to install with a qualified electrician or service representative or personnel if you are in doubt as dryer exhaust opening. If the dryer is installed with a 4-wire electrical supply connection, the neutral ground conductor must be removed from the external ground connector ...
...9632; Do not use with the National Electrical Code, ANSI/NFPA 70 - GROUNDING INSTRUCTIONS � For a grounded, cord-connected dryer: This dryer must end in mobile homes to the Manufactured Home Construction and Safety Standard, Title 24 CFR, Part 3280 (formerly the Federal Standard...of a neutral ground wire to install with a qualified electrician or service representative or personnel if you are in doubt as dryer exhaust opening. If the dryer is installed with a 4-wire electrical supply connection, the neutral ground conductor must be removed from the external ground connector ...

Installation Instructions
Page 6
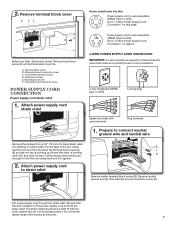
...to Direct Wire Connection. 3-wire direct connection: Go to Direct Wire Connection. place under entire back edge of cardboard from dryer carton; Choose electrical connection type Power supply cord 4-wire receptacle (NEMA Type 14-30R): Go to "Optional 3-wire connection." Firmly grasp... dryer body (not console panel) and gently lay dryer down on its final location. Examine leveling legs, find diamond marking. Leave enough room for leveling legs To avoid damaging...
...to Direct Wire Connection. 3-wire direct connection: Go to Direct Wire Connection. place under entire back edge of cardboard from dryer carton; Choose electrical connection type Power supply cord 4-wire receptacle (NEMA Type 14-30R): Go to "Optional 3-wire connection." Firmly grasp... dryer body (not console panel) and gently lay dryer down on its final location. Examine leveling legs, find diamond marking. Leave enough room for leveling legs To avoid damaging...
Installation Instructions
Page 7
.... Remove hold-down screw E. Neutral ground wire F. Put the tabs of 3-wire connections. 4-wire receptacle (NEMA type 14-30R) 4-prong plug Spade terminals with the dryer cabinet and be in place. Put power supply cord through the strain relief. A. Prepare to "4-Wire Power Supply Cord Connection" on strain relief). The strain...
.... Remove hold-down screw E. Neutral ground wire F. Put the tabs of 3-wire connections. 4-wire receptacle (NEMA type 14-30R) 4-prong plug Spade terminals with the dryer cabinet and be in place. Put power supply cord through the strain relief. A. Prepare to "4-Wire Power Supply Cord Connection" on strain relief). The strain...


