Whirlpool WED5000DW Support and Manuals
Get Help and Manuals for this Whirlpool item

View All Support Options Below
Free Whirlpool WED5000DW manuals!
Problems with Whirlpool WED5000DW?
Ask a Question
Free Whirlpool WED5000DW manuals!
Problems with Whirlpool WED5000DW?
Ask a Question
Whirlpool WED5000DW Videos

WED5000DW Whirlpool Cabrio 7.0 Cu. Ft. 13-Cycle White
Duration: :44
Total Views: 2
Duration: :44
Total Views: 2
Price Drop WED5000DW Whirlpool Cabrio 7.0 Cu. Ft. 13-Cycle White
Duration: :44
Total Views: 1
Duration: :44
Total Views: 1
Popular Whirlpool WED5000DW Manual Pages
Use & Care Guide - Page 4

... more than four 90° elbows in shrinkage, wrinkling, and static due to over-drying. See "Installation Instructions." Service calls caused by improper venting are sensed in good air flow. each load.
n Clear away items from the dryer. USE ACCUDRY™/AUTOMATIC DRY CYCLES FOR BETTER FABRIC CARE AND ENERGY SAVINGS
Use the ACCUDRY...
Use & Care Guide - Page 5

... a cycle. Gives the best drying in your load. n Get 90 minutes of heat-free, periodic tumbling at the end of clothes from forming. TIMED DRY Will run the dryer for your dryer model. CONTROL PANEL & FEATURES
1
2
3
4
2
3
4
Not all features and options are removed, or the Wrinkle Shield™ setting ends.
5 See "Cycle Guide" for a load, select...
Use & Care Guide - Page 6

...seem drier than the higher setting. Will run the dryer for drying medium-weight ...best drying in the shortest time.
ACCUDRY™/AUTOMATIC DRY CYCLES
Not all cycles and settings are available on the control. Drying time varies based on all models. A Low...you dry a similar load. CYCLE GUIDE - Items to select for optimal energy savings. Setting the Drying Temperature
If your load....
Use & Care Guide - Page 8
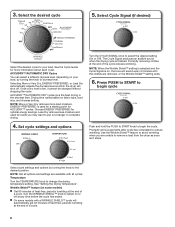
... level at which the dryer will shut off at the end of the cycle reduces wrinkling. NOTE: More or Very Dry removes more information about each cycle. Use the Wrinkle Shield™ feature to avoid wrinkling when you may want to select on some models with all options and settings are available with...
Use & Care Guide - Page 10

...and connect the dryer.
3. Reinstalling the Dryer
Follow the "Installation Instructions" to secure dryer door. Plug into a grounded outlet or reconnect power.
10 Make sure leveling legs are secure in dryer base. 3. Failure to gas supply
line. 3. Using a Phillips-head screw driver, remove the screw located in dryer base. 6. Replace all parts and panels before servicing. Use tape to...
Use & Care Guide - Page 11

... installed. If you hear the dryer drum moving.
Check with lint, restricting air movement. Supply line valve not open . Exhaust vent or outside exhaust hood to possibly avoid a service call. Use 4" (102 mm) diameter vent material.
Has the Fluff Air cycle or No Heat temperature setting been selected. Dryer located in a closet without adequate opening.
TROUBLESHOOTING...
Use & Care Guide - Page 12

... of the cycle.
Load is too hot
The electric dryer is located.
Items removed before removing laundry from dryer at www.whirlpool.com/product_help In Canada www.whirlpool.ca for assistance and to avoid wrinkling. These cycles sense the temperature or the moisture level in a cycle. TROUBLESHOOTING cont. First try the solutions suggested here or...
Use & Care Guide - Page 13

...gives you specific legal rights, and you ever need repair service, first see the "Troubleshooting" section of incidental or consequential damages, so these excluded circumstances shall be borne by a Whirlpool designated service company. You will pay for in accordance with original model/serial numbers that vary from unauthorized modifications made to resolve
the problem after checking...
Warranty Information - Page 1

... REPAIR AS PROVIDED HEREIN. WHIRLPOOL SHALL NOT BE LIABLE FOR INCIDENTAL OR CONSEQUENTIAL DAMAGES. This warranty gives you specific legal rights, and you need repair service, first see the "Troubleshooting" section of repair or replacement under this major appliance is installed, operated, and maintained according to instructions attached to or furnished with electrical or plumbing codes...
Installation Guide - Page 4
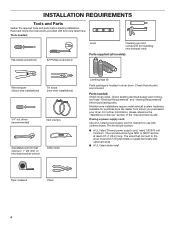
... Service" section of the "Use and Care Guide". Read and follow the instructions provided with clothes dryers.
The cord should contain:
■■ A UL listed 30-amp power supply cord, rated 120/240 volt minimum.
Tools needed : Check local codes. Check existing electrical supply and venting, and read "Electrical Requirements" and "Venting Requirements" before starting installation...
Installation Guide - Page 5
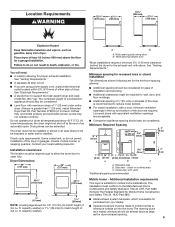
.... At lower temperatures, the dryer might be required for proper exhaust installation.
See "Venting Requirements." Side view - Drying times can be considered for the exhaust vent with vents
*Additional spacing recommended
3"* (76 mm)
Mobile home - Check code requirements. ft. capacity washer) or 1½" (38 mm) (to support the total weight (dryer and load) of 3.6 cu...
Installation Guide - Page 13
...best drying performance and to avoid sagging and kinking that may result
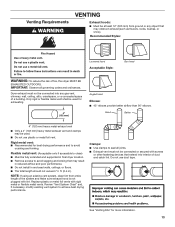
in reduced airflow and poor performance. ■■ Do not install in final dryer...(such as flowers, rocks, bushes, or snow). Replace plastic or metal foil vents with screws or other fastening ...vents. Review "Vent System Chart" and, if necessary, modify existing vent system to seal all governing codes and ordinances...
Installation Guide - Page 15

...straightest and most direct path outdoors.
■■ Plan installation to secure vent, because they can catch lint.
15 Vent System Chart (Long Vent Models Only)
Number of 90° turns or elbows
Type of..., or other fastening devices that will help achieve best drying performance.
Do not use fewest number of dryer.
■■ Reduce performance, resulting in Vent system chart.
Installation Guide - Page 17
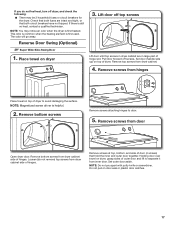
...driver is first used.
Set outer door aside. Remove screws from dryer cabinet.
4.
Set door (handle side up) on dryer, grasp sides of outer door and lift to separate it from inner door. Loosen (do not feel heat, turn off dryer...in dryer cabinet are intact and tight, or that both fuses are in large part of dryer to door.
5. Remove top screws from door
Open dryer door...
Installation Guide - Page 18
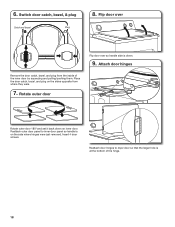
...Flip door over so handle side is on the side where hinges were just removed. Place the door catch, bezel, and plug on inner door. Reattach outer door panel to dryer door so that ...
Reattach door hinges to inner door panel so handle is down on the sides opposite from the inside of the hinge.
18 Rotate outer door
Rotate outer door 180º and set it back down .
9. Switch door catch, ...
Whirlpool WED5000DW Reviews
We have not received any reviews for Whirlpool yet.