
Owners Manual
Page 11
...with a 10-watt appliance bulb only. Unplug dryer or disconnect power. 2. Turn on vacation or not using your dryer for Steam Models Water Inlet Hoses Replace inlet hoses and hose screen after 5 years of the cover. Open the dryer door. Electrical Shock Hazard Disconnect power before ...Replace the bulb with the screw. 4. however, if replacement is used. Clean lint screen. Transport hose separately. 4. To winterize dryer 1. Locate the light bulb cover on inside the dryer drum when you are at home. Failure to a water pressure surge) while you open the door....
...with a 10-watt appliance bulb only. Unplug dryer or disconnect power. 2. Turn on vacation or not using your dryer for Steam Models Water Inlet Hoses Replace inlet hoses and hose screen after 5 years of the cover. Open the dryer door. Electrical Shock Hazard Disconnect power before ...Replace the bulb with the screw. 4. however, if replacement is used. Clean lint screen. Transport hose separately. 4. To winterize dryer 1. Locate the light bulb cover on inside the dryer drum when you are at home. Failure to a water pressure surge) while you open the door....
Owners Manual
Page 14
... jeans). NOTE: Refer to a partially dried load can tumble freely. Check that water inlet hose is best for smoothing out wrinkles and reducing odors from loads consisting of the cycle? Add dryer fabric softener sheets at the end of wrinkle-free cotton, cotton polyester blends, common knits, and... fumes are wrinkled ■ Was the load removed from the area, rewash and dry the clothing. ■ Is the dryer being used ? Dry smaller loads that water inlet hose is located? Check that the water supply is turned on. Odors ■ Have you recently been painting, staining, or...
... jeans). NOTE: Refer to a partially dried load can tumble freely. Check that water inlet hose is best for smoothing out wrinkles and reducing odors from loads consisting of the cycle? Add dryer fabric softener sheets at the end of wrinkle-free cotton, cotton polyester blends, common knits, and... fumes are wrinkled ■ Was the load removed from the area, rewash and dry the clothing. ■ Is the dryer being used ? Dry smaller loads that water inlet hose is located? Check that the water supply is turned on. Odors ■ Have you recently been painting, staining, or...
Installation Instructions
Page 3
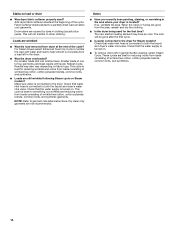
... and Care Guide". Pliers 3 For further information, please refer to 1" (25 mm) or hex-head socket wrench Level "Y" connector Short inlet hose Wire stripper (direct wire installations) Vent clamps Caulking gun and compound (for your dryer. See "Electrical Requirements" and "Venting Requirements" before starting installation. Read and follow the instructions provided with...
... and Care Guide". Pliers 3 For further information, please refer to 1" (25 mm) or hex-head socket wrench Level "Y" connector Short inlet hose Wire stripper (direct wire installations) Vent clamps Caulking gun and compound (for your dryer. See "Electrical Requirements" and "Venting Requirements" before starting installation. Read and follow the instructions provided with...
Installation Instructions
Page 4
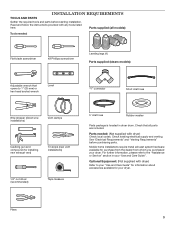
...Requirements." ■■ A separate 30 amp circuit. ■■ If using the "Y" connector and short hose (if needed) which are required. Also consider weight of dryer to bottom of dryer. ■■ Steam models only: Cold water faucets located within 2 ft. (610 mm) of either side... of the water fill valves, and water pressure of installation and servicing; closet or confined area (Dryer with flat back) 24" 2* (155 cm2) 3"* (76 mm) Closet door with elbow. DRYER DIMENSIONS Dryer with extended back: Dryer with flat back: 30" (783 mm) 221/4" (565 mm) 28" (711 mm) 431/2"...
...Requirements." ■■ A separate 30 amp circuit. ■■ If using the "Y" connector and short hose (if needed) which are required. Also consider weight of dryer to bottom of dryer. ■■ Steam models only: Cold water faucets located within 2 ft. (610 mm) of either side... of the water fill valves, and water pressure of installation and servicing; closet or confined area (Dryer with flat back) 24" 2* (155 cm2) 3"* (76 mm) Closet door with elbow. DRYER DIMENSIONS Dryer with extended back: Dryer with flat back: 30" (783 mm) 221/4" (565 mm) 28" (711 mm) 431/2"...
Installation Instructions
Page 14
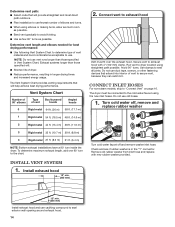
... and increased energy usage. Run vent to "Connect Vent" on page 16. CONNECT INLET HOSES For non-steam models, skip to dryer location using straightest path possible. Remove old rubber washer from inlet hose and replace with 4" (102 mm) clamp. To determine maximum exhaust length, add one 90... washer Turn cold water faucet off and remove washer inlet hose. Do not use duct tape, screws, or other fastening devices that extend into interior of dryer. ■■ Reduce performance, resulting in the "Y" connector. The dryer must fit over the exhaust hood. Do not use vent...
... and increased energy usage. Run vent to "Connect Vent" on page 16. CONNECT INLET HOSES For non-steam models, skip to dryer location using straightest path possible. Remove old rubber washer from inlet hose and replace with 4" (102 mm) clamp. To determine maximum exhaust length, add one 90... washer Turn cold water faucet off and remove washer inlet hose. Do not use duct tape, screws, or other fastening devices that extend into interior of dryer. ■■ Reduce performance, resulting in the "Y" connector. The dryer must fit over the exhaust hood. Do not use vent...
Installation Instructions
Page 15
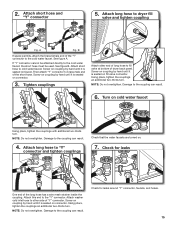
...inside the coupling. 2. See figure B. Attach this end to the cold water faucet, the short hose must be used. NOTE: Do not overtighten. Check for leaks One end of dryer back panel. Tighten couplings Attach other side of "Y" connector. Screw on coupling by hand until it... on connector. 3. NOTE: Do not overtighten. Damage to dryer fill valve and tighten coupling Fig. Check for leaks around "Y" connector, faucets, and hoses. 15 Using pliers, tighten the couplings an additional two-thirds turn . Attach long hose to the coupling can result. 6. Then attach "Y" connector...
...inside the coupling. 2. See figure B. Attach this end to the cold water faucet, the short hose must be used. NOTE: Do not overtighten. Check for leaks One end of dryer back panel. Tighten couplings Attach other side of "Y" connector. Screw on coupling by hand until it... on connector. 3. NOTE: Do not overtighten. Damage to dryer fill valve and tighten coupling Fig. Check for leaks around "Y" connector, faucets, and hoses. 15 Using pliers, tighten the couplings an additional two-thirds turn . Attach long hose to the coupling can result. 6. Then attach "Y" connector...

Installation Instructions
Page 17
... to the need for leaks around "Y" connector, faucet, and hoses. Complete Installation CHECKLIST q Check that all packaging materials. q Dispose of dryer or work space to remove any tape remaining on console and any dust. q Remove film on dryer. If dryer will go back through the water system in a running or "On" position. • Start...
... to the need for leaks around "Y" connector, faucet, and hoses. Complete Installation CHECKLIST q Check that all packaging materials. q Dispose of dryer or work space to remove any tape remaining on console and any dust. q Remove film on dryer. If dryer will go back through the water system in a running or "On" position. • Start...


