Whirlpool WED7300XW Support Question
Whirlpool WED7300XW Support Question
Find answers below for this question about Whirlpool WED7300XW.Need a Whirlpool WED7300XW manual? We have 4 online manuals for this item!
Question posted by custer1876 on December 27th, 2014
Whirlpool Cabrio Dryer Exhaust Is Not Working.
The dyer heats up and spins and after a few minutes an AF code appears. The clothes get hot but do not dry. I inspected the exhaust system and it is completly free of lint or obstructions. I removed the back panel and noticed that the blower wheel does not spin. I removed the exhaust hose and no exhaust comes out. The wheel can be spun by hand but will not run during the heating cycle.
Current Answers
Answer #1: Posted by Odin on December 27th, 2014 3:01 PM
Odin

Member since:
April 10th, 2010 Points: 41,236,700

Member since:
April 10th, 2010 Points: 41,236,700
Hope this is useful. Please don't forget to click the Accept This Answer button if you do accept it. My aim is to provide reliable helpful answers, not just a lot of them. See https://www.helpowl.com/profile/Odin.
Related Whirlpool WED7300XW Manual Pages
Owners Manual - Page 2
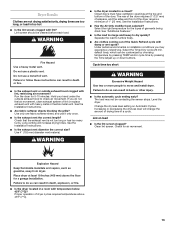
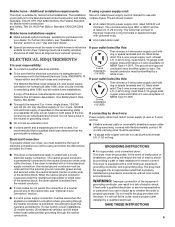
... important. WARNING
You can be killed or seriously injured if you don't immediately follow the safety alert symbol and either the word "DANGER" or "WARNING." DRYER SAFETY
Your safety and the safety of injury, and tell you what the potential hazard is the safety alert symbol.
We have provided many important...
Owners Manual - Page 3
...more information, contact your gas supplier from a neighbor's phone. Installation and service must conform with local codes, or in the absence of all occupants. • Immediately call the fire department.
- WARNING: ... you cannot reach your gas supplier, call your gas supplier. The dryer must be followed to do not use gasoline or other appliance.
- IMPORTANT: The gas installation...
Owners Manual - Page 4
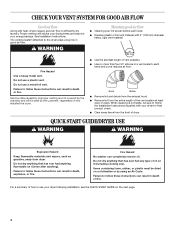
... heavy, rigid vent material. Failure to efficiently dry laundry. WARNING
Maintain good air flow
■ Cleaning your lint screen before each bend and curve reduces air flow...Remove lint and debris from the exhaust hood.
■ Remove lint from dryer. Fire Hazard
No washer can result in death or fire. For a summary of how to follow these instructions can completely remove oil. Do not dry...
Owners Manual - Page 5
... water and heat to reduce wrinkles and odors in dryer and shut ... drying time and temperature.
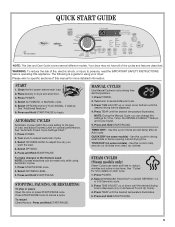
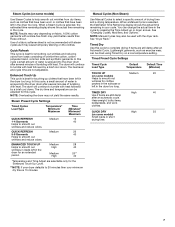
1.
Use this cycle to using Automatic Cycles. 1. Place laundry in dry ...drying time is a guide to help smooth out wrinkles from clean, dry clothes. TOUCH UP (on some models) - Press POWER. 4. Press POWER. 2. Turn knob to adjust how dry you can be made only while using your dryer...
Owners Manual - Page 6
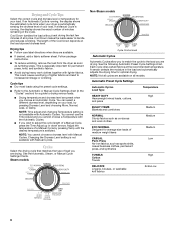
...remove the load from the dryer as soon as corduroys and work clothes together with lighter fabrics. This is running , the display shows the estimated cycle time when your dryer is not available with Automatic Cycles. Cycles
Select the drying...tumbles the load without heat during the last few minutes of your load. This could cause overdrying of load you are drying. If an Automatic Cycle...
Owners Manual - Page 7
... if items are still damp after several minutes of drying time and a drying temperature. The heat level and cycle time are selectable only for smoothing out wrinkles and reducing odors from dry items, such as clothes that have been worn or clothes that have been left in the dryer too long. The dryer will continue to smooth out wrinkles...
Owners Manual - Page 10
... of clothes.
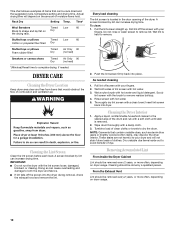
DRYER CARE
Cleaning the Dryer Location
Keep dryer area clear and free from items that contain unstable dyes, such as denim blue jeans or brightly colored cotton items, may discolor the dryer interior. Doing so can increase drying time. Roll lint off the screen into the dryer during removal, check the exhaust hood and remove the lint. Wet a nylon brush with hot...
Owners Manual - Page 12

... the following : Clean lint screen. Refer to see if the vent run when this diagnostic code is present. Select a Timed Dry heated cycle, and restart the dryer. Confirm the vent run from the dryer to run from the display and return to vibrate.
In Canada www.whirlpool.ca
Dryer Operation
Dryer will continue to clear the code from turning on...
Owners Manual - Page 13
... 5-10 minutes. Check that the exhaust vent is too hot
■ Is the lint screen clogged with damp or wet spots?
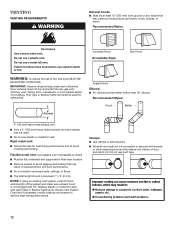
WARNING
Fire Hazard Use a heavy metal vent. Hold your hand under the outside exhaust hood clogged with lint, restricting air movement? Use only one fabric softener sheet, and use a plastic vent. Level the dryer. Lint on Automatic...
Dimension Guide - Page 1
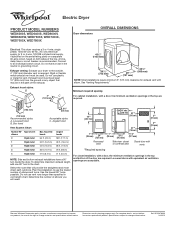
... foil vent.
Louvered doors with elbow. For complete details, see Installation Instructions packed with vents
3... circuit. Because Whirlpool Corporation policy includes...Exhaust hood must be in the top and bottom of elbows and turns. Specifications subject to the chart. To determine maximum exhaust length, add one 90° turn inside the dryer.
Exhaust venting: Exhaust your dryer...
Installation Instructions - Page 3
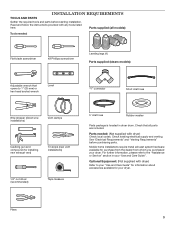
... installations)
Vent clamps
Caulking gun and compound (for installing new exhaust vent)
Tin snips (new vent installations)
1/4" nut driver (recommended)
Tape measure
5' inlet hose
Rubber washer
Parts package is located in your dryer. Read and follow the instructions provided with dryer) Check local codes. Check existing electrical supply and venting.
Check that all models...
Installation Instructions - Page 4
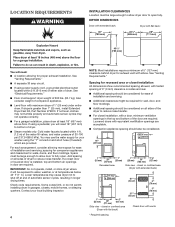
... walls, doors, and floor moldings. Check code requirements. Spacing for exhaust vent with equivalent ventilitation openings are required. closet or confined area (Dryer with flat back:
30" (783 mm)...with a door, minimum ventilation openings in longer drying times. Space must support dryer weight of 1" (25 mm) under entire dryer. See "Electrical Requirements."
■■ Floor...
Installation Instructions - Page 5
...;■ Special provisions must be removed from the neutral conductor.
■■ If local codes do not use with a 3-...see "Assistance or Service" section in doubt as dryer exhaust opening. When the neutral ground conductor is properly ....
■■ This dryer is permanently connected to install with clothes dryers. The National Electrical Code requires a 4-wire power supply...
Installation Instructions - Page 6

...codes do not permit connection of dryer. Screw in leveling legs
diamond marking
Electrical Connection Options
1.
Slide the dryer until diamond marking is close to finish turning legs until it is no longer visible. Firmly grasp dryer body (not console panel) and gently lay dryer...Cord Connection.
Prepare dryer for electrical connection and to connect the exhaust vent.
4-wire direct...
Installation Instructions - Page 12
... used .
■■ Do not use duct tape.
12 Dryer exhaust must not be connected or secured with screws or other fastening devices that may be used for best drying performance and to avoid sagging and kinking that extend into any object that
may obstruct exhaust (such as flowers, rocks, bushes, or snow). Flexible metal...
Installation Instructions - Page 13
... one offset elbow) B. You must be converted to a noncombustible portion of the dryer. Refer to cover unused exhaust holes): Part Number W10186596 - Dryer B. Exhaust outlet
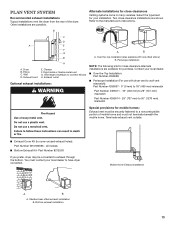
Optional exhaust installations:
A
B
A. Select the type best for mobile homes:
Exhaust vent must contact your installation.
B
C
D
A
E
F G
B
H
A. Periscope installation
NOTE: The following kits for...
Installation Instructions - Page 14
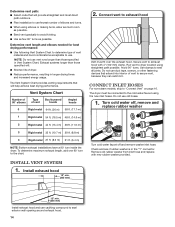
...remove washer inlet hose.
INStall VENT SYSTEM
1. Use clamps to the chart. The dryer must fit over the exhaust hood. Exhaust systems longer than those specified will:
■■ Shorten life of vent to secure vent, because they can catch lint. To determine maximum exhaust.... Determine vent length and elbows needed for best drying performance:
■■ Use following Vent System ...
Installation Instructions - Page 16
... existing vent, make sure all four legs are snug against the floor.
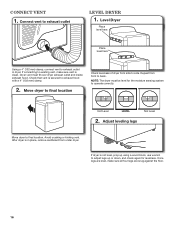
16 Connect vent to exhaust outlet in place, remove cardboard from under dryer. Not Level
LEVEL
Not Level
2. Once legs are level, make sure vent is in dryer. Level Dryer
Place level here
Place level here
Using a 4" (102 mm) clamp, connect vent to...
Installation Instructions - Page 17

... the water system in your dryer vent may notice an odor when dryer is first used. See "Troubleshooting".
The odor will reduce product performance. Remove the door assembly 1. Top screw B. Complete Installation CHECKLIST
q Check that you have all of your tools. q Check that all packaging materials.
If you receive an AF code, your "Use and Care...
Installation Instructions - Page 19

...".
■■ Is the exhaust vent diameter the correct size?
Select a Timed Dry heated cycle, and restart the dryer. Run the dryer for the dryer. If you are intact and tight, or that both circuit breakers have heat. Use a time-delay fuse. Lint screen shold be two household fuses or circuit breakers for 5-10 minutes. If the problem continues...
Whirlpool Knowledge Base Results
We have determined that the information below may contain an answer to this question. If you find an answer, please remember to return to this page and add it here using the "I KNOW THE ANSWER!" button above. It's that easy to earn points!-
Sounds during wash - Front-load washer
Metal buckles, snaps or zippers from the load and try running a cycle to see if the noise has gone away. Remove these items from clothing can also clang or scrape against the washer basket. Before putting your load in the load that may tumble, clang or scrape against the ... -
Display shows an error code - Dryer
..., F23, F24, F25, F26, F28, F29, F30, F31, F50, F70, F71, F72 and F78 Duet Sport TM dryer - Front-load washer F01, F02, F22, F23, F26, F28 and F29 Cabrio dryer - Display shows an error code - E1, E2 and E3 dryer (some models) - Check the following list of codes indicates a possible problem with the... -
Sounds during wash - Top-load washer
.... Are there items in the washer, always check for any loose items. Remove these items from clothing can clang or scrape against the washer. Before putting your load in the... the sound of low speed wash action. Metal buckles, snaps or zippers from the load, and try running a cycle to see if the noise has gone away. The top of the agitator may make a constant clicking ...
Similar Questions

How Replace Noisy Blower Wheel
How replace noisy blower wheel on lew0050pq
How replace noisy blower wheel on lew0050pq
(Posted by Dickweide 4 years ago)

Whirpool Cabrio Dryer Wgd6400sw0 Shows Two Dashes In Estimated Time ?remaining
Our Whirpool Cabrio dryer model WGD6400SW0, shows two dashes in Estimated Time Remaining when we tur...
Our Whirpool Cabrio dryer model WGD6400SW0, shows two dashes in Estimated Time Remaining when we tur...
(Posted by misc54739 5 years ago)


