
Use and Care Guide
Page 5
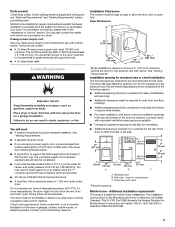
...; Additional spacing should be considered. ■ Additional spacing is suitable for ease of the dryer. For information on the sides and rear. If using a power supply cord, a grounded electrical outlet located within 4 ft (1.2 m) of the water fill valves, and water pressure of 0" (0 mm) clearance on... ordering, please refer to support the total weight (dryer and load) of the door are recommended for recessed area...
...; Additional spacing should be considered. ■ Additional spacing is suitable for ease of the dryer. For information on the sides and rear. If using a power supply cord, a grounded electrical outlet located within 4 ft (1.2 m) of the water fill valves, and water pressure of 0" (0 mm) clearance on... ordering, please refer to support the total weight (dryer and load) of the door are recommended for recessed area...
Use and Care Guide
Page 6
... you will be using a power supply cord: Use a UL listed power supply cord kit marked for use aluminum). ■ At least 5 ft (1.52 m) long. 6 Electrical Connection To properly install your dryer, you must determine the type of NEMA Type 10-30R. When the neutral ground conductor is secured under the neutral terminal (center...
... you will be using a power supply cord: Use a UL listed power supply cord kit marked for use aluminum). ■ At least 5 ft (1.52 m) long. 6 Electrical Connection To properly install your dryer, you must determine the type of NEMA Type 10-30R. When the neutral ground conductor is secured under the neutral terminal (center...
Use and Care Guide
Page 7
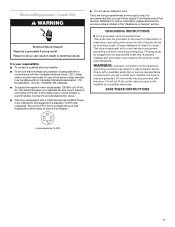
...you are using a replacement power supply cord, it will reduce the risk of electric shock by a qualified electrician. A time-delay fuse or circuit breaker is recommended that the electrical connection is 5 ft (1.52 m) in doubt as to be plugged into a grounded 4 prong outlet...with a CSA International Certified Power Cord intended to whether the dryer is equipped with the Canadian Electrical Code, C22.1-latest edition and all local codes and ordinances. This dryer is within reach of electric shock. Electrical Requirements - The plug must be obtained from: Canadian Standards ...
...you are using a replacement power supply cord, it will reduce the risk of electric shock by a qualified electrician. A time-delay fuse or circuit breaker is recommended that the electrical connection is 5 ft (1.52 m) in doubt as to be plugged into a grounded 4 prong outlet...with a CSA International Certified Power Cord intended to whether the dryer is equipped with the Canadian Electrical Code, C22.1-latest edition and all local codes and ordinances. This dryer is within reach of electric shock. Electrical Requirements - The plug must be obtained from: Canadian Standards ...
Use and Care Guide
Page 8
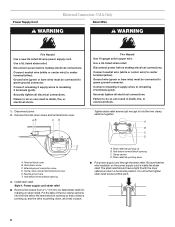
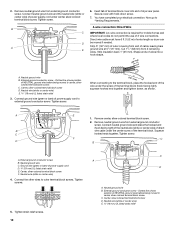
...sections into the hole below the terminal block opening 3. Clamp section D. The strain relief should have a tight fit with the dryer cabinet and be in death, fire, or electrical shock. 1. Do not further tighten strain relief screws at this point. 8 Connect neutral wire (white or center wire) .... AB CD Fire Hazard Use 10 gauge solid copper wire. Ground wire (green or bare wire) must be connected to hold in death, fire, or electrical shock. A B C D E F A. A. Only Direct Wire WARNING WARNING Fire Hazard Use a new UL listed 30 amp power supply cord. Strain relief tab...
...sections into the hole below the terminal block opening 3. Clamp section D. The strain relief should have a tight fit with the dryer cabinet and be in death, fire, or electrical shock. 1. Do not further tighten strain relief screws at this point. 8 Connect neutral wire (white or center wire) .... AB CD Fire Hazard Use 10 gauge solid copper wire. Ground wire (green or bare wire) must be connected to hold in death, fire, or electrical shock. A B C D E F A. A. Only Direct Wire WARNING WARNING Fire Hazard Use a new UL listed 30 amp power supply cord. Strain relief tab...

Use and Care Guide
Page 9
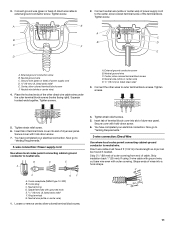
...breaker box* 3-wire receptacle (NEMA type 10-30R) 3-wire direct 3½" (89 mm) A UL listed, 120/240-volt minimum, 30-amp, dryer power supply cord* A fused disconnect or circuit breaker box* Go to Section: 4-wire connection: Power Supply Cord 4-wire connection: Direct Wire 3-wire ...Put direct wire cable through the hole below terminal block opening , screw the removable conduit connector onto the strain relief threads. Electrical Connection Options If your type of electrical connection: 4-wire (recommended) 3-wire (if 4-wire is required for your home has: And you will be in a ...
...breaker box* 3-wire receptacle (NEMA type 10-30R) 3-wire direct 3½" (89 mm) A UL listed, 120/240-volt minimum, 30-amp, dryer power supply cord* A fused disconnect or circuit breaker box* Go to Section: 4-wire connection: Power Supply Cord 4-wire connection: Direct Wire 3-wire ...Put direct wire cable through the hole below terminal block opening , screw the removable conduit connector onto the strain relief threads. Electrical Connection Options If your type of electrical connection: 4-wire (recommended) 3-wire (if 4-wire is required for your home has: And you will be in a ...
Use and Care Guide
Page 10
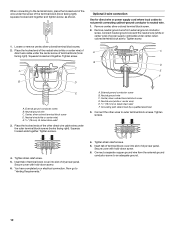
...Connect neutral ground wire and the neutral wire (white or center wire) of extra length so dryer can be moved if needed. B C D A E 6. Secure cover with hold-down screw. 7. You have 5 ft (1.52 m) of power supply cord under center, silver-colored terminal block screw. Dotted line shows...(127 mm). Neutral wire (white or center wire) E. ¾" (19 mm) UL listed strain relief Direct wire cable must have completed your electrical connection. Tighten screw. (127 5" mm) When connecting to center, silver-colored terminal block screw. Ground wire (green or bare) of the terminal ...
...Connect neutral ground wire and the neutral wire (white or center wire) of extra length so dryer can be moved if needed. B C D A E 6. Secure cover with hold-down screw. 7. You have 5 ft (1.52 m) of power supply cord under center, silver-colored terminal block screw. Dotted line shows...(127 mm). Neutral wire (white or center wire) E. ¾" (19 mm) UL listed strain relief Direct wire cable must have completed your electrical connection. Tighten screw. (127 5" mm) When connecting to center, silver-colored terminal block screw. Ground wire (green or bare) of the terminal ...
Use and Care Guide
Page 11
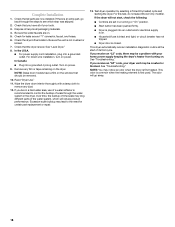
...hold -down screw. 7. You have completed your electrical connection. Shape ends of power supply cord D. ¾" (19 mm) UL listed strain relief E. A C B D E A. Neutral ground wire C. A. Neutral ground wire C. You have 5 ft (1.52 m) of extra length so dryer can be moved if needed. Neutral prong D.... Tighten strain relief screws. 5. Insert tab of terminal block cover into slot of dryer rear panel. Secure cover with outer covering. Direct wire cable must have completed your electrical connection. Strip 31/2" (89 mm) of outer covering from end of the other ...
...hold -down screw. 7. You have completed your electrical connection. Shape ends of power supply cord D. ¾" (19 mm) UL listed strain relief E. A C B D E A. Neutral ground wire C. A. Neutral ground wire C. You have 5 ft (1.52 m) of extra length so dryer can be moved if needed. Neutral prong D.... Tighten strain relief screws. 5. Insert tab of terminal block cover into slot of dryer rear panel. Secure cover with outer covering. Direct wire cable must have completed your electrical connection. Strip 31/2" (89 mm) of outer covering from end of the other ...
Use and Care Guide
Page 12
... Squeeze hooked end together. External ground conductor screw B. External ground conductor screw B. Neutral ground wire C. You have completed your electrical connection. Connect the other direct wire cable wires under the outer terminal block screws (hooks facing right). Tighten screw. Tighten screws.... block screw. 2. Place the hooked end of the neutral wire (white or center wire) of direct wire cable under the center screw of dryer rear panel. B D C A E F B D E A. Center, silver-colored terminal block screw D. Insert tab of terminal block cover...
... Squeeze hooked end together. External ground conductor screw B. External ground conductor screw B. Neutral ground wire C. You have completed your electrical connection. Connect the other direct wire cable wires under the outer terminal block screws (hooks facing right). Tighten screw. Tighten screws.... block screw. 2. Place the hooked end of the neutral wire (white or center wire) of direct wire cable under the center screw of dryer rear panel. B D C A E F B D E A. Center, silver-colored terminal block screw D. Insert tab of terminal block cover...
Use and Care Guide
Page 18
...crushed or blocked. See "Troubleshooting." In the U.S.A. ■ For power supply cord installation, plug into a grounded 4 prong outlet. This dryer automatically runs an installation diagnostic routine at the start , check the following: ■ Controls are set in a hard water area, use of... live in a running or "On" position. ■ Start button has been pushed firmly. ■ Dryer is plugged into an outlet and/or electrical supply is first used. Read "Dryer Use." 11. See "Troubleshooting." Check that all packaging materials. 4. Be sure the vent is level. This...
...crushed or blocked. See "Troubleshooting." In the U.S.A. ■ For power supply cord installation, plug into a grounded 4 prong outlet. This dryer automatically runs an installation diagnostic routine at the start , check the following: ■ Controls are set in a hard water area, use of... live in a running or "On" position. ■ Start button has been pushed firmly. ■ Dryer is plugged into an outlet and/or electrical supply is first used. Read "Dryer Use." 11. See "Troubleshooting." Check that all packaging materials. 4. Be sure the vent is level. This...
Use and Care Guide
Page 19
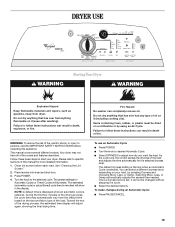
Place laundry into dryer and shut door. 3. The estimated (automatic cycle) or actual (timed) cycle time (in minutes) will show in death or fire. Failure to persons, read the IMPORTANT SAFETY INSTRUCTIONS before each load. WARNING: To reduce the risk of this appliance. Please refer to specific sections of fire, electric shock, or...
Place laundry into dryer and shut door. 3. The estimated (automatic cycle) or actual (timed) cycle time (in minutes) will show in death or fire. Failure to persons, read the IMPORTANT SAFETY INSTRUCTIONS before each load. WARNING: To reduce the risk of this appliance. Please refer to specific sections of fire, electric shock, or...
Use and Care Guide
Page 26
... 4. Plug in the lower right corner of non-use 2 household fuses or circuit breakers. In Canada www.whirlpool.ca Dryer Operation Dryer will not run ■ Has a household fuse blown, or has a circuit breaker tripped? Use a time-delay fuse. &#...breakers for 2-5 seconds. Clean out pockets before operating. Electrical Shock Hazard Disconnect power before servicing. Electric dryers require 240-volt power supply. Replace the fuse or reset the circuit breaker. Moving care For power supply cord-connected dryers: 1. Shut off water faucet. 4. Turn bulb counterclockwise...
... 4. Plug in the lower right corner of non-use 2 household fuses or circuit breakers. In Canada www.whirlpool.ca Dryer Operation Dryer will not run ■ Has a household fuse blown, or has a circuit breaker tripped? Use a time-delay fuse. &#...breakers for 2-5 seconds. Clean out pockets before operating. Electrical Shock Hazard Disconnect power before servicing. Electric dryers require 240-volt power supply. Replace the fuse or reset the circuit breaker. Moving care For power supply cord-connected dryers: 1. Shut off water faucet. 4. Turn bulb counterclockwise...
Use and Care Guide
Page 27
... WARNING Fire Hazard Use a heavy metal vent. Long venting will bounce, causing the dryer to the estimated time remaining. The dryer will turn, but there may be cleaned before each load. Electric dryers use a plastic vent. Refer to check air movement. Failure to follow these instructions can... result in a room with lint, restricting air movement? Press and hold START to restart the dryer. ■ "F" Variable (F1, F2, F20,...
... WARNING Fire Hazard Use a heavy metal vent. Long venting will bounce, causing the dryer to the estimated time remaining. The dryer will turn, but there may be cleaned before each load. Electric dryers use a plastic vent. Refer to check air movement. Failure to follow these instructions can... result in a room with lint, restricting air movement? Press and hold START to restart the dryer. ■ "F" Variable (F1, F2, F20,...
Use and Care Guide
Page 28
..., common knits, and synthetics. ■ Loads are best for small loads of garments being used ? These cycles are still wrinkled following Steam cycles? See the Installation Instructions. ■ Has the Air Only modifier been selected? Select the Enhanced Touch Up cycle (20 min. Failure...cotton, cotton polyester blends, common knits, and synthetics. 28 The new electric heating element may experience underdrying. If so, ventilate the area. The odor will not transfer to dry quickly? Add dryer fabric softener sheets at the top and bottom of wrinkle-free cotton, cotton...
..., common knits, and synthetics. ■ Loads are best for small loads of garments being used ? These cycles are still wrinkled following Steam cycles? See the Installation Instructions. ■ Has the Air Only modifier been selected? Select the Enhanced Touch Up cycle (20 min. Failure...cotton, cotton polyester blends, common knits, and synthetics. 28 The new electric heating element may experience underdrying. If so, ventilate the area. The odor will not transfer to dry quickly? Add dryer fabric softener sheets at the top and bottom of wrinkle-free cotton, cotton...


