Use and Care Guide
Page 4
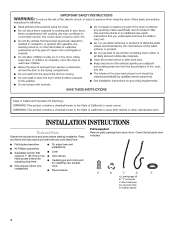
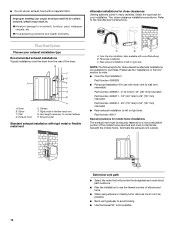
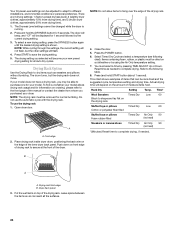
"Y" connector C. Short inlet hose D. Check that ■ Level opens to 1" (25 mm) or hex- ■ Vent clamps head socket wrench (for adjusting dryer feet) ■ Caulking gun and compound (for installing new exhaust ■ Wire stripper (direct wire vent) installations) ■ Tape measure Parts supplied: Remove parts package from dryer drum. A B C D E A. Long inlet hose E. Rubber washer 4 INSTALLATION INSTRUCTIONS Tools and Parts Gather the required tools and parts before starting installation. Read and follow the instructions provided with any tools listed here...
"Y" connector C. Short inlet hose D. Check that ■ Level opens to 1" (25 mm) or hex- ■ Vent clamps head socket wrench (for adjusting dryer feet) ■ Caulking gun and compound (for installing new exhaust ■ Wire stripper (direct wire vent) installations) ■ Tape measure Parts supplied: Remove parts package from dryer drum. A B C D E A. Long inlet hose E. Rubber washer 4 INSTALLATION INSTRUCTIONS Tools and Parts Gather the required tools and parts before starting installation. Read and follow the instructions provided with any tools listed here...
Use and Care Guide
Page 5
...;C). Mobile home installations require metal exhaust system hardware available for purchase from the dealer from whom you are using a power supply cord, a grounded electrical outlet located within 4 ft (1.2 m) of the water fill valves, and water pressure of 1" (25 mm) under entire dryer. If using the "Y" connector and short hose (if needed : Check local codes. Drying times can be considered. ■ Cold water faucets located within 2 ft (610 mm) of an automatic cycle. The dryer must not be...
...;C). Mobile home installations require metal exhaust system hardware available for purchase from the dealer from whom you are using a power supply cord, a grounded electrical outlet located within 4 ft (1.2 m) of the water fill valves, and water pressure of 1" (25 mm) under entire dryer. If using the "Y" connector and short hose (if needed : Check local codes. Drying times can be considered. ■ Cold water faucets located within 2 ft (610 mm) of an automatic cycle. The dryer must not be...
Use and Care Guide
Page 6
... identified by direct wire: Power supply cable must determine the type of electrical connection you will be using a power supply cord: Use a UL listed power supply cord kit marked for use aluminum). ■ At least 5 ft (1.52 m) long. 6 A timedelay fuse or circuit breaker is permanently connected to install with upturned ends. ■ A UL listed strain relief. Connect to introduce outside air into the dryer. The opening (such as the dryer exhaust opening. If connecting by a white cover. A copy of the above code standards...
... identified by direct wire: Power supply cable must determine the type of electrical connection you will be using a power supply cord: Use a UL listed power supply cord kit marked for use aluminum). ■ At least 5 ft (1.52 m) long. 6 A timedelay fuse or circuit breaker is permanently connected to install with upturned ends. ■ A UL listed strain relief. Connect to introduce outside air into the dryer. The opening (such as the dryer exhaust opening. If connecting by a white cover. A copy of the above code standards...
Use and Care Guide
Page 7
... codes. Failure to be plugged into a standard 14-30R wall receptacle. A time-delay fuse or circuit breaker is within reach of electric shock by a qualified electrician. For further information, please reference the service numbers located in death or electrical shock. Check with the dryer: if it is recommended that you are in doubt as to whether the dryer is equipped with a CSA International Certified Power Cord...
... codes. Failure to be plugged into a standard 14-30R wall receptacle. A time-delay fuse or circuit breaker is within reach of electric shock by a qualified electrician. For further information, please reference the service numbers located in death or electrical shock. Check with the dryer: if it is recommended that you are in doubt as to whether the dryer is equipped with a CSA International Certified Power Cord...
Use and Care Guide
Page 10
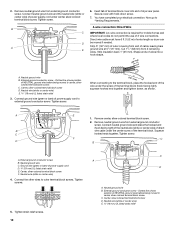
... of terminal block cover into a hook shape. (251"mm) A. Direct wire cable must have completed your electrical connection. Shape ends of power supply cord under the screw of power supply cord D. ¾" (19 mm) UL listed strain relief E. Remove neutral ground wire from external ground conductor screw. Tighten screw. Neutral ground wire C. Connect neutral ground wire and the neutral wire (white or center wire) of wires into slot of extra length so dryer...
... of terminal block cover into a hook shape. (251"mm) A. Direct wire cable must have completed your electrical connection. Shape ends of power supply cord under the screw of power supply cord D. ¾" (19 mm) UL listed strain relief E. Remove neutral ground wire from external ground conductor screw. Tighten screw. Neutral ground wire C. Connect neutral ground wire and the neutral wire (white or center wire) of wires into slot of extra length so dryer...
Use and Care Guide
Page 11
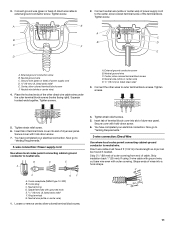
... your electrical connection. Ring terminals G. Neutral wire (white or center wire) 1. Now go to "Venting Requirements." 3-wire connection: Power supply cord Use where local codes permit connecting cabinet-ground conductor to outer terminal block screws. Center, silver-colored terminal block screw F. Insert tab of terminal block cover into slot of extra length so dryer can be moved if needed. B D E A C GF A. 3-wire receptacle (NEMA type 10-30R) B. 3-wire plug C. Shape ends of direct wire cable to neutral wire. Neutral ground wire C. Neutral wire (white...
... your electrical connection. Ring terminals G. Neutral wire (white or center wire) 1. Now go to "Venting Requirements." 3-wire connection: Power supply cord Use where local codes permit connecting cabinet-ground conductor to outer terminal block screws. Center, silver-colored terminal block screw F. Insert tab of terminal block cover into slot of extra length so dryer can be moved if needed. B D E A C GF A. 3-wire receptacle (NEMA type 10-30R) B. 3-wire plug C. Shape ends of direct wire cable to neutral wire. Neutral ground wire C. Neutral wire (white...
Use and Care Guide
Page 12
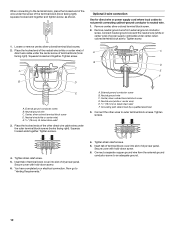
... have completed your electrical connection. Insert tab of terminal block cover into slot of dryer rear panel. Remove center, silver-colored terminal block screw. 2. Squeeze hooked ends together. Neutral ground wire C. Secure cover with hold -down screw. 6. Connect neutral ground wire and the neutral wire (white or center wire) of terminal block (hook A C facing right). Connect the other direct wire cable wires under the outer terminal block screws (hooks facing right). Optional 3-wire connection Use for direct wire or power supply cord where local codes do not permit...
... have completed your electrical connection. Insert tab of terminal block cover into slot of dryer rear panel. Remove center, silver-colored terminal block screw. 2. Squeeze hooked ends together. Neutral ground wire C. Secure cover with hold -down screw. 6. Connect neutral ground wire and the neutral wire (white or center wire) of terminal block (hook A C facing right). Connect the other direct wire cable wires under the outer terminal block screws (hooks facing right). Optional 3-wire connection Use for direct wire or power supply cord where local codes do not permit...

Use and Care Guide
Page 13
... all governing codes and ordinances. Rigid metal vent ■ For best drying performance, rigid metal vents are recommended. 4" (102 mm) heavy metal exhaust vent DURASAFE™ vent products can result in enclosed walls, ceilings, or floors. ■ The total length of flexible metal duct shall not exceed 7 3/4 ft (2.4 m). If using an existing vent system ■ Clean lint from your dealer or by calling Whirlpool Parts and...
... all governing codes and ordinances. Rigid metal vent ■ For best drying performance, rigid metal vents are recommended. 4" (102 mm) heavy metal exhaust vent DURASAFE™ vent products can result in enclosed walls, ceilings, or floors. ■ The total length of flexible metal duct shall not exceed 7 3/4 ft (2.4 m). If using an existing vent system ■ Clean lint from your dealer or by calling Whirlpool Parts and...
Use and Care Guide
Page 14
... or right side NOTE: The following kits for mobile home installations The exhaust vent must not terminate beneath the mobile home. Please see the "Assistance or Service" section to a noncombustible portion of the mobile home structure and must be securely fastened to order. ■ Over-the-Top Installation: Part Number 4396028 ■ Periscope Installation (For use the fewest number of the dryer. Exhaust hood H E. Rear exhaust installation to...
... or right side NOTE: The following kits for mobile home installations The exhaust vent must not terminate beneath the mobile home. Please see the "Assistance or Service" section to a noncombustible portion of the mobile home structure and must be securely fastened to order. ■ Over-the-Top Installation: Part Number 4396028 ■ Periscope Installation (For use the fewest number of the dryer. Exhaust hood H E. Rear exhaust installation to...
Use and Care Guide
Page 15
... short hose to the cold water faucet. Using pliers, tighten the couplings with Step 3. 3. Attach this end to dryer location. Determine vent length and elbows needed for best drying performance ■ Use the following Vent system chart to determine type of vent material and hood combinations acceptable to use old hoses. 1. Vent system chart NOTE: Performance of rear exhaust to either side of small hose. Install exhaust hood. Run vent to the "Y" connector. 7. Install Leveling...
... short hose to the cold water faucet. Using pliers, tighten the couplings with Step 3. 3. Attach this end to dryer location. Determine vent length and elbows needed for best drying performance ■ Use the following Vent system chart to determine type of vent material and hood combinations acceptable to use old hoses. 1. Vent system chart NOTE: Performance of rear exhaust to either side of small hose. Install exhaust hood. Run vent to the "Y" connector. 7. Install Leveling...
Use and Care Guide
Page 18
... dryer drum interior thoroughly with your dryer vent may be a problem with a damp cloth to see which will reduce product performance. For this test, do not select the Air Only modifier. Check the dryer's final location. NOTE: You may be crushed or blocked. The odor will not start of your tools. 3. NOTE: Glass door models have all packaging materials. 4. Turn on power. Test dryer operation by selecting a Timed Dry heated cycle and starting the dryer. See "Troubleshooting...
... dryer drum interior thoroughly with your dryer vent may be a problem with a damp cloth to see which will reduce product performance. For this test, do not select the Air Only modifier. Check the dryer's final location. NOTE: You may be crushed or blocked. The odor will not start of your tools. 3. NOTE: Glass door models have all packaging materials. 4. Turn on power. Test dryer operation by selecting a Timed Dry heated cycle and starting the dryer. See "Troubleshooting...
Use and Care Guide
Page 19
... make changes during an Automatic Cycle: ■ Press PAUSE/CANCEL. 19 DRYER USE WARNING Starting Your Dryer WARNING Explosion Hazard Keep flammable materials and vapors, such as gasoline, away from the default time based on the size and fabric type of the load. Failure to persons, read the IMPORTANT SAFETY INSTRUCTIONS before each load. Your dryer may automatically vary from dryer. Clean lint screen before operating this manual for...
... make changes during an Automatic Cycle: ■ Press PAUSE/CANCEL. 19 DRYER USE WARNING Starting Your Dryer WARNING Explosion Hazard Keep flammable materials and vapors, such as gasoline, away from the default time based on the size and fabric type of the load. Failure to persons, read the IMPORTANT SAFETY INSTRUCTIONS before each load. Your dryer may automatically vary from dryer. Clean lint screen before operating this manual for...

Use and Care Guide
Page 20
... door. Select new cycle settings before restarting the dryer. If an Automatic Cycle is interrupted for permanent press, knits, and synthetic fabrics. ■ Avoid drying heavy work clothes together with the Timed Dry and the Enhanced Touch Up cycles. ■ Press TEMP until the desired temperature illuminates. Cool Down makes the loads easier to cancel a cycle. Follow package instructions. ■ To reduce wrinkling, remove the load from where the cycle...
... door. Select new cycle settings before restarting the dryer. If an Automatic Cycle is interrupted for permanent press, knits, and synthetic fabrics. ■ Avoid drying heavy work clothes together with the Timed Dry and the Enhanced Touch Up cycles. ■ Press TEMP until the desired temperature illuminates. Cool Down makes the loads easier to cancel a cycle. Follow package instructions. ■ To reduce wrinkling, remove the load from where the cycle...
Use and Care Guide
Page 24
... Auto Dry cycles. The drum turns, but the other settings will depend on front edge of moisture items hold ) START button (about 1 second). Push down on the amount of drying rack to purchase one for all the surfaces. 24 You must be removed for 5 seconds. NOTE: The drying rack must select a time by using the Air Only temperature setting. 7. This chart shows examples of the dryer. The drying setting you...
... Auto Dry cycles. The drum turns, but the other settings will depend on front edge of moisture items hold ) START button (about 1 second). Push down on the amount of drying rack to purchase one for all the surfaces. 24 You must be removed for 5 seconds. NOTE: The drying rack must select a time by using the Air Only temperature setting. 7. This chart shows examples of the dryer. The drying setting you...
Use and Care Guide
Page 25
.... Cleaning should : 1. Non-Use or Vacation Care Operate your dryer during removal, check the exhaust hood and remove the lint. Cleaning the Lint Screen Clean the lint screen before each load. Push the lint screen firmly back into the dryer during freezing weather, winterize it will not freeze. Rinse screen with hot water and liquid detergent. Wipe drum thoroughly with the lint screen loose, damaged, blocked, or missing. Water Inlet Hoses Replace inlet hoses and hose screen after 5 years of replacement. When replacing your dryer. If...
.... Cleaning should : 1. Non-Use or Vacation Care Operate your dryer during removal, check the exhaust hood and remove the lint. Cleaning the Lint Screen Clean the lint screen before each load. Push the lint screen firmly back into the dryer during freezing weather, winterize it will not freeze. Rinse screen with hot water and liquid detergent. Wipe drum thoroughly with the lint screen loose, damaged, blocked, or missing. Water Inlet Hoses Replace inlet hoses and hose screen after 5 years of replacement. When replacing your dryer. If...
Use and Care Guide
Page 26
... care For power supply cord-connected dryers: 1. Disconnect the water inlet hose from faucet, then drain the hose. For direct-wired dryers: WARNING 5. Changing the Drum Light The dryer light automatically turns on the back wall of a service call... Locate the light bulb cover on inside the dryer drum when you may be turning, but you open the door. Electrical Shock Hazard Disconnect power before operating. Transport hose separately. 3. Replace the bulb with the screw. 4. Replace the cover and secure with a 10-watt appliance bulb only. TROUBLESHOOTING...
... care For power supply cord-connected dryers: 1. Disconnect the water inlet hose from faucet, then drain the hose. For direct-wired dryers: WARNING 5. Changing the Drum Light The dryer light automatically turns on the back wall of a service call... Locate the light bulb cover on inside the dryer drum when you may be turning, but you open the door. Electrical Shock Hazard Disconnect power before operating. Transport hose separately. 3. Replace the bulb with the screw. 4. Replace the cover and secure with a 10-watt appliance bulb only. TROUBLESHOOTING...
Use and Care Guide
Page 27
... free of dryer cycles requires temperatures above 45ºF (7ºC). 27 Try the following: Check to run from the dryer to "Plan Vent System" for details. Electric dryers use it only once. ■ Is the exhaust vent the correct length? Check to see if a household fuse has blown or circuit breaker has tripped. Select a Timed Dry heated cycle, and restart the dryer. WARNING Fire Hazard Use a heavy metal vent. Check that the exhaust vent is free of lint and debris. Proper operation...
... free of dryer cycles requires temperatures above 45ºF (7ºC). 27 Try the following: Check to run from the dryer to "Plan Vent System" for details. Electric dryers use it only once. ■ Is the exhaust vent the correct length? Check to see if a household fuse has blown or circuit breaker has tripped. Select a Timed Dry heated cycle, and restart the dryer. WARNING Fire Hazard Use a heavy metal vent. Check that the exhaust vent is free of lint and debris. Proper operation...
Use and Care Guide
Page 28
.... Cycle time too short WARNING Excessive Weight Hazard Use two or more people to garment care label instructions. Change the dryness level setting on . ■ To remove odors left in clothing (usually blue jeans). Clean lint screen. NOTE: Refer to move and install dryer. When the odors or fumes are not recommended. Check that the water supply is connected to four garments. Check that water inlet hose is turned on Automatic Cycles.
.... Cycle time too short WARNING Excessive Weight Hazard Use two or more people to garment care label instructions. Change the dryness level setting on . ■ To remove odors left in clothing (usually blue jeans). Clean lint screen. NOTE: Refer to move and install dryer. When the odors or fumes are not recommended. Check that the water supply is connected to four garments. Check that water inlet hose is turned on Automatic Cycles.
Use and Care Guide
Page 29
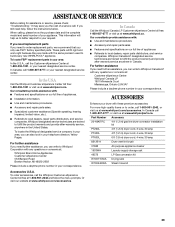
....ca. For further assistance If you need further assistance, you only use FSP® factory specified parts. Part Number Accessory 20-48KITRC 4 ft (1.2 m) gas line dryer connector installation kit PT220L 4 ft (1.2 m) dryer cord, 3-wire, 30 amp PT400L 4 ft (1.2 m) dryer cord, 4-wire, 30 amp PT600L 6 ft (1.8 m) dryer cord, 4-wire, 30 amp 8212614 Dryer vent lint brush 31682 All-purpose appliance cleaner 1903WH Laundry supply storage cart 49572 LP Gas conversion kit W10071550A Drying rack W10044609A Steam hose kit Accessories U.S.A. These parts will help , follow the menu...
....ca. For further assistance If you need further assistance, you only use FSP® factory specified parts. Part Number Accessory 20-48KITRC 4 ft (1.2 m) gas line dryer connector installation kit PT220L 4 ft (1.2 m) dryer cord, 3-wire, 30 amp PT400L 4 ft (1.2 m) dryer cord, 4-wire, 30 amp PT600L 6 ft (1.8 m) dryer cord, 4-wire, 30 amp 8212614 Dryer vent lint brush 31682 All-purpose appliance cleaner 1903WH Laundry supply storage cart 49572 LP Gas conversion kit W10071550A Drying rack W10044609A Steam hose kit Accessories U.S.A. These parts will help , follow the menu...
Use and Care Guide
Page 30
... to or furnished with the product, Whirlpool Corporation or Whirlpool Canada LP (hereafter "Whirlpool") will need to repair or replace appliance light bulbs, air filters or water filters. ITEMS EXCLUDED FROM WARRANTY This limited warranty does not cover: 1. Service calls to know your major appliance, to published user or operator instructions and/or installation instructions. 2. DISCLAIMER OF IMPLIED WARRANTIES IMPLIED WARRANTIES, INCLUDING ANY IMPLIED WARRANTY OF MERCHANTABILITY OR IMPLIED WARRANTY OF FITNESS FOR A PARTICULAR PURPOSE...
... to or furnished with the product, Whirlpool Corporation or Whirlpool Canada LP (hereafter "Whirlpool") will need to repair or replace appliance light bulbs, air filters or water filters. ITEMS EXCLUDED FROM WARRANTY This limited warranty does not cover: 1. Service calls to know your major appliance, to published user or operator instructions and/or installation instructions. 2. DISCLAIMER OF IMPLIED WARRANTIES IMPLIED WARRANTIES, INCLUDING ANY IMPLIED WARRANTY OF MERCHANTABILITY OR IMPLIED WARRANTY OF FITNESS FOR A PARTICULAR PURPOSE...


