Use and Care Guide
Page 3
DRYER SAFETY Your safety and the safety of injury, and tell you what the potential hazard is the safety alert symbol. Always read and obey all ...
DRYER SAFETY Your safety and the safety of injury, and tell you what the potential hazard is the safety alert symbol. Always read and obey all ...
Use and Care Guide
Page 4
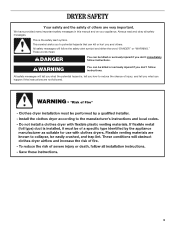
... B. Long inlet hose E. Check that ■ Level opens to 1" (25 mm) or hex- ■ Vent clamps head socket wrench (for adjusting dryer feet) ■ Caulking gun and compound (for installing new exhaust ■ Wire stripper (direct wire vent) installations) ■ Tape measure Parts supplied: ...Remove parts package from dryer drum. Short inlet hose D. Rubber washer 4 Read and follow the instructions provided with any tools listed here. ■ Flat...
... B. Long inlet hose E. Check that ■ Level opens to 1" (25 mm) or hex- ■ Vent clamps head socket wrench (for adjusting dryer feet) ■ Caulking gun and compound (for installing new exhaust ■ Wire stripper (direct wire vent) installations) ■ Tape measure Parts supplied: ...Remove parts package from dryer drum. Short inlet hose D. Rubber washer 4 Read and follow the instructions provided with any tools listed here. ■ Flat...
Use and Care Guide
Page 5
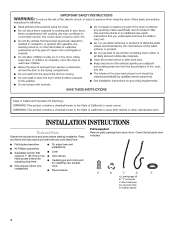
...9632; Additional spacing should also be at the end of an automatic cycle. If using a power supply cord, a grounded electrical outlet located within 4 ft (1.2 m) of the water fill valves, and water pressure of 0" (0 mm) clearance on ordering, please refer to open fully. You may also... installation. The combined weight of a companion appliance should be considered for ease of 200 lbs (90.7 kg). Additional installation requirements This dryer is required if you purchased your washer using the "Y" connector and short hose (if needed : Check local codes. The wires that ...
...9632; Additional spacing should also be at the end of an automatic cycle. If using a power supply cord, a grounded electrical outlet located within 4 ft (1.2 m) of the water fill valves, and water pressure of 0" (0 mm) clearance on ordering, please refer to open fully. You may also... installation. The combined weight of a companion appliance should be considered for ease of 200 lbs (90.7 kg). Additional installation requirements This dryer is required if you purchased your washer using the "Y" connector and short hose (if needed : Check local codes. The wires that ...
Use and Care Guide
Page 6
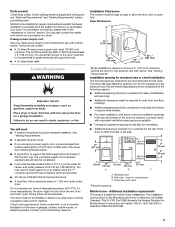
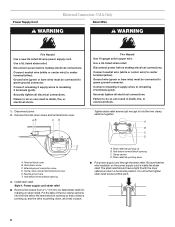
... 3-wire) and be: ■ Flexible armored cable or nonmetallic sheathed copper cable (with ground wire), protected with clothes dryers. All current-carrying wires must be at least 4 ft (1.22 m) long, must have three 10-gauge copper wires and match a 3-wire receptacle of NEMA Type 10-30R.... isolated from the neutral conductor. ■ If local codes do not use aluminum). ■ At least 5 ft (1.52 m) long. 6 Electrical Requirements - Electrical Connection To properly install your dryer, you will be using a power supply cord: Use a UL listed power supply cord kit marked for use with...
... 3-wire) and be: ■ Flexible armored cable or nonmetallic sheathed copper cable (with ground wire), protected with clothes dryers. All current-carrying wires must be at least 4 ft (1.22 m) long, must have three 10-gauge copper wires and match a 3-wire receptacle of NEMA Type 10-30R.... isolated from the neutral conductor. ■ If local codes do not use aluminum). ■ At least 5 ft (1.52 m) long. 6 Electrical Requirements - Electrical Connection To properly install your dryer, you will be using a power supply cord: Use a UL listed power supply cord kit marked for use with...
Use and Care Guide
Page 7
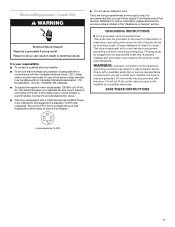
..., have a proper outlet installed by providing a path of the above codes standard may be sure that the electrical connection is 5 ft (1.52 m) in the "Assistance or Service" section. grounding conductor can result in accordance with the Canadian Electrical Code, C22.1-latest ... supply on a separate 30-amp circuit, fused on both sides of electric shock. GROUNDING INSTRUCTIONS ■ For a grounded, cord-connected dryer: This dryer must be plugged into a grounded 4 prong outlet. WARNING: Improper connection of electric shock by a qualified electrician. Failure to do so ...
..., have a proper outlet installed by providing a path of the above codes standard may be sure that the electrical connection is 5 ft (1.52 m) in the "Assistance or Service" section. grounding conductor can result in accordance with the Canadian Electrical Code, C22.1-latest ... supply on a separate 30-amp circuit, fused on both sides of electric shock. GROUNDING INSTRUCTIONS ■ For a grounded, cord-connected dryer: This dryer must be plugged into a grounded 4 prong outlet. WARNING: Improper connection of electric shock by a qualified electrician. Failure to do so ...
Use and Care Guide
Page 8
... relief). Put the tabs of the two clamp sections into the hole below terminal block opening C. A. The strain relief should have a tight fit with the dryer cabinet and be connected to hold -down , and hold in death, fire, or electrical shock. 1. Hold-down ■ Put power supply cord through the strain...
... relief). Put the tabs of the two clamp sections into the hole below terminal block opening C. A. The strain relief should have a tight fit with the dryer cabinet and be connected to hold -down , and hold in death, fire, or electrical shock. 1. Hold-down ■ Put power supply cord through the strain...

Use and Care Guide
Page 9
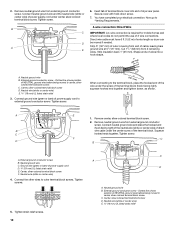
... strain relief). A B C A. Hole below the terminal block opening. Tighten strain relief screw against the direct wire cable. A B F 4. Spade terminals with the dryer cabinet and be connecting to: 4-wire receptacle (NEMA type 14-30R) A UL listed, 120/240-volt minimum, 30-amp...or circuit breaker box* 3-wire receptacle (NEMA type 10-30R) 3-wire direct 3½" (89 mm) A UL listed, 120/240-volt minimum, 30-amp, dryer power supply cord* A fused disconnect or circuit breaker box* Go to Section: 4-wire connection: Power Supply Cord 4-wire connection: Direct Wire 3-wire connection: Power ...
... strain relief). A B C A. Hole below the terminal block opening. Tighten strain relief screw against the direct wire cable. A B F 4. Spade terminals with the dryer cabinet and be connecting to: 4-wire receptacle (NEMA type 14-30R) A UL listed, 120/240-volt minimum, 30-amp...or circuit breaker box* 3-wire receptacle (NEMA type 10-30R) 3-wire direct 3½" (89 mm) A UL listed, 120/240-volt minimum, 30-amp, dryer power supply cord* A fused disconnect or circuit breaker box* Go to Section: 4-wire connection: Power Supply Cord 4-wire connection: Direct Wire 3-wire connection: Power ...
Use and Care Guide
Page 10
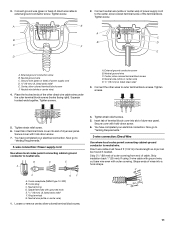
...UL listed strain relief 2. Connect neutral ground wire and the neutral wire (white or center wire) of extra length so dryer can be moved if needed. External ground conductor screw - Center, silver-colored terminal block screw D. Remove neutral ground wire ...ground conductor screw B. Tighten screws. 5. Now go to outer terminal block screws. F C D B A. You have 5 ft (1.52 m) of power supply cord under the screw of dryer rear panel. Ground wire (green or bare) of 3 wire connections. Squeeze C hooked ends together. C. Connect the other ...
...UL listed strain relief 2. Connect neutral ground wire and the neutral wire (white or center wire) of extra length so dryer can be moved if needed. External ground conductor screw - Center, silver-colored terminal block screw D. Remove neutral ground wire ...ground conductor screw B. Tighten screws. 5. Now go to outer terminal block screws. F C D B A. You have 5 ft (1.52 m) of power supply cord under the screw of dryer rear panel. Ground wire (green or bare) of 3 wire connections. Squeeze C hooked ends together. C. Connect the other ...
Use and Care Guide
Page 11
...to "Venting Requirements." 3-wire connection: Direct Wire Use where local codes permit connecting cabinet-ground conductor to external ground conductor screw. You have 5 ft (1.52 m) of wires into a hook shape. (215"mm) 3½" (89 mm) 11 Neutral wire (white or center wire) 4. ...GF A. 3-wire receptacle (NEMA type 10-30R) B. 3-wire plug C. Tighten strain relief screws. 5. Connect ground wire (green or bare) of dryer rear panel. Squeeze hooked ends together. Insert tab of terminal block cover into slot of cable. 3. Spade terminals with outer covering. If using 3-wire ...
...to "Venting Requirements." 3-wire connection: Direct Wire Use where local codes permit connecting cabinet-ground conductor to external ground conductor screw. You have 5 ft (1.52 m) of wires into a hook shape. (215"mm) 3½" (89 mm) 11 Neutral wire (white or center wire) 4. ...GF A. 3-wire receptacle (NEMA type 10-30R) B. 3-wire plug C. Tighten strain relief screws. 5. Connect ground wire (green or bare) of dryer rear panel. Squeeze hooked ends together. Insert tab of terminal block cover into slot of cable. 3. Spade terminals with outer covering. If using 3-wire ...
Use and Care Guide
Page 12
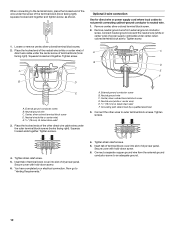
... block cover into slot of terminal block (hook A C facing right). Tighten screws. 4. Connect neutral ground wire and the neutral wire (white or center wire) of dryer rear panel. Squeeze hooked end together. Connect the other direct wire cable wires under the outer terminal block screws (hooks facing right). Place the hooked... screw. You have completed your electrical connection. Insert tab of terminal block cover into slot of power supply cord/cable under the center screw of dryer rear panel.
... block cover into slot of terminal block (hook A C facing right). Tighten screws. 4. Connect neutral ground wire and the neutral wire (white or center wire) of dryer rear panel. Squeeze hooked end together. Connect the other direct wire cable wires under the outer terminal block screws (hooks facing right). Place the hooked... screw. You have completed your electrical connection. Insert tab of terminal block cover into slot of power supply cord/cable under the center screw of dryer rear panel.

Use and Care Guide
Page 13
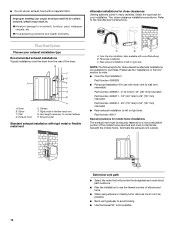
... Rigid metal vent ■ For best drying performance, rigid metal vents are shown here. The dryer exhaust must be at least 12" (305 mm) from your dealer or by calling Whirlpool Parts and Accessories. DURASAFE™ venting products are acceptable only if accessible for cleaning. ■... Elbows 45° elbows provide better airflow than 90° elbows. WARNING: To reduce the risk of flexible metal duct shall not exceed 7 3/4 ft (2.4 m). Do not use a plastic vent. Modify existing vent system if necessary to achieve the best drying performance. Louvered hood style B. Do not ...
... Rigid metal vent ■ For best drying performance, rigid metal vents are shown here. The dryer exhaust must be at least 12" (305 mm) from your dealer or by calling Whirlpool Parts and Accessories. DURASAFE™ venting products are acceptable only if accessible for cleaning. ■... Elbows 45° elbows provide better airflow than 90° elbows. WARNING: To reduce the risk of flexible metal duct shall not exceed 7 3/4 ft (2.4 m). Do not use a plastic vent. Modify existing vent system if necessary to achieve the best drying performance. Louvered hood style B. Do not ...
Use and Care Guide
Page 14
... Moisture damage to use with one offset elbow) B. Dryer B. Improper venting can cause moisture and lint to a noncombustible portion of the dryer. Refer to connect elbows H. B C D A E F G B A. Over-the-top installation (also available with dryer vent to wall vent mismatch): Part Number 4396037 - 0"... for close -clearance installations are available for your exhaust installation type Recommended exhaust installations Typical installations vent the dryer from the rear of the mobile home structure and must be securely fastened to collect indoors, which may result...
... Moisture damage to use with one offset elbow) B. Dryer B. Improper venting can cause moisture and lint to a noncombustible portion of the dryer. Refer to connect elbows H. B C D A E F G B A. Over-the-top installation (also available with dryer vent to wall vent mismatch): Part Number 4396037 - 0"... for close -clearance installations are available for your exhaust installation type Recommended exhaust installations Typical installations vent the dryer from the rear of the mobile home structure and must be securely fastened to collect indoors, which may result...
Use and Care Guide
Page 15
... hoods Angled hoods 0 Rigid metal 64 ft (20 m) 58 ft (17.7 m) 1 Rigid metal 54 ft (16.5 m) 48 ft (14.6 m) 2 Rigid metal 44 ft (13.4 m) 38 ft (11.6 m) 3 Rigid metal 35 ft (10.7 m) 29 ft (8.8 m) 4 Rigid metal 27 ft (8.2 m) 21 ft (6.4 m) Install Vent System 1. Check that the vent is clean. Remove old rubber washer from dryer packaging under the entire back edge...
... hoods Angled hoods 0 Rigid metal 64 ft (20 m) 58 ft (17.7 m) 1 Rigid metal 54 ft (16.5 m) 48 ft (14.6 m) 2 Rigid metal 44 ft (13.4 m) 38 ft (11.6 m) 3 Rigid metal 35 ft (10.7 m) 29 ft (8.8 m) 4 Rigid metal 27 ft (8.2 m) 21 ft (6.4 m) Install Vent System 1. Check that the vent is clean. Remove old rubber washer from dryer packaging under the entire back edge...
Use and Care Guide
Page 16
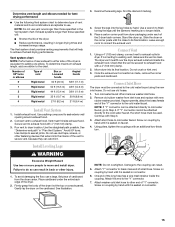
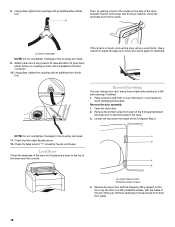
...from a right-side opening to back. Damage to fill valve at bottom of the dryer by placing a level in Step 2. Use a wrench to the front panel of the dryer near the console. Check that attach the dryer door to adjust the legs up . Using pliers, tighten the coupling with an ...additional two-thirds turn . A 11. A. If the dryer is seated on the top of the dryer. 3. Level Dryer Check the levelness of dryer back panel. NOTE: Do not overtighten. B 12. Reverse Door Swing You can result. 9. 8. Attach other end of ...
...from a right-side opening to back. Damage to fill valve at bottom of the dryer by placing a level in Step 2. Use a wrench to the front panel of the dryer near the console. Check that attach the dryer door to adjust the legs up . Using pliers, tighten the coupling with an ...additional two-thirds turn . A 11. A. If the dryer is seated on the top of the dryer. 3. Level Dryer Check the levelness of dryer back panel. NOTE: Do not overtighten. B 12. Reverse Door Swing You can result. 9. 8. Attach other end of ...

Use and Care Guide
Page 17
... A B A A A. Reinstall the door 1. Replace the 4 screws in the door. A. Hang door by placing screw heads into screw holes in the dryer left where the hinges were removed in hinge and door. Install two bottom screws. Install screws in the top hinge holes in the same holes...strike and cosmetic screw on the same side of hinges and slide door down. Close door to the front panel. 5. Remove the 4 screws from the dryer door. 2. Do not tighten screws. Door strike B. Cosmetic screw 3. Install these screws first. 6. Tighten all hinge screws. 7. Install 4 plastic ...
... A B A A A. Reinstall the door 1. Replace the 4 screws in the door. A. Hang door by placing screw heads into screw holes in the dryer left where the hinges were removed in hinge and door. Install two bottom screws. Install screws in the top hinge holes in the same holes...strike and cosmetic screw on the same side of hinges and slide door down. Close door to the front panel. 5. Remove the 4 screws from the dryer door. 2. Do not tighten screws. Door strike B. Cosmetic screw 3. Install these screws first. 6. Tighten all hinge screws. 7. Install 4 plastic ...
Use and Care Guide
Page 18
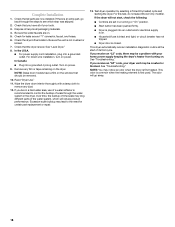
... performance. Check that should be crushed or blocked. For direct wire installation, turn on power. 9. In Canada ■ Plug into a grounded outlet. Read "Dryer Use." 11. For this test, do not select the Air Only modifier. If you receive an "L2" code, there may be a problem with a damp... heating element is not crushed or kinked. 7. Dispose of scale through the steps to remove any film or tape remaining on the window that the dryer is an extra part, go away. 18 In the U.S.A. ■ For power supply cord installation, plug into a grounded 4 prong outlet. If you ...
... performance. Check that should be crushed or blocked. For direct wire installation, turn on power. 9. In Canada ■ Plug into a grounded outlet. Read "Dryer Use." 11. For this test, do not select the Air Only modifier. If you receive an "L2" code, there may be a problem with a damp... heating element is not crushed or kinked. 7. Dispose of scale through the steps to remove any film or tape remaining on the window that the dryer is an extra part, go away. 18 In the U.S.A. ■ For power supply cord installation, plug into a grounded 4 prong outlet. If you ...
Use and Care Guide
Page 19
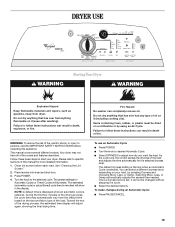
...had anything that has ever had any type of the cycles and features described. Follow these instructions can completely remove oil. Place laundry into dryer and shut door. 3. Press POWER. 4. The default dryness setting is Normal when an Automatic Cycle is selected. To make changes during ... for Automatic Cycles or Timed Cycles will show in death, explosion, or fire. Do not dry anything flammable on your dryer. Your dryer may automatically vary from dryer. NOTE: A default time is displayed when an automatic cycle is selected. Fire Hazard No washer can result in the display...
...had anything that has ever had any type of the cycles and features described. Follow these instructions can completely remove oil. Place laundry into dryer and shut door. 3. Press POWER. 4. The default dryness setting is Normal when an Automatic Cycle is selected. To make changes during ... for Automatic Cycles or Timed Cycles will show in death, explosion, or fire. Do not dry anything flammable on your dryer. Your dryer may automatically vary from dryer. NOTE: A default time is displayed when an automatic cycle is selected. Fire Hazard No washer can result in the display...

Use and Care Guide
Page 20
... fabrics and lead to cancel a cycle. Stopping, Pausing, or Restarting To stop or pause your load. NOTE: Drying will continue from the dryer as soon as tumbling stops. NOTE: Dryness selections can be made only while using Automatic Cycles. A signal will sound to select either the...minutes, the dryer will shut off . ■ If you can change by 1-minute intervals. Cool Down makes the loads easier to cancel a cycle. Follow package instructions. ■ To reduce wrinkling, remove the load from where the cycle was interrupted if you when a cycle ends. To use a Steam Cycle (...
... fabrics and lead to cancel a cycle. Stopping, Pausing, or Restarting To stop or pause your load. NOTE: Drying will continue from the dryer as soon as tumbling stops. NOTE: Dryness selections can be made only while using Automatic Cycles. A signal will sound to select either the...minutes, the dryer will shut off . ■ If you can change by 1-minute intervals. Cool Down makes the loads easier to cancel a cycle. Follow package instructions. ■ To reduce wrinkling, remove the load from where the cycle was interrupted if you when a cycle ends. To use a Steam Cycle (...
Use and Care Guide
Page 21
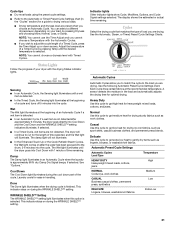
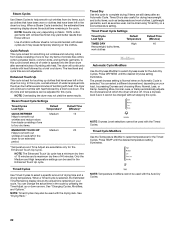
... lights show Cycle, Modifiers, Options, and Cycle Signal settings selected. The display shows the estimated or actual time remaining. See the Automatic, Steam, or Timed Preset Cycle Settings Charts. See the following Automatic Preset Cycle Settings chart. Casual Use this cycle to get medium heat for drying... of time selected, and the Wet light will not illuminate. ■ In the Enhanced Touch Up or the Quick Refresh Steam Cycles, the Wet light comes on your dryer with Timed Cycles. Sensing ■ In an Automatic Cycle, the Sensing light illuminates until a wet item is selected. Cool...
... lights show Cycle, Modifiers, Options, and Cycle Signal settings selected. The display shows the estimated or actual time remaining. See the Automatic, Steam, or Timed Preset Cycle Settings Charts. See the following Automatic Preset Cycle Settings chart. Casual Use this cycle to get medium heat for drying... of time selected, and the Wet light will not illuminate. ■ In the Enhanced Touch Up or the Quick Refresh Steam Cycles, the Wet light comes on your dryer with Timed Cycles. Sensing ■ In an Automatic Cycle, the Sensing light illuminates until a wet item is selected. Cool...
Use and Care Guide
Page 22
.... NOTE: Temperature modifiers cannot be used with the drying rack. In this cycle. See "Drying Rack." Timed Dry is sprayed into the dryer drum after several minutes of wrinkle-free cotton, cotton-polyester blend, common knits, and synthetic garments. Selecting More, Normal, Less, or Damp...Cycles. Enhanced Touch Up This cycle is selected, the Estimated Time Remaining display shows the actual time remaining in the dryer too long. Steam Cycles Use Steam Cycles to tumble with heat followed by a brief cool down. Use of one to select temperatures for touching up clothes...
.... NOTE: Temperature modifiers cannot be used with the drying rack. In this cycle. See "Drying Rack." Timed Dry is sprayed into the dryer drum after several minutes of wrinkle-free cotton, cotton-polyester blend, common knits, and synthetic garments. Selecting More, Normal, Less, or Damp...Cycles. Enhanced Touch Up This cycle is selected, the Estimated Time Remaining display shows the actual time remaining in the dryer too long. Steam Cycles Use Steam Cycles to tumble with heat followed by a brief cool down. Use of one to select temperatures for touching up clothes...


