
Ventilation Specification
Page 3
... fabric softener or product. ■ Do not use heat to cooking oils in your dryer. IMPORTANT SAFETY INSTRUCTIONS WARNING: To reduce the risk of fire, electric shock, or injury to persons when using the dryer, follow basic precautions, including the following: ■ Read all instructions before using the... have been previously cleaned in, washed in, soaked in, or spotted with controls. ■ Do not repair or replace any part of the dryer or attempt any servicing unless specifically recommended in this Use and Care Guide or in published user-repair instructions that could ignite or ...
... fabric softener or product. ■ Do not use heat to cooking oils in your dryer. IMPORTANT SAFETY INSTRUCTIONS WARNING: To reduce the risk of fire, electric shock, or injury to persons when using the dryer, follow basic precautions, including the following: ■ Read all instructions before using the... have been previously cleaned in, washed in, soaked in, or spotted with controls. ■ Do not repair or replace any part of the dryer or attempt any servicing unless specifically recommended in this Use and Care Guide or in published user-repair instructions that could ignite or ...

Ventilation Specification
Page 7
... exhaust hood (at the exhaust outlet). 2. Lint may collect in the exhaust hood so that the joints are no leaks in multiple dryer systems a more frequent inspection is intact and free from lint accumulation. Reassemble the exhaust duct and hood, checking that the flappers or louvers... (if installed as part of the exhaust system) will vary, depending on the system and usage of the dryer. For single-family usage, an annual inspection is not obstructed in the vent and that are found...
... exhaust hood (at the exhaust outlet). 2. Lint may collect in the exhaust hood so that the joints are no leaks in multiple dryer systems a more frequent inspection is intact and free from lint accumulation. Reassemble the exhaust duct and hood, checking that the flappers or louvers... (if installed as part of the exhaust system) will vary, depending on the system and usage of the dryer. For single-family usage, an annual inspection is not obstructed in the vent and that are found...
Owners Manual
Page 6
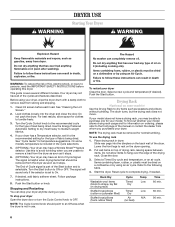
...Start button. To find out whether your model allows drying rack usage and for your dryer has a Temperature selector, set to an Off area when the dryer is part of load being dried. Slide rear pegs into the dryer and close the door. Close the door. 3. Rack Dry Washable wool items (...to hang over the edge of the drying rack. Do not pack the dryer. Start the dryer. To restart your dryer. If your dryer anytime during a cycle. Reset cycle to ON or OFF. Your dryer may have all of fire, electric shock, or injury to purchase one for information on the back wall ...
...Start button. To find out whether your model allows drying rack usage and for your dryer has a Temperature selector, set to an Off area when the dryer is part of load being dried. Slide rear pegs into the dryer and close the door. Close the door. 3. Rack Dry Washable wool items (...to hang over the edge of the drying rack. Do not pack the dryer. Start the dryer. To restart your dryer. If your dryer anytime during a cycle. Reset cycle to ON or OFF. Your dryer may have all of fire, electric shock, or injury to purchase one for information on the back wall ...
Owners Manual
Page 8
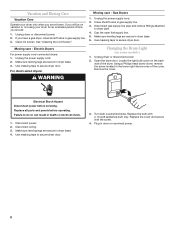
...line pipe and remove fittings attached to secure dryer door. Moving care - Use masking tape to dryer pipe. 4. Open the dryer door. Remove the cover. WARNING Electrical Shock Hazard Disconnect power before operating. Replace all parts and panels before servicing. Make sure leveling... legs are secure in dryer base. 4. Turn bulb counterclockwise. Replace ...
...line pipe and remove fittings attached to secure dryer door. Moving care - Use masking tape to dryer pipe. 4. Open the dryer door. Remove the cover. WARNING Electrical Shock Hazard Disconnect power before operating. Replace all parts and panels before servicing. Make sure leveling... legs are secure in dryer base. 4. Turn bulb counterclockwise. Replace ...
Owners Manual
Page 10
... high? Part Number 3404351 3406839 Accessory Drying rack - fits 29" (737 mm) Super Capacity Plus, 7.0 cu. The new electric heating element may have ventilation openings at the beginning of drying time in the area where your dryer with these premium accessories. Select a lower temperature, and use an automatic drying cycle. Level the dryer. ft. (0.20 cu. Drum...
... high? Part Number 3404351 3406839 Accessory Drying rack - fits 29" (737 mm) Super Capacity Plus, 7.0 cu. The new electric heating element may have ventilation openings at the beginning of drying time in the area where your dryer with these premium accessories. Select a lower temperature, and use an automatic drying cycle. Level the dryer. ft. (0.20 cu. Drum...
Installation Instructions
Page 1
...16 Exigences d'emplacement 17 Spécifications électriques- DRYER SAFETY Your safety and the safety of Contents / Table des matières DRYER SAFETY 1 INSTALLATION INSTRUCTIONS 2 Tools and Parts 2 Location Requirements 2 Electrical Requirements - We have provided many important safety messages in ...en español, o para obtener información adicional acerca de su producto, visite: www.whirlpool.com. All safety messages will follow instructions. U.S.A 3 Electrical Requirements - Canada 5 Electrical Connection - Always read and obey all safety messages.
...16 Exigences d'emplacement 17 Spécifications électriques- DRYER SAFETY Your safety and the safety of Contents / Table des matières DRYER SAFETY 1 INSTALLATION INSTRUCTIONS 2 Tools and Parts 2 Location Requirements 2 Electrical Requirements - We have provided many important safety messages in ...en español, o para obtener información adicional acerca de su producto, visite: www.whirlpool.com. All safety messages will follow instructions. U.S.A 3 Electrical Requirements - Canada 5 Electrical Connection - Always read and obey all safety messages.
Installation Instructions
Page 2
...30-amp power supply cord, rated 120/240 volt minimum. If using a power supply cord, a grounded electrical outlet located within 2 ft (61 cm) of either side of the dryer in ring terminals or spade terminals with any tools listed here. ■ Flat-blade screwdriver ■ #2 ... and compound (for proper exhaust installation. Check that allows for installing new exhaust vent) ■ Tape measure Parts supplied: Remove parts package from dryer drum. The dryer must end in garages, closets, mobile homes or sleeping quarters. For further information, please reference the "Assistance ...
...30-amp power supply cord, rated 120/240 volt minimum. If using a power supply cord, a grounded electrical outlet located within 2 ft (61 cm) of either side of the dryer in ring terminals or spade terminals with any tools listed here. ■ Flat-blade screwdriver ■ #2 ... and compound (for proper exhaust installation. Check that allows for installing new exhaust vent) ■ Tape measure Parts supplied: Remove parts package from dryer drum. The dryer must end in garages, closets, mobile homes or sleeping quarters. For further information, please reference the "Assistance ...
Installation Instructions
Page 3
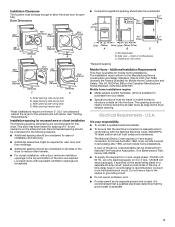
...following spacing dimensions are recommended for spacing of 0" (0 cm) clearance on the sides and rear. Additional Installation Requirements This dryer is adequate. 3 Electrical Requirements - It is your dealer. ■ Special provisions must be considered on both sides of installation and servicing. &#...conform to an individual branch circuit. Large opening side-swing door D. The National Electric Code requires a 4-wire supply connection for Mobile Home Construction and Safety, Title 24, HUD Part 280) or the Canadian Manufactured Home Standard, CAN/CSA-Z240 MH. Installation ...
...following spacing dimensions are recommended for spacing of 0" (0 cm) clearance on the sides and rear. Additional Installation Requirements This dryer is adequate. 3 Electrical Requirements - It is your dealer. ■ Special provisions must be considered on both sides of installation and servicing. &#...conform to an individual branch circuit. Large opening side-swing door D. The National Electric Code requires a 4-wire supply connection for Mobile Home Construction and Safety, Title 24, HUD Part 280) or the Canadian Manufactured Home Standard, CAN/CSA-Z240 MH. Installation ...
Installation Instructions
Page 5
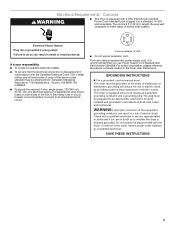
... Cord Replacement Part Number 3394208. A time-delay fuse or circuit breaker is recommended that you use an extension cord. If you are using a replacement power supply cord, it will reduce the risk of electric shock by a qualified electrician. This dryer is properly ...equipment- Canada WARNING ■ This dryer is 5 ft (1.52 m) in death or electrical shock. The cord is equipped with a CSA International Certified Power Cord intended to whether the dryer is properly grounded. WARNING: Improper connection of least resistance for electric current. It is your responsibility ■...
... Cord Replacement Part Number 3394208. A time-delay fuse or circuit breaker is recommended that you use an extension cord. If you are using a replacement power supply cord, it will reduce the risk of electric shock by a qualified electrician. This dryer is properly ...equipment- Canada WARNING ■ This dryer is 5 ft (1.52 m) in death or electrical shock. The cord is equipped with a CSA International Certified Power Cord intended to whether the dryer is properly grounded. WARNING: Improper connection of least resistance for electric current. It is your responsibility ■...

Installation Instructions
Page 12
... path outdoors. ■ Plan the installation to use an exhaust hood with dryer vent to wall vent mismatch): Part Number 4396037 - 0" (0 cm) to 18" (45.72 cm) mismatch Part Number 4396011 - 18" (45.72 cm) to 29" (73.66 cm) mismatch Part Number 4396014 - 29" (73.66 cm) to 50" (127 cm) ... elbows H. Alternate installations for mobile home installations The exhaust vent must not terminate beneath the mobile home. Refer to a noncombustible portion of the Dryer User Instructions. ■ Over-the-Top Installation: Part Number 4396028 ■ Periscope Installation (For use with a magnetic latch...
... path outdoors. ■ Plan the installation to use an exhaust hood with dryer vent to wall vent mismatch): Part Number 4396037 - 0" (0 cm) to 18" (45.72 cm) mismatch Part Number 4396011 - 18" (45.72 cm) to 29" (73.66 cm) mismatch Part Number 4396014 - 29" (73.66 cm) to 50" (127 cm) ... elbows H. Alternate installations for mobile home installations The exhaust vent must not terminate beneath the mobile home. Refer to a noncombustible portion of the Dryer User Instructions. ■ Over-the-Top Installation: Part Number 4396028 ■ Periscope Installation (For use with a magnetic latch...

Installation Instructions
Page 14
... lift to adjust alignment. Place towel (A) on right side of cabinet. 9. Pull door forward off screws. Insert plugs into hinge holes on top of dryer to door. 5. Tighten screws halfway. Tighten screws. Remove door strike (E) from inner door. If it is needed , slide door catch left or right... so that door strike aligns with door catch (C). Slide door up so screws are in large part of hinge slot. Insert the door strike you removed in bottom of dryer. Loosen (do not remove) top screws from cabinet side of hinges. 14 Remove top screws from cabinet side of hinges ...
... lift to adjust alignment. Place towel (A) on right side of cabinet. 9. Pull door forward off screws. Insert plugs into hinge holes on top of dryer to door. 5. Tighten screws halfway. Tighten screws. Remove door strike (E) from inner door. If it is needed , slide door catch left or right... so that door strike aligns with door catch (C). Slide door up so screws are in large part of hinge slot. Insert the door strike you removed in bottom of dryer. Loosen (do not remove) top screws from cabinet side of hinges. 14 Remove top screws from cabinet side of hinges ...

Installation Instructions
Page 15
... there is level. If you have not tripped. Complete Installation 1. Check that both circuit breakers have all of /recycle all parts are now installed. The odor will not start the dryer. 2. Set the dryer on . ■ Household fuse is intact and tight, or circuit breaker has not tripped. ■...button has been pushed firmly. ■ Dryer is plugged into an outlet and/or electrical supply is on a full heat cycle (not an air cycle) for 5 minutes, open the dryer door and feel heat, cancel cycle and close the door. If the dryer will go back through the steps to ...
... there is level. If you have not tripped. Complete Installation 1. Check that both circuit breakers have all of /recycle all parts are now installed. The odor will not start the dryer. 2. Set the dryer on . ■ Household fuse is intact and tight, or circuit breaker has not tripped. ■...button has been pushed firmly. ■ Dryer is plugged into an outlet and/or electrical supply is on a full heat cycle (not an air cycle) for 5 minutes, open the dryer door and feel heat, cancel cycle and close the door. If the dryer will go back through the steps to ...


