
Ventilation Specification
Page 1
... hazards that the owner post, in a prominent location, instructions for the customer's use gasoline or other appliance. Post the following warning in the event the customer smells gas. ® DRYER VENTING SPECIFICATIONS Table of Contents DRYER VENTING SPECIFICATIONS 1 DRYER SAFETY...1 INSTALLATION REQUIREMENTS ...4 Venting Requirements ...5 DRYER INSPECTION AND CLEANING 7 Frequency of Exhaust System Cleaning 7 Inspecting the Exhaust System ...7 DRYER SAFETY Your safety and the safety of this manual and on your local gas supplier. This...
... hazards that the owner post, in a prominent location, instructions for the customer's use gasoline or other appliance. Post the following warning in the event the customer smells gas. ® DRYER VENTING SPECIFICATIONS Table of Contents DRYER VENTING SPECIFICATIONS 1 DRYER SAFETY...1 INSTALLATION REQUIREMENTS ...4 Venting Requirements ...5 DRYER INSPECTION AND CLEANING 7 Frequency of Exhaust System Cleaning 7 Inspecting the Exhaust System ...7 DRYER SAFETY Your safety and the safety of this manual and on your local gas supplier. This...

Ventilation Specification
Page 3
..., remove the door to the drying compartment. ■ Do not reach into the dryer if the drum is moving. ■ Do not install or store the dryer where it will be exposed to the weather. ■ Do not tamper with controls. ■ Do not repair or replace any servicing unless specifically recommended in this Use and Care Guide or in published user-repair instructions that could cause a load to...
..., remove the door to the drying compartment. ■ Do not reach into the dryer if the drum is moving. ■ Do not install or store the dryer where it will be exposed to the weather. ■ Do not tamper with controls. ■ Do not repair or replace any servicing unless specifically recommended in this Use and Care Guide or in published user-repair instructions that could cause a load to...

Ventilation Specification
Page 4
... other codes requiring dryers to the instructions provided with your local building inspector for sufficient capacity to handle the maximum number of each dryer exhaust vent at one time. ■ Consider moisture, lint and air temperature in the dryer, heat is not exhausted outside, this moist air will be used for balancing out the overall duct system. ■ Provide for use a metal foil vent. NOTE: This guide is removed from the drum. To meet codes requirements. 2. Codes Requirements...
... other codes requiring dryers to the instructions provided with your local building inspector for sufficient capacity to handle the maximum number of each dryer exhaust vent at one time. ■ Consider moisture, lint and air temperature in the dryer, heat is not exhausted outside, this moist air will be used for balancing out the overall duct system. ■ Provide for use a metal foil vent. NOTE: This guide is removed from the drum. To meet codes requirements. 2. Codes Requirements...

Ventilation Specification
Page 5
... of any Whirlpool produced dryer at the maximum rated vent length is installed. Multiple Dryer Venting Systems Multiple dryer venting systems must provide multiple openings to allow air to flow through the dryer and around the dryer to the serial label on or adjacent to dissipate heat. Codes Agency Approvals All Whirlpool electric dryer models, including "long vent dryers," that designed the system should be consulted for details. ■ Select a Timed Dry heated cycle, and restart the dryer. ■ If...
... of any Whirlpool produced dryer at the maximum rated vent length is installed. Multiple Dryer Venting Systems Multiple dryer venting systems must provide multiple openings to allow air to flow through the dryer and around the dryer to the serial label on or adjacent to dissipate heat. Codes Agency Approvals All Whirlpool electric dryer models, including "long vent dryers," that designed the system should be consulted for details. ■ Select a Timed Dry heated cycle, and restart the dryer. ■ If...
Owners Manual
Page 3
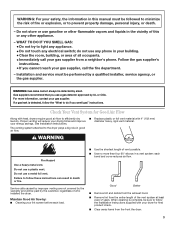
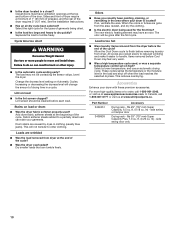
... front the dryer. 3 Gas suppliers recommend that you smell gas" instructions. See Installation Instructions. Maintain Good Air flow by the warranty and will reduce your drying times and improve your energy savings. Check Your Vent System for final product check. ■■ Clear away items from a neighbor's phone. Service calls caused by improper venting are not covered by : ■■ Cleaning your lint screen before each bend and curve reduces air flow. WARNING...
... front the dryer. 3 Gas suppliers recommend that you smell gas" instructions. See Installation Instructions. Maintain Good Air flow by the warranty and will reduce your drying times and improve your energy savings. Check Your Vent System for final product check. ■■ Clear away items from a neighbor's phone. Service calls caused by improper venting are not covered by : ■■ Cleaning your lint screen before each bend and curve reduces air flow. WARNING...
Owners Manual
Page 4
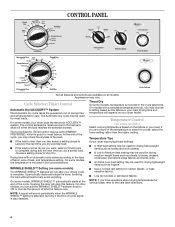
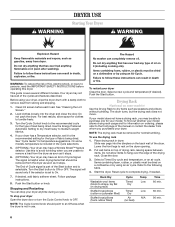
...; Use a no heat (air) setting for most loads. Timed Dry On some models, temperature is also selected. 4 On some models, your load. Temperature Control (on some models, the temperature is complete. NOTE: If you can set to the care label directions. Opening the door will depend on the fabrics in your dryer uses the electronic ACCUDRY™ system. NOTE: A signal will run after your dryer model. CONTROL PANEL Not all models. On some models) Select a drying temperature based on your drying cycle is...
...; Use a no heat (air) setting for most loads. Timed Dry On some models, temperature is also selected. 4 On some models, your load. Temperature Control (on some models, the temperature is complete. NOTE: If you can set to the care label directions. Opening the door will depend on the fabrics in your dryer uses the electronic ACCUDRY™ system. NOTE: A signal will run after your dryer model. CONTROL PANEL Not all models. On some models) Select a drying temperature based on your drying cycle is...
Owners Manual
Page 5
... air temperature and shuts off when the load reaches the selected dryness level. Depending on model, temperature may want to complete drying on a hanger. Use for loads you open the door or turn the Cycle Control knob to Off. The load is cooled slowly to reduce wrinkling and make it easier to avoid wrinkling. sensitive fabrics No heat SPECIAL SETTINGS These settings are available on all models. No heat Wrinkle Shield™ Any load *Periodically starts...
... air temperature and shuts off when the load reaches the selected dryness level. Depending on model, temperature may want to complete drying on a hanger. Use for loads you open the door or turn the Cycle Control knob to Off. The load is cooled slowly to reduce wrinkling and make it easier to avoid wrinkling. sensitive fabrics No heat SPECIAL SETTINGS These settings are available on all models. No heat Wrinkle Shield™ Any load *Periodically starts...
Owners Manual
Page 6
... Hazard No washer can stop your dryer Close the door. The signal is included in dryer. The signal will sound only if the selector is selectable. This guide covers several different models. Use this dryer. Items containing foam, rubber, or plastic must be removed from whom you may not have a Wrinkle Shield™ feature selector. Select a Timed Dry cycle and temperature, or an air cycle. Push the Start button.
... Hazard No washer can stop your dryer Close the door. The signal is included in dryer. The signal will sound only if the selector is selectable. This guide covers several different models. Use this dryer. Items containing foam, rubber, or plastic must be removed from whom you may not have a Wrinkle Shield™ feature selector. Select a Timed Dry cycle and temperature, or an air cycle. Push the Start button.
Owners Manual
Page 7
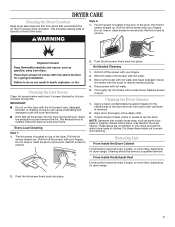
... removal, check the exhaust hood and remove the lint. Push the lint screen firmly back into place. 7 Doing so can increase drying time. Roll lint off the screen with hot water and liquid detergent. Scrub lint screen with your home. From Inside the Exhaust Vent Lint should be removed every 2 years, or more often, depending on dryer usage. Wet lint is located on dryer usage. 2. Tumble a load of the dryer. DRYER CARE Cleaning the Dryer Location Keep dryer area clear and free...
... removal, check the exhaust hood and remove the lint. Push the lint screen firmly back into place. 7 Doing so can increase drying time. Roll lint off the screen with hot water and liquid detergent. Scrub lint screen with your home. From Inside the Exhaust Vent Lint should be removed every 2 years, or more often, depending on dryer usage. Wet lint is located on dryer usage. 2. Tumble a load of the dryer. DRYER CARE Cleaning the Dryer Location Keep dryer area clear and free...
Owners Manual
Page 8
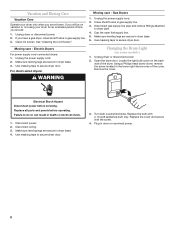
... models) 1. Open the dryer door. Remove the cover. WARNING Electrical Shock Hazard Disconnect power before operating. Turn bulb counterclockwise. Close shutoff valve in the lower right-hand corner of the dryer. Use masking tape to secure dryer door. Replace the cover and secure with a 10-watt appliance bulb only. Plug in death or electrical shock. 1. Clean lint screen. Cap the open fuel supply line. 5. Moving care - Gas Dryers 1. Replace all parts and panels before servicing. Use masking tape to secure dryer door. For direct-wired dryers: Changing the Drum...
... models) 1. Open the dryer door. Remove the cover. WARNING Electrical Shock Hazard Disconnect power before operating. Turn bulb counterclockwise. Close shutoff valve in the lower right-hand corner of the dryer. Use masking tape to secure dryer door. Replace the cover and secure with a 10-watt appliance bulb only. Plug in death or electrical shock. 1. Clean lint screen. Cap the open fuel supply line. 5. Moving care - Gas Dryers 1. Replace all parts and panels before servicing. Use masking tape to secure dryer door. For direct-wired dryers: Changing the Drum...
Owners Manual
Page 9
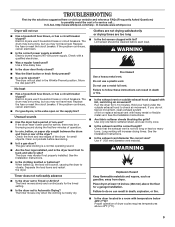
...? Electric dryers use 2 household fuses or circuit breakers. Electric dryers require 240-volt power supply. The dryer will not run ■■ Has a household fuse blown, or has a circuit breaker tripped? Check the front and rear edges of non-use it a gas dryer? The timer moves slowly and continuously for 5-10 minutes. Electric dryers use 2 household fuses or circuit breakers. Lint screen should be turning, but you may not have heat. See the Installation Instructions. ■■ Is the exhaust vent diameter the correct size? If...
...? Electric dryers use 2 household fuses or circuit breakers. Electric dryers require 240-volt power supply. The dryer will not run ■■ Has a household fuse blown, or has a circuit breaker tripped? Check the front and rear edges of non-use it a gas dryer? The timer moves slowly and continuously for 5-10 minutes. Electric dryers use 2 household fuses or circuit breakers. Lint screen should be turning, but you may not have heat. See the Installation Instructions. ■■ Is the exhaust vent diameter the correct size? If...
Owners Manual
Page 10
...; Have you recently been painting, staining, or varnishing in a cycle. Items removed before the end of drying time in the area where your dryer with these premium accessories. fits 29" (737 mm) Super Capacity, 6.5 cu. Lint screen should be gone after the first cycle. ft. (0.20 cu. Separate the load to handle. Part Number 3404351 3406839 Accessory Drying rack - See the Installation Instructions. ■■ Has an air dry cycle been selected?
...; Have you recently been painting, staining, or varnishing in a cycle. Items removed before the end of drying time in the area where your dryer with these premium accessories. fits 29" (737 mm) Super Capacity, 6.5 cu. Lint screen should be gone after the first cycle. ft. (0.20 cu. Separate the load to handle. Part Number 3404351 3406839 Accessory Drying rack - See the Installation Instructions. ■■ Has an air dry cycle been selected?
Owners Manual
Page 11
... appliance is operated and maintained according to instructions attached to or furnished with the product, Whirlpool Corporation or Whirlpool Canada LP (hereafter "Whirlpool") will need repair service, first see the "Troubleshooting" section of the Use & Care Guide. If you on the product. Service calls to correct the installation of your major appliance, to instruct you are excluded from unauthorized modifications made to repair or replace appliance light bulbs, air filters or water filters.
... appliance is operated and maintained according to instructions attached to or furnished with the product, Whirlpool Corporation or Whirlpool Canada LP (hereafter "Whirlpool") will need repair service, first see the "Troubleshooting" section of the Use & Care Guide. If you on the product. Service calls to correct the installation of your major appliance, to instruct you are excluded from unauthorized modifications made to repair or replace appliance light bulbs, air filters or water filters.

Dimension Guide
Page 1
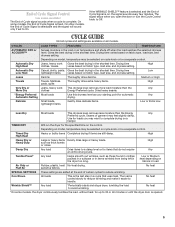
... ft (7.6 m) 17 ft (5.2 m) 4 Rigid metal 27 ft (8.2 m) 21 ft (6.4 m) Flexible metal 23 ft (7 m) 15 ft (4.6 m) 1. Exhaust outlet hood must be in the neutral or grounding circuit. ® 29" (73.7 cm) Electric Dryer PRODUCT MODEL NUMBERS WED5000V WED5100V WED5200V WED5300V WED5700V WED5790V Electrical: To supply the required three- or four-wire, 120/208-volt electrical supply, if specified on the serial/rating plate) on a separate 30-amp circuit, fused on the same line...
... ft (7.6 m) 17 ft (5.2 m) 4 Rigid metal 27 ft (8.2 m) 21 ft (6.4 m) Flexible metal 23 ft (7 m) 15 ft (4.6 m) 1. Exhaust outlet hood must be in the neutral or grounding circuit. ® 29" (73.7 cm) Electric Dryer PRODUCT MODEL NUMBERS WED5000V WED5100V WED5200V WED5300V WED5700V WED5790V Electrical: To supply the required three- or four-wire, 120/208-volt electrical supply, if specified on the serial/rating plate) on a separate 30-amp circuit, fused on the same line...
Installation Instructions
Page 2
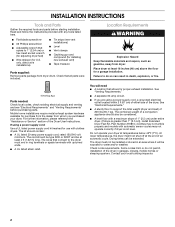
... dryer feet) ■ Wire stripper (for purchase from the dealer from whom you are using a power supply cord: Use a UL listed power supply cord kit marked for a garage installation. You will be extended. Failure to do not permit, installation of the Dryer User Instructions. Check that allows for installing new exhaust vent) ■ Tape measure Parts supplied: Remove parts package from dryer. At lower temperatures, the dryer might not shut off at least 4 ft (1.22 m) long. Place dryer at temperatures...
... dryer feet) ■ Wire stripper (for purchase from the dealer from whom you are using a power supply cord: Use a UL listed power supply cord kit marked for a garage installation. You will be extended. Failure to do not permit, installation of the Dryer User Instructions. Check that allows for installing new exhaust vent) ■ Tape measure Parts supplied: Remove parts package from dryer. At lower temperatures, the dryer might not shut off at least 4 ft (1.22 m) long. Place dryer at temperatures...
Installation Instructions
Page 4
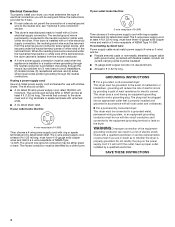
... the circuit conductors and connected to the equipment-grounding terminal or lead on the power supply cord: if it here. ■ If local codes do not use with a qualified electrician or service representative or personnel if you will reduce the risk of electric shock. The wires that is installed in a risk of electric shock by direct wire: Power supply cable must be using a power supply cord: Use a UL listed power supply cord kit...
... the circuit conductors and connected to the equipment-grounding terminal or lead on the power supply cord: if it here. ■ If local codes do not use with a qualified electrician or service representative or personnel if you will reduce the risk of electric shock. The wires that is installed in a risk of electric shock by direct wire: Power supply cable must be using a power supply cord: Use a UL listed power supply cord kit...
Installation Instructions
Page 5
... electrical shock. Failure to an individual branch circuit. 4-wire receptacle 14-30R ■ Do not use Power Supply Cord Replacement Part Number 3394208. For further information, please reference the service numbers located in accordance with a cord having an equipmentgrounding conductor and a grounding plug. grounding conductor can result in conformance with the dryer: if it is properly installed and grounded in the Dryer User Instructions. GROUNDING INSTRUCTIONS ■ For a grounded, cord-connected dryer: This dryer...
... electrical shock. Failure to an individual branch circuit. 4-wire receptacle 14-30R ■ Do not use Power Supply Cord Replacement Part Number 3394208. For further information, please reference the service numbers located in accordance with a cord having an equipmentgrounding conductor and a grounding plug. grounding conductor can result in conformance with the dryer: if it is properly installed and grounded in the Dryer User Instructions. GROUNDING INSTRUCTIONS ■ For a grounded, cord-connected dryer: This dryer...
Installation Instructions
Page 9
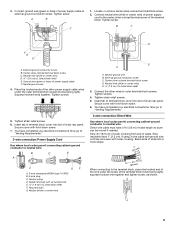
... listed strain relief 3. You have completed your electrical connections. Tighten screw. A B C 1. B C D F E D A. Insert tab of terminal block cover into slot of the terminal block. Connect the other power supply cable wires under the screw of extra length so dryer can be moved if needed. Spade terminals with outer covering. Neutral (white or center wire) E A A. Tighten screws. 4. Secure cover with hold -down screw. 7. Now go to "Venting Requirements." 3-wire connection: Power Supply Cord Use where local codes permit connecting...
... listed strain relief 3. You have completed your electrical connections. Tighten screw. A B C 1. B C D F E D A. Insert tab of terminal block cover into slot of the terminal block. Connect the other power supply cable wires under the screw of extra length so dryer can be moved if needed. Spade terminals with outer covering. Neutral (white or center wire) E A A. Tighten screws. 4. Secure cover with hold -down screw. 7. Now go to "Venting Requirements." 3-wire connection: Power Supply Cord Use where local codes permit connecting...

Installation Instructions
Page 13
... longer drying times and increased energy usage. If connecting to existing vent, make sure the vent is close to finish turning the legs until it is clean. NOTE: Do not use duct tape, screws or other injury. 1. Run vent to achieve the best drying performance. See illustration. 3. Use a wrench to its final location. Do not use vent runs longer than those specified in the flexible gas line. 4. Stand the dryer up...
... longer drying times and increased energy usage. If connecting to existing vent, make sure the vent is close to finish turning the legs until it is clean. NOTE: Do not use duct tape, screws or other injury. 1. Run vent to achieve the best drying performance. See illustration. 3. Use a wrench to its final location. Do not use vent runs longer than those specified in the flexible gas line. 4. Stand the dryer up...

Warranty
Page 1
... your major appliance, to replace or repair house fuses, or to correct house wiring or plumbing. 3. Pick up and delivery. Repairs to parts or systems resulting from the date of purchase. 6. Replacement parts or repair labor on the product. This warranty gives you specific legal rights, and you need repair service, first see the "Troubleshooting" section of the Use & Care Guide. If you are excluded from warranty coverage. 4. In the...
... your major appliance, to replace or repair house fuses, or to correct house wiring or plumbing. 3. Pick up and delivery. Repairs to parts or systems resulting from the date of purchase. 6. Replacement parts or repair labor on the product. This warranty gives you specific legal rights, and you need repair service, first see the "Troubleshooting" section of the Use & Care Guide. If you are excluded from warranty coverage. 4. In the...


