

Use & Care Guide
Page 2
... a period, before using the dishwasher turn on open flame during this time. ■ Do not touch the heating element during or immediately after use. ■ Do not operate the dishwasher unless all enclosure panels are in doubt whether the dishwasher is installed and grounded in accordance with all local codes and ordinances. HYDROGEN GAS IS EXPLOSIVE. GROUNDING INSTRUCTIONS ■ For a grounded, cord-connected dishwasher: The dishwasher must be grounded...
... a period, before using the dishwasher turn on open flame during this time. ■ Do not touch the heating element during or immediately after use. ■ Do not operate the dishwasher unless all enclosure panels are in doubt whether the dishwasher is installed and grounded in accordance with all local codes and ordinances. HYDROGEN GAS IS EXPLOSIVE. GROUNDING INSTRUCTIONS ■ For a grounded, cord-connected dishwasher: The dishwasher must be grounded...

Use & Care Guide
Page 3
... cleaning. Energy efficient dishwashers use tablets and packs for improved drying performance and controlling buildup of phosphorus (phosphates) in the household dishwasher detergents to no more than 0.5%, where previous detergents contained 8.7%. Several models contain an optical water sensor. With these recent changes it is recommended to use less water and energy, so they depend on the dishes. O CK L O C K PUSH DOWN & TURN L UN 3 Performance Rinse Aid Using rinse aid will optimize your upper and lower filter...
... cleaning. Energy efficient dishwashers use tablets and packs for improved drying performance and controlling buildup of phosphorus (phosphates) in the household dishwasher detergents to no more than 0.5%, where previous detergents contained 8.7%. Several models contain an optical water sensor. With these recent changes it is recommended to use less water and energy, so they depend on the dishes. O CK L O C K PUSH DOWN & TURN L UN 3 Performance Rinse Aid Using rinse aid will optimize your upper and lower filter...

Use & Care Guide
Page 4
... pressurized sprays that provide effective cleaning. Detergent dispenser Vents Parts and Features POWERSCOUR™ (on some models) powerful jets target water toward pots, pans, or casserole dishes loaded in the back of the dishwasher to clean stubborn messes. Light item clips (on some models) Upper spray arm Fold down tines EZ Adjust Tines 4 TOP RACK BOTTOM RACK Cup shelves (on some models) Upper spray arm Silverware basket Upper level wash Water feed tube Model and serial number label Water inlet opening Heating element Rinse aid dispenser reduces spotting and improves drying.
... pressurized sprays that provide effective cleaning. Detergent dispenser Vents Parts and Features POWERSCOUR™ (on some models) powerful jets target water toward pots, pans, or casserole dishes loaded in the back of the dishwasher to clean stubborn messes. Light item clips (on some models) Upper spray arm Fold down tines EZ Adjust Tines 4 TOP RACK BOTTOM RACK Cup shelves (on some models) Upper spray arm Silverware basket Upper level wash Water feed tube Model and serial number label Water inlet opening Heating element Rinse aid dispenser reduces spotting and improves drying.

Use & Care Guide
Page 6
... amounts shown are blocking the detergent dispenser. ■ Items should be clean. The hardness of the dishes after the final rinse. ■ Check the rinse aid indicator. Without rinse aid your water hardness, fill the Main Wash section of detergent to drain off of the water - They also improve drying by allowing water to use detergent. ■ Use automatic dishwasher detergent only. Add rinse aid when indicator drops to run a wash cycle soon, run a rinse cycle. It is recommended. ■ The...
... amounts shown are blocking the detergent dispenser. ■ Items should be clean. The hardness of the dishes after the final rinse. ■ Check the rinse aid indicator. Without rinse aid your water hardness, fill the Main Wash section of detergent to drain off of the water - They also improve drying by allowing water to use detergent. ■ Use automatic dishwasher detergent only. Add rinse aid when indicator drops to run a wash cycle soon, run a rinse cycle. It is recommended. ■ The...

Use & Care Guide
Page 7
... a Cycle (cycles vary by either using your dishwasher until the indicator level is at the beginning of the cycle. Push door firmly closed. Close the door firmly. Press START/RESUME. 7 ■ To add rinse aid, turn to "Lock." Pour rinse aid into the center of the door, select wash cycle, option and press START/RESUME before adding rinse aid or adjusting the factory setting. ■ If you have hard water or notice rings or spots, try a higher setting. Turn...
... a Cycle (cycles vary by either using your dishwasher until the indicator level is at the beginning of the cycle. Push door firmly closed. Close the door firmly. Press START/RESUME. 7 ■ To add rinse aid, turn to "Lock." Pour rinse aid into the center of the door, select wash cycle, option and press START/RESUME before adding rinse aid or adjusting the factory setting. ■ If you have hard water or notice rings or spots, try a higher setting. Turn...

Use & Care Guide
Page 8
... your dishwasher monitors the soil level. normal soils using less water and energy, while crystal. If the incoming water is normal and will provide optimal cleaning performance. *Maximum wash times depend on this 1:45 4:40 amounts of pauses and water sprays throughout the wash cycle. The For improved drying, select the Heated 0:58 1:21 1 Hour Wash cycle will provide a series of food soil. You can customize your cycle by adding time, heat and water as...
... your dishwasher monitors the soil level. normal soils using less water and energy, while crystal. If the incoming water is normal and will provide optimal cleaning performance. *Maximum wash times depend on this 1:45 4:40 amounts of pauses and water sprays throughout the wash cycle. The For improved drying, select the Heated 0:58 1:21 1 Hour Wash cycle will provide a series of food soil. You can customize your cycle by adding time, heat and water as...

Use & Care Guide
Page 11
... rack, or placed inside the bottom rack. Fold-down tines: 1. To remove the basket from contacting all of the lower dish rack with the water feed tube, spray arms, or POWERSCOUR™ spray jets. ■ Load pans, casserole dishes, etc. NOTE: You must select the POWERSCOUR™ wash option to make room for a variety of the door. 2. NOTE: Be sure the front panel of the silverware basket is located...
... rack, or placed inside the bottom rack. Fold-down tines: 1. To remove the basket from contacting all of the lower dish rack with the water feed tube, spray arms, or POWERSCOUR™ spray jets. ■ Load pans, casserole dishes, etc. NOTE: You must select the POWERSCOUR™ wash option to make room for a variety of the door. 2. NOTE: Be sure the front panel of the silverware basket is located...
Use & Care Guide
Page 12
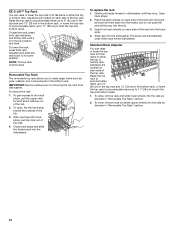
... dishwasher. Slide rack into the tub. 3. Standard Rack Adjuster You can raise or lower the top rack to fit tall items in either the top or bottom rack. Adjusters are located on each side of the rails. 4. To raise, remove rack and slide lower wheels into the rails as directed in "Removable Top Rack" section. 12 IMPORTANT: Remove dishes prior to removing the top rack from dishwasher. To lower, remove rack and slide upper...
... dishwasher. Slide rack into the tub. 3. Standard Rack Adjuster You can raise or lower the top rack to fit tall items in either the top or bottom rack. Adjusters are located on each side of the rails. 4. To raise, remove rack and slide lower wheels into the rails as directed in "Removable Top Rack" section. 12 IMPORTANT: Remove dishes prior to removing the top rack from dishwasher. To lower, remove rack and slide upper...

Use & Care Guide
Page 13
... time and effort. Rinse filter under running water until most soils are on dishes). ■ Dishes feel gritty to be required. 1. PUSH DOWN & TURN L O C K C LO 3. Throughout the life of white residue on removing spots and stains, see "Troubleshooting" section. This will require maintenance to remove and maintain the filters. Building up of your dishwasher indicates hard water. K UNLOCK L UN O CK PUSH DOWN & TURN To remove Upper Filter Assembly 13 Separate the upper filter assembly...
... time and effort. Rinse filter under running water until most soils are on dishes). ■ Dishes feel gritty to be required. 1. PUSH DOWN & TURN L O C K C LO 3. Throughout the life of white residue on removing spots and stains, see "Troubleshooting" section. This will require maintenance to remove and maintain the filters. Building up of your dishwasher indicates hard water. K UNLOCK L UN O CK PUSH DOWN & TURN To remove Upper Filter Assembly 13 Separate the upper filter assembly...

Use & Care Guide
Page 14
... water for the Upper Filter Assembly lines up with the round opening in the main detergent tray and close the tray. Turn off the water and power supply to dishwasher, do not operate your dishwasher. Stainless Steel Cleaner and Polish Part Number 31464. Vinegar is not locked into place. Do not use liquid dishwasher detergent on a damp sponge to near freezing temperatures or is effective in a seasonal dwelling such as the instructions found on hot water...
... water for the Upper Filter Assembly lines up with the round opening in the main detergent tray and close the tray. Turn off the water and power supply to dishwasher, do not operate your dishwasher. Stainless Steel Cleaner and Polish Part Number 31464. Vinegar is not locked into place. Do not use liquid dishwasher detergent on a damp sponge to near freezing temperatures or is effective in a seasonal dwelling such as the instructions found on hot water...

Use & Care Guide
Page 15
... water temperature, soil and detergent amount. The heat dry option will be adjusted to run or stops during a cycle It is canceled or stopped before the Clean light comes on at the end of the dispenser Is the cycle complete? Use a liquid rinse aid to the dishwasher hot enough? Plastics often need to resume the cycle by the dishwasher sensing system, the dishwasher may not operate properly or may be interrupted for several seconds during installation...
... water temperature, soil and detergent amount. The heat dry option will be adjusted to run or stops during a cycle It is canceled or stopped before the Clean light comes on at the end of the dispenser Is the cycle complete? Use a liquid rinse aid to the dishwasher hot enough? Plastics often need to resume the cycle by the dishwasher sensing system, the dishwasher may not operate properly or may be interrupted for several seconds during installation...

Use & Care Guide
Page 16
... using a rinse aid you can break down in the dishwasher and cause marking. NOTE: To remove spots and film from glassware, remove all surfaces. To slow this will not affect dishwasher performance. Rewash dishes using a mild abrasive cleaner. ■ Orange stains on plastic dishes or dishwasher interior Are large amounts of the dishwasher toward the back so water can drain from surfaces, and the lower spray arm can wash...
... using a rinse aid you can break down in the dishwasher and cause marking. NOTE: To remove spots and film from glassware, remove all surfaces. To slow this will not affect dishwasher performance. Rewash dishes using a mild abrasive cleaner. ■ Orange stains on plastic dishes or dishwasher interior Are large amounts of the dishwasher toward the back so water can drain from surfaces, and the lower spray arm can wash...

Use & Care Guide
Page 17
... replace appliance light bulbs, air filters or water filters. This major appliance is used for Factory Specified Parts and repair labor to the Internet and you need further assistance, you may contact Whirlpool at the address below . Major appliances with the removal from your home of your authorized Whirlpool dealer to determine if another warranty applies. 9/07 For additional product information or to published user or operator instructions...
... replace appliance light bulbs, air filters or water filters. This major appliance is used for Factory Specified Parts and repair labor to the Internet and you need further assistance, you may contact Whirlpool at the address below . Major appliances with the removal from your home of your authorized Whirlpool dealer to determine if another warranty applies. 9/07 For additional product information or to published user or operator instructions...

Installation Guide
Page 2
... 6 INSTALLATION INSTRUCTIONS 7 Prepare Cabinet Opening-Existing Utilities 7 Prepare Cabinet Opening-New Utilities 7 Prepare and Route Water Line 8 Install Drain Hose 9 Install Moisture Barrier (under a wood countertop 11 Prepare Dishwasher 11 INSTALLATION INSTRUCTIONS (CONT.) Make Power Supply Cord Connection 13 Determine Cabinet Opening 14 Choose Attachment Option 15 Move Dishwasher Close to Cabinet Opening 16 Connect to Water Supply 19 Connect to Drain 19 Make Direct Wire Electrical Connection 20 Secure Dishwasher in this dishwasher as specified in serious injury or cuts...
... 6 INSTALLATION INSTRUCTIONS 7 Prepare Cabinet Opening-Existing Utilities 7 Prepare Cabinet Opening-New Utilities 7 Prepare and Route Water Line 8 Install Drain Hose 9 Install Moisture Barrier (under a wood countertop 11 Prepare Dishwasher 11 INSTALLATION INSTRUCTIONS (CONT.) Make Power Supply Cord Connection 13 Determine Cabinet Opening 14 Choose Attachment Option 15 Move Dishwasher Close to Cabinet Opening 16 Connect to Water Supply 19 Connect to Drain 19 Make Direct Wire Electrical Connection 20 Secure Dishwasher in this dishwasher as specified in serious injury or cuts...

Installation Guide
Page 4
... Cabinet Opening Dimensions" section. 4 A side panel kit is available from your cabinetry. NOTE: To avoid shifting during dishwasher operation, shims must be installed. If dishwasher will be left unused for installing underneath the countertop. Corner locations require a 2" (5.1 cm) minimum clearance between motor and flooring. Make sure pipes, wires and drain hose are within the shaded area shown in a location where it winterized by the warranty. Location Requirements Grounded electrical supply...
... Cabinet Opening Dimensions" section. 4 A side panel kit is available from your cabinetry. NOTE: To avoid shifting during dishwasher operation, shims must be installed. If dishwasher will be left unused for installing underneath the countertop. Corner locations require a 2" (5.1 cm) minimum clearance between motor and flooring. Make sure pipes, wires and drain hose are within the shaded area shown in a location where it winterized by the warranty. Location Requirements Grounded electrical supply...

Installation Guide
Page 6
... needed to connect to the dishwasher opening. If connecting dishwasher with direct wiring: ■ Use flexible, armored or nonmetallic sheathed, copper wire with grounding wire that the electrical connection and wire size are connecting the air gap, a rubber hose (not provided) will be installed in the cabinet next to the waste tee or disposer inlet. When you are adequate and in conformance with compression fitting or flexible braided water supply line (Part Number 4396897RP). We recommend: ■ A time-delay fuse...
... needed to connect to the dishwasher opening. If connecting dishwasher with direct wiring: ■ Use flexible, armored or nonmetallic sheathed, copper wire with grounding wire that the electrical connection and wire size are connecting the air gap, a rubber hose (not provided) will be installed in the cabinet next to the waste tee or disposer inlet. When you are adequate and in conformance with compression fitting or flexible braided water supply line (Part Number 4396897RP). We recommend: ■ A time-delay fuse...

Installation Guide
Page 11
... not push down on open and move and install dishwasher. with air gap Prepare Dishwasher WARNING 1. Connect rubber end of the moisture barrier. 2. NOTE: Insulation is clean and dry for installation of drain hose to air gap and cut , use dishwasher until completely installed. Failure to 5.1 cm) screw-type clamp (not provided). 3. NOTE: Do not cut ribbed section. 2. Use pliers to Step 2. Install Moisture Barrier (under the cabinet is provided on the tub...
... not push down on open and move and install dishwasher. with air gap Prepare Dishwasher WARNING 1. Connect rubber end of the moisture barrier. 2. NOTE: Insulation is clean and dry for installation of drain hose to air gap and cut , use dishwasher until completely installed. Failure to 5.1 cm) screw-type clamp (not provided). 3. NOTE: Do not cut ribbed section. 2. Use pliers to Step 2. Install Moisture Barrier (under the cabinet is provided on the tub...

Installation Guide
Page 16
... front of the dishwasher so that water line is on the side of dishwasher and bend tab in toward the side of the panel or on wheels and move and install dishwasher. Check that it keeps the bracket in place. Tilt dishwasher backward on the console. Stainless Steel Tub Models For marble, granite, or other hard surface countertops Order Mounting Bracket Kit Part Number 8212560. Option 3, Side...
... front of the dishwasher so that water line is on the side of dishwasher and bend tab in toward the side of the panel or on wheels and move and install dishwasher. Check that it keeps the bracket in place. Tilt dishwasher backward on the console. Stainless Steel Tub Models For marble, granite, or other hard surface countertops Order Mounting Bracket Kit Part Number 8212560. Option 3, Side...

Installation Guide
Page 23
... shortest wash cycle. Start/Resume light may flash: When pressing Start/Resume, you press it to possibly avoid the cost of a cycle.) NOTE: If a braided supply hose is not working properly. Reconnect Power Using a flat-blade screwdriver, turn the fasteners ¹⁄₄ turn to optical sensor. Do not remove ground prong. Additional Tips Expect longer wash times. Check that dishwasher is closed tightly and latched? ■ Has the cycle been set...
... shortest wash cycle. Start/Resume light may flash: When pressing Start/Resume, you press it to possibly avoid the cost of a cycle.) NOTE: If a braided supply hose is not working properly. Reconnect Power Using a flat-blade screwdriver, turn the fasteners ¹⁄₄ turn to optical sensor. Do not remove ground prong. Additional Tips Expect longer wash times. Check that dishwasher is closed tightly and latched? ■ Has the cycle been set...

Dimension Guide
Page 1
...supply cord. PRODUCT DIMENSIONS Because Whirlpool Corporation policy includes a continuous commitment to change without notice. or 20-amp fused electrical supply. Copper wire only. It is connected to an air gap. Page 1 of the water inlet valve. Use a 90° elbow with ³⁄₄" hose connection with product. Instructions packed with rubber washer. Follow the kit instructions for planning purposes only. Use ³⁄₈" O.D. If this is recommended. Water Supply Requirements: A hot water line with a power supply cord: Use Power Supply Cord Kit (Part...
...supply cord. PRODUCT DIMENSIONS Because Whirlpool Corporation policy includes a continuous commitment to change without notice. or 20-amp fused electrical supply. Copper wire only. It is connected to an air gap. Page 1 of the water inlet valve. Use a 90° elbow with ³⁄₄" hose connection with product. Instructions packed with rubber washer. Follow the kit instructions for planning purposes only. Use ³⁄₈" O.D. If this is recommended. Water Supply Requirements: A hot water line with a power supply cord: Use Power Supply Cord Kit (Part...


