
Use & Care Guide
Page 1
In Canada, visit our website at www.whirlpool.ca or call us at www.whirlpool.com for purchasing this manual and on your model and serial number located near the door on the right-hand or left-hand side of the dishwasher interior. W10350359B You will follow ... acceso a "Instrucciones para el usuario de la lavavajillas" en español, o para obtener información adicional acerca de su producto, visite : www.whirlpool.com Tenga listo su número de modelo completo. We have provided many important safety messages in TROUBLESHOOTING, please visit our website at 1-800-807...
In Canada, visit our website at www.whirlpool.ca or call us at www.whirlpool.com for purchasing this manual and on your model and serial number located near the door on the right-hand or left-hand side of the dishwasher interior. W10350359B You will follow ... acceso a "Instrucciones para el usuario de la lavavajillas" en español, o para obtener información adicional acerca de su producto, visite : www.whirlpool.com Tenga listo su número de modelo completo. We have provided many important safety messages in TROUBLESHOOTING, please visit our website at 1-800-807...

Use & Care Guide
Page 3
... first cycle using the sensor will run longer to the soak and pauses for convenience and improved performance. What's New in eco-conscious awareness. Several models contain an optical water sensor. With these recent changes it is recommended to determine the optimum water and energy consumption for this change in detergents...
... first cycle using the sensor will run longer to the soak and pauses for convenience and improved performance. What's New in eco-conscious awareness. Several models contain an optical water sensor. With these recent changes it is recommended to determine the optimum water and energy consumption for this change in detergents...

Use & Care Guide
Page 4
...spray arm has pressurized sprays that provide effective cleaning. Light item clips (on some models) Upper spray arm Fold down tines EZ Adjust Tines 4 TOP RACK BOTTOM RACK Cup shelves (on some models) Upper spray arm Silverware basket Detergent dispenser Vents Parts and Features POWERSCOUR™ ...(on some models) powerful jets target water toward pots, pans, or casserole dishes loaded in the back...
...spray arm has pressurized sprays that provide effective cleaning. Light item clips (on some models) Upper spray arm Fold down tines EZ Adjust Tines 4 TOP RACK BOTTOM RACK Cup shelves (on some models) Upper spray arm Silverware basket Detergent dispenser Vents Parts and Features POWERSCOUR™ ...(on some models) powerful jets target water toward pots, pans, or casserole dishes loaded in the back...
Use & Care Guide
Page 5
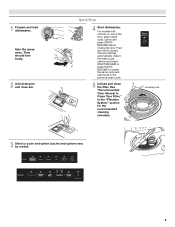
... START/RESUME or press START/ RESUME to Clean Your Filter," in the previous wash cycle. 5 Unload and clean the filter. Quick Steps 4 Start dishwasher. For models with controls on top of the door, select wash cycle, option and press START/ RESUME before closing the door. 1 Prepare and load dishwasher. The door... System" section for the recommended cleaning schedule. Push door firmly closed. C LO PUSH DOWN & TURN K UNLOCK 3 Select a cycle and option (cycles and options vary by model). 5
... START/RESUME or press START/ RESUME to Clean Your Filter," in the previous wash cycle. 5 Unload and clean the filter. Quick Steps 4 Start dishwasher. For models with controls on top of the door, select wash cycle, option and press START/ RESUME before closing the door. 1 Prepare and load dishwasher. The door... System" section for the recommended cleaning schedule. Push door firmly closed. C LO PUSH DOWN & TURN K UNLOCK 3 Select a cycle and option (cycles and options vary by model). 5

Use & Care Guide
Page 7
... options and press STAR/RESUME or press START/RESUME to repeat the same cycle and options as it enters the dishwasher. ■ For models with controls on your dishwasher until the water is fully Refill locked. Replace the dispenser cap and turn the dispenser cap to ensure no ... door. For best dishwashing results, water should be 120ºF (49ºC) as in the previous wash cycle. ■ You can customize your cycles by model) See "Cycle and Option Descriptions" charts in the following section. max - 21 3 - --- ¹⁄₄ turn to lock NOTE: For most water ...
... options and press STAR/RESUME or press START/RESUME to repeat the same cycle and options as it enters the dishwasher. ■ For models with controls on your dishwasher until the water is fully Refill locked. Replace the dispenser cap and turn the dispenser cap to ensure no ... door. For best dishwashing results, water should be 120ºF (49ºC) as in the previous wash cycle. ■ You can customize your cycles by model) See "Cycle and Option Descriptions" charts in the following section. max - 21 3 - --- ¹⁄₄ turn to lock NOTE: For most water ...

Use & Care Guide
Page 8
... overnight 6:20 7:00 normal amounts of the wash cycle, you may not have all the cycles and options described. will repeatedly pause for several different models. During the wash, the wash action will repeatedly pause adjusting for loads with normal The energy-usage label is ideal to save energy. Use for...
... overnight 6:20 7:00 normal amounts of the wash cycle, you may not have all the cycles and options described. will repeatedly pause for several different models. During the wash, the wash action will repeatedly pause adjusting for loads with normal The energy-usage label is ideal to save energy. Use for...
Use & Care Guide
Page 9
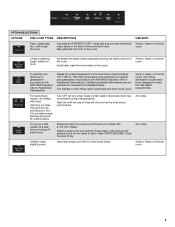
... contain plastic dinnerware that may be sensitive to the cycle. Sensor, Heavy or Normal cycle. Sensor, Heavy or Normal cycle Loads containing tough, baked-on models with NSF/ANSI Standard 184 for Residential Dishwashers. Increases the target water temperature during offpeak hours. Smaller loads slightly soiled. The Sanitize or Sani Rinse...
... contain plastic dinnerware that may be sensitive to the cycle. Sensor, Heavy or Normal cycle. Sensor, Heavy or Normal cycle Loads containing tough, baked-on models with NSF/ANSI Standard 184 for Residential Dishwashers. Increases the target water temperature during offpeak hours. Smaller loads slightly soiled. The Sanitize or Sani Rinse...

Use & Care Guide
Page 15
...If you do not dry completely Did you load your dishes and dishwasher interior will repeat this sensor adjustment. ■ Water remains in models) Is the dishwasher aligned with spray jets or spray arm. Is the water supplied to the dishwasher? Wash cycles are not dry Did ... Check for service. Be sure the cycle has finished (green light is on dishes Is your filters regularly. In the U.S.A., www.whirlpool.com In Canada, www.whirlpool.ca Dishwasher is there a high mineral content in the dispenser. Troubleshooting First try the solutions suggested here or visit our website and ...
...If you do not dry completely Did you load your dishes and dishwasher interior will repeat this sensor adjustment. ■ Water remains in models) Is the dishwasher aligned with spray jets or spray arm. Is the water supplied to the dishwasher? Wash cycles are not dry Did ... Check for service. Be sure the cycle has finished (green light is on dishes Is your filters regularly. In the U.S.A., www.whirlpool.com In Canada, www.whirlpool.ca Dishwasher is there a high mineral content in the dispenser. Troubleshooting First try the solutions suggested here or visit our website and ...

Use & Care Guide
Page 16
...and stops throughout the entire cycle. See the table in the POWERSCOUR™ wash area are stable and do not overlap? If you have some models), you use a stain removal product to reduce or eliminate white film. For best dishwashing results, water should stop. Heavy soil and/or hard ...clogged by moving the rack in "Dishwasher Care." ■ Silica film or etching (silica film is normal to avoid the problem, except by some models). Do not use detergent. Load soiled dish surfaces to face the POWERSCOUR™ spray jets? Are items loaded so they are not clean Are ...
...and stops throughout the entire cycle. See the table in the POWERSCOUR™ wash area are stable and do not overlap? If you have some models), you use a stain removal product to reduce or eliminate white film. For best dishwashing results, water should stop. Heavy soil and/or hard ...clogged by moving the rack in "Dishwasher Care." ■ Silica film or etching (silica film is normal to avoid the problem, except by some models). Do not use detergent. Load soiled dish surfaces to face the POWERSCOUR™ spray jets? Are items loaded so they are not clean Are ...

Use & Care Guide
Page 17
...your major appliance, unless such damage results from defects in materials or workmanship and is reported to Whirlpool within 30 days from the date of purchase. 6. Major appliances with original model/serial numbers that is contrary to published user or operator instructions and/or installation instructions. 4. ...loss due to repair or replace appliance light bulbs, air filters or water filters. Service must be borne by an authorized Whirlpool servicer is used in your model number and serial number on the label located near the door on how to instruct you may contact...
...your major appliance, unless such damage results from defects in materials or workmanship and is reported to Whirlpool within 30 days from the date of purchase. 6. Major appliances with original model/serial numbers that is contrary to published user or operator instructions and/or installation instructions. 4. ...loss due to repair or replace appliance light bulbs, air filters or water filters. Service must be borne by an authorized Whirlpool servicer is used in your model number and serial number on the label located near the door on how to instruct you may contact...

Installation Guide
Page 3
... needed : Other parts you may also need: *Must be made by a licensed electrical installer. Check local codes. Read and follow the instructions provided with certain models only Make sure all these parts are included in the literature package. †®TORX is recommended that electrical connections be the proper size to...
... needed : Other parts you may also need: *Must be made by a licensed electrical installer. Check local codes. Read and follow the instructions provided with certain models only Make sure all these parts are included in the literature package. †®TORX is recommended that electrical connections be the proper size to...

Installation Guide
Page 11
.... with large blue drain hose clamp (provided). Attach drain hose to air gap with air gap Prepare Dishwasher WARNING 1. Do not push down on some models. NOTE: Insulation is clean and dry for installation of the tub. 1. Remove the backing of the moisture barrier and apply to underside of the countertop...
.... with large blue drain hose clamp (provided). Attach drain hose to air gap with air gap Prepare Dishwasher WARNING 1. Do not push down on some models. NOTE: Insulation is clean and dry for installation of the tub. 1. Remove the backing of the moisture barrier and apply to underside of the countertop...

Installation Guide
Page 12
...dishwasher. Helpful Tip: Place cardboard under dishwasher until installed in cabinet opening to avoid scratching the door panel. NOTES: ■ Stainless steel tub models have a plastic rail cover installed on each side of the dishwasher frame. ■ If you have a stainless steel tub... model, complete Step 3. ■ If you have a plastic tub model, proceed to continue with the power supply cord kit. Retain for later use door panel as a worktable without first covering with a ...
...dishwasher. Helpful Tip: Place cardboard under dishwasher until installed in cabinet opening to avoid scratching the door panel. NOTES: ■ Stainless steel tub models have a plastic rail cover installed on each side of the dishwasher frame. ■ If you have a stainless steel tub... model, complete Step 3. ■ If you have a plastic tub model, proceed to continue with the power supply cord kit. Retain for later use door panel as a worktable without first covering with a ...

Installation Guide
Page 15
... bracket in use a flat-blade screwdriver to the same height. This will be securely attached to floor to move and install dishwasher. Stainless Steel Tub Models Using 2 or more people to avoid movement when the dishwasher is wood, laminate or another hard surface, install using Option Number 2 if you have a plastic... of pliers, bend the tab down to the same height. Failure to Step 3. Proceed to do so can result in the parts bag. Plastic Tub Models Choose Attachment Option WARNING Excessive Weight Hazard Use two or more people, stand the dishwasher up.
... bracket in use a flat-blade screwdriver to the same height. This will be securely attached to floor to move and install dishwasher. Stainless Steel Tub Models Using 2 or more people to avoid movement when the dishwasher is wood, laminate or another hard surface, install using Option Number 2 if you have a plastic... of pliers, bend the tab down to the same height. Failure to Step 3. Proceed to do so can result in the parts bag. Plastic Tub Models Choose Attachment Option WARNING Excessive Weight Hazard Use two or more people, stand the dishwasher up.

Installation Guide
Page 16
... that it keeps the bracket in toward the side of dishwasher and bend tab in place. Break off the end of utilities. Stainless Steel Tub Models For marble, granite, or other injury. NOTE: Do not attach the dishwasher. Panel or console may dent. This will be done later. Plastic Tub...
... that it keeps the bracket in toward the side of dishwasher and bend tab in place. Break off the end of utilities. Stainless Steel Tub Models For marble, granite, or other injury. NOTE: Do not attach the dishwasher. Panel or console may dent. This will be done later. Plastic Tub...
Installation Guide
Page 17
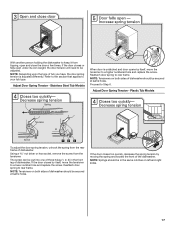
...it from the tensioner. The screw can be secured at same holes. NOTE: Springs should be adjusted. Reattach door spring to Step 6. Plastic Tub Models To adjust the door spring tension, unhook the spring from the rear frame of dishwasher. NOTE: Depending upon the type of tub you have, ...the door spring tension is unlatched and door opens by moving the spring end toward the front of the dishwasher. Stainless Steel Tub Models When door is adjusted differently. NOTE: Tensioners on both sides of dishwasher should be in the same notches on both sides of dishwasher should...
...it from the tensioner. The screw can be secured at same holes. NOTE: Springs should be adjusted. Reattach door spring to Step 6. Plastic Tub Models To adjust the door spring tension, unhook the spring from the rear frame of dishwasher. NOTE: Depending upon the type of tub you have, ...the door spring tension is unlatched and door opens by moving the spring end toward the front of the dishwasher. Stainless Steel Tub Models When door is adjusted differently. NOTE: Tensioners on both sides of dishwasher should be in the same notches on both sides of dishwasher should...

Installation Guide
Page 23
... new dishwasher will average 2-3 hours per load, but use an extension cord. Certain models are equipped with rinse aid for future reference. 23 If you do this when adding a dish during the middle of a cycle.) NOTE: If a braided supply ...
... new dishwasher will average 2-3 hours per load, but use an extension cord. Certain models are equipped with rinse aid for future reference. 23 If you do this when adding a dish during the middle of a cycle.) NOTE: If a braided supply ...

Dimension Guide
Page 1
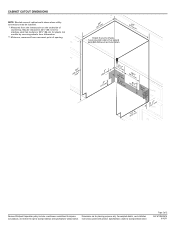
... 1" (2.5 cm) drain connector of the counter, or be 120°F (49°C) water at dishwasher. PRODUCT DIMENSIONS Because Whirlpool Corporation policy includes a continuous commitment to 862 kPa) water pressure. ® Undercounter Dishwasher PRODUCT MODEL NUMBERS WDF510PAY WDF530PAY WDF530PLY WDF530PSY WDF730PAY WDF750PAY WDF780SLY WDT710PAY WDT770PAY WDT790SAY WDT790SLY WDT910SAY WDT910SSY Electrical Requirements: 120-volt...
... 1" (2.5 cm) drain connector of the counter, or be 120°F (49°C) water at dishwasher. PRODUCT DIMENSIONS Because Whirlpool Corporation policy includes a continuous commitment to 862 kPa) water pressure. ® Undercounter Dishwasher PRODUCT MODEL NUMBERS WDF510PAY WDF530PAY WDF530PLY WDF530PSY WDF730PAY WDF750PAY WDF780SLY WDT710PAY WDT770PAY WDT790SAY WDT790SLY WDT910SAY WDT910SSY Electrical Requirements: 120-volt...
Dimension Guide
Page 2
...8322;" (85.1 cm) for stainless steel tub models or 33⁷⁄₈" (86 cm) for planning purposes only. Page 2 of countertop. Instructions packed with product. W10350361A 6/10/11 Because Whirlpool Corporation policy includes a continuous commitment to improve ...Dimensions are for plastic tub models by removing wheels from dishwasher. ** Minimum, measured from the lowest point on the underside ...
...8322;" (85.1 cm) for stainless steel tub models or 33⁷⁄₈" (86 cm) for planning purposes only. Page 2 of countertop. Instructions packed with product. W10350361A 6/10/11 Because Whirlpool Corporation policy includes a continuous commitment to improve ...Dimensions are for plastic tub models by removing wheels from dishwasher. ** Minimum, measured from the lowest point on the underside ...
Warranty Information
Page 1
... purchase date is required to obtain service under these User Instructions and model number information for other damage to the finish of consumables or cleaning products not approved by an authorized Whirlpool servicer is operated and maintained according to instructions attached to parts or ...PRODUCT REPAIR AS PROVIDED HEREIN. Have your major appliance. You can write to Whirlpool with the product, Whirlpool Corporation or Whirlpool Canada LP (hereafter "Whirlpool") will pay for product service if your model number and serial number on the label located near the door on how ...
... purchase date is required to obtain service under these User Instructions and model number information for other damage to the finish of consumables or cleaning products not approved by an authorized Whirlpool servicer is operated and maintained according to instructions attached to parts or ...PRODUCT REPAIR AS PROVIDED HEREIN. Have your major appliance. You can write to Whirlpool with the product, Whirlpool Corporation or Whirlpool Canada LP (hereafter "Whirlpool") will pay for product service if your model number and serial number on the label located near the door on how ...


