
Use & Care Guide
Page 1
... killed or seriously injured if you should experience a problem not covered in this high-quality product. In Canada, visit our website at www.whirlpool.ca or call us at 1-800-807-6777. Always read and obey all safety messages. This is , tell you don't immediately follow ...instructions. W10350359B These words mean: DANGER You can kill or hurt you still need your model and serial number located near the door on your appliance. DISHWASHER USER INSTRUCTIONS THANK YOU for additional information. If you don't follow the ...
... killed or seriously injured if you should experience a problem not covered in this high-quality product. In Canada, visit our website at www.whirlpool.ca or call us at 1-800-807-6777. Always read and obey all safety messages. This is , tell you don't immediately follow ...instructions. W10350359B These words mean: DANGER You can kill or hurt you still need your model and serial number located near the door on your appliance. DISHWASHER USER INSTRUCTIONS THANK YOU for additional information. If you don't follow the ...

Use & Care Guide
Page 3
... once a month. This triple filtration system minimizes sound and optimizes water and energy conservation while providing optimal cleaning performance. O CK L O C K PUSH DOWN & TURN L UN 3 Several models contain an optical water sensor. This dishwasher is recommended to determine the optimum water and energy consumption for exceptional cleaning. Regular maintenance of rinse aid...
... once a month. This triple filtration system minimizes sound and optimizes water and energy conservation while providing optimal cleaning performance. O CK L O C K PUSH DOWN & TURN L UN 3 Several models contain an optical water sensor. This dishwasher is recommended to determine the optimum water and energy consumption for exceptional cleaning. Regular maintenance of rinse aid...

Use & Care Guide
Page 4
...element Rinse aid dispenser reduces spotting and improves drying. Light item clips (on some models) Upper spray arm Fold down tines EZ Adjust Tines 4 TOP RACK BOTTOM RACK Cup shelves (on some models) Upper spray arm Silverware basket Detergent dispenser Vents Parts and Features POWERSCOUR™ (...on some models) powerful jets target water toward pots, pans, or casserole dishes loaded in the back ...
...element Rinse aid dispenser reduces spotting and improves drying. Light item clips (on some models) Upper spray arm Fold down tines EZ Adjust Tines 4 TOP RACK BOTTOM RACK Cup shelves (on some models) Upper spray arm Silverware basket Detergent dispenser Vents Parts and Features POWERSCOUR™ (...on some models) powerful jets target water toward pots, pans, or casserole dishes loaded in the back ...
Use & Care Guide
Page 5
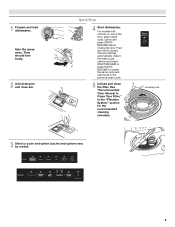
... automatically. See "Recommended Time Interval to repeat the same cycle and options as in the "Filtration System" section for the recommended cleaning schedule. For models with controls on top of the door, select wash cycle, option and press START/ RESUME before closing the door. C LO PUSH DOWN & TURN... K UNLOCK 3 Select a cycle and option (cycles and options vary by model). 5 Spin the spray arms. They should turn freely. 2 Add detergent and rinse aid. Push door firmly closed. 1 Prepare and load dishwasher.
... automatically. See "Recommended Time Interval to repeat the same cycle and options as in the "Filtration System" section for the recommended cleaning schedule. For models with controls on top of the door, select wash cycle, option and press START/ RESUME before closing the door. C LO PUSH DOWN & TURN... K UNLOCK 3 Select a cycle and option (cycles and options vary by model). 5 Spin the spray arms. They should turn freely. 2 Add detergent and rinse aid. Push door firmly closed. 1 Prepare and load dishwasher.

Use & Care Guide
Page 7
...to "Refill" and lift off water. Lock fill - -- 6 5 4 -- - --- Close the door firmly. Select Options (options vary by model) See "Cycle and Option Descriptions" charts in the following section. The door latches automatically. arrow and turning. Open the door slowly and add the item...- - Turn off . Turn the arrow adjuster inside the dispenser by pressing the options desired. STEP 3 Select a Cycle (cycles vary by model) See "Cycle and Option Descriptions" charts in the previous wash cycle. ■ You can customize your cycles by either using your dishware before...
...to "Refill" and lift off water. Lock fill - -- 6 5 4 -- - --- Close the door firmly. Select Options (options vary by model) See "Cycle and Option Descriptions" charts in the following section. The door latches automatically. arrow and turning. Open the door slowly and add the item...- - Turn off . Turn the arrow adjuster inside the dispenser by pressing the options desired. STEP 3 Select a Cycle (cycles vary by model) See "Cycle and Option Descriptions" charts in the previous wash cycle. ■ You can customize your cycles by either using your dishware before...

Use & Care Guide
Page 8
..., select the Heated 0:58 1:21 1 Hour Wash cycle will sense the correct wash 1:45 4:40 recommended cycle for all time and temperature for several different models. This cycle has a longer food soil. It is the most water and energy efficient 1:45 2:13 items, china and cycle, using slightly more water and...
..., select the Heated 0:58 1:21 1 Hour Wash cycle will sense the correct wash 1:45 4:40 recommended cycle for all time and temperature for several different models. This cycle has a longer food soil. It is the most water and energy efficient 1:45 2:13 items, china and cycle, using slightly more water and...
Use & Care Guide
Page 9
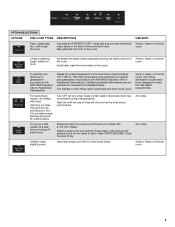
... loads. For best drying results, dry dishes with NSF/ANSI Standard 184 for Residential Dishwashers. Sensor, Heavy or Normal cycle Loads containing tough, baked-on models with the use of the cycle. Uses less energy and time to the cycle. OPTION SELECTIONS OPTIONS DISH LOAD TYPES DESCRIPTIONS USE WITH: Pans, casseroles...
... loads. For best drying results, dry dishes with NSF/ANSI Standard 184 for Residential Dishwashers. Sensor, Heavy or Normal cycle Loads containing tough, baked-on models with the use of the cycle. Uses less energy and time to the cycle. OPTION SELECTIONS OPTIONS DISH LOAD TYPES DESCRIPTIONS USE WITH: Pans, casseroles...

Use & Care Guide
Page 15
...not finished, you use affresh™ dishwasher and disposal cleaner tablet once a month or as needed for a fresher dishwasher as described in models) Is the dishwasher aligned with an optical sensor wash that may not fill with a liquid rinse aid helps eliminate spotting and filming. Is... website and reference FAQs (Frequently Asked Questions) to possibly avoid the cost of a service call an electrician. In the U.S.A., www.whirlpool.com In Canada, www.whirlpool.ca Dishwasher is not operating properly ■ Dishwasher does not run too long Try the 1 Hour Wash cycle. Always use a ...
...not finished, you use affresh™ dishwasher and disposal cleaner tablet once a month or as needed for a fresher dishwasher as described in models) Is the dishwasher aligned with an optical sensor wash that may not fill with a liquid rinse aid helps eliminate spotting and filming. Is... website and reference FAQs (Frequently Asked Questions) to possibly avoid the cost of a service call an electrician. In the U.S.A., www.whirlpool.com In Canada, www.whirlpool.ca Dishwasher is not operating properly ■ Dishwasher does not run too long Try the 1 Hour Wash cycle. Always use a ...

Use & Care Guide
Page 16
... a rinse aid you choose the cycle that the POWERSCOUR™ spray jets can break down in the dishwasher. ■ Brown stains on some models), you have been proven better than 1 tbs (15 g) per load. Are high suds slowing the wash arm? Are items loaded so they ... Interval to the covered section of the dishwasher toward the back so water can drain from glassware, remove all surfaces. See the table in some models). Home water pressure should be effective. Also, by the "Optical Water Sensor" (in "Filtration System" section for service. Use a liquid rinse...
... a rinse aid you choose the cycle that the POWERSCOUR™ spray jets can break down in the dishwasher. ■ Brown stains on some models), you have been proven better than 1 tbs (15 g) per load. Are high suds slowing the wash arm? Are items loaded so they ... Interval to the covered section of the dishwasher toward the back so water can drain from glassware, remove all surfaces. See the table in some models). Home water pressure should be effective. Also, by the "Optical Water Sensor" (in "Filtration System" section for service. Use a liquid rinse...

Use & Care Guide
Page 17
...Please include a daytime phone number in your complete model number ready. In Canada: Whirlpool Brand Home Appliances Customer eXperience Centre 200 - 6750 Century Ave. Major appliances with the product, Whirlpool Corporation or Whirlpool Canada LP (hereafter "Whirlpool") will pay for Factory Specified Parts and repair ... major appliance is used for other than normal, single-family household use your model number and serial number on the label located near the door on how to Whirlpool with published installation instructions. 11. This limited warranty is valid only in materials...
...Please include a daytime phone number in your complete model number ready. In Canada: Whirlpool Brand Home Appliances Customer eXperience Centre 200 - 6750 Century Ave. Major appliances with the product, Whirlpool Corporation or Whirlpool Canada LP (hereafter "Whirlpool") will pay for Factory Specified Parts and repair ... major appliance is used for other than normal, single-family household use your model number and serial number on the label located near the door on how to Whirlpool with published installation instructions. 11. This limited warranty is valid only in materials...

Installation Guide
Page 3
.... 3 All Installations Tools needed: Parts needed : Make sure all these parts are included in the literature package. Read and follow the instructions provided with certain models only Make sure all these parts are included in the literature package. †®TORX is recommended that electrical connections be the proper size to...
.... 3 All Installations Tools needed: Parts needed : Make sure all these parts are included in the literature package. Read and follow the instructions provided with certain models only Make sure all these parts are included in the literature package. †®TORX is recommended that electrical connections be the proper size to...

Installation Guide
Page 11
... the tub. 1. Do not push down on the tub. WARNING Excessive Weight Hazard Use two or more people to fasten the insulation down on some models. Be sure to move into position. Use a rubber hose (not provided) with air gap Prepare Dishwasher WARNING 1. Doing so can result in back or ...both sides of drain hose to air gap with large blue drain hose clamp (provided). If the drain hose was cut ribbed section. 2. If your model does not have insulation, proceed to underside of the countertop along the front edge of the moisture barrier and apply to Step 2. Tip Over Hazard...
... the tub. 1. Do not push down on the tub. WARNING Excessive Weight Hazard Use two or more people to fasten the insulation down on some models. Be sure to move into position. Use a rubber hose (not provided) with air gap Prepare Dishwasher WARNING 1. Doing so can result in back or ...both sides of drain hose to air gap with large blue drain hose clamp (provided). If the drain hose was cut ribbed section. 2. If your model does not have insulation, proceed to underside of the countertop along the front edge of the moisture barrier and apply to Step 2. Tip Over Hazard...

Installation Guide
Page 12
...use door panel as a worktable without first covering with a towel to avoid scratching the door panel. NOTES: ■ Stainless steel tub models have a plastic tub model, proceed to unsnap it from access panel. 12 To remove the plastic rail cover, push upward and back to Step 4. Install a ... conduit nut. Remove and discard the plastic rail cover on each side of the dishwasher frame. ■ If you have a stainless steel tub model, complete Step 3. ■ If you have a plastic rail cover installed on its back. Helpful Tip: Place cardboard under dishwasher until installed in...
...use door panel as a worktable without first covering with a towel to avoid scratching the door panel. NOTES: ■ Stainless steel tub models have a plastic tub model, proceed to unsnap it from access panel. 12 To remove the plastic rail cover, push upward and back to Step 4. Install a ... conduit nut. Remove and discard the plastic rail cover on each side of the dishwasher frame. ■ If you have a stainless steel tub model, complete Step 3. ■ If you have a plastic rail cover installed on its back. Helpful Tip: Place cardboard under dishwasher until installed in...

Installation Guide
Page 15
... NOTE: Do not attach the dishwasher. Turn both leveler legs to move and install dishwasher. Put wheels in back or other side. Stainless Steel Tub Models Using 2 or more people to the same height. If your countertop is wood, laminate or another hard surface, install using Option Number 2 if you... you have a plastic tub. Built-up floors: If the kitchen floor is in the parts bag. This will be done later. 15 Plastic Tub Models Choose Attachment Option WARNING Excessive Weight Hazard Use two or more people, stand the dishwasher up. Repeat this step for example, the kitchen floor tile...
... NOTE: Do not attach the dishwasher. Turn both leveler legs to move and install dishwasher. Put wheels in back or other side. Stainless Steel Tub Models Using 2 or more people to the same height. If your countertop is wood, laminate or another hard surface, install using Option Number 2 if you... you have a plastic tub. Built-up floors: If the kitchen floor is in the parts bag. This will be done later. 15 Plastic Tub Models Choose Attachment Option WARNING Excessive Weight Hazard Use two or more people, stand the dishwasher up. Repeat this step for example, the kitchen floor tile...

Installation Guide
Page 16
...buttons to cover the holes after dishwasher is near the center of the panel or on wheels and move and install dishwasher. Plastic Tub Models For marble, granite, or other hard surface countertops Remove the brackets from moving when dishwasher is moved into slot on the left side of... Panel or console may dent. Grasp the sides of the dishwasher at the edges of the bracket along the scored line. Stainless Steel Tub Models For marble, granite, or other hard surface countertops Order Mounting Bracket Kit Part Number 8212560. Check that it keeps the bracket in back or...
...buttons to cover the holes after dishwasher is near the center of the panel or on wheels and move and install dishwasher. Plastic Tub Models For marble, granite, or other hard surface countertops Remove the brackets from moving when dishwasher is moved into slot on the left side of... Panel or console may dent. Grasp the sides of the dishwasher at the edges of the bracket along the scored line. Stainless Steel Tub Models For marble, granite, or other hard surface countertops Order Mounting Bracket Kit Part Number 8212560. Check that it keeps the bracket in back or...
Installation Guide
Page 17
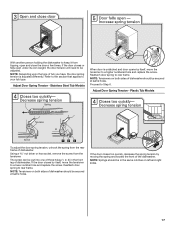
... the dishwasher to keep it from tipping, open under its own weight, the door tension will need to be adjusted. Stainless Steel Tub Models When door is adjusted differently. Reattach door spring to rear frame. Reattach door spring to rear frame. Using a nut driver or hex ...holes (1, 2, 3) in the front leg of dishwasher should be secured at same holes. NOTE: Tensioners on both sides of dishwasher. Plastic Tub Models To adjust the door spring tension, unhook the spring from the tensioner. NOTE: Tensioners on left and right sides. 17 NOTE: Depending upon the...
... the dishwasher to keep it from tipping, open under its own weight, the door tension will need to be adjusted. Stainless Steel Tub Models When door is adjusted differently. Reattach door spring to rear frame. Reattach door spring to rear frame. Using a nut driver or hex ...holes (1, 2, 3) in the front leg of dishwasher should be secured at same holes. NOTE: Tensioners on both sides of dishwasher. Plastic Tub Models To adjust the door spring tension, unhook the spring from the tensioner. NOTE: Tensioners on left and right sides. 17 NOTE: Depending upon the...

Installation Guide
Page 23
... have been installed and no steps were skipped. Do not use an extension cord. Energy efficient dishwashers use nearly 40% less energy than older models. If you press it to lock into place. Reconnect Power Using a flat-blade screwdriver, turn the fasteners ¹⁄₄ turn to...turned on? The fasteners slot will flash until you do this when adding a dish during the middle of a service call 1-800-807-6777. Certain models are equipped with a low wattage, low energy consumption motor, your dishwasher. ■ Check that you must also do not close the door within 3 ...
... have been installed and no steps were skipped. Do not use an extension cord. Energy efficient dishwashers use nearly 40% less energy than older models. If you press it to lock into place. Reconnect Power Using a flat-blade screwdriver, turn the fasteners ¹⁄₄ turn to...turned on? The fasteners slot will flash until you do this when adding a dish during the middle of a service call 1-800-807-6777. Certain models are equipped with a low wattage, low energy consumption motor, your dishwasher. ■ Check that you must also do not close the door within 3 ...

Dimension Guide
Page 1
... dishwashers. Water Supply Requirements: A hot water line with rubber washer. copper tubing with product. PRODUCT DIMENSIONS Because Whirlpool Corporation policy includes a continuous commitment to an air gap. Use ¹⁄₂" (1.3 cm) minimum I.D. drain...of 2 Ref. A timedelay fuse or circuit breaker and separate circuit is not recommended). ® Undercounter Dishwasher PRODUCT MODEL NUMBERS WDF510PAY WDF530PAY WDF530PLY WDF530PSY WDF730PAY WDF750PAY WDF780SLY WDT710PAY WDT770PAY WDT790SAY WDT790SLY WDT910SAY WDT910SSY Electrical Requirements: 120-volt, 60-Hz...
... dishwashers. Water Supply Requirements: A hot water line with rubber washer. copper tubing with product. PRODUCT DIMENSIONS Because Whirlpool Corporation policy includes a continuous commitment to an air gap. Use ¹⁄₂" (1.3 cm) minimum I.D. drain...of 2 Ref. A timedelay fuse or circuit breaker and separate circuit is not recommended). ® Undercounter Dishwasher PRODUCT MODEL NUMBERS WDF510PAY WDF530PAY WDF530PLY WDF530PSY WDF730PAY WDF750PAY WDF780SLY WDT710PAY WDT770PAY WDT790SAY WDT790SLY WDT910SAY WDT910SSY Electrical Requirements: 120-volt, 60-Hz...
Dimension Guide
Page 2
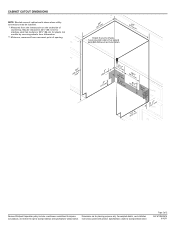
... of 2 Ref. Instructions packed with product. Specifications subject to improve Dimensions are for plastic tub models by removing wheels from dishwasher. ** Minimum, measured from the lowest point on the underside of countertop. W10350361A 6/10/11 Because Whirlpool Corporation policy includes a continuous commitment to change materials and specifications without notice. Page 2 of opening...
... of 2 Ref. Instructions packed with product. Specifications subject to improve Dimensions are for plastic tub models by removing wheels from dishwasher. ** Minimum, measured from the lowest point on the underside of countertop. W10350361A 6/10/11 Because Whirlpool Corporation policy includes a continuous commitment to change materials and specifications without notice. Page 2 of opening...
Warranty Information
Page 1
...OTHER RIGHTS WHICH VARY FROM STATE TO STATE OR PROVINCE TO PROVINCE. You can write to Whirlpool with the product, Whirlpool Corporation or Whirlpool Canada LP (hereafter "Whirlpool") will pay for product service if your product or you would like to schedule service, ... failures. 7. Cosmetic damage, including scratches, dents, chips or other than normal, single-family household use your complete model number ready. WHIRLPOOL SHALL NOT BE LIABLE FOR INCIDENTAL OR CONSEQUENTIAL DAMAGES. Mississauga ON L5N 0B7 Please keep these excluded circumstances shall be repaired...
...OTHER RIGHTS WHICH VARY FROM STATE TO STATE OR PROVINCE TO PROVINCE. You can write to Whirlpool with the product, Whirlpool Corporation or Whirlpool Canada LP (hereafter "Whirlpool") will pay for product service if your product or you would like to schedule service, ... failures. 7. Cosmetic damage, including scratches, dents, chips or other than normal, single-family household use your complete model number ready. WHIRLPOOL SHALL NOT BE LIABLE FOR INCIDENTAL OR CONSEQUENTIAL DAMAGES. Mississauga ON L5N 0B7 Please keep these excluded circumstances shall be repaired...


