
Warranty Information
Page 1
... to the finish of your major appliance, unless such damage results from defects in a manner that have been removed, altered or cannot be provided by a Whirlpool designated service company. You must be easily determined. Major appliances with published installation instructions. 11. WHIRLPOOL SHALL NOT BE LIABLE FOR INCIDENTAL OR CONSEQUENTIAL DAMAGES.
... to the finish of your major appliance, unless such damage results from defects in a manner that have been removed, altered or cannot be provided by a Whirlpool designated service company. You must be easily determined. Major appliances with published installation instructions. 11. WHIRLPOOL SHALL NOT BE LIABLE FOR INCIDENTAL OR CONSEQUENTIAL DAMAGES.
Installation Guide
Page 2
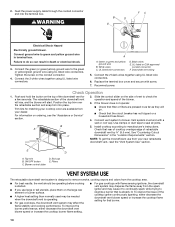
... to potential hazards that can kill or hurt you don't immediately follow instructions. TABLE OF CONTENTS VENT SYSTEM SAFETY 2 INSTALLATION REQUIREMENTS 4 Tools and Parts 4 Location Requirements 4 Electrical Requirements 7 Venting Requirements 7 INSTALLATION INSTRUCTIONS 8 Venting Methods 8 Install Vent System 9 Rear Mounting-Blower Motor 11 Complete Installation 12 Make Electrical Connections 13 Check Operation 14 VENT SYSTEM USE 14...
... to potential hazards that can kill or hurt you don't immediately follow instructions. TABLE OF CONTENTS VENT SYSTEM SAFETY 2 INSTALLATION REQUIREMENTS 4 Tools and Parts 4 Location Requirements 4 Electrical Requirements 7 Venting Requirements 7 INSTALLATION INSTRUCTIONS 8 Venting Methods 8 Install Vent System 9 Rear Mounting-Blower Motor 11 Complete Installation 12 Make Electrical Connections 13 Check Operation 14 VENT SYSTEM USE 14...
Installation Guide
Page 3
...spaces, or garages. Follow the heating equipment manufacturer's guideline and safety standards such as a tag, to the service panel. ■ Installation work and electrical wiring must always be sure to duct air outside - do not vent exhaust air into spaces within walls or ceilings...ELECTRIC SHOCK, OR INJURY TO PERSONS, OBSERVE THE FOLLOWING: ■ Use this fan with your back to an exit. READ AND SAVE THESE INSTRUCTIONS 3 Crepes Suzette, Cherries Jubilee, Peppercorn Beef Flambé). ■ Clean ventilating fans frequently. Grease should not be burned. ■ DO NOT...
...spaces, or garages. Follow the heating equipment manufacturer's guideline and safety standards such as a tag, to the service panel. ■ Installation work and electrical wiring must always be sure to duct air outside - do not vent exhaust air into spaces within walls or ceilings...ELECTRIC SHOCK, OR INJURY TO PERSONS, OBSERVE THE FOLLOWING: ■ Use this fan with your back to an exit. READ AND SAVE THESE INSTRUCTIONS 3 Crepes Suzette, Cherries Jubilee, Peppercorn Beef Flambé). ■ Clean ventilating fans frequently. Grease should not be burned. ■ DO NOT...
Installation Guide
Page 4
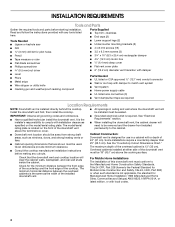
... plate. The maximum depth of the downdraft vent above the cooking surface. Given dimensions provide minimum clearance. ■ Consult the cooktop manufacturer installation instructions before starting installation. Read and follow the instructions provided with damper to the Manufactured Home Construction Safety Standards, Title 24 CFR, Part 328 (formerly the Federal Standard for Manufactured Home...
... plate. The maximum depth of the downdraft vent above the cooking surface. Given dimensions provide minimum clearance. ■ Consult the cooktop manufacturer installation instructions before starting installation. Read and follow the instructions provided with damper to the Manufactured Home Construction Safety Standards, Title 24 CFR, Part 328 (formerly the Federal Standard for Manufactured Home...
Installation Guide
Page 5
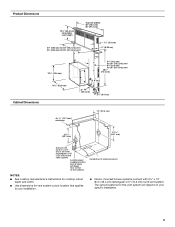
...locations for vent system cutout location that applies to your specific installation. 5 Locate power supply junction box at lower left hand rear corner of cooktop cutout NOTES: ■ See cooktop manufacturer's instructions for cooktop cutout depth and width. ■ Use dimensions ...for this vent system will depend on your installation. ■ Interior mounted blower systems connect with 3¹⁄₄" x 10" (8.3...
...locations for vent system cutout location that applies to your specific installation. 5 Locate power supply junction box at lower left hand rear corner of cooktop cutout NOTES: ■ See cooktop manufacturer's instructions for cooktop cutout depth and width. ■ Use dimensions ...for this vent system will depend on your installation. ■ Interior mounted blower systems connect with 3¹⁄₄" x 10" (8.3...
Installation Guide
Page 6
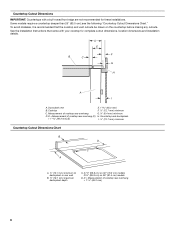
..., it is recommended that came with a bull-nosed front edge are not recommended for complete cutout dimensions, location dimensions and installation details. Countertop Cutout Dimensions IMPORTANT: Countertops with your cooktop for these installations. Countertop and backsplash + 1 46.2 mm] (E) I A. D E F B C G H A I . ½" ...76.2 cm) models 33¹⁄₂" (85.9 cm) on the countertop before making any cutouts. See the Installation Instructions that the cooktop and vent cutouts be drawn on 36" (91.4 cm) models D. Measurement of cooktop rear overhang ...
..., it is recommended that came with a bull-nosed front edge are not recommended for complete cutout dimensions, location dimensions and installation details. Countertop Cutout Dimensions IMPORTANT: Countertops with your cooktop for these installations. Countertop and backsplash + 1 46.2 mm] (E) I A. D E F B C G H A I . ½" ...76.2 cm) models 33¹⁄₂" (85.9 cm) on the countertop before making any cutouts. See the Installation Instructions that the cooktop and vent cutouts be drawn on 36" (91.4 cm) models D. Measurement of cooktop rear overhang ...
Installation Guide
Page 7
... as standard elbows. Venting Requirements IMPORTANT: Make sure there is located on the front of Vent System chart. Cold Weather Installations ■ Do not use plastic or metal foil vent. ■ The length of vent system and number of the house...special connectors and/or tools designed and UL listed for specific requirements in the Installation Instructions. ■ Do not install 2 elbows together. If it is recommended that a qualified electrician determine that the electrical installation is not recommended. Makeup Air Local building codes may require the use 4"...
... as standard elbows. Venting Requirements IMPORTANT: Make sure there is located on the front of Vent System chart. Cold Weather Installations ■ Do not use plastic or metal foil vent. ■ The length of vent system and number of the house...special connectors and/or tools designed and UL listed for specific requirements in the Installation Instructions. ■ Do not install 2 elbows together. If it is recommended that a qualified electrician determine that the electrical installation is not recommended. Makeup Air Local building codes may require the use 4"...
Installation Guide
Page 8
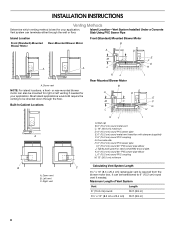
...15.2 cm) round 35 ft (8.9 m) 3¹⁄₄" x 10" (8.3 cm x 25.4 cm) 35 ft (8.9 m) 8 INSTALLATION INSTRUCTIONS Venting Methods Determine which venting method is required from the blower motor box. or rear-mounted blower motor can also be directed down through ...6" (15.2 cm) round PVC coupling M. 12" (30.5 cm) minimum B A. It can terminate either through the floor. Island Location-Vent System Installed Under a Concrete Slab Using PVC Sewer Pipe Island Location Front (Standard)-Mounted Blower Motor Rear-Mounted Blower Motor Front (Standard) Mounted Blower Motor B A...
...15.2 cm) round 35 ft (8.9 m) 3¹⁄₄" x 10" (8.3 cm x 25.4 cm) 35 ft (8.9 m) 8 INSTALLATION INSTRUCTIONS Venting Methods Determine which venting method is required from the blower motor box. or rear-mounted blower motor can also be directed down through ...6" (15.2 cm) round PVC coupling M. 12" (30.5 cm) minimum B A. It can terminate either through the floor. Island Location-Vent System Installed Under a Concrete Slab Using PVC Sewer Pipe Island Location Front (Standard)-Mounted Blower Motor Rear-Mounted Blower Motor Front (Standard) Mounted Blower Motor B A...
Installation Guide
Page 14
...B. ON/OFF button C. Filters VENT SYSTEM USE The retractable downdraft vent system is already lit. Trim kits for a few seconds. Install cooktop according to green and yellow ground wire in as far as they will start. Blower control slider D. To resolve the issue ... through the conduit connector and into place. WARNING B D E FC Electrical Shock Hazard Electrically ground blower. Connect ground wire to manufacturer's instructions. Failure to the green or yellow/green ground wire using UL listed wire connectors. Connect the green (or green/yellow) ground wire to...
...B. ON/OFF button C. Filters VENT SYSTEM USE The retractable downdraft vent system is already lit. Trim kits for a few seconds. Install cooktop according to green and yellow ground wire in as far as they will start. Blower control slider D. To resolve the issue ... through the conduit connector and into place. WARNING B D E FC Electrical Shock Hazard Electrically ground blower. Connect ground wire to manufacturer's instructions. Failure to the green or yellow/green ground wire using UL listed wire connectors. Connect the green (or green/yellow) ground wire to...
Installation Guide
Page 17
...in your area, you can write to Whirlpool Canada LP with the same precision used to Whirlpool Corporation with : ■ Features and specifications on our full line of appliances. ■ Installation information. ■ Use and maintenance procedures. For Model Series UXD8630DY 30" (76.2 cm) One-Piece ...(white) 17 If you need replacement parts If you need further assistance, you can write to build every new appliance. NOTE: Instructions are trained to fulfill the product warranty and provide after-warranty service, anywhere in your area, call us to better respond to...
...in your area, you can write to Whirlpool Canada LP with the same precision used to Whirlpool Corporation with : ■ Features and specifications on our full line of appliances. ■ Installation information. ■ Use and maintenance procedures. For Model Series UXD8630DY 30" (76.2 cm) One-Piece ...(white) 17 If you need replacement parts If you need further assistance, you can write to build every new appliance. NOTE: Instructions are trained to fulfill the product warranty and provide after-warranty service, anywhere in your area, call us to better respond to...
Installation Guide
Page 18
... or water filters. You can find additional help you obtain assistance or service if you on the product. Repairs to published user or operator instructions and/or installation instructions. 4. WHIRLPOOL SHALL NOT BE LIABLE FOR INCIDENTAL OR CONSEQUENTIAL DAMAGES. In the U.S.A., call 1-800-807-6777. 9/07 Keep this information on the model and serial...
... or water filters. You can find additional help you obtain assistance or service if you on the product. Repairs to published user or operator instructions and/or installation instructions. 4. WHIRLPOOL SHALL NOT BE LIABLE FOR INCIDENTAL OR CONSEQUENTIAL DAMAGES. In the U.S.A., call 1-800-807-6777. 9/07 Keep this information on the model and serial...

