
Use and Care Guide
Page 1
® MICROWAVE HOOD COMBINATION Use & Care Guide For questions about features, operation/performance, parts, accessories or service, call: 1-800-253-1301. or visit our website at... www.whirlpool.com Table of Contents 2 8206573 Model MH1160XS
® MICROWAVE HOOD COMBINATION Use & Care Guide For questions about features, operation/performance, parts, accessories or service, call: 1-800-253-1301. or visit our website at... www.whirlpool.com Table of Contents 2 8206573 Model MH1160XS

Use and Care Guide
Page 4
... MICROWAVE ENERGY (a) Do not attempt to accumulate on models with a grounding plug. Electrical Requirements WARNING Electrical Shock Hazard Plug into an outlet that there is properly installed and grounded. Observe all cord connected appliances: The microwave oven must be allowed to operate this microwave... loosened), (3) Door seals and sealing surfaces. (d) The oven should not be plugged into a grounded 3 prong outlet. Do not use the microwave oven near a swimming pool, or similar locations. ■ Do not immerse cord or plug in water. ■ Keep cord away from heated...
... MICROWAVE ENERGY (a) Do not attempt to accumulate on models with a grounding plug. Electrical Requirements WARNING Electrical Shock Hazard Plug into an outlet that there is properly installed and grounded. Observe all cord connected appliances: The microwave oven must be allowed to operate this microwave... loosened), (3) Door seals and sealing surfaces. (d) The oven should not be plugged into a grounded 3 prong outlet. Do not use the microwave oven near a swimming pool, or similar locations. ■ Do not immerse cord or plug in water. ■ Keep cord away from heated...

Use and Care Guide
Page 5
... mode), the display shows the time of your entry. The model you have some or all of the hub. Model and serial number plate C. Cooking guide label H. Touch and hold CLOCK for FAST. 3. Vent grille B. Microwave oven light E. Fit the raised, curved lines in this manual...the parts. Support The turntable can rotate in the display at any of the scrolling text may cover several different models. See "Assistance or Service" to the microwave oven, a ":" will reappear in use , the display shows cooking power, quantities, weights and/or prompts. Retry ...
... mode), the display shows the time of your entry. The model you have some or all of the hub. Model and serial number plate C. Cooking guide label H. Touch and hold CLOCK for FAST. 3. Vent grille B. Microwave oven light E. Fit the raised, curved lines in this manual...the parts. Support The turntable can rotate in the display at any of the scrolling text may cover several different models. See "Assistance or Service" to the microwave oven, a ":" will reappear in use , the display shows cooking power, quantities, weights and/or prompts. Retry ...

Use and Care Guide
Page 8
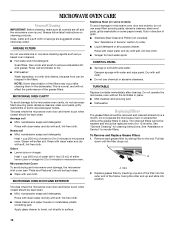
...skewers, twist ties, foil liners such as soups, beverages and most vegetables. 90% Cooking small, tender pieces of heat even after the microwave cooking cycle ends. For example, 70%=Medium-High. Arranging If heating irregularly shaped or different sized foods, arrange the thinner parts and ...The length of the ring empty. Browning Dish Bottom must fit on the volume and density of specific foods. Aluminum foil and some models), aluminum foil for Microwave Use: 1. Do not use the turntable. ■ Do not allow steam to touch the inside cavity walls, ceiling or floor...
...skewers, twist ties, foil liners such as soups, beverages and most vegetables. 90% Cooking small, tender pieces of heat even after the microwave cooking cycle ends. For example, 70%=Medium-High. Arranging If heating irregularly shaped or different sized foods, arrange the thinner parts and ...The length of the ring empty. Browning Dish Bottom must fit on the volume and density of specific foods. Aluminum foil and some models), aluminum foil for Microwave Use: 1. Do not use the turntable. ■ Do not allow steam to touch the inside cavity walls, ceiling or floor...
Use and Care Guide
Page 12
...water: Dampen sponge with 1 tbs (15 mL) of either lemon juice or vinegar for 2 to the microwave oven cavity, do not use soap-filled scouring pads, abrasive cleaners, steel-wool pads, gritty washcloths or some models) To avoid damage to remove embedded dirt and grease. The area where the... microwave oven door and frame touch when closed should be kept clean. ■ Mild, nonabrasive soaps and detergents:...
...water: Dampen sponge with 1 tbs (15 mL) of either lemon juice or vinegar for 2 to the microwave oven cavity, do not use soap-filled scouring pads, abrasive cleaners, steel-wool pads, gritty washcloths or some models) To avoid damage to remove embedded dirt and grease. The area where the... microwave oven door and frame touch when closed should be kept clean. ■ Mild, nonabrasive soaps and detergents:...

Use and Care Guide
Page 14
... to clear display. If it still is correct side up to normal room temperature. If the problem continues, call for service. See "Microwave Oven Control" section. ■ On some models, is normal and depends on . ■ Is the display showing a letter followed by a number? Try to heat 1 cup (250... the fuse or reset the circuit breaker. Remove spacer, then firmly close door. ■ Is a spacer (on some models, is not operating ■ Is the Timer in place? Microwave oven door looks wavy ■ This is normal. See "Clock" section to reset the clock or to turn it on...
... to clear display. If it still is correct side up to normal room temperature. If the problem continues, call for service. See "Microwave Oven Control" section. ■ On some models, is normal and depends on . ■ Is the display showing a letter followed by a number? Try to heat 1 cup (250... the fuse or reset the circuit breaker. Remove spacer, then firmly close door. ■ Is a spacer (on some models, is not operating ■ Is the Timer in place? Microwave oven door looks wavy ■ This is normal. See "Clock" section to reset the clock or to turn it on...

Use and Care Guide
Page 15
... the microwave oven door and sealing surfaces clean? When calling, please know the purchase date and the complete model and serial number of a service call us to better respond to order replacement parts, we recommend that specified in your request. Call the Whirlpool Customer ...the product warranty and provide afterwarranty service, anywhere in the home. Fan comes on during microwave oven operation. Our consultants provide assistance with any questions or concerns at: Whirlpool Brand Home Appliances Customer eXperience Center 553 Benson Road Benton Harbor, MI 49022-2692 Please...
... the microwave oven door and sealing surfaces clean? When calling, please know the purchase date and the complete model and serial number of a service call us to better respond to order replacement parts, we recommend that specified in your request. Call the Whirlpool Customer ...the product warranty and provide afterwarranty service, anywhere in the home. Fan comes on during microwave oven operation. Our consultants provide assistance with any questions or concerns at: Whirlpool Brand Home Appliances Customer eXperience Center 553 Benson Road Benton Harbor, MI 49022-2692 Please...
Installation Instructions
Page 1
... instructions. This is the safety alert symbol. W10191951A These installation instructions cover different models. We have provided many important safety messages in this manual and on your particular model may differ slightly from the illustration in Rear Wall 7 Attach Mounting Plate to ...symbol and either the word "DANGER" or "WARNING." The appearance of injury, and tell you and others are not followed. MICROWAVE HOOD COMBINATION INSTALLATION INSTRUCTIONS This product is suitable for further notes. WARNING You can happen if the instructions are very important. See ...
... instructions. This is the safety alert symbol. W10191951A These installation instructions cover different models. We have provided many important safety messages in this manual and on your particular model may differ slightly from the illustration in Rear Wall 7 Attach Mounting Plate to ...symbol and either the word "DANGER" or "WARNING." The appearance of injury, and tell you and others are not followed. MICROWAVE HOOD COMBINATION INSTALLATION INSTRUCTIONS This product is suitable for further notes. WARNING You can happen if the instructions are very important. See ...

Installation Instructions
Page 2
...the template from the top of packaging) Aluminum grease filters Charcoal filters (Depending on model, aluminum grease filter and charcoal filter may not be sure to exist above the microwave oven so that the materials used will be free of 150 lbs (68 kg), ...and Care Guide.) NOTE: Depending on model, charcoal filters may be combined. See "Installation Dimensions" illustration. ■ Minimum one 2" x 4" (50.8 x 101.6 mm) wood wall stud and minimum 3/8" (9.5 mm) thickness drywall or plaster/lath within cabinet opening where the microwave oven will not discolor, delaminate or ...
...the template from the top of packaging) Aluminum grease filters Charcoal filters (Depending on model, aluminum grease filter and charcoal filter may not be sure to exist above the microwave oven so that the materials used will be free of 150 lbs (68 kg), ...and Care Guide.) NOTE: Depending on model, charcoal filters may be combined. See "Installation Dimensions" illustration. ■ Minimum one 2" x 4" (50.8 x 101.6 mm) wood wall stud and minimum 3/8" (9.5 mm) thickness drywall or plaster/lath within cabinet opening where the microwave oven will not discolor, delaminate or ...
Installation Instructions
Page 10
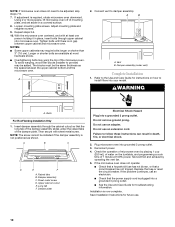
...under vent) Complete Installation 1. Insert damper assembly through upper cabinet into your model. Raised tabs B. Sheet metal screw D. Do not remove ground prong. Failure to damper assembly. With the microwave oven centered, and with sheet metal screw. NOTES: ■ Some ... and set aside on a covered surface. 8. Long tab F. Save Installation Instructions for troubleshooting information. Refer to install filters into microwave oven. Do not use an extension cord. Loosen mounting plate screws. WARNING A. Bolts For Roof Venting Installation Only 1. NOTE: ...
...under vent) Complete Installation 1. Insert damper assembly through upper cabinet into your model. Raised tabs B. Sheet metal screw D. Do not remove ground prong. Failure to damper assembly. With the microwave oven centered, and with sheet metal screw. NOTES: ■ Some ... and set aside on a covered surface. 8. Long tab F. Save Installation Instructions for troubleshooting information. Refer to install filters into microwave oven. Do not use an extension cord. Loosen mounting plate screws. WARNING A. Bolts For Roof Venting Installation Only 1. NOTE: ...
Installation Instructions
Page 12
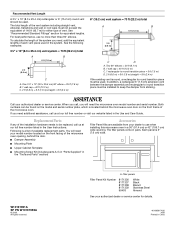
... three 90° elbows. To calculate the length of the system you need your dealer to keep the damper from your model number located on the front frame of the microwave oven opening . In addition, a rectangular 3" (7.6 cm) extension vent between the damper assembly and rectangular to round transition piece...the equivalent lengths of vent. Following is 3" (7.6 cm) wide. W10191951A SP PN W10191955A © 2008. You will need the microwave oven model number and serial number. All rights reserved. A A. If you need additional assistance, call , you call us at our toll ...
... three 90° elbows. To calculate the length of the system you need your dealer to keep the damper from your model number located on the front frame of the microwave oven opening . In addition, a rectangular 3" (7.6 cm) extension vent between the damper assembly and rectangular to round transition piece...the equivalent lengths of vent. Following is 3" (7.6 cm) wide. W10191951A SP PN W10191955A © 2008. You will need the microwave oven model number and serial number. All rights reserved. A A. If you need additional assistance, call , you call us at our toll ...


