

Use and Care Guide
Page 3
...designed for a short time before using electrical appliances basic safety precautions should not be boiling. for examination, repair, or adjustment. ■ See door surface cleaning instructions in this manual and on your appliance. Visible bubbling or boiling when the container is removed from paper or plastic bags before... in the microwave oven. are very important. Pieces can happen if the instructions are placed inside the oven ignite, keep oven door closed glass jars - Always read and obey all instructions before removing the container. - This is not always present.
...designed for a short time before using electrical appliances basic safety precautions should not be boiling. for examination, repair, or adjustment. ■ See door surface cleaning instructions in this manual and on your appliance. Visible bubbling or boiling when the container is removed from paper or plastic bags before... in the microwave oven. are very important. Pieces can happen if the instructions are placed inside the oven ignite, keep oven door closed glass jars - Always read and obey all instructions before removing the container. - This is not always present.

Use and Care Guide
Page 4
...circuit, grounding reduces the risk of the oven. If the power supply cord is equipped with a cord having a grounding wire with the door open since open-door operation can result in a risk of 36" (91.44 cm). ■ Clean Ventilating Hoods Frequently - SAVE THESE INSTRUCTIONS This device ... not cover or block any openings on the microwave oven. ■ Do not store this appliance. It is particularly important that the oven door close properly and that is properly grounded. WARNING: Improper use of the grounding plug can result in death, fire, or electrical shock. IMPORTANT...
...circuit, grounding reduces the risk of the oven. If the power supply cord is equipped with a cord having a grounding wire with the door open since open-door operation can result in a risk of 36" (91.44 cm). ■ Clean Ventilating Hoods Frequently - SAVE THESE INSTRUCTIONS This device ... not cover or block any openings on the microwave oven. ■ Do not store this appliance. It is particularly important that the oven door close properly and that is properly grounded. WARNING: Improper use of the grounding plug can result in death, fire, or electrical shock. IMPORTANT...

Use and Care Guide
Page 5
... the time of the parts. PARTS AND FEATURES This manual may be adjusted, if necessary. A BC D MICROWAVE OVEN CONTROL E F G H IJ K A. Model and serial number plate C. Door lock system F. Cooktop light J. See "Assistance or Service" to stop the blinking. Touch CANCEL OFF to reorder any other time, a power failure has occurred. If...
... the time of the parts. PARTS AND FEATURES This manual may be adjusted, if necessary. A BC D MICROWAVE OVEN CONTROL E F G H IJ K A. Model and serial number plate C. Door lock system F. Cooktop light J. See "Assistance or Service" to stop the blinking. Touch CANCEL OFF to reorder any other time, a power failure has occurred. If...
Use and Care Guide
Page 6
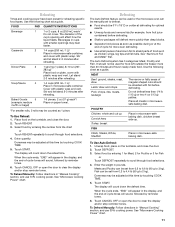
If cooking is interrupted by reminder tones. Close the door and touch START to unlock and remove the padlock icon from display. 6 To Set: The microwave oven and timer must be off when the door is opened. Touch CLOCK or START. To Remove: 1. Tones Tones are turned off, "OFF TIMER" will sound, followed... by opening the door, touching START will return to turn tones back on. NOTE: The Timer does not start or stop the microwave oven. To see the countdown for 3 ...
If cooking is interrupted by reminder tones. Close the door and touch START to unlock and remove the padlock icon from display. 6 To Set: The microwave oven and timer must be off when the door is opened. Touch CLOCK or START. To Remove: 1. Tones Tones are turned off, "OFF TIMER" will sound, followed... by opening the door, touching START will return to turn tones back on. NOTE: The Timer does not start or stop the microwave oven. To see the countdown for 3 ...
Use and Care Guide
Page 7
... 5 minutes. When set on the microwave generator (magnetron). The DEMO icon will appear in the display as cake. 7 Repeat to swing on the microwave oven door. ■ Do not operate microwave oven when it does not absorb microwaves. ■ Use oven mitts or pot holders when removing containers from the display...
... 5 minutes. When set on the microwave generator (magnetron). The DEMO icon will appear in the display as cake. 7 Repeat to swing on the microwave oven door. ■ Do not operate microwave oven when it does not absorb microwaves. ■ Use oven mitts or pot holders when removing containers from the display...

Use and Care Guide
Page 8
... Use Racks and bakeware supplied with gold or silver trim. Aluminum Foil and Metal Always use cookware and dinnerware with the microwave oven (on the door and cavity surfaces is not available, wax paper, paper towels or plastic wrap approved for use cookware or dinnerware if it . 2. Microwave Cooking Power Many...
... Use Racks and bakeware supplied with gold or silver trim. Aluminum Foil and Metal Always use cookware and dinnerware with the microwave oven (on the door and cavity surfaces is not available, wax paper, paper towels or plastic wrap approved for use cookware or dinnerware if it . 2. Microwave Cooking Power Many...
Use and Care Guide
Page 9
..., whole fish and meat loaf. 70%, Medium-High Reheating a single serving of time to 2 stages. Place food on the turntable and close the door. 2. Touch COOK TIME, then enter a length of food. 60% Cooking sensitive foods such as lasagna. 50%, Medium Cooking ham, whole poultry and...a microwave popcorn popper. ■ Do not try placing a microwave-safe dish upside down the popping time. Place food on the turntable and close the door. 2. Touch COOK POWER, then enter the desired power level for the second stage. 5. See "Microwave Cooking Power" chart. 4. Touch START. The ...
..., whole fish and meat loaf. 70%, Medium-High Reheating a single serving of time to 2 stages. Place food on the turntable and close the door. 2. Touch COOK TIME, then enter a length of food. 60% Cooking sensitive foods such as lasagna. 50%, Medium Cooking ham, whole poultry and...a microwave popcorn popper. ■ Do not try placing a microwave-safe dish upside down the popping time. Place food on the turntable and close the door. 2. Touch COOK POWER, then enter the desired power level for the second stage. 5. See "Microwave Cooking Power" chart. 4. Touch START. The ...
Use and Care Guide
Page 10
...safe container. Place rice and liquid in microwave-safe container. Let stand 5 minutes after cooking. Place potato(es) on the turntable and close the door. 2. Pizza Up to three 3 oz (85 g) pizza slices (refrigerated) may be heated automatically in the microwave oven by touching COOK TIME. 4.... with plastic wrap and vent. Cover with plastic wrap and vent. Select food by touching COOK TIME. 5. Touch CANCEL OFF or open the door to the side (not centered). During programming, before baking. ■ Place a single potato on the turntable, off to clear the display and...
...safe container. Place rice and liquid in microwave-safe container. Let stand 5 minutes after cooking. Place potato(es) on the turntable and close the door. 2. Pizza Up to three 3 oz (85 g) pizza slices (refrigerated) may be heated automatically in the microwave oven by touching COOK TIME. 4.... with plastic wrap and vent. Cover with plastic wrap and vent. Select food by touching COOK TIME. 5. Touch CANCEL OFF or open the door to the side (not centered). During programming, before baking. ■ Place a single potato on the turntable, off to clear the display and...
Use and Care Guide
Page 11
... to shield parts of food such as a guide. Let stand 2-3 minutes after reheating. Place food on the turntable, and close the door. 2. To Reheat Manually: Follow directions in cups with plastic wrap. The Auto Defrost system has 3 categories: Meat, Poultry and Fish.... time by reminder tones. 6. FISH Fillets, Steaks, Whole, Shellfish Place in microwave-safe container. Unwrap food, place on the turntable, and close the door. 2. See "Microwave Cooking Power" chart. 11 Soup/Sauce 4 1-4 cups (250 mL-1 L)/ Place in microwave-safe baking dish. Enter quantity. See...
... to shield parts of food such as a guide. Let stand 2-3 minutes after reheating. Place food on the turntable, and close the door. 2. To Reheat Manually: Follow directions in cups with plastic wrap. The Auto Defrost system has 3 categories: Meat, Poultry and Fish.... time by reminder tones. 6. FISH Fillets, Steaks, Whole, Shellfish Place in microwave-safe container. Unwrap food, place on the turntable, and close the door. 2. See "Microwave Cooking Power" chart. 11 Soup/Sauce 4 1-4 cups (250 mL-1 L)/ Place in microwave-safe baking dish. Enter quantity. See...
Use and Care Guide
Page 12
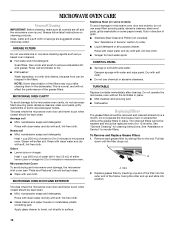
... 1 cup (250 mL) of grain. ■ Stainless Steel Cleaner & Polish (not included): See "Assistance or Service" section to microwave oven door and exterior, do not use soap-filled scouring pads, abrasive cleaners, steel-wool pads, gritty washcloths or some paper towels. Rub in direction of ... such as lyebased oven cleaners. ■ Hot water and mild detergent: Soak filters, then scrub and swish to reorder filters. MICROWAVE OVEN DOOR AND EXTERIOR Stainless Steel (on cleaning products. Tabs 2. The charcoal filters cannot be washed and should be kept clean. ■ Wipe with...
... 1 cup (250 mL) of grain. ■ Stainless Steel Cleaner & Polish (not included): See "Assistance or Service" section to microwave oven door and exterior, do not use soap-filled scouring pads, abrasive cleaners, steel-wool pads, gritty washcloths or some paper towels. Rub in direction of ... such as lyebased oven cleaners. ■ Hot water and mild detergent: Soak filters, then scrub and swish to reorder filters. MICROWAVE OVEN DOOR AND EXTERIOR Stainless Steel (on cleaning products. Tabs 2. The charcoal filters cannot be washed and should be kept clean. ■ Wipe with...

Use and Care Guide
Page 13
... grille. Vent grille B. See "Assistance or Service" section to reorder. To Replace: 1. Bulb cover 5. Replace light. Mounting screws 2. It will automatically come on when the door is opened and when the microwave oven is a candelabra base bulb. Slide filter back slightly, lift front end, and pull out filter. Top louver C. Replacing...
... grille. Vent grille B. See "Assistance or Service" section to reorder. To Replace: 1. Bulb cover 5. Replace light. Mounting screws 2. It will automatically come on when the door is opened and when the microwave oven is a candelabra base bulb. Slide filter back slightly, lift front end, and pull out filter. Top louver C. Replacing...

Use and Care Guide
Page 14
...showing a letter followed by a number? Try to cool the microwave oven. Make sure turntable is normal and will not operate ■ Is the door completely closed? Replace turntable support. There has been a power failure or the clock time has been turned off ? See "Tones" section. See "...affect performance. If it reappears, call for service. Fan running slower than usual ■ Has the microwave oven been stored in use ? Firmly close door. ■ Is the electronic microwave oven control set ? Replace turntable. Steam is the Demo Mode in place? See "Timer" section. ■ On...
...showing a letter followed by a number? Try to cool the microwave oven. Make sure turntable is normal and will not operate ■ Is the door completely closed? Replace turntable support. There has been a power failure or the clock time has been turned off ? See "Tones" section. See "...affect performance. If it reappears, call for service. Fan running slower than usual ■ Has the microwave oven been stored in use ? Firmly close door. ■ Is the electronic microwave oven control set ? Replace turntable. Steam is the Demo Mode in place? See "Timer" section. ■ On...

Use and Care Guide
Page 15
...appliance. Make sure these items during cooktop usage ■ This is on our full line of a service call us to better respond to Whirlpool Corporation with the same precision used to cool the microwave oven if the temperature from the microwave oven, or adjust the radio or TV ...antenna. ■ Are the microwave oven door and sealing surfaces clean? This information will fit right and work right because they are trained to order replacement parts, we recommend that specified...
...appliance. Make sure these items during cooktop usage ■ This is on our full line of a service call us to better respond to Whirlpool Corporation with the same precision used to cool the microwave oven if the temperature from the microwave oven, or adjust the radio or TV ...antenna. ■ Are the microwave oven door and sealing surfaces clean? This information will fit right and work right because they are trained to order replacement parts, we recommend that specified...

Installation Instructions
Page 2
... and refer to separate the template from the top of installation. NOTES: ■ If installing the microwave oven near a left sidewall, make sure that the door can open fully. ■ Some cabinet and building materials are for cabinet 1/4-20 x 3" bolts ■ Keyhole saw ■ Electric drill ■ 3/16" (5 mm), 3/8" (10 mm...
... and refer to separate the template from the top of installation. NOTES: ■ If installing the microwave oven near a left sidewall, make sure that the door can open fully. ■ Some cabinet and building materials are for cabinet 1/4-20 x 3" bolts ■ Keyhole saw ■ Electric drill ■ 3/16" (5 mm), 3/8" (10 mm...

Installation Instructions
Page 4
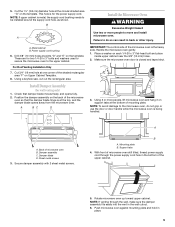
...screws attaching damper plate to the venting system. NOTE: To avoid damage to the microwave oven, do not grip or use the door or door handle while the microwave oven is reinstalled in another location where wall or roof venting may be made to top of microwave oven. ... remaining contents from the microwave oven cavity. 2. NOTE: Skip this section if you are using recirculation installation. Tape the microwave oven door closed so that door does not swing open while the microwave oven is set for recirculation installation. Remove 2 screws attaching blower motor to the work surface,...
...screws attaching damper plate to the venting system. NOTE: To avoid damage to the microwave oven, do not grip or use the door or door handle while the microwave oven is reinstalled in another location where wall or roof venting may be made to top of microwave oven. ... remaining contents from the microwave oven cavity. 2. NOTE: Skip this section if you are using recirculation installation. Tape the microwave oven door closed so that door does not swing open while the microwave oven is set for recirculation installation. Remove 2 screws attaching blower motor to the work surface,...
Installation Instructions
Page 9
... freely, and opens fully. 2. Position the damper assembly on the template. Make sure the microwave oven door is for the power supply cord. NOTE: To avoid damage to do not grip or use the door or door handle while the microwave oven is metal, the supply cord bushing needs to move and install...
... freely, and opens fully. 2. Position the damper assembly on the template. Make sure the microwave oven door is for the power supply cord. NOTE: To avoid damage to do not grip or use the door or door handle while the microwave oven is metal, the supply cord bushing needs to move and install...
Installation Instructions
Page 12
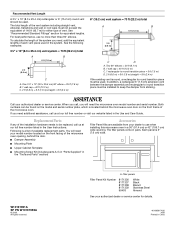
... 10" (8.3 x 25.4 cm) vent system = 73 ft (22.2 m) total A B 6 ft (1.8 m) 2 ft (0.6 m) C A. Following is located behind the door. ■ Damper Assembly ■ Mounting Plate ■ Upper Cabinet Template ■ Mounting Screw Kit (includes parts A-G in "Parts Supplied" in the "Tools and Parts" section... sticking. For best performance, use when installing this microwave oven in a 36" (91.4 cm) or 42" (106.7 cm) wide opening , behind the microwave oven door on the front frame of vent. One 3¹⁄₄" x 10" (8.3 x 25.4 cm) 90° elbow = 25 ft (7.6 m) B. 1 wall cap...
... 10" (8.3 x 25.4 cm) vent system = 73 ft (22.2 m) total A B 6 ft (1.8 m) 2 ft (0.6 m) C A. Following is located behind the door. ■ Damper Assembly ■ Mounting Plate ■ Upper Cabinet Template ■ Mounting Screw Kit (includes parts A-G in "Parts Supplied" in the "Tools and Parts" section... sticking. For best performance, use when installing this microwave oven in a 36" (91.4 cm) or 42" (106.7 cm) wide opening , behind the microwave oven door on the front frame of vent. One 3¹⁄₄" x 10" (8.3 x 25.4 cm) 90° elbow = 25 ft (7.6 m) B. 1 wall cap...


