
Use and Care Guide
Page 1
or visit our website at... ® MICROWAVE HOOD COMBINATION Use & Care Guide For questions about features, operation/performance, parts, accessories or service, call: 1-800-253-1301. www.whirlpool.com Table of Contents 2 8206573 Model MH1160XS
or visit our website at... ® MICROWAVE HOOD COMBINATION Use & Care Guide For questions about features, operation/performance, parts, accessories or service, call: 1-800-253-1301. www.whirlpool.com Table of Contents 2 8206573 Model MH1160XS
Use and Care Guide
Page 2
... Clock 6 Tones 6 Timer 6 Control Lock 6 Vent Fan 7 Cooktop Light 7 Demo Mode 7 MICROWAVE OVEN USE 7 Food Characteristics 7 Cooking Guidelines 8 Cookware and Dinnerware 8 Aluminum Foil and Metal 8 Microwave Cooking Power 8 Manual Cooking 9 Cooking in Stages (or steps 9 Popcorn 9 Baked Potato 10 Pizza ...10 Doneness 10 Preset Cooking 10 Reheating 11 Defrosting 11 MICROWAVE OVEN CARE 12 General Cleaning 12 Replacing Filters 12 Replacing Cooktop Light 13 Replacing Microwave Oven Light 13 TROUBLESHOOTING 14 ASSISTANCE OR SERVICE 15 Replacement Parts 15 ...
... Clock 6 Tones 6 Timer 6 Control Lock 6 Vent Fan 7 Cooktop Light 7 Demo Mode 7 MICROWAVE OVEN USE 7 Food Characteristics 7 Cooking Guidelines 8 Cookware and Dinnerware 8 Aluminum Foil and Metal 8 Microwave Cooking Power 8 Manual Cooking 9 Cooking in Stages (or steps 9 Popcorn 9 Baked Potato 10 Pizza ...10 Doneness 10 Preset Cooking 10 Reheating 11 Defrosting 11 MICROWAVE OVEN CARE 12 General Cleaning 12 Replacing Filters 12 Replacing Cooktop Light 13 Replacing Microwave Oven Light 13 TROUBLESHOOTING 14 ASSISTANCE OR SERVICE 15 Replacement Parts 15 ...

Use and Care Guide
Page 3
.... Use extreme care when inserting a spoon or other combustible materials are not followed. Pieces can be heated in the microwave oven. ■ Use the microwave oven only for a short time before using electrical appliances basic safety precautions should not be killed or seriously injured if you...type of electric shock. ■ Do not clean with the provided Installation Instructions. ■ Some products such as whole eggs in the microwave oven as they may create a fire or risk of oven is not designed for storage purposes. It is specifically designed to facilitate cooking...
.... Use extreme care when inserting a spoon or other combustible materials are not followed. Pieces can be heated in the microwave oven. ■ Use the microwave oven only for a short time before using electrical appliances basic safety precautions should not be killed or seriously injured if you...type of electric shock. ■ Do not clean with the provided Installation Instructions. ■ Some products such as whole eggs in the microwave oven as they may create a fire or risk of oven is not designed for storage purposes. It is specifically designed to facilitate cooking...

Use and Care Guide
Page 4
...than manufacturer's recommended accessories, in this oven when not in use. ■ Do not store anything directly on top of the microwave oven when the microwave oven is in operation. ■ When flambeing foods under the hood, turn the fan on sealing surfaces. (c) Do not operate...grounded 3 prong outlet. The plug must be used above both gas and electric cooking equipment. ■ Intended to accumulate on models with this microwave oven outdoors. WARNING: Improper use of the grounding plug can result in a risk of electric shock. SAVE THESE INSTRUCTIONS This device complies with ...
...than manufacturer's recommended accessories, in this oven when not in use. ■ Do not store anything directly on top of the microwave oven when the microwave oven is in operation. ■ When flambeing foods under the hood, turn the fan on sealing surfaces. (c) Do not operate...grounded 3 prong outlet. The plug must be used above both gas and electric cooking equipment. ■ Intended to accumulate on models with this microwave oven outdoors. WARNING: Improper use of the grounding plug can result in a risk of electric shock. SAVE THESE INSTRUCTIONS This device complies with ...

Use and Care Guide
Page 5
... display shows cooking power, quantities, weights and/or prompts. Touch CANCEL OFF and reset the clock if needed. When the microwave oven is not in place. A BC D MICROWAVE OVEN CONTROL E F G H IJ K A. Cooking guide label H. Control panel Parts and Features not shown Turntable Turntable ... "3" for 3 seconds until 2 tones sound. 2. Charcoal filter (behind vent grille) D. Metal shielded window G. Display When power is in microwave oven cavity) I. See "Assistance or Service" to reorder any other time, a power failure has occurred. Touch START to stop the blinking...
... display shows cooking power, quantities, weights and/or prompts. Touch CANCEL OFF and reset the clock if needed. When the microwave oven is not in place. A BC D MICROWAVE OVEN CONTROL E F G H IJ K A. Cooking guide label H. Control panel Parts and Features not shown Turntable Turntable ... "3" for 3 seconds until 2 tones sound. 2. Charcoal filter (behind vent grille) D. Metal shielded window G. Display When power is in microwave oven cavity) I. See "Assistance or Service" to reorder any other time, a power failure has occurred. Touch START to stop the blinking...
Use and Care Guide
Page 6
..., touch TIMER SET/OFF. Touch CLOCK or START. Touch CLOCK. 2. To Turn Off All Tones (except end-of-timer and hidden feature tones): With the microwave oven in standby mode, touch and hold the number pad "2" for 3 seconds until 2 tones sound and a padlock icon appears in the display and the invalid... scroll in the display, and end-of cook time, up to 90 minutes, and counts down the control panel pads to prevent unintended use , the microwave oven can be off , "OFF TIMER" will sound, followed by opening the door, touching START will be in the display. If tones are audible ...
..., touch TIMER SET/OFF. Touch CLOCK or START. Touch CLOCK. 2. To Turn Off All Tones (except end-of-timer and hidden feature tones): With the microwave oven in standby mode, touch and hold the number pad "2" for 3 seconds until 2 tones sound and a padlock icon appears in the display and the invalid... scroll in the display, and end-of cook time, up to 90 minutes, and counts down the control panel pads to prevent unintended use , the microwave oven can be off , "OFF TIMER" will sound, followed by opening the door, touching START will be in the display. If tones are audible ...
Use and Care Guide
Page 7
...during any function. See "Assistance or Service" section to the food. They will heat faster than irregularly shaped food. Food Characteristics When microwave cooking, the amount, size and shape, starting temperature, composition and density of time if necessary. Amount of Food The more evenly than...to turn on for off. The vent fan is chipped or broken. After 5 minutes of a light, porous food, such as a reminder. MICROWAVE OVEN USE A magnetron in the display when any cooking function begins. Heavy, dense foods, such as meat and potatoes, require a longer cook...
...during any function. See "Assistance or Service" section to the food. They will heat faster than irregularly shaped food. Food Characteristics When microwave cooking, the amount, size and shape, starting temperature, composition and density of time if necessary. Amount of Food The more evenly than...to turn on for off. The vent fan is chipped or broken. After 5 minutes of a light, porous food, such as a reminder. MICROWAVE OVEN USE A magnetron in the display when any cooking function begins. Heavy, dense foods, such as meat and potatoes, require a longer cook...

Use and Care Guide
Page 8
...Use Metal cookware and bakeware, gold, silver, pewter, nonapproved meat thermometers, skewers, twist ties, foil liners such as a general guide for microwave oven use cookware and dinnerware with cookware. PERCENT/NAME USE 100%, High (default setting) Quick heating convenience foods and foods with 1 cup ...Guidelines Covering Covering food helps retain moisture, shorten cook time and reduce spattering. Do not use . Ceramic Glass, Glass Acceptable for microwave ovens may be used properly, arcing (a blue flash of specific foods. Do not use oven mitts or pot holders when handling...
...Use Metal cookware and bakeware, gold, silver, pewter, nonapproved meat thermometers, skewers, twist ties, foil liners such as a general guide for microwave oven use cookware and dinnerware with cookware. PERCENT/NAME USE 100%, High (default setting) Quick heating convenience foods and foods with 1 cup ...Guidelines Covering Covering food helps retain moisture, shorten cook time and reduce spattering. Do not use . Ceramic Glass, Glass Acceptable for microwave ovens may be used properly, arcing (a blue flash of specific foods. Do not use oven mitts or pot holders when handling...
Use and Care Guide
Page 9
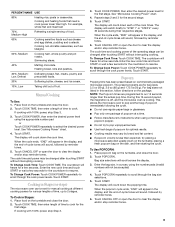
...: Touch COOK POWER repeatedly to select the desired power level. Touch COOK POWER, then enter the desired power level for a few seconds. See "Microwave Cooking Power" chart. 4. When the cycle ends, "END" will sound, followed by reminder tones. 5. Popcorn Popping time has been preset based ...on the turntable and close the door. 2. Touch POPCORN repeatedly to "STEP 1" or "STEP 2" every 30 seconds during their respective stages. See "Microwave Cooking Power" chart. 4. When the cycle ends, "END" will appear in the display, and the end-of -cycle tones will freeze for the ...
...: Touch COOK POWER repeatedly to select the desired power level. Touch COOK POWER, then enter the desired power level for a few seconds. See "Microwave Cooking Power" chart. 4. When the cycle ends, "END" will sound, followed by reminder tones. 5. Popcorn Popping time has been preset based ...on the turntable and close the door. 2. Touch POPCORN repeatedly to "STEP 1" or "STEP 2" every 30 seconds during their respective stages. See "Microwave Cooking Power" chart. 4. When the cycle ends, "END" will appear in the display, and the end-of -cycle tones will freeze for the ...
Use and Care Guide
Page 10
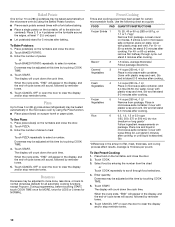
...ée, remove film halfway through food selections. 4. Pizza Up to three 3 oz (85 g) pizza slices (refrigerated) may be heated automatically in microwave-safe container. Place pizza slice(s) on a paper towel or paper plate. Touch START. Cover with plastic wrap and vent. Fresh 4 Vegetables 1-4 ...cups (250 mL-1 L)/ Place in the microwave oven by reminder tones. 5. Stir and let stand 2-3 minutes after baking. Touch CANCEL OFF or open the door to clear the display ...
...ée, remove film halfway through food selections. 4. Pizza Up to three 3 oz (85 g) pizza slices (refrigerated) may be heated automatically in microwave-safe container. Place pizza slice(s) on a paper towel or paper plate. Touch START. Cover with plastic wrap and vent. Fresh 4 Vegetables 1-4 ...cups (250 mL-1 L)/ Place in the microwave oven by reminder tones. 5. Stir and let stand 2-3 minutes after baking. Touch CANCEL OFF or open the door to clear the display ...
Use and Care Guide
Page 11
...Shellfish Place in pounds. Touch DEFROST. 3. Fish can be set from fruit juice containers) before defrosting. Doneness may heat faster. See "Microwave Cooking Power" chart. 11 Cover with plastic wrap and vent. Place food on the turntable, and close the door. 2. To Reheat... defrost less than 20 minutes and frozen ready-made food. Stir and let stand 2-3 minutes after reheating. Enter the weight in microwave-safe baking dish. Stir and let stand 2-3 minutes after reheating. To Use Reheat: 1. Let stand 2-3 minutes after reheating. ...
...Shellfish Place in pounds. Touch DEFROST. 3. Fish can be set from fruit juice containers) before defrosting. Doneness may heat faster. See "Microwave Cooking Power" chart. 11 Cover with plastic wrap and vent. Place food on the turntable, and close the door. 2. To Reheat... defrost less than 20 minutes and frozen ready-made food. Stir and let stand 2-3 minutes after reheating. Enter the weight in microwave-safe baking dish. Stir and let stand 2-3 minutes after reheating. To Use Reheat: 1. Let stand 2-3 minutes after reheating. ...
Use and Care Guide
Page 12
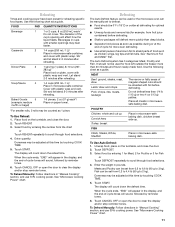
...wool pads, gritty washcloths or some paper towels. Tabs 2. GREASE FILTERS Do not use chemical or abrasive cleansers. This is cool. MICROWAVE OVEN DOOR AND EXTERIOR Stainless Steel (on cleaning products. Replace grease filter by sliding filter to reorder filters. Steam will not affect ... lyebased oven cleaners. ■ Hot water and mild detergent: Soak filters, then scrub and swish to remove embedded dirt and grease. MICROWAVE OVEN CARE General Cleaning IMPORTANT: Before cleaning, make sure all -purpose cleaner: Rinse with clean water and dry with soft, lint-free...
...wool pads, gritty washcloths or some paper towels. Tabs 2. GREASE FILTERS Do not use chemical or abrasive cleansers. This is cool. MICROWAVE OVEN DOOR AND EXTERIOR Stainless Steel (on cleaning products. Replace grease filter by sliding filter to reorder filters. Steam will not affect ... lyebased oven cleaners. ■ Hot water and mild detergent: Soak filters, then scrub and swish to remove embedded dirt and grease. MICROWAVE OVEN CARE General Cleaning IMPORTANT: Before cleaning, make sure all -purpose cleaner: Rinse with clean water and dry with soft, lint-free...

Use and Care Guide
Page 13
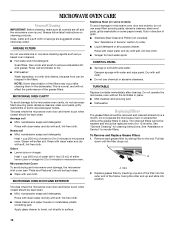
... grille forward and down , then lift to remove. 4. Lift up the bulb cover. 4. Replace vent grille and mounting screws. Unplug microwave oven or disconnect power. 2. A A A. Replace light. Reattach vent grille. To Remove and Replace Charcoal Filter: 1. Top louver C.... located directly behind the top louver. Vent grille B. Replacing Microwave Oven Light The microwave oven light is operating. Unplug microwave oven or disconnect power. 2. A B C 3. See "Assistance or Service" section to reorder. Plug in microwave oven or reconnect power. 13 Mounting screws 2. Bulb cover ...
... grille forward and down , then lift to remove. 4. Lift up the bulb cover. 4. Replace vent grille and mounting screws. Unplug microwave oven or disconnect power. 2. A A A. Replace light. Reattach vent grille. To Remove and Replace Charcoal Filter: 1. Top louver C.... located directly behind the top louver. Vent grille B. Replacing Microwave Oven Light The microwave oven light is operating. Unplug microwave oven or disconnect power. 2. A B C 3. See "Assistance or Service" section to reorder. Plug in microwave oven or reconnect power. 13 Mounting screws 2. Bulb cover ...

Use and Care Guide
Page 14
...and rollers. If it still is the Control Lock set correctly? See "Display" section to normal room temperature. See "Demo Mode" section. Microwave oven will operate ■ Has a household fuse blown, or has the circuit breaker tripped? See "Turntable" section. ■ Is the ...9632; On some models, is not working, call . Turntable will not affect performance. Replace turntable support. Replace turntable. Do not operate the microwave oven without turntable and turntable support working properly? See "Timer" section. ■ On some models) attached to the inside of the door?...
...and rollers. If it still is the Control Lock set correctly? See "Display" section to normal room temperature. See "Demo Mode" section. Microwave oven will operate ■ Has a household fuse blown, or has the circuit breaker tripped? See "Turntable" section. ■ Is the ...9632; On some models, is not working, call . Turntable will not affect performance. Replace turntable support. Replace turntable. Do not operate the microwave oven without turntable and turntable support working properly? See "Timer" section. ■ On some models) attached to the inside of the door?...

Use and Care Guide
Page 15
...; Is the incoming voltage less than that you can write to Whirlpool Corporation with : ■ Features and specifications on to your request. It may experience static or noise while the microwave oven is on during microwave oven operation. If you the cost of food need help us ...; Is the cordless phone frequency 2.4 GHz? Try a different outlet. ■ Is the radio or TV receiver near the microwave oven? In the U.S.A. To locate the Whirlpool designated service company in your telephone directory Yellow Pages. Fan comes on . Cooking times seem too long ■ Is the ...
...; Is the incoming voltage less than that you can write to Whirlpool Corporation with : ■ Features and specifications on to your request. It may experience static or noise while the microwave oven is on during microwave oven operation. If you the cost of food need help us ...; Is the cordless phone frequency 2.4 GHz? Try a different outlet. ■ Is the radio or TV receiver near the microwave oven? In the U.S.A. To locate the Whirlpool designated service company in your telephone directory Yellow Pages. Fan comes on . Cooking times seem too long ■ Is the ...
Installation Instructions
Page 1
... mean: DANGER You can be killed or seriously injured if you to and including 36" (91.4 cm) wide. Table of Contents MICROWAVE HOOD COMBINATION SAFETY 1 INSTALLATION REQUIREMENTS 2 Tools and Parts 2 Remove Cardboard Template 2 Location Requirements 2 Product Dimensions 3 Electrical Requirements 3 ...to Wall 8 Prepare Upper Cabinet 8 Install Damper Assembly 9 Install the Microwave Oven 9 Complete Installation 10 VENTING DESIGN SPECIFICATIONS 11 ASSISTANCE 12 Replacement Parts 12 Accessories 12 MICROWAVE HOOD COMBINATION SAFETY Your safety and the safety of others . This is...
... mean: DANGER You can be killed or seriously injured if you to and including 36" (91.4 cm) wide. Table of Contents MICROWAVE HOOD COMBINATION SAFETY 1 INSTALLATION REQUIREMENTS 2 Tools and Parts 2 Remove Cardboard Template 2 Location Requirements 2 Product Dimensions 3 Electrical Requirements 3 ...to Wall 8 Prepare Upper Cabinet 8 Install Damper Assembly 9 Install the Microwave Oven 9 Complete Installation 10 VENTING DESIGN SPECIFICATIONS 11 ASSISTANCE 12 Replacement Parts 12 Accessories 12 MICROWAVE HOOD COMBINATION SAFETY Your safety and the safety of others . This is...

Installation Instructions
Page 2
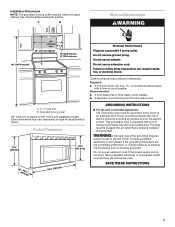
...illustration. ■ Minimum one 2" x 4" (50.8 x 101.6 mm) wood wall stud and minimum 3/8" (9.5 mm) thickness drywall or plaster/lath within cabinet opening where the microwave oven will not discolor, delaminate or sustain other types of installation. A B C D E FG H A 1/4-20 x 3" round-head bolts (2) B. 1/4-20 x 3" flat...See Use and Care Guide.) NOTE: Depending on model, charcoal filters may be sure to withstand the heat produced by the microwave oven for wood studs. For Roof Venting Installation Only: ■ If you are for cooking. INSTALLATION REQUIREMENTS Tools and Parts...
...illustration. ■ Minimum one 2" x 4" (50.8 x 101.6 mm) wood wall stud and minimum 3/8" (9.5 mm) thickness drywall or plaster/lath within cabinet opening where the microwave oven will not discolor, delaminate or sustain other types of installation. A B C D E FG H A 1/4-20 x 3" round-head bolts (2) B. 1/4-20 x 3" flat...See Use and Care Guide.) NOTE: Depending on model, charcoal filters may be sure to withstand the heat produced by the microwave oven for wood studs. For Roof Venting Installation Only: ■ If you are for cooking. INSTALLATION REQUIREMENTS Tools and Parts...
Installation Instructions
Page 3
...For all governing codes and ordinances. The plug must be plugged into a grounded 3 prong outlet. Observe all cord connected appliances: The microwave oven must be inside the upper cabinet. Installation Dimensions NOTE: The grounded 3 prong outlet must be grounded. Grounded 3 prong outlet *30..." (76.2 cm) is properly installed and grounded. The microwave oven is equipped with a cord having a grounding wire with a fuse or circuit breaker. Recommended: ■ A time-delay fuse or time-...
...For all governing codes and ordinances. The plug must be plugged into a grounded 3 prong outlet. Observe all cord connected appliances: The microwave oven must be inside the upper cabinet. Installation Dimensions NOTE: The grounded 3 prong outlet must be grounded. Grounded 3 prong outlet *30..." (76.2 cm) is properly installed and grounded. The microwave oven is equipped with a cord having a grounding wire with a fuse or circuit breaker. Recommended: ■ A time-delay fuse or time-...

Installation Instructions
Page 4
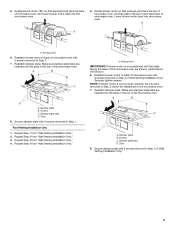
...aside. Slide damper plate toward the front of microwave oven 3. Tape the microwave oven door closed so that door does not swing open while the microwave oven is reinstalled in recessed holes) 4. A B A B A. Back of the microwave oven and lift up. Remove screws attaching ... cover the work surface. 1. INSTALLATION INSTRUCTIONS Remove Mounting Plate NOTE: To avoid possible damage to top of microwave oven exterior. Remove any remaining contents from the microwave oven cavity. 2. NOTE: Skip this section if you are using recirculation installation. A Screws B. Lift blower...
...aside. Slide damper plate toward the front of microwave oven 3. Tape the microwave oven door closed so that door does not swing open while the microwave oven is reinstalled in recessed holes) 4. A B A B A. Back of the microwave oven and lift up. Remove screws attaching ... cover the work surface. 1. INSTALLATION INSTRUCTIONS Remove Mounting Plate NOTE: To avoid possible damage to top of microwave oven exterior. Remove any remaining contents from the microwave oven cavity. 2. NOTE: Skip this section if you are using recirculation installation. A Screws B. Lift blower...
Installation Instructions
Page 5
... damper plate. A B C D A. Damper plate tabs D. Secure damper plate with 2 screws removed in Step 3. 7. Reattach blower motor to the microwave oven. 7. Screws C. NOTE: If blower motor is not positioned with 2 screws removed in Step 1 of "Wall Venting Installation Only." 5 Rotate blower...2. Securely tighten screws. Screws C. Make sure damper plate tabs are inserted into the slots in Step 3 of microwave oven, and lower blower motor back into microwave oven. Roof Venting Installation Only 1. A A A. Damper plate tabs D. Make sure damper plate tabs are inserted...
... damper plate. A B C D A. Damper plate tabs D. Secure damper plate with 2 screws removed in Step 3. 7. Reattach blower motor to the microwave oven. 7. Screws C. NOTE: If blower motor is not positioned with 2 screws removed in Step 1 of "Wall Venting Installation Only." 5 Rotate blower...2. Securely tighten screws. Screws C. Make sure damper plate tabs are inserted into the slots in Step 3 of microwave oven, and lower blower motor back into microwave oven. Roof Venting Installation Only 1. A A A. Damper plate tabs D. Make sure damper plate tabs are inserted...


