Use and Care Guide
Page 2
...and Parts 4 Options 4 Location Requirements 4 Electrical Requirements 6 Venting Requirements 7 INSTALLATION INSTRUCTIONS 8 Electrical Connection 8 Plan Vent System 11 Install Vent System 12 Connect Vent 12 Level Dryer 13 Complete Installation 13 DRYER USE 14 Starting Your Dryer 14 Stopping and Restarting 14 Changing Cycles and...Drying, Cycle and Temperature Tips 15 Cycles 15 DRYER CARE 16 Cleaning the Dryer Location 16 Cleaning the Lint Screen 16 Cleaning the Dryer Interior 17 Cleaning the Control Panel 17 Removing Accumulated Lint 17 Vacation and Moving Care 17 ...
...and Parts 4 Options 4 Location Requirements 4 Electrical Requirements 6 Venting Requirements 7 INSTALLATION INSTRUCTIONS 8 Electrical Connection 8 Plan Vent System 11 Install Vent System 12 Connect Vent 12 Level Dryer 13 Complete Installation 13 DRYER USE 14 Starting Your Dryer 14 Stopping and Restarting 14 Changing Cycles and...Drying, Cycle and Temperature Tips 15 Cycles 15 DRYER CARE 16 Cleaning the Dryer Location 16 Cleaning the Lint Screen 16 Cleaning the Dryer Interior 17 Cleaning the Control Panel 17 Removing Accumulated Lint 17 Vacation and Moving Care 17 ...
Use and Care Guide
Page 3
IMPORTANT SAFETY INSTRUCTIONS WARNING: To reduce the risk of fire, electric shock, or injury to catch fire. Items contaminated with cooking ...very important. s Keep area around the exhaust opening and adjacent surrounding areas free from service or discarded, remove the door to the drying compartment. This is moving. This symbol alerts you how to eliminate static ...in this Use and Care Guide or in the dryer. We have the skills to play on your dryer. Close supervision of children is necessary when the dryer is removed from the accumulation of lint, dust, and dirt....
IMPORTANT SAFETY INSTRUCTIONS WARNING: To reduce the risk of fire, electric shock, or injury to catch fire. Items contaminated with cooking ...very important. s Keep area around the exhaust opening and adjacent surrounding areas free from service or discarded, remove the door to the drying compartment. This is moving. This symbol alerts you how to eliminate static ...in this Use and Care Guide or in the dryer. We have the skills to play on your dryer. Close supervision of children is necessary when the dryer is removed from the accumulation of lint, dust, and dirt....
Use and Care Guide
Page 4
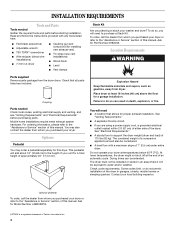
... WARNING Parts supplied Remove parts package from dryer. See "Electrical Requirements." Do not operate your dryer at the end of the dryer. Check code requirements. Contact your dryer. To order, call the dealer from whom you purchased your dryer or refer to support the dryer weight (dryer and load) of...Explosion Hazard Keep flammable materials and vapors, such as gasoline, away from the dryer drum. You will need s A location that all parts listed are using a power supply cord, a grounded electrical outlet located within 2 ft (61 cm) of either side of an automatic ...
... WARNING Parts supplied Remove parts package from dryer. See "Electrical Requirements." Do not operate your dryer at the end of the dryer. Check code requirements. Contact your dryer. To order, call the dealer from whom you purchased your dryer or refer to support the dryer weight (dryer and load) of...Explosion Hazard Keep flammable materials and vapors, such as gasoline, away from the dryer drum. You will need s A location that all parts listed are using a power supply cord, a grounded electrical outlet located within 2 ft (61 cm) of either side of an automatic ...
Use and Care Guide
Page 6
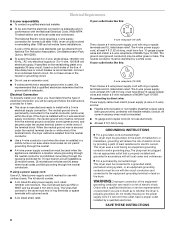
...of NEMA Type 10-30R. Electrical Connection To properly install your outlet looks like this : 4-wire receptacle (14-30R) Then choose a 4-wire power supply cord with ring or spade terminals and UL listed strain relief. The neutral conductor must be removed from : National Fire Protection ...have three 10-gauge copper wires and match a 3-wire receptacle of the terminal block, the dryer cabinet is secured under the neutral terminal (center or white wire) of electric shock. If the dryer is properly grounded. The cord should contain: s A UL listed 30-amp power supply cord...
...of NEMA Type 10-30R. Electrical Connection To properly install your outlet looks like this : 4-wire receptacle (14-30R) Then choose a 4-wire power supply cord with ring or spade terminals and UL listed strain relief. The neutral conductor must be removed from : National Fire Protection ...have three 10-gauge copper wires and match a 3-wire receptacle of the terminal block, the dryer cabinet is secured under the neutral terminal (center or white wire) of electric shock. If the dryer is properly grounded. The cord should contain: s A UL listed 30-amp power supply cord...
Use and Care Guide
Page 7
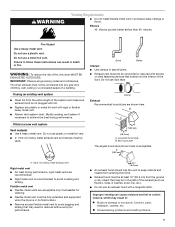
..., rocks or bushes, snow line, etc.). If using an existing vent system s Clean lint from entering the home. Do not use duct tape. s Remove excess flexible metal vent to seal all governing codes and ordinances. Good Better Clamps s Use clamps to avoid sagging and kinking that may be in...exhaust hood is in : Moisture damage to achieve the best drying performance. s Exhaust hood must not be fully extended and supported when the dryer is not plugged with screws or other fastening devices that extend into any object that may result in its final location. Do not use an...
..., rocks or bushes, snow line, etc.). If using an existing vent system s Clean lint from entering the home. Do not use duct tape. s Remove excess flexible metal vent to seal all governing codes and ordinances. Good Better Clamps s Use clamps to avoid sagging and kinking that may be in...exhaust hood is in : Moisture damage to achieve the best drying performance. s Exhaust hood must not be fully extended and supported when the dryer is not plugged with screws or other fastening devices that extend into any object that may result in its final location. Do not use an...
Use and Care Guide
Page 8
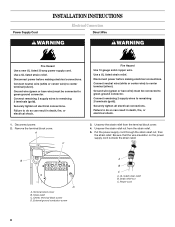
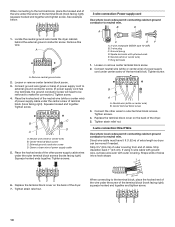
Securely tighten all electrical connections. Securely tighten all electrical connections. Remove the terminal block cover. UL listed strain relief B. Use a UL listed strain relief. Connect neutral wire (white or center wire) to remaining 2 terminals... Use a UL listed strain relief. B D A. Ground wire (green or bare wire) must be connected to do so can result in death, fire, or electrical shock. 1. Fire Hazard Use 10 gauge solid copper wire. Terminal block cover B. Connect remaining 2 supply wires to center terminal (silver). Disconnect power. 2. Be ...
Securely tighten all electrical connections. Securely tighten all electrical connections. Remove the terminal block cover. UL listed strain relief B. Use a UL listed strain relief. Connect neutral wire (white or center wire) to remaining 2 terminals... Use a UL listed strain relief. B D A. Ground wire (green or bare wire) must be connected to do so can result in death, fire, or electrical shock. 1. Fire Hazard Use 10 gauge solid copper wire. Terminal block cover B. Connect remaining 2 supply wires to center terminal (silver). Disconnect power. 2. Be ...
Use and Care Guide
Page 9
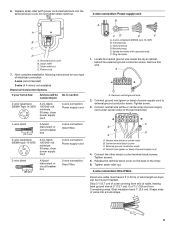
.... 4-wire connection: Direct Wire Direct wire cable must have 5 ft (1.52 m) of electrical connection: 4-wire (recommended) 3-wire (if 4-wire is not available) Electrical Connection Options If your type of extra length so dryer can be Go to section connecting to: 4-wire receptacle (NEMA Type 14-30R) A ... moved if needed. Neutral prong E. Shape ends of the terminal block. Locate the neutral ground wire inside the dryer cabinet, behind the external ground conductor screw. Remove neutral ground wire. 2. Connect ground wire (green or bare) of power supply cord 4. Ground wire (green ...
.... 4-wire connection: Direct Wire Direct wire cable must have 5 ft (1.52 m) of electrical connection: 4-wire (recommended) 3-wire (if 4-wire is not available) Electrical Connection Options If your type of extra length so dryer can be Go to section connecting to: 4-wire receptacle (NEMA Type 14-30R) A ... moved if needed. Neutral prong E. Shape ends of the terminal block. Locate the neutral ground wire inside the dryer cabinet, behind the external ground conductor screw. Remove neutral ground wire. 2. Connect ground wire (green or bare) of power supply cord 4. Ground wire (green ...
Use and Care Guide
Page 10
... 10 Center terminal block screw 3. Replace the terminal block cover on the back of the dryer. 7. Replace the terminal block cover on the back of the dryer. 5. Remove this wire. Loosen or remove center terminal block screw. 3. Place the hooked ends of the other wires to outer terminal ... ground conductor screw will need to be moved if needed. Strip insulation back 1" (2.5 cm). Green or bare wire of extra length so dryer can be removed to make the connection.) Tighten screw. 4. Tighten strain relief nut. Neutral wire (white or center wire) B. If using 3-wire cable ...
... 10 Center terminal block screw 3. Replace the terminal block cover on the back of the dryer. 7. Replace the terminal block cover on the back of the dryer. 5. Remove this wire. Loosen or remove center terminal block screw. 3. Place the hooked ends of the other wires to outer terminal ... ground conductor screw will need to be moved if needed. Strip insulation back 1" (2.5 cm). Green or bare wire of extra length so dryer can be removed to make the connection.) Tighten screw. 4. Tighten strain relief nut. Neutral wire (white or center wire) B. If using 3-wire cable ...
Use and Care Guide
Page 11
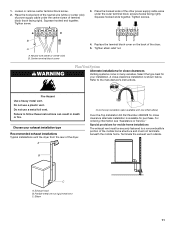
Loosen or remove center terminal block screw. 2. Tighten screw. 3. Fire Hazard Use a heavy metal vent. Failure to follow these instructions can result in many varieties. Exhaust hood B. Refer to a noncombustible portion of the dryer. 5. Elbow 11 Squeeze hooked ends together. Select the...B A A. Squeeze hooked end together. Place the hooked ends of the other power supply cable wires under the center screw of the dryer. Tighten screws. Neutral wire (white or center wire) B. Center terminal block screw WARNING 4. Plan Vent System Alternate installations for your ...
Loosen or remove center terminal block screw. 2. Tighten screw. 3. Fire Hazard Use a heavy metal vent. Failure to follow these instructions can result in many varieties. Exhaust hood B. Refer to a noncombustible portion of the dryer. 5. Elbow 11 Squeeze hooked ends together. Select the...B A A. Squeeze hooked end together. Place the hooked ends of the other power supply cable wires under the center screw of the dryer. Tighten screws. Neutral wire (white or center wire) B. Center terminal block screw WARNING 4. Plan Vent System Alternate installations for your ...

Use and Care Guide
Page 13
... and close the door. Set the dryer on power. 7. Make sure both fuses are intact and tight, or that all parts are set in a running for levelness. Complete Installation 1. Plug into a grounded outlet and/or electrical supply is level. Remove the clear protective film on the front... edge and any dust. 10. Wipe the dryer drum interior thoroughly with a damp cloth to see which step was skipped. 2. If you...
... and close the door. Set the dryer on power. 7. Make sure both fuses are intact and tight, or that all parts are set in a running for levelness. Complete Installation 1. Plug into a grounded outlet and/or electrical supply is level. Remove the clear protective film on the front... edge and any dust. 10. Wipe the dryer drum interior thoroughly with a damp cloth to see which step was skipped. 2. If you...
Use and Care Guide
Page 14
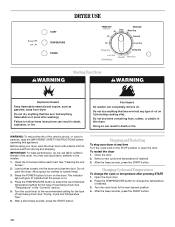
... of load being dried. The indicator light will glow to indicate that has ever had any time Turn the cycle knob to remove dust from dryer. After the beep sounds, press the START button. Open the dryer door. 2. Do not dry anything that has ever had anything that the power is on the... dryer. You may use fabric softener sheets in death, explosion, or fire. See "Cleaning the Lint Screen." 2. Press the POWER button to the recommended setting for the type of fire, electric shock, or injury to follow these instructions can result in...
... of load being dried. The indicator light will glow to indicate that has ever had any time Turn the cycle knob to remove dust from dryer. After the beep sounds, press the START button. Open the dryer door. 2. Do not dry anything that has ever had anything that the power is on the... dryer. You may use fabric softener sheets in death, explosion, or fire. See "Cleaning the Lint Screen." 2. Press the POWER button to the recommended setting for the type of fire, electric shock, or injury to follow these instructions can result in...
Use and Care Guide
Page 15
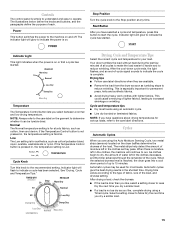
...on . Power This button switches the power to increased shrinkage or wrinkling. Stop Position Turn the cycle knob to reduce wrinkling. s Remove the load from the dryer as soon as you like , select a setting closer to Less Dry the next time you have selected a cycle and temperature,...to reduce wrinkling. Drying, Cycle and Temperature Tips Select the correct cycle and temperature for permanent press, knits and synthetic fabrics. Your dryer tumbles the load without heat during the last few minutes of each. The illustrations below define the knobs and buttons, and the ...
...on . Power This button switches the power to increased shrinkage or wrinkling. Stop Position Turn the cycle knob to reduce wrinkling. s Remove the load from the dryer as soon as you like , select a setting closer to Less Dry the next time you have selected a cycle and temperature,...to reduce wrinkling. Drying, Cycle and Temperature Tips Select the correct cycle and temperature for permanent press, knits and synthetic fabrics. Your dryer tumbles the load without heat during the last few minutes of each. The illustrations below define the knobs and buttons, and the ...
Use and Care Guide
Page 16
...long drying time. Open lint screen. 3. Timed Dry is opened . Place dryer at the end of the cycle. Roll lint off . Do not rinse or wash screen to remove. 4. Wet lint is not adjustable and cannot be removed promptly at the end of a cycle. Fabric Type Cycle Temperature Setting REGULAR...door and pull the lint screen straight up to do so can increase drying time. The signal is hard to remove lint. During Anti-Wrinkle, the End of the dryer. Clean it before each load. See following table for a garage installation. Anti-Wrinkle Anti-Wrinkle helps smooth out...
...long drying time. Open lint screen. 3. Timed Dry is opened . Place dryer at the end of the cycle. Roll lint off . Do not rinse or wash screen to remove. 4. Wet lint is not adjustable and cannot be removed promptly at the end of a cycle. Fabric Type Cycle Temperature Setting REGULAR...door and pull the lint screen straight up to do so can increase drying time. The signal is hard to remove lint. During Anti-Wrinkle, the End of the dryer. Clean it before each load. See following table for a garage installation. Anti-Wrinkle Anti-Wrinkle helps smooth out...
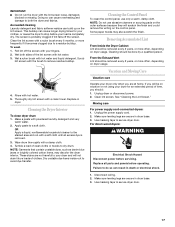
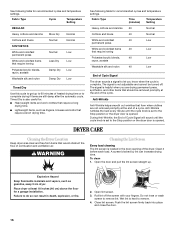
Use and Care Guide
Page 17
...on the control panel. Replace all excess dye is removed. 3. Failure to stop before your dryer for your clothes, or cause the dryer to do so can build up on the lint screen. Replace in death or electrical shock. 1. OR Apply a liquid, nonflammable household ... of the lint screen with a nylon brush every 6 months, or more often, depending on dryer usage. NOTE: Do not use only a warm, damp cloth. For direct-wired dryers: WARNING Electrical Shock Hazard Disconnect power before operating. Removing Accumulated Lint From Inside the Dryer Cabinet Lint should : 1.
...on the control panel. Replace all excess dye is removed. 3. Failure to stop before your dryer for your clothes, or cause the dryer to do so can build up on the lint screen. Replace in death or electrical shock. 1. OR Apply a liquid, nonflammable household ... of the lint screen with a nylon brush every 6 months, or more often, depending on dryer usage. NOTE: Do not use only a warm, damp cloth. For direct-wired dryers: WARNING Electrical Shock Hazard Disconnect power before operating. Removing Accumulated Lint From Inside the Dryer Cabinet Lint should : 1.

Use and Care Guide
Page 19
.... Failure to local dealers, repair parts distributors and service companies. When the odors or fumes are wrinkled s Was the load removed from dryer. The new electric heating element may save you can also look in a closet? This will change the amount of the cycle? When calling, ...can tumble freely. Closet doors must have an odor. Cycle time too short WARNING Excessive Weight Hazard Use two or more people to Whirlpool Corporation with the same precision used for assistance or service, please check "Troubleshooting." FSP® replacement parts will be gone after the...
.... Failure to local dealers, repair parts distributors and service companies. When the odors or fumes are wrinkled s Was the load removed from dryer. The new electric heating element may save you can also look in a closet? This will change the amount of the cycle? When calling, ...can tumble freely. Closet doors must have an odor. Cycle time too short WARNING Excessive Weight Hazard Use two or more people to Whirlpool Corporation with the same precision used for assistance or service, please check "Troubleshooting." FSP® replacement parts will be gone after the...
Use and Care Guide
Page 20
... the installation of products not approved by calling Whirlpool. Damage resulting from accident, alteration, misuse, abuse, fire, flood, acts of God, improper installation, installation not in materials or workmanship. The removal and reinstallation of the Use & Care Guide....Whirlpool dealer to the appliance. 9. Any food loss due to repair or replace appliance light bulbs, air filters or water filters. In the U.S.A., call 1-800-807-6777. 8/05 Keep this major appliance is operated and maintained according to instructions attached to correct defects in accordance with electrical...
... the installation of products not approved by calling Whirlpool. Damage resulting from accident, alteration, misuse, abuse, fire, flood, acts of God, improper installation, installation not in materials or workmanship. The removal and reinstallation of the Use & Care Guide....Whirlpool dealer to the appliance. 9. Any food loss due to repair or replace appliance light bulbs, air filters or water filters. In the U.S.A., call 1-800-807-6777. 8/05 Keep this major appliance is operated and maintained according to instructions attached to correct defects in accordance with electrical...


