Whirlpool WGD4800XQ Support Question
Whirlpool WGD4800XQ Support Question
Find answers below for this question about Whirlpool WGD4800XQ.Need a Whirlpool WGD4800XQ manual? We have 4 online manuals for this item!
Question posted by ljsbjs on June 25th, 2011
How Do I Remove The Front Panel?
I need to remove the front panel of our Whirlpool WGD4800XQ dryer.
Current Answers
Related Whirlpool WGD4800XQ Manual Pages
Owners Manual - Page 4

... good air flow. n Use the shortest length of who installed the dryer.
n Use no more drying time or when using the drying rack.
4 n Remove lint from the dryer. n Replace plastic or foil vent material with your dryer for the occasional damp load that needs a little more than four 90° elbows in the load.
each...
Owners Manual - Page 5

... time will depend on the fabrics in your laundry load. Promptly removing clothes at the end of cycles. Turn the knob to start the dryer. n Get up to 40 minutes of heat... temperature based on the control. CONTROL PANEL & FEATURES
1
2
3
4
TIMED DRY 50
40
Damp Dry
Tumble Press
20
60
70
Heavy Dry
Cool Down OFF ACCUDRY
sensor dryer
Jeans Very Dry
ENERGY PREFERRED
OFF
Delicate...
Owners Manual - Page 7
... rinse or wash screen to tumble freely.
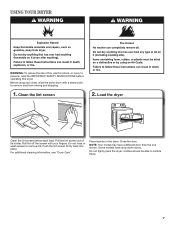
7 Clean the lint screen
2. Place laundry in the dryer. Close the door. Some models have a different door than the one shown. Roll lint off the screen with your dryer, wipe the dryer drum with a damp cloth to remove dust from storing and shipping.
1. For additional cleaning information, see...
Owners Manual - Page 8
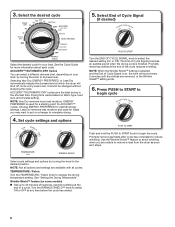
...feature (on fabric type, load size, and dryness setting. Promptly removing clothes at which the dryer will sound every 5 minutes until the clothes are removed, or the Wrinkle Shield™ setting ends.
6. Press PUSH...Cycle
SOignnal
PUSH TO START
Turn the END OF CYCLE SIGNAL knob to remove a load from the dryer as soon as it cannot be changed without stopping the cycle.
ENERGY PREFERRED...
Owners Manual - Page 9
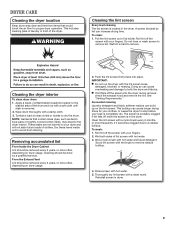
... Exhaust Vent Lint should be done by lint can cause overheating and damage to remove. n If lint falls off the screen with a damp cloth. 3. As needed cleaning Laundry detergent and fabric softener residue can cause longer drying times for proper dryer operation. Roll lint off the screen into place. Wet a nylon brush with the...
Owners Manual - Page 10

... valve in the lower right-hand corner of the cover.
Moving Care
For power supply cord-connected dryers: 1. Changing the drum light (on the back wall of the dryer. Locate the light bulb cover on some models)
1. Remove the cover.
3. Cap the open fuel supply line. 5. Make sure leveling legs are secure in...
Owners Manual - Page 12
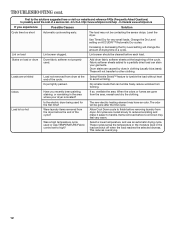
...strips. Stains on ACCUDRY™/Automatic Dry cycles.
Dryer tightly packed.
The new electric heating element may not be cleaned before removing laundry from the area, rewash and dry the clothing....Automatic cycle ending early.
Items removed before the end of the cycle? Select a lower temperature, and use an automatic drying cycle. In Canada www.whirlpool.ca
If you recently been ...
Owners Manual - Page 13

...LAUNDRY WARRANTY
LIMITED WARRANTY
For one year from the date of purchase, when this major appliance is operated and maintained according to instructions attached to or furnished with the product, Whirlpool Corporation or Whirlpool Canada LP (hereafter "Whirlpool") will need... reference. The removal and reinstallation of products not approved by an authorized Whirlpool servicer is located...
Warranty - Page 1
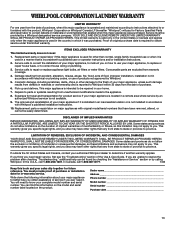
... Whirlpool servicer is located in accordance with the product, Whirlpool Corporation or Whirlpool Canada LP (hereafter "Whirlpool") will need to know your authorized Whirlpool dealer to or furnished with Whirlpool... instructions and/or installation instructions.
2. Pick up and delivery. The removal and reinstallation of purchase.
6.
Service must provide proof of incidental or...
Dimension Guide - Page 1

... doors with vents
Select the route that will need.
Large opening hamper door
3"* (76 mm...Do not use old hoses.
Side view - Because Whirlpool Corporation policy includes a continuous commitment to improve our ...or circuit breaker and a separate circuit are recommended. Water (Steam models only): The dryer must be connected to L.P. Do not overtighten. Hood styles: A & B are ...
Installation Instructions - Page 4
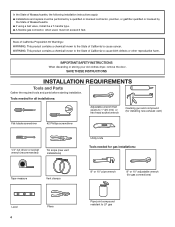
... nut driver or socket wrench (recommended)
Tin snips (new vent installations)
Utility knife Tools needed for gas installations:
Tape measure
Vent clamps
8" or 10" pipe wrench
8" or 10" ... resistant to LP gas
IMPORTANT SAFETY INSTRUCTIONS
When discarding or storing your old clothes dryer, remove the door. In the State of Massachusetts, the following installation instructions apply:
�...
Installation Instructions - Page 9
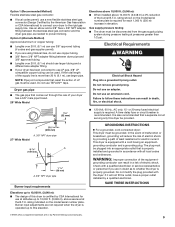
...larger pipe.
rating shown on the model/serial number plate. Do not remove ground prong. Do not use an adapter.
This dryer is certified by providing a path of electric shock.
Use an elbow ...CSA International) to connect your dryer to whether the dryer is more than 1/2 psi. The plug must be provided. grounding conductor can result in doubt as needed to this elevation.
†...
Installation Instructions - Page 10
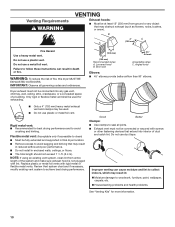
... with lint. Do not use duct tape. WARNING: To reduce the risk of a building.
Dryer exhaust must not be at least 12" (305 mm) from entire length of duct and catch... clamps may result
in reduced airflow and poor performance. ■■ Do not install in final dryer location. ■■ Remove excess to clean) ■■ Must be used .
■■ Do not use a...
Installation Instructions - Page 13
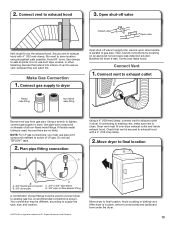
... solution. Your connection may be sure there are no kinks. Use clamps to exhaust outlet
Flared male fitting
Non-flared male fitting
Remove red cap from under the dryer.
13 Dryer vent must use TEFLON®† tape.
2.
Run vent to exhaust hood
3. Make Gas Connection
1. Connect vent to seal all non-flared...
Installation Instructions - Page 14
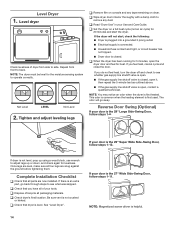
... location. Be sure vent is level. Tighten and adjust leveling legs
q Remove film on console and any dust. q Set the dryer on dryer.
q Check that dryer is not crushed
or kinked. Level Dryer
1. If you do not feel heat, turn the dryer off and check to adjust legs up or down, and check again for
20...
Installation Instructions - Page 15

... or right within slot to reinstall door. Pull door forward off top screws
NOTE: Two people maybe needed , slide door catch left side of dryer.
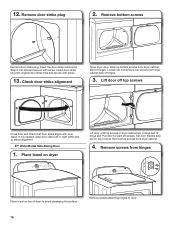
Close door and check that door strike aligns with door catch. Remove bottom screws
Use a small, flat-blade screwdriver to avoid damaging the surface.
2. Lift door off screws...
Installation Instructions - Page 16

... or plastic door catches.
6. Rotate outer door
Take outer door and rotate in large part of dryer. Remove screws from dryer cabinet side of hinges.
3. Do not pull on dryer, grasp sides of outer door and lift to inner door panel so handle is on top of hinge slot. 29" Super Wide Side-Swing Door
1.
Installation Instructions - Page 17

... hole plugs
Reattach door hinges to reinstall door. Insert screws into hinge holes on
dryer cabinet
NOTE: Two people maybe needed to dryer door so that the larger hole is over screws. Tighten screws. Attach door hinges
Remove door strike from dryer cabinet and set aside.
10. Position door so large end of door hinge...
Installation Instructions - Page 18
... screw.
13. If it is needed, slide door catch left or right within slot to door.
18 Place towel on dryer
Lift door until top screws in dryer cabinet are in Step 9 into original door strike hole and secure with screw. Remove bottom screws
Remove door strike plug. Remove bottom screws from dryer cabinet.
4. Check door strike...
Installation Instructions - Page 19

... door over towel on the left side. Attach door hinges
Remove screws at the bottom of door (5 screws). Transfer plugs to dryer door so that attach 2 plugs on dryer, grasp sides of outer door and lift to separate it back down .
Reattach outer door panel to keep cardboard spacer centered between doors. Rotate outer...
Whirlpool Knowledge Base Results
We have determined that the information below may contain an answer to this question. If you find an answer, please remember to return to this page and add it here using the "I KNOW THE ANSWER!" button above. It's that easy to earn points!-
Adjusting the door spring tension prior to installing the dishwasher
... duty door springs (Part number 4318050) when adding a heavy custom door panel. Standard Tub Models Dishwasher door hitting countertop Product repair manuals FAQs Knowledgebase search ... closes or falls open under its own weight, the door tension will need to be secured at the same holes. To adjust the door spring ... or hex socket, remove the screw from the rear leg of the dishwasher. -
Cleaning your refrigerator
...and dry removable parts and interior surfaces thoroughly. There is no need to ...clean the grille, the open areas behind a sparkling shine. Side by side refrigerator Order your refrigerator: NOTE: Do not use paper towels, scouring pads, or other objects. Use a clean sponge or soft cloth and a mild detergent in warm water. Here On some models, wash glass door panels... -
Nothing operates on my microwave oven
... To activate Child Lock (on the control panel. Try to use of cold water for ...(magnetron), grill element or convection element. Remove spacer, then firmly close the door. While...local service provider: Product Category Washer or Dryer Refrigerator or Freezer Dishwasher Electric Range, ... Dispenser Vent Hood Ice Machine Commercial Laundry Vacuum Cleaner Central Vac Dehumidifier Child...
Similar Questions

Dryer Will Not Turn On.
my dryer wil not turn on. I have checked a fuses and they are good. What's next?
my dryer wil not turn on. I have checked a fuses and they are good. What's next?
(Posted by Dtidavid54 7 years ago)

Power But No Tumbler?
The unit is only four years old, in a rental with one tenant, looks brand new! It powers on, switche...
The unit is only four years old, in a rental with one tenant, looks brand new! It powers on, switche...
(Posted by jwoloszyn14 8 years ago)

Dryer Error Message
What does the F-01 error message mean on my Duet dryer?
What does the F-01 error message mean on my Duet dryer?
(Posted by gghays01 9 years ago)


Dryer Vent Length Is Whirlpool Electric Dryer Wgd4800xq A 'long Venting Model'?
(Posted by Hmaucher2 11 years ago)