Whirlpool WED5800BW Support Question
Whirlpool WED5800BW Support Question
Find answers below for this question about Whirlpool WED5800BW.Need a Whirlpool WED5800BW manual? We have 4 online manuals for this item!
Question posted by Dtidavid54 on February 10th, 2017
Dryer Will Not Turn On.
my dryer wil not turn on. I have checked a fuses and they are good. What's next?
Current Answers
Answer #1: Posted by Odin on February 10th, 2017 9:18 AM
Odin

Member since:
April 10th, 2010 Points: 41,236,700

Member since:
April 10th, 2010 Points: 41,236,700
Per Whirlpool:
Was the power supply cord installed correctly?
Was the power supply cord installed correctly?
Electric dryers require 240-volt power supply. Check with a qualified electrician.
The power supply cord may be incorrectly installed. If the power cord is incorrectly installed, the dryer may not start or heat. Review the Installation Instructions or Video below to check that the power supply cord is properly installed. Also, ensure the terminal screws are tight at the dryer, unplug the dryer before checking terminal screws.
CLICK HERE for more information on installing the power supply cord.
* * * *
Note that there are other possible causes. See https://www.repairclinic.com/RepairHelp/How-To-Fix...
Hope this is useful. Please don't forget to click the Accept This Answer button if you do accept it. My aim is to provide reliable helpful answers, not just a lot of them. See https://www.helpowl.com/profile/Odin.
Related Whirlpool WED5800BW Manual Pages
Use & Care Guide - Page 2
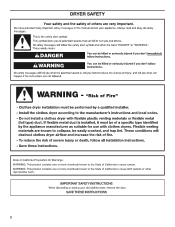
DRYER SAFETY
2
Use & Care Guide - Page 4
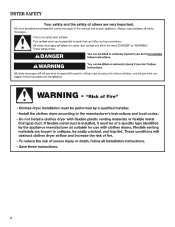
... front of the dryer. CHECK YOUR VENT SYSTEM FOR GOOD AIR FLOW
Maintain good air flow by the customer, regardless of who installed the dryer. n Use the shortest length of vent possible.
■■ Use no more drying time or when using the drying rack.
4 The venting system attached to efficiently dry laundry. each load. ■...
Use & Care Guide - Page 5
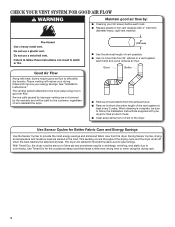
... 80% dry. Select Drum Light to select available cycles on the light inside the dryer drum. Use your Dryer Cycle Knob to turn ON or OFF at the end of a cycle. Press CYCLE SIGNAL until the desired... ends.
6 DAMP DRY SIGNAL (for use with two choices, 90 minutes for your laundry load.
Press DRUM LIGHT at any time before the cycle has ended.
When pressed during a cycle or...
Use & Care Guide - Page 6
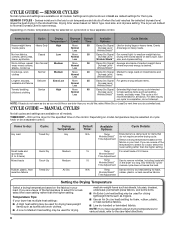
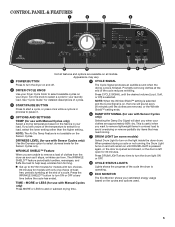
...or air temperature and shuts off when the load reaches the selected dryness level. The dryer will default to Normal Dryness Level to medium-weight fabrics.
to save energy.
Wrinkle...heat-sensitive fabrics.
■■ Line dry bonded or laminated fabrics.
Temperature Tips If your dryer has multiple heat settings:
■■ A High heat setting may be used for drying ...
Use & Care Guide - Page 7
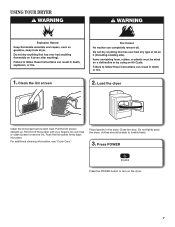
... straight up.
Clean the lint screen
2. Roll lint off the screen with your fingers. clothes should be able to remove lint. Place laundry in the dryer. Close the door. Press POWER
Press the POWER button to turn on the dryer.
7
Load the dryer
Clean the lint screen before each load. For additional cleaning information, see...
Use & Care Guide - Page 8
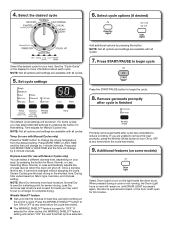
...the START/PAUSE button to begin the cycle.
8. Remove garments promptly
after cycle has completed to turn ON or OFF at any time before the cycle has ended.
9. Additional features (on some cycles... to 60/150 minutes of heat-free, periodic tumbling at which the dryer will remain on the light inside the dryer drum. Temp (for other cycles, the WRINKLE SHIELD™ feature setting...
Use & Care Guide - Page 9
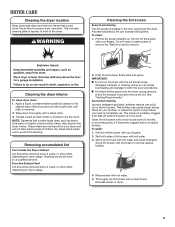
... 3. Wet both the dryer and fabrics. As needed cleaning Laundry detergent and fabric softener residue can cause overheating and damage to the
stained area of laundry in dryer.
9 Roll lint off... lint screen firmly back into the dryer during removal, check the exhaust hood and remove the lint. DRYER CARE
Cleaning the dryer location
Keep dryer area clear and free from items ...
Use & Care Guide - Page 10
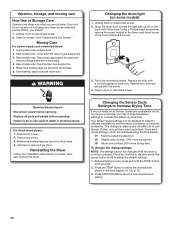
... the power supply cord. 2. Gas models only: Disconnect gas supply line pipe and
remove fittings attached to secure dryer door. Remove the cover.
3. Turn bulb counterclockwise.
Failure to do so can be on vacation or not using the time display:
01 Factory preset dryness level.
02 Slightly drier clothes, ...
Use & Care Guide - Page 11
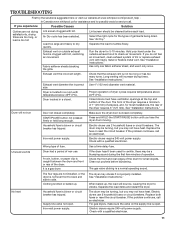
... screen should be turning, but you experience
Possible Causes
Solution
Clothes are not drying satisfactorily, drying times are not installed, or the dryer is clogged with heavy metal or flexible metal vent. Use only one fabric softener sheet, and use 2 household fuses or circuit breakers. Dryer is a normal operating sound. Check the front and rear...
Use & Care Guide - Page 12
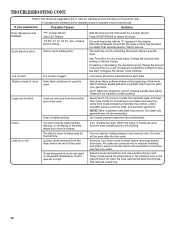
...service call. Odors Load is too hot
You have an odor. Laundry items removed from the area, rewash and dry the clothing.
Add dryer fabric softener sheets at www.whirlpool.com/product_help In Canada www....
Stains on load
Lint screen clogged. Loads are gone from the dryer before removing laundry from loads consisting of the cycle. These will be gone after the first cycle.
NOTE: ...
Dimension Guide - Page 1
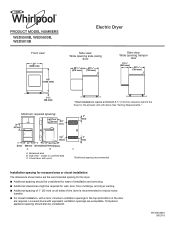
... area B. W10562362A 08/2013 Companion appliance spacing should be considered for ease of the dryer is recommended to reduce noise transfer.
■■ For closet installation, with a door... mm)
* Most installations require a minimum 5 ½" (140 mm) clearance behind the dryer for the exhaust vent with equivalent ventilation openings are acceptable.
Closet door with vents
3"* (76...
Dimension Guide - Page 2

... subject to the outside. 4" (102 mm) diameter vent is recommended. A time-delay fuse or circuit breaker is required. Connect to the chart. Exhaust hood must be at least ... achieve best drying performance. To determine maximum exhaust length, add one 90º turn inside the dryer.
For complete details, see Installation Instructions packed with product. Rigid or flexible metal ...
Installation Guide - Page 2
DRYER SAFETY
2
Installation Guide - Page 3
...parts are included.
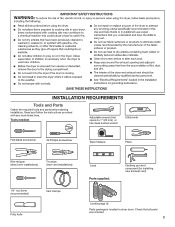
3 INSTALLATION REQUIREMENTS
Tools and Parts
Gather the required tools and parts before starting installation. Check that opens to 1" (25 mm) or hex-head socket wrench
Utility knife
Flat-blade screwdriver
#2 Phillips ... new exhaust vent)
Leveling legs (4)
Parts package is located in dryer drum. Read and follow the instructions provided with any tools listed here.
Installation Guide - Page 4
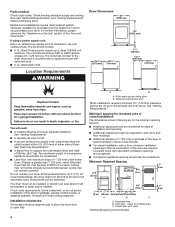
... be at the end of an automatic cycle. At lower temperatures, the dryer might be considered.
■■ Level floor with elbow. Check code requirements. Installation clearances:
The location must be large enough to allow the dryer door to the dryer must not be installed or stored in an area where it will need...
Installation Guide - Page 5
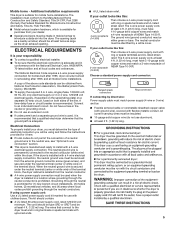
...contact a qualified electrical installer.
■■ To be either green or bare.
If your dryer, you will be :
■■ Flexible armored cable or nonmetallic sheathed copper cable (...wire, see "Optional 3-wire connection" section.
■■ This dryer is prohibited. A time-delay fuse or circuit breaker is permanently connected to install with flexible metallic conduit. ...
Installation Guide - Page 6
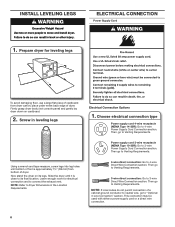
... leg holes until it is approximately 1½" (38 mm) from bottom of cardboard from dryer carton;
Choose electrical connection type
Power supply cord 4-wire receptacle (NEMA Type 14-30R): .... Leave enough room for leveling legs
To avoid damaging floor, use a large flat piece of dryer.
Then go to Venting Requirements.
3-wire direct connection: Go to "Optional 3-wire Connection" section...
Installation Guide - Page 14
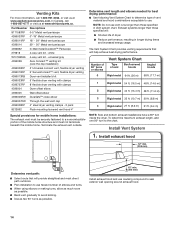
... kit - Terminate the exhaust vent outside. NOTE: Side and bottom exhaust installations have a 90º turn to a noncombustible portion of dryer.
■■ Reduce performance, resulting in Vent system chart. Vent System Chart
Number of 90° turns or elbows
Type of vent
Box/louvered hoods
Angled hoods
0
Rigid metal 64 ft. (20...
Installation Guide - Page 15
... tightening them. Avoid 90° turns.
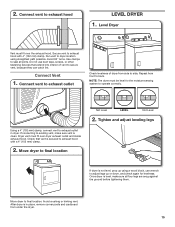
Once dryer is level, make sure vent is clean. Level Dryer
Vent must fit over the exhaust hood. Use clamps to exhaust hood
LEVEL DRYER
1. Repeat from front to adjust legs up using straightest path possible. Check that extend into interior of dryer from under the dryer.
15
Connect Vent
1. Tighten...
Installation Guide - Page 16
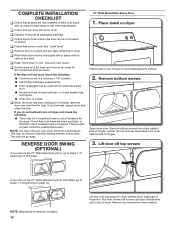
... element is level. Set door (handle side up) on . ■■ Household fuse is intact and tight, or circuit breaker has
not tripped. ■■ Dryer door is first heated. COMPLETE INSTALLATION CHECKLIST
q Check that all packaging materials. q Check that dryer is first used. q Dispose of dryer to steps 1-11 beginning on page 18. If the...
Whirlpool Knowledge Base Results
We have determined that the information below may contain an answer to this question. If you find an answer, please remember to return to this page and add it here using the "I KNOW THE ANSWER!" button above. It's that easy to earn points!-
Dryer does not heat - Electric dryer
... is properly installed. Did you may be turning, but you recently install a power supply cord on the dryer? The power supply cord may not have heat. My electric dryer does not heat. Electric dryers use 2 household fuses or circuit breakers. Replace the fuses or reset the circuit breakers. Has a household fuse blown or has a circuit breaker tripped... -
Cycle is too short - Dryer
... drying a small load in the load as the wet load items pass over the sensor strips. Dryer The dryer cycle is heating, check the following: Is the dryer level? How Auto Dry and Timed Dry Work If the dryer is too short. Why? Are you using a dry rack with Automatic Dry or Accudry... -
Damp loads or long drying times - Dryer
... many turns. Heavy rigid metal vent material and boxed or louvered exhaust hoods allow for the longest exhaust vent systems. Use the fewest number of the dryer requires ... that is heating, check the following: Clean the Lint Screen Check the Outside Exhaust Hood Check for Crushed Vent Material Good Airflow for details. Dryer The air temperature surrounding a dryer in a garage or...
Similar Questions


My Dryer Whirpool Dryer Turns On But It Won’t Start It Makes A Noise How Do I
how do I reset my whirlpool dryer it turns on but won't start
how do I reset my whirlpool dryer it turns on but won't start
(Posted by Watchmework111 4 years ago)
Dryer Display Isn't Working
Dryer is getting power but the display won't turn on. It doesn't appear that any connections are loo...
Dryer is getting power but the display won't turn on. It doesn't appear that any connections are loo...
(Posted by Lts9989 5 years ago)

How To Install Side Vent In Wed5800bw Dryer
Spece restrictions make it necessary to use side vent option. I need to know how to do it and spacin...
Spece restrictions make it necessary to use side vent option. I need to know how to do it and spacin...
(Posted by billyveno 10 years ago)

Dryer Turns On But No Heat.
We are getting error code AF, we cleaned the vents and removed all lint. My husband even took the ba...
We are getting error code AF, we cleaned the vents and removed all lint. My husband even took the ba...
(Posted by tjmcgraw91 11 years ago)