Get support for Whirlpool WED5800BW

Whirlpool WED5800BW Support Question

Whirlpool WED5800BW Support Question

Find answers below for this question about Whirlpool WED5800BW.
Need a Whirlpool WED5800BW manual? We have 4 online manuals for this item!
Question posted by almamendoza93 on November 17th, 2020

Dryer Window

How do clean the window on the dryer?

Current Answers

Answer #1: Posted by techyagent on November 18th, 2020 6:22 AM
This answer was accepted by the poster of the original question.
techyagent

Member since:
June 17th, 2014

Points: 4,799,820
1,100
points
As needed: clean lint trap and exterior

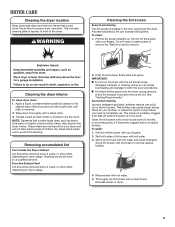
Thoroughly clean lint trap
Remove your lint screen and set it aside, then completely turn off your dryer and open the dryer door. Using a vacuum crevice tool or dryer cleaning brush, carefully clean the interior and exterior of the lint trap, as well as the moisture sensor strips on the outside of the lint trap. When you're done, make sure to replace the lint screen, close the door and plug your dryer back in.

Clean dryer exterior
Use an affresh® Machine Cleaning Wipe or microfiber cloth and gentle cleaning spray to clean the outside surfaces, knobs and buttons.

Every six months: deep clean lint screen

The laundry detergent and fabric softener that builds up on your lint screen can increase drying time. If you notice lint collecting on areas of the screen or plugging the mesh, the screen may be more difficult to clean by hand. Here's how to clean your screen with water:

  1. Roll lint off, then wet both sides with hot water.
  2. Scrub with nylon brush, hot water and liquid detergent to remove buildup.
  3. Rinse with hot water and dry thoroughly.

As needed or indicated by dryer: clean drum, vent and duct system

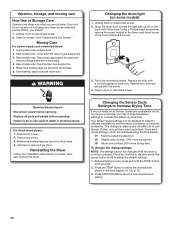
Clean your dryer drum
Clear or vacuum any debris before cleaning. Watch out for things like stuck-on tape and wedged-in threads.

  1. For an electric dryer, rub the drum with a soft cloth that has been dipped in a mild hand-wash dish soap diluted in very warm water. For a gas dryer, do the same with a liquid, nonflammable household cleaner.
  2. For both an electric and gas dryer, rinse well with a wet sponge or towel.
  3. Tumble a load of clean clothes or towels to dry the drum.

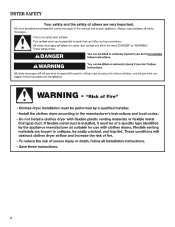
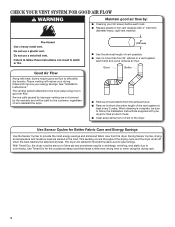
Clean dryer vent and duct

Your dryer's exhaust vent may be clogged if dry times are lagging, clothes aren't getting dry or you can't feel air moving through the outside vent. Cleaning your dryer vent is essential, so schedule a service appointment if it's difficult to find or access your dryer duct and outside exhaust vent. If you want to clean the dryer vent yourself, get a dryer vent cleaning kit then follow these steps:

  1. Locate your dryer's exhaust vent. Typical locations include the outside of your home, your roof or your attic. Remove the plastic cover that protects the end of the vent.
  2. Unplug your dryer's power supply cord. On gas models, close the shut-off valve in the gas supply line, then disconnect and cap the supply line pipe.
  3. Remove any tape or clamps holding the exhaust vent pipe to vent on the back of your dryer.
  4. Push the brush from your dryer cleaning kit as gently and as far as possible into either end of your dryer duct. Make sure to follow any turns or corners.
  5. Clean up any lint that comes out the opposite side of the duct from where you started, then reconnect the vent pipe and power cord and/or gas supply.
  6. Slide your dryer back into place. Run an empty dryer cycle for 10 - 15 minutes to blow out residual dust and confirm that the vent is clean.

Please check this link below:-https://www.whirlpool.com/blog/washers-and-dryers/clean-dryer.html


Thanks


Techygirl

Related Whirlpool WED5800BW Manual Pages

Use & Care Guide - Page 2

DRYER SAFETY 2
Use & Care Guide - Page 4

...and static due to the dryer plays a big role in the load. The venting system attached to over-drying. When cleaning is complete, be paid by : ■■ Cleaning your lint screen before ... every 2 years. Proper venting will be sure to efficiently dry laundry. This sensing occurs throughout the drying cycle and the dryer shuts off when the load reaches the selected dryness. n Use the...
Use & Care Guide - Page 5

...light inside the dryer drum. WRINKLE SHIELD™ Feature When you are unsure of the cycle the dryer is operating. 9 ECO MONITOR The Eco Monitor shows your laundry load. Use your Dryer Cycle Knob ...SHIELD™ feature periodically tumbles, rearranges, and fluffs the load to help keep wrinkles from the dryer as soon as it . 4 OPTIONS AND SETTINGS TEMP (for use with Manual Cycles only) ...
Use & Care Guide - Page 6

... for a load, select the lower setting rather than the higher setting. Temperature Tips If your dryer has multiple heat settings: ■■ A High heat setting may be selected on all cycles...loads of the temperature to the care label directions. 6 Settings and options shown in the dryer too long. SENSOR CYCLES - Items to remove wrinkles, including loads left in bold are ...
Use & Care Guide - Page 7

... screen with your fingers. Push the lint screen firmly back into place. clothes should be able to remove lint. USING YOUR DRYER 1. For additional cleaning information, see "Dryer Care." Place laundry in the dryer. Pull the lint screen straight up. Do not rinse or wash screen to tumble freely. 3. Press POWER Press the POWER button...
Use & Care Guide - Page 8

... Sensor Cycles only) You can select a different dryness level, depending on the light inside the dryer drum. When pressed during a cycle or not running, the Drum Light turns on and will remain on... each cycle. Press the WRINKLE SHIELD™ button to turn ON or OFF at which the dryer will change by 1-minute intervals. NOTE: Not all cycles. Once a dryness level is left open...
Use & Care Guide - Page 9

... lint screen with a damp cloth. 3. Reinstall screen in the dryer. This includes clearing piles of laundry in the door opening of the drum and rub with hot water. 3. Cleaning should be done by lint can build up . To wash: 1. DRYER CARE Cleaning the dryer location Keep dryer area clear and free from items that contain loose dyes...
Use & Care Guide - Page 10

.... 4. Remove the cover. 3. Vacation, storage, and moving care Non-Use or Storage Care Operate your dryer only when you are displayed using your dryer for 6 seconds. 2. See "Cleaning the Lint Screen." There are 3 drying settings, which are at home. Electrical Shock Hazard Disconnect power before operating. Make sure leveling legs are secure in...
Use & Care Guide - Page 11

... fuses or circuit breakers. A coin, button, or paper clip is a gas dryer. Electric dryers use . Incorrect power supply. Electric dryers use it only once. Electric dryers require 240-volt power supply. Use 4" (102 mm) diameter vent material. Electric dryers require 240-volt power supply. Clean out pockets before each load. Load too large and heavy to...
Use & Care Guide - Page 12

... Items removed before removing laundry from dryer. If a code beginning with water and heat. Alternating between F# and E#, the dryer control has detected a problem that can stain your dryer is too hot You have... or decreasing the dryness level will not transfer to handle. Lint screen should be cleaned before the end of the cycle. These will change the amount of drying time in...
Dimension Guide - Page 1

...;■ Additional clearances might be considered. Side view - Recessed area B. PRODUCT MODEL NUMBERS WED5500B, WED5800B, WED5810B Front view: 27" (686 mm) 43" (1092 mm) Electric Dryer Side view: Wide opening side-swing door 223/4" (578 mm) 291/2" (749 mm) Side view: Wide opening hamper door 133/4" (349 mm) 291/2" (749 mm...
Dimension Guide - Page 2

... drying performance. To determine maximum exhaust length, add one 90º turn inside the dryer. Determine vent length and elbows needed for planning purposes only. Because Whirlpool Corporation policy includes... energy usage. Vent System Chart Number of 90° turns or elbows Type of dryer. ■■ Reduce performance, resulting in Vent System Chart. For complete details, see...
Installation Guide - Page 2

DRYER SAFETY 2
Installation Guide - Page 3

... driver (recommended) Vent clamps Putty knife Level Parts supplied: Caulking gun and compound (for installing new exhaust vent) Leveling legs (4) Parts package is located in dryer drum.
Installation Guide - Page 4

... opening hamper door *Most installations require a minimum 5½" (140 mm) clearance behind the dryer for proper exhaust installation. Minimum Required Spacing 18"* (457 mm) 14" max.* (356 ... to water and/or weather. The combined weight of the "Use and Care Guide." The dryer must be extended. Contact your local building inspector. Wide opening side-swing door B. See "...
Installation Guide - Page 5

...wire power supply connection for homes built after 1996, and all local codes and ordinances. If the dryer is suitable for (1) new branch-circuit installations, (2) mobile homes, (3) recreational vehicles, and (4)...on both sides of electrical connection you will be at least twice as large as a nearby window) should contain: ■■ A UL listed 30-amp power supply cord, rated 120/...
Installation Guide - Page 6

...): Go to 4-wire Power Supply Cord Connection section. Now stand the dryer on cardboard. 2. Then go to Dryer Dimensions in leveling legs Using a wrench and tape measure, screw legs into... INSTALL LEVELING LEGS ELECTRICAL CONNECTION Power Supply Cord 1. Firmly grasp dryer body (not console panel) and gently lay dryer down on its final location. Screw in the Location Requirements. ...
Installation Guide - Page 7

... -down screw E. If your outlet looks like this point. Hold-down screw (D) and terminal block cover (A). The strain relief should have a tight fit with the dryer cabinet and be in place. Power supply cord 3-wire receptacle (NEMA Type 10-30R): Go to 4-Wire Power Supply Cord Connection on page 8. 7 Remove hold...
Installation Guide - Page 12

...metal vent shall be used for exhausting. Flexible metal vent: (Acceptable only if accessible to clean) ■■ Must be fully extended and supported in enclosed walls, ceilings, or floors...Venting Requirements Louvered hood Acceptable Style: Box hood WARNING: To reduce the risk of dryer rear panel. IMPORTANT: Observe all governing codes and ordinances. Secure cover with hold-...
Installation Guide - Page 15

... to adjust legs up using straightest path possible. If connecting to side. Tighten and adjust leveling legs If dryer is clean. Use clamps to operate correctly. NOTE: The dryer must fit over the exhaust hood. Move dryer to exhaust hood with a 4" (102 mm) clamp. 2. Secure vent to final location Not Level LEVEL Not Level...

Whirlpool Knowledge Base Results

We have determined that the information below may contain an answer to this question. If you find an answer, please remember to return to this page and add it here using the "I KNOW THE ANSWER!" button above. It's that easy to earn points!

  • My ice maker runs but doesn't produce ice
    ... experiencing problems with your appliance, you may need to clean the drain tube. Be sure to On? Is the clean light flashing on my upright freezer is loose, water ...Washer or Dryer Refrigerator or Freezer Dishwasher Electric Range, Oven or Cooktop Gas Range, Oven or Cooktop Microwave Trash Compactor Window Air Conditioner Hot Water Dispenser Vent Hood Ice Machine Commercial Laundry Vacuum ...
  • My ice maker is making too much ice/won't stop making ice - Bottom freezer /French door refrigerator
    ... 't stop making ice - Find a local service provider: Product Category Washer or Dryer Refrigerator or Freezer Dishwasher Electric Range, Oven or Cooktop Gas Range, Oven or Cooktop Microwave Trash Compactor Window Air Conditioner Hot Water Dispenser Vent Hood Ice Machine Commercial Laundry Vacuum Cleaner Central Vac Dehumidifier My ice maker is making too much...
  • Reverse-osmosis water filtration - Bottom freezer/French door refrigerator
    ... after heavy use. Find a local service provider: Product Category Washer or Dryer Refrigerator or Freezer Dishwasher Electric Range, Oven or Cooktop Gas Range, Oven or Cooktop Microwave Trash Compactor Window Air Conditioner Hot Water Dispenser Vent Hood Ice Machine Commercial Laundry Vacuum Cleaner Central Vac Dehumidifier How to a reverse-osmosis filtration system? Side...

Similar Questions

Dryer Display Isn't Working
Dryer is getting power but the display won't turn on. It doesn't appear that any connections are loo...
(Posted by Lts9989 5 years ago)
Dryer Will Not Turn On.
my dryer wil not turn on. I have checked a fuses and they are good. What's next?
(Posted by Dtidavid54 7 years ago)
Whirlpool Duet Dryer Error Codes.
We have the Whirlpool Duet dryer model # WED9400SU. It has worked flawlessly for about 4 yrs. Recent...
(Posted by jpcox69 9 years ago)
How To Install Side Vent In Wed5800bw Dryer
Spece restrictions make it necessary to use side vent option. I need to know how to do it and spacin...
(Posted by billyveno 10 years ago)
Dryer Comes On But Won't Run
My dryer was working and stopped. It was very hot and it was set on low heat. Cleaned the lint, whic...
(Posted by ffpoolcare 12 years ago)
Ask a New Question
Use the box below to post a new question about this Whirlpool product .
Points & Prizes
  • You can earn points for nearly everything you do on HelpOwl.com
  • You can trade in those points for gift cards at leading retailers such as Amazon.com and Walmart
  • It's that simple!
See How it Works
Create a Free Account

Whirlpool Manuals

Find free Whirlpool WED5800BW manuals and user guides available at ManualOwl.com. Try out our unique manual viewer allowing you to interact with manuals from directly within your browser!

Whirlpool Reviews

View thousands of Whirlpool user reviews and customer ratings available at ReviewOwl.com.

Contact Information

Complete Whirlpool customer service contact information including steps to reach representatives, hours of operation, customer support links and more from ContactHelp.com.

Scoreboard Ratings

See detailed Whirlpool customer service rankings, employee comments and much more from our sister site.

Whirlpool Recalls

Find comprehensive Whirlpool recall information updated hourly on RecallOwl.com.